If you treat your artistic development seriously, I'm sure you've tried
to learn perspective and to apply it to everything you draw. However,
even if your animals in perspective looked 3D, they also became as stiff as stone statues.
Why? Because if you wanted to use only one
perspective grid, all the lines of the picture were bound to it, which
means they turned out having all the same rhythm. Yes, you could add
another perspective grid, for example for a turned head, but can you
imagine all those converging lines? And what about the neck: wouldn't it
have some kind of "transition perspective" between those two?
All
these problems come from one source. Perspective as you know it, called
linear perspective, was created to simplify the visual phenomena
occurring when observing a big area, e.g. a city or a landscape, or
maybe a herd of bison. Never a single bison! Why? It's simply too small
to
be affected by converging lines. It doesn't mean it's not affected by
perspective at all—but unfortunately, the tutorials you might have read
focus
completely on large-scale scenes, as if small scale had nothing to do
with
perspective.
Of course, perspective is inevitable in realistic drawing.
At the same time very few tutorials teach how to use it without
sketching a grid at the very beginning of the drawing process. That's
why usually artists need to work it out themselves, as I did, but this
time I'll try to show you the way.
This tutorial is a practical extension of this article, and I strongly suggest reading it thoroughly before trying this one. Also, keep in mind this tutorial isn't "how to draw animals in perspective" or "how to draw animals in perspective, but rather "how to draw animals in perspective. It's directed to people who already know how to draw animals, but struggle with creating more interesting poses for them.
Still Perspective vs. Organic Perspective
Converging
lines appear when objects follow the same rhythm. They don't occur in
nature on a large scale too often, but humans love order and arrange their
creations this way. This is the first reason why perspective seems to be
necessary only to draw man-made space.
Some pictures simply shout "perspective!"...
...while others don't
Linear
perspective is all about right angles. They're predictable and neat,
and can easily be organized with straight lines. Unfortunately, nature
doesn't
know anything about right angles. It creates them spontaneously (usually
on a very small scale), but it doesn't favor them in any way,
as architects would. We could say that chaos is far more natural, but
how can
chaos be constrained with perspective rules?
There's no such thing as organized chaos
Even
if animals had a silhouette based on right angles, in most cases they
wouldn't follow linear perspective rules. They're just too small! Let's
take a closer look at this "horse". Its lines converge so far from us
that we can safely say they don't. Where's the vanishing point then?
Where's the horizon?
That's
how it's going to look in most cases. Even if you manage to find
straight lines in a silhouette, they won't converge and won't show you
the horizon. And since the horizon is the first thing you should draw in
classic linear perspective, how can you even start without it?
Perspective Without Vanishing Points
On
a small scale, the scale on which humans observe animals, we don't need
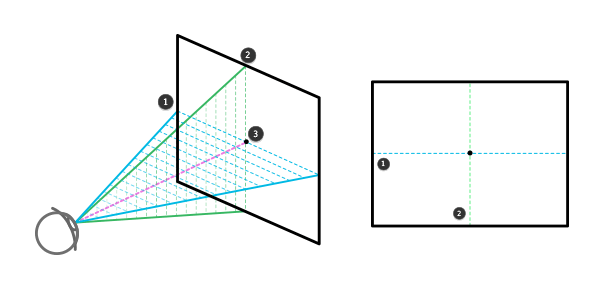
vanishing points, but the horizon is still crucial. This is what a
human eye sees when it comes
to a small area (no converging lines visible). Notice two
horizons—horizontal and vertical. They're actually the same, but we
favor the horizontal one because we rarely move up and down, and our
eyes are placed horizontally, too.
The point in the center is the one you're looking at. When you look up, your horizontal horizon
slides up along the vertical one. You can't look anywhere but in the center of your field of view
(FOV). However, for simplicity's sake we can ignore the motion of the
eyeballs and treat only the motion of the head as a change of perspective.
Both horizons are simply lines crossing the center, and they have nothing
to do with Earth's horizon.
A
cube looks 2D only when it's in the center. Every motion away from the
horizon (no matter which) results in showing us another side of the
cube, at the expense of accuracy. A cube moving away from the center
seems to be rotating:
If it's moving up, it gradually shows you more and more of its bottom, until it becomes a square and the front becomes a line.
If it's moving down, it gradually shows you more and more of its top, until it becomes a square and the front becomes a line.
If it's moving left, it gradually shows you more and more of its right side, until it becomes a square and the left side becomes a line.
If it's moving right, it gradually shows you more and more of its left side, until it becomes a square and the right side becomes a line.
These
movements can be combined, e.g. a cube can move up and left, giving you
three visible sides (bottom, right, and front). What's interesting, a
cube rotating in the center will look exactly the same!
This example shows how a cube changes when going up, right, or combined
How to Draw a CubeAlthough
the picture above makes a good reference, you don't really need it.
There are simple rules for drawing a cube in every perspective, and they
can be used for drawing other forms, too. The most important lesson
from it is: how to draw something in perspective without setting it at all. Because we don't want perspective—we want what perspective gives us!
Basic Rules
You
can show one, two, or three sides at a time. It isn't really like "the
more sides, the better", but rather "the more sides, the more
distortion".
Only one side will give you perfect 2D view.
It's the easiest to draw; no space for mistakes here. However, it's
also flat and boring.
If you want to show another side,
you'll need to compromise. The front can't be a square any more, if you
want to squish something next to it. The more complete one side is, the more squished the other one.
If
you want to include the third side, it'll push the angles, too. There
is no way to preserve right angles with three sides visible (unless you
get rid of the depth by dividing them).
How
to control this chaos? You only need to remember that the rotation
leads to a point where the current front becomes a side, and a side
becomes new front. In order to reach this state, the current front (A) needs to get smaller as the side (B) gets bigger.
Basically,
every cube is made out of two squares with a distance between them.
When you connect their corners, all the sides appear by themselves.
However, our vision doesn't work that simply:
Let's take a look at this scheme once again, trying to find the connected sides. There they are!
But hey, there seem to be four of them in combined views! How does it work? How can we foresee where they should be to make an accurate cube?
Step 1
Start
with a cube in the center view ("no perspective"). This is going to be a
base for the front, no matter how visible it'll be.
Step 2
The
front needs to be changed if other sides are to be introduced. It has
two lengths: width (horizontal length) and height (vertical length). If
you want to add a side that's placed vertically, you need to shorten the
vertical length of the front:
A—a bit of the bottom will be visible, so I shortened the front slightly.
B—I want the bottom and the front to look the same big, so I made the front half smaller.
C—I want a bit of the top to be visible, so I shortened the front a bit.
Step 3
We need to do the same with the horizontal sides and horizontal lengths:
A—I shortened the front a bit to reveal part of the left side.
B—I shortened the front a bit to reveal part of the right side.
C—I shortened the front a bit to reveal part of the left side.
Step 4
The
front is done, and since we need two sides and a distance to make a
cube, let's add another side. The one we've drawn before will now be the
back. Draw it once again higher (to reveal the bottom) or lower (to reveal the top). The rule to evaluate the distance is:
The shorter the vertical length, the bigger the shift and the more of the upper/lower side will be visible.
Step 5
That
would be enough if we wanted to rotate the cube only vertically, but we
want more. Let's move the front again, to the side we don't want to see:
The shorter the horizontal length, the bigger the shift and the more of the left/right side will be visible.
Step 6
To
make a base for the angles, we need to copy both front and back, and
move it to the same side as before. The distance between the original
and the copy is based on this rule:
The bigger the horizontal and vertical lengths, the bigger the distance.
Step 7
A
cube has only eight corners, but our sides all together have sixteen!
That's way too many. To pick the correct ones, first focus on the
top/bottom side (depending on what's not visible in our perspective).
Select the corners of the "original" sides.
Step 8
Now move to the border of the side we will see (top or bottom) and select the corners of the copied sides.
Step 9
Now simply connect the dots:
Copied corners will make the visible top/bottom.
Original corners will make the hidden top/bottom.
The other sides should be easy to create out of them.
Why no vanishing points? Here's
the answer. Converging lines look converging only when you look at them
from a distance. If you crop a smaller area, the lines will look almost
parallel. That's why linear perspective works so great with cities, big
buildings, and man-planted forests. You'd need a whole herd of animals standing in perfect rows to see the converging lines.
You don't need them for one animal seen by an observer of similar size.
No vanishing points are necessary, until you decide to draw a huge monster
(or a normal animal seen by a tiny observer).
In most cases the bending is so subtle that we can ignore it
This
basic rule about visible sides may seem confusing, but I'm sure you've
used it even unintentionally. Just put a simple animal in place of the
cube:
This is perspective in action, though without right angles and vanishing points!
Cubes in Nature
However, cubes are very hard to find in animal bodies. The only useful application for them is a bounding box.
It's usually a cuboid, with its longer side symbolizing the length of the
body, and the shorter one the width of the body. It defines the perspective by
showing the ground and the "ceiling". However, the perspective of the animal
inscribed into the box doesn't need to define it—the box only shows us the
ground as the observes sees it, and a default position of the animal.
If the animal shares its perspective fully with its bounding box, it will be literally bound by it
For
elements of the body inside the box, it's better to use balls and their
derivatives. Look what happens to the center lines of a ball when the
perspective changes:
These lines are crucial to understand perspective and 3D overlapping. For animal (and human, too) drawing, they're as important as vanishing points in architectural drawing!
These bending lines add a lot of volume to forms and show the perspective in a clear wayNotice
how these lines define the forms in 3D, showing us when and how they
cover each other. Compare them to the balls to remember this rule.
They're
also indicators of the bending of the surface. Notice that in the case of a
cube, when the sides aren't bent, the lines only change length, but not
shape. When we want to draw rounded forms, these lines come in handy.
Even when we don't sketch them, they appear in the form of shading and
texture (yes, a texture can't be flat on a rounded surface!).
Enough theory, let's see how to use it in practice!
Simplified Animal Skeleton
The
pose of an animal is defined by the pose of its skeleton. This is why
it's so important to learn about the bones of an animal, their
construction and proportions. Fortunately, most of the animals you'll
draw will share the same skeletal structure:
Skull
Neck
Torso
Hips
Arm with shoulder (A)
Forearm with elbow (B)
Hand with wrist (C) and fingers (D)
Thigh with knee (E)
Calf
Foot with heel (F) and toes (G)
The
shape of individual bones, though helpful, doesn't need to be
memorized. Look at the scheme below—it's simple, easy to remember, and
you can still find all the structures described above!
However,
this simplified skeleton is still too complicated and stiff to start a
picture with it. If you want your lines to be truly free, simplify them
even more!
This
way you can draw every pose you imagine. However, only as long as you
stay in two dimensions. It's a bit boring, isn't it? We perceive three
dimensions every day, and we don't want to be limited to only two of
them!
If you're having problems at this point, check these exercises before going any further. It'll spare you a lot of frustration! To understand movement, check my article about poses and the introduction to this tutorial about run cycle.The bad news is, we can't draw in 3D yet. The good news is, we can pretend
we do—and even so well that others will believe us. To do this we need
to convert the simplified skeleton to a simulated 3D form.
From 2D to 3D
We're going to work on every part of our simplified skeleton to understand how to add depth to it.
Torso
This
is the simplest, and also the most important part. The torso is the
part
that gives direction to the rest of the body. It's the front of
everything. Even though the head seems to lead the body, it can easily
be
turned to a different direction while running—you can't do the same with
the torso without changing the direction of the main movement.
The 2D base for the torso is an ellipse. An ellipse is
symmetrical in both axes—no matter how and when you draw it, it can't be
changed. It has two axes—a major axis (longer, A) and a minor axis (shorter, B)—that define its shape. The axes are always perpendicular to each other.
A rotated ellipse stays an ellipse
The
easiest way to draw an ellipse is to sketch a cross of perpendicular
axes, and finish them partially—first with straight lines and then with
round ones between them.
A
simplified torso we're going to use is made out of elliptical
cross-sections. When shown in simple views like top (1), side (2), and
front (3), they're either full ellipses or straight lines. To create an
illusion of depth we'll need to break this rule.
The
shape for the torso can be a barrel or a capsule. No matter what you
choose, an ellipsoid will be the best base for it. Most of the time
you'll want your torso to be oblong and rounded, just like it:
It
doesn't look very easy to draw, does it? Fortunately, an ellipsoid will
follow the rhythm of its bounding box—and we already know how to draw a
bounding box in every perspective! There's only one problem with the
perspective of the ellipses, so let's investigate it step by step.
Step 1
Let's
start exactly as we'd do with a cube, but this time use a rectangle as a
base from the center view. The procedure is exactly the same, except
that the front of the torso is the left side of a cube. So, let's say we
want the front (left side) and bottom visible. What can you do with a
rectangle to achieve this?
Step 2
Draw diagonals on every pair of corresponding sides and connect them with a line.
Step 3
The axes show us the points where the torso touches the sides of the bounding box. That's a good start!
Step 4
These
points are also the centers of every side. You can use them to draw
rectangular cross-sections right in the middle of the cuboid. These will
be bounding rectangles (looking like trapezes now) for our ellipses.
Step 5
This is where all the problems start. Take a closer look at one of the bounding rectangles.
If
you try to draw a simple ellipse inside, it won't touch the the sides
of the bounding box, which makes it useless. We can always draw a
rotated ellipse, but where to put the axes? What angle do they need?
Step 6
To find out, draw the diagonals of the rectangle.
Step 7
Let's draw an ellipse, starting as we would normally. Sketch two short, straight lines at the ends of the "fake" minor axis.
Step 8
Now
things go a bit differently. For an acute angle, draw a normal straight
line, but when it comes closer to an obtuse angle, turn a bit to the
inside.
Step 9
The other guide lines will look different, too. Draw them long for the area of an obtuse angle and short for an acute angle.
Step 10
You can now finish the ellipse. Draw the opposite arcs in pairs—they should be identical.
Step 11
Do the same with the other rectangles.
Make sure your ellipses are symmetrical, and if not, correct the arcs.
Step 12
You
can now draw the outline of the main, outer ellipse. It doesn't need to
be perfect, but make sure you enclose all the other ellipses inside.
Step 13
To make the depth more apparent, fade or erase the lines lying on the hidden sides.
It
looks very complicated, I agree. The good news is you won't have to
repeat all this process every time you want to draw an animal. If you
practice long enough, you'll understand what a proper torso looks like,
how it changes in perspective, and what your favorite views are. The
more experience you get, the less you'll have to resort to drawing a
cuboid for the base. But until then—practice!
Hips
Hips
are very complicated structures, hard to picture in the classic
front/top/back view. Fortunately, we don't need them as a whole in a drawing. The most important elements for us are:
Iliac crest—you can feel it in front of your hips, and even see it, if you're skinny.
Acetabulum—the "hole" for the thigh bone.
Sitting bone—the part that you basically sit on.
As
you can see, our simplified animal hips are built of two flat cuboids
and circular spots for leg bones. The longer, rotated cuboid may look a
bit hard to draw in perspective, but fear not—there's a simple trick for
it!
Step 1
Inscribe the side view into a
bounding rectangle. Then treat it as a regular side of a cuboid. We want
the left and top visible, so we shorten the side properly.
Step 2
Let's use only the bounding rectangle for a while. Build a bounding box out of it.
Step 3
Draw
one part of the hips on both sides of the box, then connect them.
Remember to follow the rhythm defined by the bounding box!
Step 4
"Cut" the opposite corners of the box with short lines, making an angle similar to the original.
Step 5
Connect the upper points with the upper points on the small box.
Step 6
Copy the lines you've just drawn to find the lower part of the box.
Step 7
Connect the lines to finish the box.
Step 8
You
can now add the circles. Don't worry about their perspective—they're
spots, so their shape isn't that important. Clean up the picture to
define the visible and hidden lines.
Skull
The
skull is the most complicated part of a simplified skeleton. Even
though you don't need to draw teeth, the nose, or the complicated
curvatures of its surface, there are a few elements that need to be
included for the head to have a proper shape.
The method I'm going
to show you works for almost every skull you can imagine. However,
you'll need to understand what you're drawing in order to modify the
elements. The most important thing to determine at the very beginning is
whether the animal is a herbivore or a carnivore. Though their skulls
can be very similar, there are some general differences:
Herbivores usually have longer snouts, with big incisors.
Carnivores usually have wider, stronger jaws, with big canines and small incisors.
Herbivores generally have eyes on the sides, carnivores—on the front.
Herbivores may have very big jawbones, designed for chewing, while carnivores can only move their jaws up and down.
No
matter how strongly you simplify the skull, it will always be
complicated if you want it to be accurate. What you need to define are:
Upper jaw—fused with the rest of the skull
Lower jaw—mobile, with big bony "hooks" attached to the upper part
Eye sockets—no matter how big the eyes are, keep the sockets wide and round
Brain case—usually quite small in comparison to the jaws
Zygomatic arch—the point where the "hooks" of lower jaw hangs on
Remember
that when the lower jaw is open, you need to use a slightly different
perspective for it, treating it as a separate part.
Step 1
Because
our skull is made of cuboids, it shouldn't be too hard to draw them in
perspective. However, it can be time consuming to draw them all
separately. You can use this trick instead.
Find a bounding
rectangle for all the views to see what kind of cuboid you'll need to
use. Then modify the front as a whole, using the method for drawing a
cube.
Step 2
Add guide lines to see where the elements should be placed inside the bounding box.
Step 3
Prepare a bounding box in the same size as we've just defined for the side.
Step 4
Draw the elements on the side, following the rhythm of the bounding box.
Step 5
Replicate the elements on the next side.
Step 6
Add other sides, if you need to define other distances too.
Step 7
Connect the sides, still following the rhythm.
Step 8
Add any necessary details. Now you should be ready to draw the skull or head based on the perspective.
Again,
using the bounding box isn't obligatory, but it's very useful when you
don't have too much experience with cuboids in perspective. Also, once
you understand the elements of the skull, you'll be able to create your
own method of simplifying them.
Spine
The
skull, torso and hips are linked together by the spine. It's this
element that makes animals so different from buildings or cars—thanks to
the spine, the elements of the body can rotate very independently.
That's why the whole body shouldn't be enclosed within one bounding box
and its perspective. Accordingly, by using the power of the spine you
can add a lot of depth and realism to your picture.
To understand the flexibility of the body, we need to learn the parts of the spine:
Cervical spine (neck)—for
quadrupeds it starts in the back of the skull and ends in the upper
part of the torso. It's S-shaped, which means it can be pretty flexible
on its own.
Thoracic spine—not a very flexible part. It's good to treat the whole chest as one big block.
Lumbar spine—the most flexible part. The longer it is, the more elastic the body (compare a cat and a horse).
Sacrum—fused vertebrae make this part stiff. You can treat it as a part of the hips.
Caudal spine (tail)—made
of very small vertebrae and therefore extremely flexible. However,
notice where it starts—the sacrum isn't part of the tail!
No
matter how long the neck, it takes a similar S-shape—stiff just by the
skull and chest, and more flexible in between. The neck doesn't really
move on its own—it's the head that directs it. When drawing it, decide
how long the neck can maximally be, and then place the head somewhere in
the area within its reach. Afterwards, add the neck.
The
lumbar spine adds shape to the back. It's usually straight in the
default position, but it can't be bent to make the back more concave or
convex. The longer this part of the spine, the more extreme an angle the
animal can reach.
Why aren't we saying anything about the perspective of the spine? Because
for us it's just a line of no width. It symbolizes the connection
between the elements in perspective, but it doesn't need to be changed
itself. What changes is the perceived length of this connection,
and that's where foreshortening comes to play.
When the elements
in a line rotate at the same angle, they all get proportionally shorter
(we've already learned how), but not only them—the distance between them
gets shorter too! We can say the distance is longest in the side view,
and then it gets gradually shorter, until the point where it's equal to
zero. Keep in mind it's proportional change—e.g. when the hips
and chest are half shorter, so is the spine between them. Don't make it
shorter by 2 cm or some other value!
Legs
Just
like the spine, the leg bones don't need to be managed in perspective
other than by foreshortening. They are indicators of position, with no
special width.
It's
important to understand the relation between the legs and the other
elements of the body. Both the forelegs (arms) and hind legs (legs) can
move on their own, but they have their limits. When you want to move
them farther, you also need to move the element they're attached to.
Paws
Although
the legs themselves can be drawn as simple lines, paws require a
different treatment. If you want to be fast, you can draw the fingers as
simple cuboids and add details to them later. For slightly better
accuracy, you can use the method below.
Step 1
As usual, use a bounding rectangle to create the bounding box.
Step 2
Divide the bounding box into sections just as on the template.
Step 3
Using the template as a reference, connect the points that will make a finger. Do the same with all the fingers:
Step 4
Later
you can add the details, like paw pads, claws, and fur. Keep in mind
that these are only a finger—you need the rest of the hand (or foot) to
make it complete.
Practical Exercise
Now I'm going to show you how all this information can be used in practice.
Step 1
Start
with a basic sketch of your idea. It can be hard to plan depth when
you're a total beginner to it, but starting with a perspective grid
kills the composition and liveness of your animal, so it's worth trying.
To
keep it free from formal mistakes, I decided to draw a made-up species,
some kind of feline with its baby. This way we'll focus on creation,
not on accurate re‑creation.
Step 2
Try to guess what kind of bounding box your sketch brings to mind and draw it.
Step 3
If
we use the bounding box's sides, we don't need to draw them for the
chest's bounding box. Just follow the rhythm, to create bounding
rectangles for cross‑section ellipses. Then use the usual method to draw
the chest.
Step 4
Draw the box for the hips. See how I simplified it?
Step 5
I repeated the steps for the body of the baby:
Step 6
Now,
skulls. For the baby I borrowed the rhythm of the big bounding box, but
the mother's has a totally new perspective that breaks the monotony of
the composition.
Step 7
Add the connecting lines: spine and legs. You can be free here!
Step 8
You can now build the body on the guide lines.
Step 9
When it's all done, you can finally draw the details and refine the picture.
It's the End... Finally!
That
was a long tutorial, wasn't it? I know for now it may look very
complicated, but with practice it'll become second nature and you'll
just feel how to use a certain perspective without all these guide lines and bounding boxes.
Practice
a lot! Don't refine every interesting pose you've managed to draw just to show others how
good you are. Draw for as long as is necessary to gain confidence—it must
come naturally to you, without "unexpectedly good results".
Perspective
is the hardest topic in drawing, but the methods I've shown you should
help you at least get close to it. Finally, you can move from
non-intuitive "where should I place the vanishing points?" to "what
sides do I want to present?"
Of course, it doesn't mean vanishing
points are totally useless. They're useful when you want to picture
motion or scale, but in most cases you can forget what architects teach
you—for your own good!
The best thing about drawing animals in
perspective is that you can make a whole lot of mistakes without any
risk that someone actually notices it. It doesn't work this way for
architecture, and that's why perspective tutorials usually require
perfection. Don't try to be perfect—learn how to delude people that
they're looking at something 3D, and that is all you need!
Photography by Taichiro Ueki
The Instructors here at Tuts+ Photo & Video are a diverse crew.
Though we come from different walks of life, one thing we share is our
love of books: photo and video books.
I asked our Instructors about their favourite books on learning how
to make photos and video, and here are the results! This is the Tuts+
annotated reading list of great books for learning to make photo and
video, broken down into handy sections:
If you can buy only one textbook about photography, this is the one
to get. Straightforward, practical, and clear instruction from start to
finish. This book covers the fundamentals so well I still sometimes
consult my copy from ten years ago. The current edition is up-to-date
with digital technology and practices
Even if you aren't a photojournalist, the technique and approaches in
this book will help anyone getting into assignment photography -
whether it's editorial or commercial.
All about how to understand the language of cities in 100 quick
lessons. If you're someone who is interested in street photography or
architecture this is your handbook to urban visual communication.
An in-depth book through the last century of photography about the
perception of images, how they capture our world, how they relate to one
another and the evolution of photographic themes. Recommended by Simon Bray.
A surprising book of true short stories from photographers about the pictures they saw but didn't take. Pocketable. Great for passing the time when you're waiting for something photographic to happen.
Documentary is the root of all cinema, so if you're thinking of
getting into film making start here! Great sections about finding your
voice, direction, and building your team.
What is editing all about? In his short but highly influential book,
acclaimed Hollywood editor Walter Murch shares his simple, effective,
and emotional editing process. Written for film editing, but equally
interesting and applicable to photo editing.
A book that takes you through the evolution of Wes Anderson and his
films-great for seeing where he started and how he grew into where he is
today. Handwritten break downs of soundtracks, story boarding, thought
processes, inspiration. Many interviews included. A good way to see how
all the pieces of a film fit together and how initial styles can be
strengthened and used throughout multiple films. Recommended by Lauren Justice.
Compositing isn't really complicated. It's taking a lot of tiny
steps, treating them like building blocks, and putting them together to
make something great. This book goes over those fundamental building
blocks. Recommended by Ben Lucas.
A lot of important life lessons for work put together into two short
and easily digestible books. Favourite lesson: "The Tone is in your
Fingers". Recommended by Harry Guinness and Andrew Childress, respectively.
The best book about images, imagination, memory, and art that I have
ever read. Richly illustrated and touching, this book is a personal, and
practical, journey of discovery. Barry asks, but it's you who find the
answer: What is that formless thing which gives things form? See also Picture This: The Near-sighted Monkey Book and Syllabus: Notes from an Accidental Professor
What It Is
covers the same topic in a much more interesting and engaging way,
but if you want to hold your weight when talking with art-school grads a
quick read about Barthes' "punctum" (or the spirit of an image) will go
a long way. Understanding punctum also helps to train your eye to look
for the core of an image, and discern between images, quickly and
effectively.
Also an illustrated guide to understand how and why photographs
work. Anything but short, still a fascinating read for those with an
addiction to the mysteries of photography. Capturing the Light: The Birth of Photography
by Roger Watson and Helen Rappaport
A history book about the invention of photography and the controversy of who really came up with it first! Recommended by Marie Gardiner.
Add Your Favourites
Do you have a favourite book about learning to make photos and video? Let us know!
This
interview is an absolute pleasure. From drag queens to pop culture
icons, Daniel Alexander mixes fashion, gender expression, and comic book
illustration in a skillful and utterly fabulous manner. Sit for a spell
and read about his influences, inspiration, stories about his present
work, and where it's all going.
Daniel, thank you so much for the interview! Let's start from the top: What got you into illustration?
Illustration
is something I have always been interested in for as long as I can
remember. The initial interaction I had with it would be through comic
books and the animated cartoons of the late 80's, leading into the 90's
(predominantly X-Men). I would say exposure to these became intrinsic to
the style of my work and the subject matter or muse upon which it is
sometimes based. In conjunction with comic characters, classic
illustrated movie posters (such as Star Wars, Indiana Jones) were always
sources of inspiration, as well as the films and merchandise itself. Daniel's childhood drawings of Wonder Woman and X-Men characters.
Who or what inspires your work?
I
would credit Jim Lee, Alan Davis, Salvador Larroca, Marc Silvestri,
Patrick Nagel, Thierry Perez and Richard Gray as being influential
illustrators for me.
My work is a derivative mix of Bronze to
Modern Age comic book characters, sci-fi vixens and no-nonsense power
dressers. The subject matter depicted within my work is drawn from the
international Drag/Club Kid scene, "Divas" (icons of television, music,
pop culture) and generally anything else that takes my fancy; from the
Queen of the country to the Queens of nightlife! I like to add a comic
book or a sci-fi edge where possible with the appearance of blank eyes
and occasional drips or otherworldly features. Queen Elizabeth II as you've likely never seen her before.
Are you formally trained?
I
have pursued Art and Design through various forms throughout my
education and I was awarded 1:1 BA (Hons) in Illustration last year.
What is your creative process like?
My
creative process is mostly organic, beginning with initial sketches and
sometimes just the jotting down of ideas. Then, drafting the image and
refining it until I am happy with it. Sometimes the final outcome will
literally be from the efforts of a spontaneous splurge. I
tend to swap between sketchbooking and loose sheets depending on the
final process required for the image, such as digital coloring, hand
rendering, etc. If I can, I like to get one job done at a time and work
my way through each one. Unless I am doing a set of images for the same
collection or client.
Typically, what's your artistic weapon of choice?
My
choice of stationery would be pencil, ball-point pen (biro), fine
liners, felt-tips or markers, and ink. I sometimes use less conventional
media such as bleach and nail varnish. Everything is hand-drawn
regardless of digital coloring; if I am coloring digitally then I do so
using Adobe Photoshop.
For how long have you worked as an illustrator, and is it your day job?
Not
for very long. I have been putting work out for a while but I would
technically only count myself as an illustrator for the last year and a
bit or so. Illustration can be great as a day job but in practice can
come with some instability (financial, frequency of work).
I
haven't worked in-house or contractually yet. It's not something I would
rule out. It's just things haven't gone that way so far.
Have you participated in gallery shows (or do you want to)?
Aside
from my graduate showcase, I have yet to participate in any gallery
shows. This is something I would love to do, but in the future when I
would consider myself to have a greater breadth of work to showcase and
be in a better position to really put on a show.
A great deal of your artwork explores gender expression. What led you to tackling the subject artistically?
Gender
and the expression of it is something that has always been of interest
to me. From a sociological point of view, the inherent view that there
is a masculine and feminine identity that is transcribed and reinforced
from birth, with any decidedly deviant behavior/expression being
labelled as "other" and marginalized from mainstream society. Illustration of Mathu Andersen from the Marco Marco LAFW show.Of
course, this has changed, is changing, is perhaps in a constant state
of flux all over the world. Visually recording and creating
representations based around the idea of gender allows me to express
uncapped creativity; this can be from the makeup, hair and fashion to
even the mood of the image.
I love your exploration of high, fabulous fashion in your work. What designers' lines have you got your eye on lately?
I
have my eye on everyone. However, I would mention the following:
Christian Cowan-Sanluis, Elliot Joseph Rentz and Jay Briggs for their
fabulous fashions. Also, always excited to see what Versace, The Blonds,
Pam Hogg and Moschino are doing.
Have
you ever met any of the subjects of your illustrations (whether pop
stars or drag queens)? If so, have they seen your illustrative work?
Yes!
I have met a number of those depicted within my work (currently, mainly
Drag Queens) and they have seen my work either prior or post meeting.
The
likenesses of your artwork are spot-on. Are faces, poses and such
heavily referenced, or do you use light reference and focus more on
designing a new figure for your purposes?
References are
something I try to use directly less and less. They have their use but
my aim now is to capture a moment and look of my own.
What are your current or future goals as an illustrator?
To
continue with the type of projects I work on currently, like events and
portraiture, as well as build up a solid base of published editorial
work. In the future, I would love to be involved in a major campaign
with a leading cosmetics brand across packaging and advertising, as well
as to debut textile prints in a collaboration with a fashion label. A small selection of products in Daniel's Society6 shop.
Any advice or words of wisdom for readers who wish to engage in the art world as you have?
Go for it! If it doesn't work out then at least you tried.
Things
to remember: confidence in what you are doing rubs off on others, have a
slightly thick skin as sometimes you just can't please everyone, and
enjoy it!
Daniel's fantastic take on a glamazon version of Marge Simpson
Many
thanks to Daniel sharing his work and experiences with us. I really
look forward to seeing where his work goes in the near future and
beyond. For more of Daniel's art, check out the links below:
Medical Disclaimer
The information on this site is not intended or implied to be a substitute for professional medical advice, diagnosis or treatment. All content, including text, graphics, images and information, contained on or available through this web site is for general information purposes only. Krobknea makes no representation and assumes no responsibility for the accuracy of information contained on or available through this web site, and such information is subject to change without notice. You are encouraged to confirm any information obtained from or through this web site with other sources, and review all information regarding any medical condition or treatment with your physician. NEVER DISREGARD PROFESSIONAL MEDICAL ADVICE OR DELAY SEEKING MEDICAL TREATMENT BECAUSE OF SOMETHING YOU HAVE READ ON OR ACCESSED THROUGH THIS WEB SITE.


.png)


