by
The Winged Hussars were an elite cavalry unit of Poland, invincible for almost two centuries, often defeating enemies many times more numerous. They're the national pride of Poles—a symbol of the greatest time in our history. Besides that, they simply look epic, so they're a great topic for an epic painting.
Now, I've never painted a hussar before. Therefore, it will not be only a tutorial about digital painting, but also about preparation for drawing something accurately, even if you have no previous experience at this.
I'll show you how to prepare the composition and how to shape basic lighting into full detail shading. Then you'll learn how to add vivid colors to a grayscale painting, and how to manage recurrent details without having to copy and paste them. I'll also explain the difference in shading different materials, like metal, horse hair, and cloth.
The most important lesson you may take from this tutorial, though, is how to manage the whole process of painting to keep control over it in every phase.
1. Sketch a Horse Rider on a Rearing Horse
I can't stress how important it is to work from the whole to the part when it comes to painting. We may want to draw a hussar on his horse, but it's not what we should start with! There are various levels of details of this picture that our vision system will recognize one by one:
- a dynamic scene
- a rider on a horse
- a rider in an armor—a knight
- the armor of a Polish winged hussar
And that's how we need to take them, one by one. Let's start with a sketch of a rider on a horse. To make it dynamic, the horse will be rearing.
Step 1
Get yourself a bunch of references of rearing horses and sketch them quickly, loosely. It's not only about looking for this perfect pose, but also about warming up before serious drawing.

Step 2
Now, take a good look at all the poses and find the one that will present the rider in a clear way. I've chosen this one, because it brings Napoleon Crossing the Alps to mind. You can also sketch your own pose based on what you've just learned about rearing horses!

Step 3
Our horse is ready, and now we need to put a rider on it. If you don't ride, you should definitely do some research on this topic before trying to draw it. Our intuition sometimes has little to do with reality, and it's so much easier to fix the pose now than later, when the picture is colored and shaded.
- Normal pose: the rider is sitting with his back, hips, and heels in one line. The heel is pointing down.
- Rearing pose: the rider leans to the front and lifts a bit, so as not to pull the horse back with his own body. The reins should be loose, and the rider uses his legs (calves and heels) to stay on top.

Let's use this information for our picture. Lower the Opacity of the horse and create aNew Layer above it. Add a few guide points: the line of leaning, and the spots for the knees and feet. The hussars' horses weren't very big, so keep that in mind here.

Add the rest of the body. Our rider isn't leaning too strongly, because he's obviously not afraid of falling—he's a hussar, after all! (And he still has it better than Napoleon.)

Step 4
To break the side view imposed by the horse, we can turn the upper body of the rider towards the observer. It will make the whole picture less static, and the hussar will also look as if he is fully controlling the situation.

2. Adjust the Composition
At the moment we've got a nice, squarish composition. It can't stay this way, though. Thehussar lance was five to six meters long, which means it's not only longer than the body of the rider, but the horse, too! It can't be added to the picture without disrupting the composition we have now. The question is: how to add this long, obtrusive lance and keep the composition attractive?
Step 1
First, create a New Layer and paint a sloppy silhouette of the horse and the rider. As long as there is no color and shading, the "inside" and "outside" of the drawing only make the composition.

Step 2
How many straight lines can you find in this shape? (You can draw them, but you don't need to; you should be able to imagine them as well.) In my case the lines prove the dynamism—if they were perpendicular or parallel, they would make the silhouette static.
The circle around the rider's shoulder describes the reach of the arm. The lance must cross it if it's to be held in the right hand.

Step 3
Let's see a few possibilities for the placement of the lance. We'll make it a bit shorter than in reality, because otherwise this side-view composition wouldn't stand it.

Step 4
Let's close the whole shape with lines:

Step 5
Now, if we inscribe the silhouette into a rectangle divided according to the rule of thirds, we'll be able to see what should be fixed to create a proper composition.

Let's see what needs to be changed in terms of a dynamic, single character composition:
- None of the elements should touch the edges of the picture.
- If one of the rectangles is empty, its neighbors aren't allowed to be.
- The main focus shouldn't be on the center of the horse's body, but somewhere between it and the rider.

There are two elements we can add quite freely to modify the perspective: the two-tailed flag and the horses' tail. They're both very flexible, so you can do what you want with them to shift the focus and the weight of the composition to the right place.
Now, the attractiveness of a composition is very subjective. At this point it's hard to say that any of the propositions is incorrect, though each of them may have its flaws.

I've decided I like the vertical frame better. Now I have to decide which of these two works the best for me. I noticed the first one creates an odd, very obtuse angle, while the second one has it acute (of course, if we use the direction the rider's heading). When it comes to dynamism, streamlined shapes look better: imagine both of these angles as the front of a sports car. Isn't it obvious which one should we choose?

Step 6
Crop (C) your canvas to adjust it to the composition we have chosen.

Step 7
Now we can add the other arm. It may be partially covered by the mane, but it shouldn't stop us from defining it!

3. Clean Up the Anatomy
For now we have managed to establish a pose, both for the horse and the rider, and even the lance. However, a pose isn't a body, since there may be a lot of understatements hidden in the sketch.
Step 1
Create a New Layer and make the previous ones more transparent. Use images from my tutorial about horses as a reference for the simplified skeleton.

Step 2
Use the same tutorial to draw the outline of the muscles. Be careful in the neck area, because there's—gasp!—perspective going on.

Step 3
Finish by adding the muscles. They're going to be very useful for shading!

Step 4
You can find a reference for drawing the human body in my tutorial about creating an anthro-wolf. The rider shouldn't be too skinny—hussars were mostly magnates, representatives of the highest class that never suffered from hunger.

Step 5
Clean up the overlapped areas and Merge (Control-E) the detailed sketches. You can now delete the previous versions.

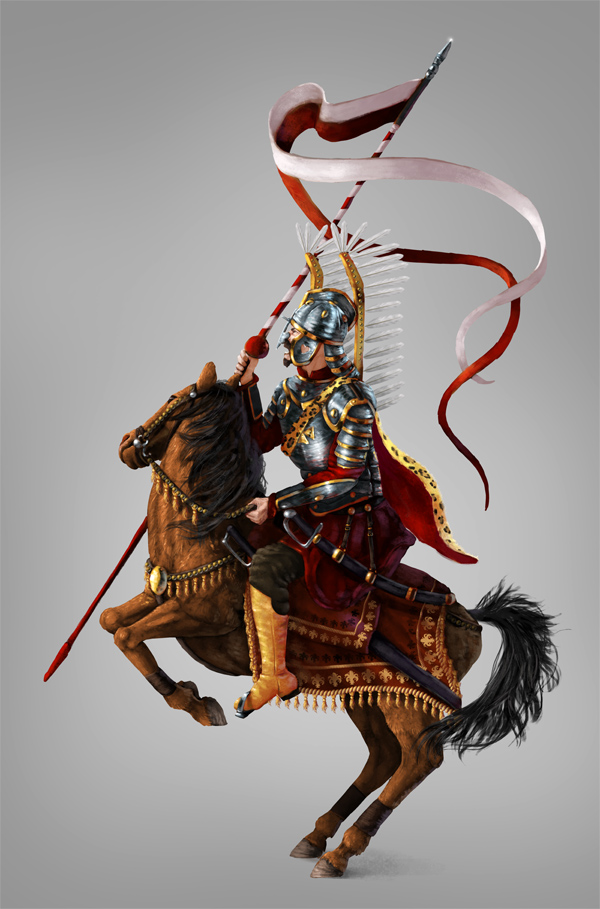
4. Draw the Armor of a Winged Hussar
You may have some elusive concept of what a winged hussar looks like, but it's not a good idea to start drawing him without any preparation, especially if you're working for a client. Let's analyze the equipment of this warrior step by step, keeping in mind that the Polish Hussars weren't a uniform formation, and they changed over the centuries. We're going to analyze a more recent type of armor.
The Horse Tack
As we mentioned before, hussars came from the highest class, equal to the king. Taking part in a war was not only their duty, but also a privilege. It was a great honor to fight as a hussar; we can say they were the elite warriors of that time. To accentuate how wealthy the knight was, all his equipment had to be expensive and decorative.
Let's see how a typical horse tack could have looked.
- a saddle of Eastern type (influenced by the Turks)
- an ornamental blanket
- a harness studded with gold
Two additional weapons were placed here:
- one or two guns (in the latter case, strapped at both sides)
- the kancerz—a very long saber used to pierce the enemies once the lance had been crushed

As before, lower the Opacity of the sketch and draw every part on a New Layer. Sketch the tack without any decorations for now.

The Breastplate
As a charging cavalry unit, hussars typically wore only breastplates, with their backs protected by animal pelts. However, for the wings to be attached to the back, the backplate had to be present, too.


The Pauldrons
They protected the shoulders and arms, and also concealed the gaps in the breastplate.


The Armguards
Used for protecting the forearms: the long part covered the outer side, and the shorter part protected the inside.


The Helmet
There were many types of hussar helmet. Here I'm presenting the one with a "crest". Notice the covering on the face was screwed to the helmet and could be rotated to be put on the forehead instead, leaving a small, rectangular covering for the nose only. The hearts cut on the "ear-flaps" didn't seem funny at that time at all! If you want to make your picture more serious, though, you can use simple holes for this part.


The Tunic
This long robe made of thick cloth was worn as a base for the armor. Chainmail hauberks were more rare.


The Boots
Hussars wore standard, long rider's boots, yellow or red.


The Saber
A curved saber was strapped to the belt and used in a direct encounter.


The Wings
The iconic hussar wings are a controversial issue. The most probable story about them is that they were used for ceremonies mainly, and if any were worn during fighting, there was only one, straight wing, with a few feathers, strapped to the back of the saddle, not the rider's back. However, since our hussar looks pretty iconic even now, let's add these double wings to his back, as a crucial part of hussar legend.


The Lance
A hussar without wings can be perfectly fine, as long as he has a lance with a long flag. A flapping flag with two tips, sliding through the air like two snakes, was supposed to (and it successfully did) frighten the enemy horses.


When you're done with the sketch, clean up the overlapping parts and Merge the layers.

Lower the Opacity of the sketch and use a New Layer to draw proper line art. Use a sharp, pointed brush—thanks to this you'll make sure you don't leave any unclear lines for guessing later.
A line art drawing isn't always necessary, but it's crucial if we know exactly what we want to paint. It doesn't need to be overly scrupulous, but it should leave nothing to imagination.

5. Prepare the Shading
I'll show you a digital painting technique that I call 2D sculpting. It's a great method for painting from imagination, which is all about asking your subconscious: "Is it how it's supposed to look? Can I keep going?" This technique will help you manage light, shadow, textures, and color.
Step 1
We need to prepare a Clipping Mask first. Create a New Layer and use a hard brush to draw the outline of the silhouette. You can ignore the wings and the hair—we're going to paint them with a different method.

Step 2
Use the Magic Wand Tool (W) to select the area outside, and press Control-Shift-I toInvert the selection. Create a New Layer and fill it with the Paint Bucket Tool (G). You can now Merge both layers.

Step 3
Lower the Saturation (Control-U) to neutralize the color—it should be about 50% gray. The shape we've created will be our Clipping Mask. Every future layer should be clipped (Control-Alt-G) to it.

Step 4
We're going to use a nice painterly brush we can create out of the default ones. Select the Chalk brush, and go to its Settings (F5). Give it a size of 30 px, just so that we get identical effects.

Step 5
Check off Texture, because we don't need it.

Step 6
In Transfer, select Pen Pressure for Opacity Jitter.

Step 7
For the second brush, built in as a Dual Brush. Select Sampled Tip 41 for it, and then adjust the Spacing and Scatter as below.

Create a New File and test the brush. If something doesn't feel right about it, play with the settings once again. Then Save the brush by clicking the white card icon in the lower right corner.

Step 8
Create a New Layer over the Clipping Mask, and don't forget to clip it (Control-Alt-G). Change the Blending Mode of the layer to Multiply. Use our new brush to paint the shadow area very roughly, in a big zoom out. Squint your eyes and see if the 3D form starts to appear. Treat the base color as the shade of the fully illuminated area.

Step 9
Sculpt more details in the shadow. In Multiply mode white works like an eraser, and every gray darkens the background. Use a whole palette of grayscale to paint the shadow, and clean up the light area. With every step, zoom in a bit and add more details. Imagine you're sculpting in a gray stone—both the rider and the horse should be made of the same material.
A couple of tips: in the first steps see the big picture, don't zoom in to details, and pay attention to the form all the time. Save 100% black for crevices only, change the shades often, and if you want to pick them from the picture, set the Sample option of theEyedropper Tool (I) to Current Layer.

Your goal is to define the form so strictly that the line art won't be needed any more. It may take some time, but don't hurry—this is far more important than all the colors and details you'll add later.

Step 10
Add a New Layer and set it to Screen mode. You can treat it as the opposite of Multiply—black works like an eraser, and every gray makes the background brighter. Do the same as before, this time working in the light area. Remember: from the whole to the part!

What's important, it's also time to draw basic textures, because it's the light that creates them. Attention: by texture I mean the pattern you paint with your brush, not a photo pasted into the picture. What you draw in the light area determines the surface of the material.


Step 11
To see contrast better, change the color of the background to a neutral, 50% gray. Create a New Layer, this time in Normal mode, and polish all the details. We're almost there!


6. From Grayscale to Color
Painting in grayscale first helps manage the lighting properly, but adding the colors later may be problematic. There is no Blending Mode that will color a picture in grayscale with one click—using Color or Overlay alone will not give you the effect you want. However, it's not really that hard to fix what these modes can't. Just follow me and see for yourself!
Step 1
Create a New Layer and use some solid brush to paint the flat colors. Use the line art layer to see the borders correctly. Use the local shades of color—just as if it was an overcast day.

Step 2
Now, if you change the Blending Mode to Color, the colors will be applied to the shading, but in a very weird way. Is it what we wanted? What is wrong with it—why does it look so odd?
Take a moment to fix any places where the color was applied differently to the shading and the line art, and then continue.

A bit of theory now. Let's say we want to apply the colors from the right to the shaded ball on the left.

If we do this with the Color mode, we get this unpleasant effect. As you can see, some of the colors got darker, and some brighter, instead of getting all brighter in the light and all darker in the shadow. Just... each of the colors does what it wants!

Why is it so? Value isn't only about brightness. These two shapes are both 100% bright, which means they can't get any brighter. However, it doesn't mean their value is equal to white! If you check it, the value of yellow turns out to be much brighter than the value of blue. This relative brightness brought by color is called luminosity or luminance.

You can check the value of something by placing a New Layer over it and setting itsBlending Mode to Saturation. So, if we check the value of the colored ball, it turns out the colors disappear! What does this mean?
The Color mode uses the value of its background only, ignoring the luminosity of the colors. That's why yellow (requiring high value) gets darker when receiving the same, medium value as red (requiring low value). On the right you can see the values the colors require to look as intended.

OK, so the Color mode isn't very useful for coloring. But maybe some other one is?
- Overlay—a very good candidate: color values are definitely used here. However, there is a brightness issue here—the colors get washed off in the brightest areas, which means their saturation gets lower. We don't want that!
- Multiply—very neat, uniform change, with one obvious flaw: it makes the colors darker.
- Soft Light—a softer version of Overlay; too much washing off.

But... what about Hard Light? It makes the colors darker in the shadow, as intended, and yellow in shadow isn't as dark as green, just as in the real world...

.... and when you look at the light area, the values are simply perfect!

Step 3
Change the Blending Mode of the colors to Hard Light and see the magic happen!

Step 4
But, as I mentioned, this isn't the end. It would be too easy! The reason why Hard Light mode often gets overlooked in tutorials about digital painting is that it definitely looks as if it has a darkening effect on the shading. However, if you understand color theory, it's obvious it must have a darkening effect.
When we were sculpting the shading, we used the same bright value for every part, be it a brown strap or a gold ornament. They had the same brightness when illuminated, but it's not true about all colors. Since, as we've just learned, gold has a higher value than brown, brown needs to have a darker value than we have used for it when shading. Hard Light mode simply does this job for us!
Why doesn't the picture look complete, then? Doesn't it look a bit as if it has been put underwater? This is a clear indicator that we applied only diffuse reflection to it. What the picture is lacking is specular reflection and reflected light.
Let's start with specular reflection. It reveals the glossiness of a surface and its texture. Most materials are partially shiny, and they would look weird without brightening them in some areas.
Here's how to do it: pick a color from the area, add more Brightness to it, and slide theHue slightly towards yellow. Then use this tint to draw tiny details, like individual hairs. Draw them sparingly and only in the light area!


Then you can make the tint even brighter and add details to these details. Use this method until you're happy with the effect. Save white for 100% glossy or wet surfaces!


Step 5
Metal is all about nothing but specular reflection. Let's work on the golden parts. First, pick their color and slide the Hue slider towards green—it will make this part colder. Then lower the Brightness almost to black, and use this shade to draw hard lines.

Step 6
Now, pick the main color and slide Brightness up, and Hue towards yellow/red to make it warmer. Draw bright stripes here and there.

Step 7
Use white (or very bright yellow) to add the final shine to the gold. Remember, the more you use it, the less effect it has!

Step 8
Use the same technique to finish the metal elements.


Step 9
Add more light to the rest of the elements. The brighter the color you use, the less of it should be used, and the glossier the material will look. Don't ever use white to brighten a matte material!
An important hint:
- Use gradual change for matte materials.
- Use sharp change for glossy materials.
- Use rapid change for metals and other mirror-like surfaces. Beware not to use this method for matte or textured materials!


Step 10
The next effect we need for an object above the water is reflected light. For now we took care of direct diffuse reflection, direct specular reflection, and what's left is reflected light—the indirect lighting. For example, if direct light hits a metal, it reflects it so strongly that it can illuminate a nearby object. Non-specular objects reflect light too, although it's not so apparent.
Look at our picture and try to guess where to put reflected light. It's visible only in shadow, because it's never stronger than the direct light. You should also treat it as colored light—to simplify it, if "yellow" light gets reflected on a brown surface, that surface will become brighter, less saturated, and shifted in hue towards yellow.

Keep in mind there's also ambient light: diffuse light reflected from the atmosphere. So imagine there's a giant blue dome somewhere above and on the right, and make it reflect light, too.

7. Add the Final Details
Our hussar looks pretty good! Time to finish the picture with more or less necessary details.
Step 1
We left the mane and tail of the horse for later, because it needs to be drawn with a different technique. Create a New Layer and use a smooth, pointed brush to draw big strokes of hair.
Tip: I used the DP Smooth brush from DP Presets, which you can open in the Window > Tool Presets tab.

Step 2
Make the brush smaller and draw thinner strokes. You can use a slightly brighter shade of gray for it.

Step 3
Now we're going to shade it as before. Create a New Layer and paint light usingScreen as Blending Mode.

Step 4
Then lower its Opacity and make the shading more detailed.

Step 5
Another element waiting for our attention is the hussar wings. We're going to paint them using one feather.
Create a New Layer and draw the shaft.

Use a New Layer and Clipping Mask to color and shade the shaft.

Create a New Layer under the shaft and paint the vane.

Use a New Layer and Clipping Mask to shade the vane.

Step 6
Merge all the feather parts. Right-click the feather and select Convert to Smart Object. It will make it immune to quality drop during modifications.
Duplicate (Control-J) the feather and use the Free Transform Tool (Control-T) to place the feathers in the bars. Change their size lightly when doing this to make them more variable.

Step 7
Select the layers of the lower feathers and use the Free Transform Tool again. HoldControl and drag the corners to fix the perspective.

Step 8
Merge all the feathers and duplicate them for the other wing.

Step 9
Add the Layer Mask to the first wing. Draw with black over the parts that should be covered. You can also use this as an opportunity to add more details to the feathers.

Do the same with the other wing.

If your picture seems too dark, select the layer that's causing it (in my case, colors anddetails) and use the Curves editor (Control-M) to fix it.

Step 10
Let's decorate the horse. Create a New Layer and paint a single golden tassel.

Step 11
Select the Mixer Brush Tool, and change it to Dry, Heavy Load. Then select any round brush from your list, make the stroke big enough to fit the tassel inside, and press firmly when holding Alt. The sample has been taken!

Step 12
Create a New Layer and try to paint the tassels along the blanket. If they're placed too thickly, change the Spacing in the Settings (F5) of the brush. You can also check off all the other options, like Transfer or Shape Dynamics, because we don't need them here.

Step 13
You can use the same method to hem the blanket with gold.

Step 14
Because the Mixer Brush Tool doesn't support rotation, we need to create a new brush for floral ornaments. Create a New File and paint a single ornament, any way you want.

Go to Edit > Define Brush Preset, and change the settings (F5) as below:


You can now draw the ornaments using the brush.

Step 15
Feel free to mix both methods when decorating the blankets!

Step 16
Merge all the decorations and put the Layer Mask on them. Paint with black over areas that you want to hide.

By using a brush with lower Flow, or gray instead of black, you can simulate the shading of the decorations.

Step 17
Let's add golden studs here and there, just as before.


Step 18
Now, knowing of the methods you can use, add any decorations you can imagine!

Step 19
Now it's time to fix everything you don't like about the picture and to refine the details as you see fit. As you can see, I almost forgot about the animal pelt that hussars wore on their backs!

We've Galloped to the End!
Today you've learned how to paint digitally in Photoshop, but not only this—I hope you also realized why the "Oh, I've got an idea, I'm going to draw it!" approach so often leads to disappointment. If you've got a good concept of what you want to draw, planning is crucial to achieve the desired effect.
Remember to always divide your process into steps, like: free sketch, adjusting the pose to composition, basic lighting, detailed shading, coloring, adding reflections, adding details, and finishing up. If your whole process can be described as "painting", it will be very hard for you to find the elements you should work on. Feel free to use this tutorial as a process-reference for your future works!


