
In this tutorial we’ll be creating a semi-realistic wooden palette for painting. We’ll use some basic shapes along with simple freehand drawing, and then we'll add spectacular effects, making the palette look more real with the help of the Image Trace function that will help us to add some texture to our image. Let’s get started!
1. Form the Base of the Palette
Step 1
First of all, create a New Document of a 600 x 800 px size. We’re not going to print our image, so let’s use the RGB Color Mode. That will eventually allow us to work with Blending Modes in order to create a glossy, sparkling look.

Step 2
Take the Ellipse Tool (L) and make a slightly squashed elliptical shape, filling it with linear gradient from light brown on top to darker brown in the bottom, using bright, warm wooden tones. Transform a shape by moving its side anchor points up a bit with the Direct Selection Tool (A) to make the top part wider.

Step 3
Let’s form an indent for the finger on top of the palette. Select the Pencil Tool (N)and add a curved line above the top right part of the palette base. Select both the line and the palette and use the Divide function of Pathfinder, cutting the palette into separate parts. Edit the position of the anchor points with the Direct Selection Tool (A), so that the lines remain smooth.

Step 4
Add another hole in the palette surface with the Ellipse Tool (L) and use the Minus Front function in Pathfinder panel to cut out the ellipse. Let’s add some dimension to our palette, as it looks too flat at this stage. Copy the basic shape and Paste it in Back (Control-C > Control-B). Move the shape down and to the left using the arrow keys on your keyboard.

Step 5
Select the created shape and fill it with linear gradient, varying darker and lighter brown colors.

Step 6
Add another copy beneath the basic shape and make it much lighter, creating a layered wood formation.

Use the Direct Selection Tool (A) to align the anchor points of all three shapes in the places where they fit together.

2. Add Texture to the Palette for a More Realistic Look
Step 1
First of all, we need to find a suitable texture that we’ll be able to turn into vector and then apply to our image. I’ve used one of the wooden textures from this great free pack by borysses. File > Place the image onto the Artboard and find the Image Trace button in the control panel above. Reveal the drop-down menu and select the3 Colors tracing preset.

Step 2
You can always edit the settings of the traced image manually from the same control panel, but in our case the 3-colored preset works perfectly fine, creating a distinct vector wooden texture from the raster image.
However, we don’t need the whole texture, but only its darkest notches. To get those, open the Magic Wand options menu (Window > Magic Wand) and set theFill Color Tolerance to 0. With these settings, the Magic Wand Tool (Y) will select only the shapes of one and the same color, without any variations. Click the darkest lines with the Magic Wand Tool (Y) and press Control-8 to turn the separate shapes into a single Compound Path.

Step 3
Place the created texture above the palette and rotate it a bit, so that the notches follow the right direction. Fill the shape with linear gradient from light brown on top to white on the bottom. Switch the shape to Multiply Blending Mode, making it semi-transparent.

Step 4
Now we need to get rid of the parts outside the palette. Duplicate the upper basic part of the palette and place the created copy on top of all other shapes. Then select both the created copy and the wood texture, click the right mouse button and Make Clipping Mask.

Step 5
Duplicate the wood texture shape twice, and move the upper copy to the right a bit. Select the two copies and use the Minus Front function of Pathfinder to cut off the unwanted parts, thus creating an additional piece of texture next to the initial one.
Turn the shape into a Compound Path (Control-8) and fill with it with dark linear gradient from deep brown on top to black at the bottom. Switch to Screen Blending Mode, making a highlight and creating a more realistic look.

Step 6
Add another copy of the basic palette shape on top and make it slightly smaller than the original shape. You can decrease its size manually or use Object > Path > Offset Path with -5 px Offset value to create a smaller copy inside the selected shape.
Fill the shape with linear gradient from light brown to black and switch to Screen Blending Mode, creating an effect of smooth polished wood.

3. Place Colorful Paint Pieces on the Palette
Step 1
Let’s form the paint wells, filled up with paint. Firstly, form an empty cavity by creating an ellipse and filling it with linear gradient from darker brown to lighter brown.
Add a larger ellipse beneath the first one and fill it with light-beige color to make the well look as if it is cut out from the wood. You can switch the lighter ellipse to Screen Blending Mode in order to make it semi-transparent, so that the wooden texture is visible underneath.
Finally, add a third, smaller, ellipse on top of the first two and fill it with vivid radial gradient from darker blue at the edges to lighter blue in the center, thus forming the paint.

Step 2
Group (Control-G) the parts of our well and make more copies, placing them along the edge of the palette.

Step 3
Let’s brighten the paint pieces by adding some highlights and overtones. Take thePencil Tool (N) and draw a couple of curved shapes, overlapping the blue paint shape.
Select the created curves together with the paint shape and use the Shape Builder Tool (Shift-M) to delete the unneeded parts outside the paint ellipse by clicking them, while holding down the Alt key. Fill the remaining parts with linear gradients from black to blue, creating a glossy effect.

Step 4
Let’s add more highlights and reflections using the same technique. Feel free to copy the whole highlight group and add it to other paint wells. You can change the shapes slightly with the Direct Selection Tool (A), so that they don’t look all the same.

Step 5
The palette should actually include different paint colors for each well, while we have them all filled with the same blue color at this step. Let’s fix this in just a few clicks with the help of the Recolor Artwork feature.
Select the paint group (together with the highlights) and click the Recolor Artworkicon (a segmented circle) in the upper control panel. In the Recolor Artwork options window go to Edit, and click the Link harmony colors icon.
Now you can start adjusting the colors by either moving the sliders in the Hue-Saturation-Brightness panel below or by moving the handles of the color wheel. Check the Recolor Art box in the bottom left corner of the options window to see how the color of your artwork changes in real time, making it easier to pick the desired tint.

This is how our palette looks when the new colors are applied with the Recolor Artwork.

4. Create the Paintbrushes
Step 1
We definitely need some more details to make the composition look complete. Let’s add some drawing items, such as brushes.
Start forming the handle of our brush by making a thin squashed ellipse with theEllipse Tool (L). Fill it with a three-colored linear gradient of darker and lighter blue tints, thus creating a nice solid highlight in the center of the brush handle.

Step 2
Add a smaller, narrower ellipse above the first one and fill it with linear gradient from light blue to black to darker blue. Switch to Screen Blending Mode to turn the shape into a bright overtone, making the handle more glossy and slick.

Step 3
Now we need to render the metal ferrule of our brush (the part connecting the handle with the bristle). Form the ferrule base by duplicating the brush handle and placing it on top. Delete its lower part with the Eraser Tool (Shift-E), leaving only a tip on the top of the brush handle.
Let’s make it look more realistic and metal. Select the Mesh Tool (U) and start forming the mesh grid by clicking in the middle of the lower part of the ferrule. Add more columns by clicking the horizontal line of our mesh with the Mesh Tool (U).
Step 4
Once you’ve added enough rows and columns, select the central anchor points with the Direct Selection Tool (A) and fill them with light-grey color to form a bright highlight on the metal surface. Add more columns to form more highlights, filling them with the same light-grey color, making the ferrule more realistic.
Once you’re happy with the result, let’s get rid of the rounded tip of the ferrule, as we don’t need it. Create another ferrule base as we did previously: use the brush handle shape and shorten it with the help of the Eraser Tool (Shift-E). Delete the upper part as well by erasing it and making the tip flat (check out the black shape in the screenshot below).
Select both the metal ferrule and the created shape that is placed on top. Click the right mouse button and Make Clipping Mask. Now have a ferrule with a flat top.

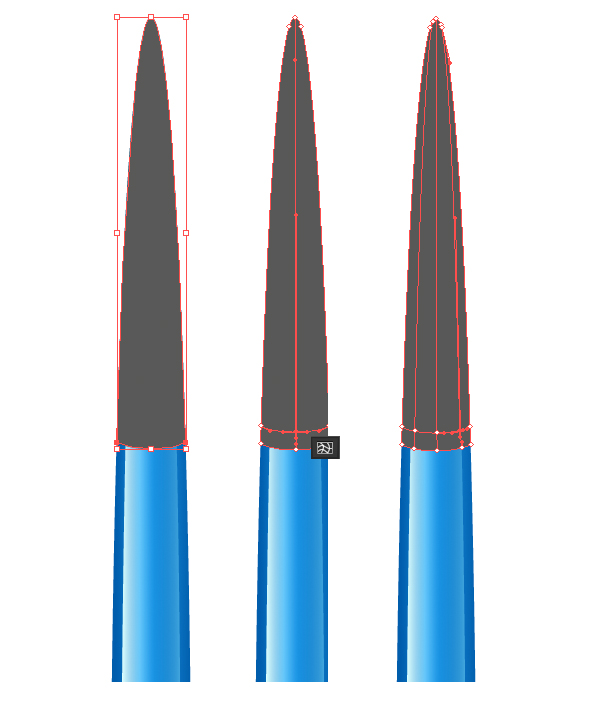
Step 5
Now we need to form the bristle part of our brush, which is called the belly. Place an ellipse on top of our bush and hide its lower part beneath the ferrule by rearranging the objects (Control-[). Fill the ellipse with the radial gradient from light-brown to darker brown, placing the center closer to the left part of the shape. Make the tip of the belly pointed by clicking it with the Anchor Point Tool (Shift-C).

Step 6
Let’s add more details to the belly, forming the bristle that will make it look more natural. Draw several strokes with the Pencil Tool (N) and set the Variable width profile to Width Profile 1 in the control panel above. This will make the tips of the strokes thin and pointed. The more strokes you add, the more realistic your brush will look. Don't forget to Object > Expand Appearance of the strokes in order to turn them into shapes and delete the unwanted pieces on top of the brush with theEraser Tool (Shift-E).

Step 7
Now as we’ve added enough bristles, let’s fill some of them with dark brown (
#171004, almost black) and switch to Screen Blending Mode, making the bristles light and thin. Fill the remaining bristles with light-brown (#AD761D) and switch them to Multiply Blending Mode, adding volume to the belly.
Create some gentle shadows on top and in the bottom of the brush by adding zigzagged shapes with the Pencil Tool (N) and switching them to Multiply Blending Mode as well.

Step 8
You can add some more highlights and shadows to the brush if you feel that you want it to look more realistic. For example, we can add a subtle shadow on the handle, right under the ferrule. Feel free to use the Recolor Artwork tool to change the color of the handle or of the whole brush itself. As an example, I’ve switched the color of the handle from blue to black, to create more contrast.

Step 9
Create more brushes using the same technique. Make them look different by varying their widths and colors.

Step 10
Let’s place our new set of brushes above the palette and make them run through the hole. For this purpose, we need to delete those parts of the brushes that should be hidden behind the palette.
First of all, copy the basic palette shape and place it on top of all other objects (shown black in the screenshot). Go on, take the Pencil Tool (N) and outline the brushes. You don’t have to be very precise—just make sure that the brushes are inside the penciled line, not crossing it.
Finally, select the black shape and the penciled line and hit Minus Back in the Pathfinder panel. Now we have three separate shapes left.

Step 11
We need to unite the two upper shapes into a single element. For this purpose, take the Direct Selection Tool (A) and start transforming the upper shape so that it overlaps the elliptical shape, as shown in the screenshot. Select both the transformed shape and the small ellipse and Unite them in Pathfinder.
Great, now we have two shapes, outlining the appropriate parts of our brushes. Select them and press Control-8 to turn the shapes into a Compound Path. You can always use the Direct Selection Tool (A) to edit the path by moving the anchor points (for example, we need to fix the lower part of the path so that it doesn’t overlap with the bottom part of the palette). Finally, select our brushes and the created compound path, click the right mouse button and Make Clipping Mask.

Now we have the unneeded parts of the brushes hidden inside the mask.

Step 12
Let’s finish up with our image by adding a simple background. Form a rectangle the size of our Artboard with the Rectangle Tool (M) and Send it to Back (Shift-Control-[). Fill it with radial gradient from light blue in the center to darker blue at the edges, adding depth.

Step 13
Add another rectangle of the same size and fill it with linear gradient from light blue to white, switching to Multiply Blending Mode in order to make the bottom part of the image darker.

Step 14
Put a squashed ellipse under the palette and turn it into a gentle shadow by filling the shape with radial gradient from blue to white and switching it to Multiply Blending Mode.

Step 15
Add a subtle bokeh on the background and speckle some sparks around the palette to make the image more complete. Check out Part 4 of this Winter Candle Lanterntutorial to find more descriptions on how to create similar bokeh and sparks.

Great Job! Our Artist's Palette Is Finished!
If you’re not a traditional artist yet, you can already feel like one, because now you have your own painting palette. Though it is only a digital piece, you know how to draw it.
I hope you’ve discovered some useful tips and tricks on creating textures and using simple effects to make your artwork look real. Stay tuned for more! Good luck!


