As much as we love summer, it does have annoying mosquitos. I am sharing 10 Plants to Keep Mosquitos Away! Help repel mosquitos by filling your garden with as many plants that keep mosquitos away and hopefully, you’ll have a mosquito-free yard!
Many of the 10 plants to keep mosquitos away are easy to add to your patio decor. They will not only look beautiful but serve a purpose in keeping your outdoor space pest-free!
If you want to control mosquitos so you can cut down or eliminate using dangerous poisons look no further than nature to do so. As you choose which plants to use, consider placement, putting them where you are more likely to hang out such as doorways, near windows and near outdoor seating.
A lot of the plants do double duty as they’re actually edible and can be used in culinary dishes such as lavender in ice-cream or basil and garlic in your marinara sauce. Plus they look interesting and aren’t usually that hard to grow or take care of. I have many of these planted in the yard or in flower pots.
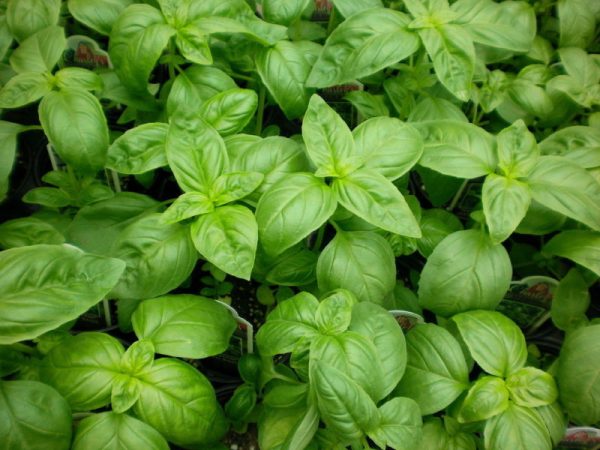
Basil – This is one of 10 plants to keep mosquitos away. You can make your own natural mosquito repellent with dried basil very easily. Simply steep a cup of dried basil in 1/2 cup of filtered boiling water, kind of like you would make tea. In fact, you can use a tea ball to help make this a neater job. Add in a little basil essential oil and about 1/2 cup of some sort of alcohol that is safe for the skin.
Catnip – There are some studies that show that catnip oil is better at repelling mosquitoes than harsh chemical insect repellants. If this is true, you should try it. You can buy it already made catnip oil repellent or make your own catnip mosquito repellent. It works on other types of pests too.
Citronella – This lemony plant is the most popular known plant to help keep mosquitos away. You’ve likely seen citronella candles that work too, but why not just plant this pretty grass-like plant. You should plant it in large containers that can be easily protected during frost and place strategically around when guests are visiting.
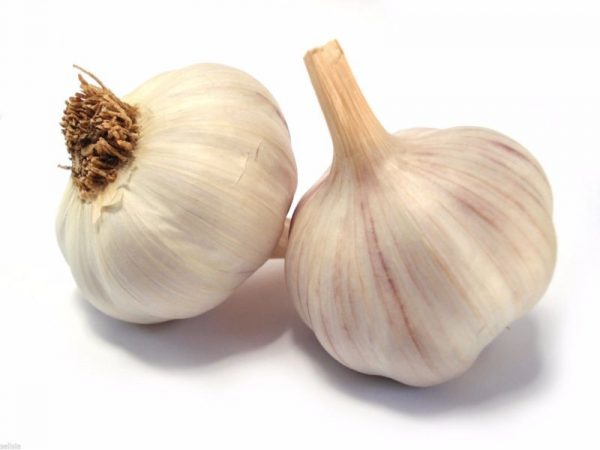
Garlic – The bulb of the garlic plant’s amino acid make up coverts to a substance called allicin once you crush it, blend it or chop it. You can actually blend the bulbs with water and water other plants and foliage (and humans) with it to help repel insects. Here are a few recipes you can try.
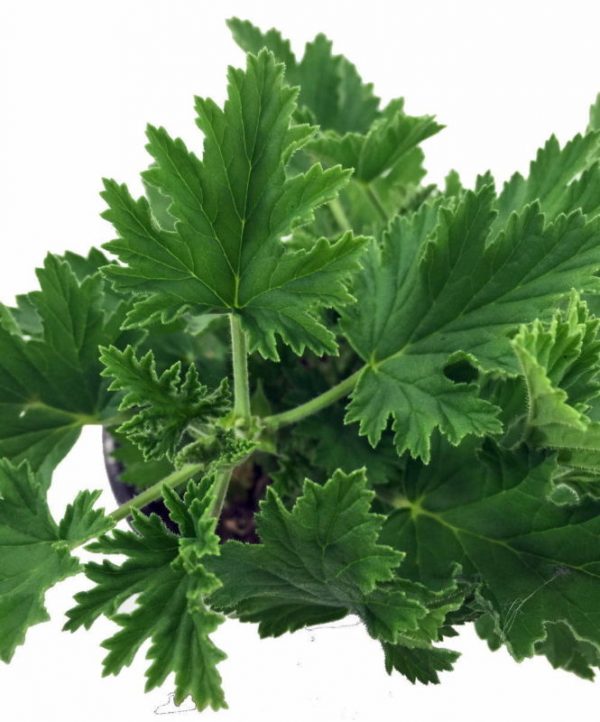
Geranium — Plant scented citronella geraniums to help control mosquitos in pots to put around your patio and in areas that you and your guests might want to sit without being bothered by mosquitos. You can also crush the leaves and add to lotions to help the repellent work even better.
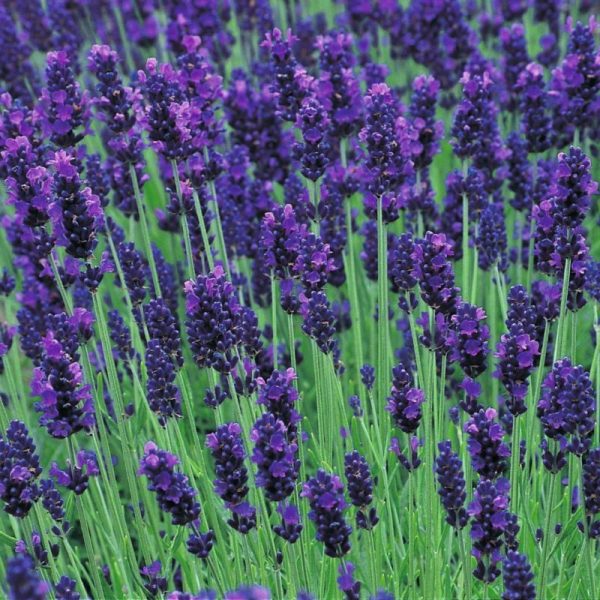
Lavender – Growing lavender is fun and has many uses including as a mosquito repellent and it’s a lot more plant to smell than some of the other options. If you don’t want to grow it you can purchase lavender soaps, essential oils, and lotions to use as a mosquito repellent.
Lemon Balm – This also smells a lot better than citronella or garlic and works well too. All you have to do is take the leaves and crush them and rub them on your body where the skin will be exposed.
Marigolds – Most people who grow vegetables tend to plant marigolds within, and for good reason. These magical flowers help banish many types of insects including mosquitoes. Of course, the smell is usually not that pleasant to humans either, but they’re not hard to look at or grow.
Peppermint – This delicious tasting and smelling plant is a great mosquito repellent. Bugs hate the smell and the flavor of them. You can either crush up the leaves or rub on skin or you can use an essential oil-infused lotion. Thankfully, peppermint is easy to grow because you’ll want to use it for mosquito repellent and for your mojitos. Buy peppermint essential oil here.
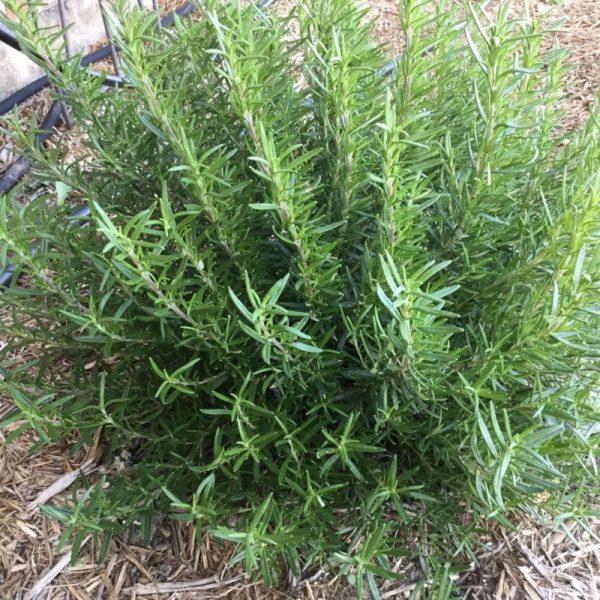
Rosemary – You can boil a cup of dried rosemary in a quart of filtered water for 20 minutes, and then strain into another quart of filtered water. Pour into individual spray bottles, to use when going outside where mosquitoes might be. Be sure to store the unused portion in the fridge.
These 10 plants to keep mosquitos away are much better to use than chemical bug compounds that contain DEET which is not only bad for you but the environment.
Are you terrified of snakes? Are you looking for plants that repel snakes? This is a list of the top 9 plants that are said to repel those slithery serpents!
As a disclosure, I’d like to say that these plants have not been scientifically proven to repel snakes. However, they have been traditionally used for many years by gardeners as well as in countries full of lots of dangerous snakes to keep these slithery creatures away. So while they can not be proven to work, there are many many people around the world that swear by them.
9 Plants That Repel Snakes
Before we go over how to repel snakes, I want to first state that certain snakes can actually be beneficial to have around. First of all, snakes eat mice and rats, which is definitely a plus. Also, certain snakes like the common black snake are said to help keep away poisonous snakes. However, even though my husband points these things out regularly to me, I still have an extreme fear of all snakes! Just seeing a snake will send me into a panic! If this is you, then this post is for you;) Here are 9 plants to help repel snakes!
Marigolds are said to be a plant that snakes do not like. The scent is something that drives them away. Plus they have such pretty flowers!
Lemongrass is another plant that is said to repel snakes. The scent of lemongrass is one that many insects and pests do not like.
AMERICAN PLANT EXCHANGE Sansevieria Trifasciata Snake Laurentii Live Plant, 6" Pot, Indoor Air Purifier
This plant is a plant commonly used in landscaping that is said to repel snakes. The difference between this plant and most snake repellent plants is that the snakes are not repelled by the scent of this plant. Instead, they are motivated to stay away from its sharp edges.
Andrographis Seeds (Andrographis paniculata) 100+ Rare Medicinal Herb Seeds
This plant is native to India and Sri Lanka. It is said to be used in these countries to help repel snakes with success.
Buttercup TURNER ULMIFOLIA - 2 Live Plants - 3.25" Pot
The Turnera Ulmifolia, also known as Yellow Alder, is also said to be a snake repellent plant. Plus it has a beautiful yellow bloom!
20 Society Garlic Seeds - Tulbaghia Violacea - both ornamental and kitchen Herb
The scientific name of this plant is Tulbaghia Violacea, but growing up we knew it as Society Garlic. And trust me, that is a very accurate name! This plant has a very pungent garlic scent. If you touch it, the smell will stay on your hands or clothes. My mother kept this plant in our flower beds when I was a child and the smell immediately takes me back to that time. What I didn't know as a child is that snakes greatly dislike the strong scent of these plants! Definitely a good thing in my book;) Plus these plants have lots of pretty purple flowers as well!
Mugwort is another plant that is commonly used to repel snakes. Add it to your garden to keep away the creepy-crawly pests!
Rauvolfia serpentine is also known as Indian Snakeroot. It is native to India and East Asia and is said to have been traditionally used to repel snakes.
Seed Needs, Wormwood Herb (Artemisia Absinthium) Twin Pack of 500 Seeds Each Non-GMO
Wormwood is another herb that is unappealing to snakes. Plant this in your garden to keep them away!
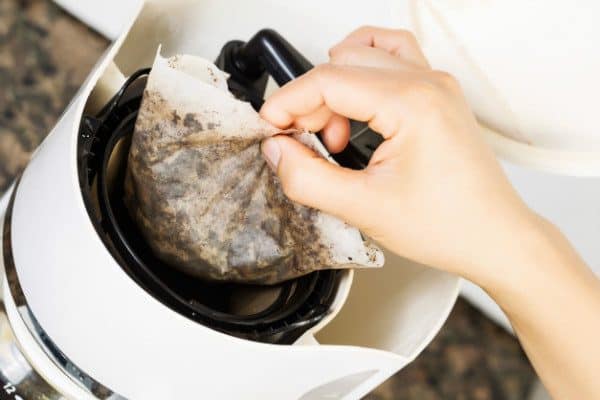
Whether you enjoy an occasional cup or have a pot-a-day habit, coffee is one of the most popular beverages to make at home. However, brewing coffee leaves behind unappealing dregs: coffee grounds. What to do with those old coffee grounds? While most of us immediately dump our coffee grounds into the trash, let them help your home inside and out. Here are three ways to use coffee grounds in the garden (and a few ways to use them in your house).
Ways to Use Coffee Grounds in the Garden
When used correctly, coffee grounds can be a great addition to your garden. Many gardeners find it is a safe, natural, and effective way to boost their gardens without using harsh chemicals or pesticides. Use them to boost blooms and berries, and to keep away slugs and snails. Use them in your compost pile to increase nitrogen levels in your soil.
Even if you aren’t a coffee drinker, you may be able to get the benefits. Contact local coffee shops or restaurants to inquire about picking up their grounds for use in your garden. If that doesn’t work, try asking one or more of your coffee-drinking neighbors to help you out.
Benefits of Using Coffee Grounds in the Garden as Fertilizer
Is coffee good for plants? Yes. The benefits of coffee grounds in the garden are fourfold.
Benefits of Coffee Grounds in the Garden
Aeration
Water Retention
Drainage
Earthworm Attraction
Aeration. Compacted soil is a problem for plants because the soil is compressed, meaning the roots of the plant are unable to get what they need. Aeration breaks up the soil and creates small holes through which oxygen, nutrients, and water can reach the roots. Healthy roots can become strong, and as a result, your plants strengthen.
Water Retention. Water retention is a problem in dry and arid regions, where droughts are common. Even drought-resistant plants are unable to get enough water, and they end up wilting and dying. Coffee grounds improve water retention in soil, and improved water retention means the plants will be able to do more with less water.
Drainage. On the other end of the water retention spectrum, poor drainage creates stagnant water and leave your plants vulnerable to diseases. Soil with good drainage ensures that the roots of the plant can receive the water they need while letting the excess flow away which helps to get rid of soil gnats. Coffee grounds help to break down the soil and allow for better drainage.
Earthworms. Love them or hate them, worms are fantastic for gardens. They move through the soil by tunneling, which creates natural vents through which oxygen and water can flow. They also eat organic matter, and their castings (excrement) contain nutrients that plants love. Coffee grounds are organic matter, so adding them to your garden will attract earthworms, which will, in turn, provide your plants with vital nutrients and drainage.
How to Use Coffee as a Fertilizer
Using coffee grounds to fertilize your garden is simple: work the grounds into the soil around your garden, and you’re set to go. Leftover coffee can work well, too, as long as it’s black or sweetened with real sugar — if you’ve used artificial sweeteners or milk, avoid introducing the grounds to your plants.
What about Soil pH?
You may have heard that coffee grounds will alter the pH level of your garden.
The short answer: unwashed coffee grounds will lower the pH level of your garden (raise the acidity), which is great for plants that like acidic soil, but hurts plants that prefer less acidic soil.
Washed coffee grounds have a pH level of 6.5, which is almost neutral. In layman’s terms, washed coffee grounds will neither increase nor decrease the acidity level of your soil, making them useful for all plant types.
Composting
Two Types of Compost Material
Green (Nitrogen)
Brown (Carbon)
One benefit to using coffee grounds in compost instead of using it as a fertilizer is that coffee grounds will increase the nitrogen levels in the compost and, thereby, in your soil. Plants get food from the sun, absorbing ultraviolet light and converting it into food. The process of using sunlight to create food is called photosynthesis. For a plant to properly photosynthesize, it needs nitrogen. Used coffee grounds, as well as used filters, make great compost.
One thing to keep in mind: compost piles need equal amounts of green compost material and brown compost material to benefit your garden. Without a proper balance, your compost pile may not break down and might even start to smell bad.
Green compost material consists of material high in nitrogen such as old food, grass clippings, and manure. Brown compost material is high in carbon and includes dried leaves, chips of wood, hay, and sawdust.
If you add coffee grounds (green material) to your pile, be certain to add brown material as well.
Keep Pests Away
Does your garden attract unwanted visitors like slugs and snails? Sprinkle coffee grounds around the edges of your garden plot and atop the soil to repel pests. Slugs and snails dislike caffeine, so they avoid soil with high caffeine content. Spread some coffee grounds through your garden, and your pest problem is solved. It’s also thought that the grounds will repel cats and serve as a welcome homemade rabbit repellent, keeping them from using your garden as their personal pantry or litter box.
You also know that earthworms are good for gardens, and here’s another reason why: earthworms like to eat the pests who like to eat your plants, such as spider mites and aphids. See more on how to kill spider mites here.
Coffee grounds will attract worms — who will then take care of the mites and aphids.
You’re looking at a double-win.
What Plants Like Coffee Grounds?
Coffee grounds should be used to help boost specific plants. Many acid-loving plants can benefit from having fresh coffee grounds mixed into their soil. However, be careful where you put your coffee; while some plants thrive with the minor acidic soil, others will not farewell.
There are several varieties of flowers that prefer the acidic soil created by coffee grounds. Hydrangeas, lilies, and azaleas are all flowering plants that thrive when adding coffee grounds to their soil. Experienced gardeners know that coffee grounds can do more than just improve the soil – they can also make the flowers change colors! Adding coffee grounds around hydrangea plants can help their blooms sprout a vibrant blue, no matter the original color.
Plants That Prefer Acidic Soil (from Coffee Grounds)
Hydrangeas
Azaleas
Roses
Fruit Plants like Blueberries etc.
Root Crops vegetables, like Carrots and Radishes
Coffee grounds can also help your vegetable beds. Crops like carrots and radishes do especially well by adding coffee to the soil during planting. Likewise, fruit plants like blueberry bushes can also benefit.
Coffee grounds should be applied with care, however. Although they help many plants flourish, their properties can hurt others. Coffee grounds have allelopathic properties, which can suppress some weeds. However, this can cause harm to plants, such as tomatoes.
Additional Uses for Coffee Grounds
Use coffee grounds inside your home. Here a couple of creative ways to use coffee grounds in your home.
Freshen flower vases. Cut flowers last longer when placed in coffee grounds; the grounds also serve double duty by serving as an air freshener.
Make dirt play dough. Adding coffee grounds to homemade Play-Doh can create realistic dirt, perfect for playing with plastic worms and hauling around in toy-sized dump trucks.
Fill pincushions. Filling a pin cushion with coffee grounds can prevent pins from rusting – as well as letting out a pleasant aroma each time you use it. Dry the grounds before placing them inside the pincushion by spreading them into a thin layer and placing in the freezer for several hours.
Scour baked-on stains. Use coffee grounds as a natural way to clean baked-on bits on pots and pans. Together with some vinegar it will clean pots and make them look new. However, because this can cause discoloration, it should not be used with ceramics or any other dishware that can stain.
Freshen hands after chopping onions. If cutting onions, garlic, or other vegetables leave your hands smelly, coffee grounds can help absorb the odor. Rub grounds onto your hands before washing to eliminate strong smells that might otherwise linger for hours – or days.
Deodorize your fridge. A bowl of coffee grounds can be used in place of baking soda deodorize refrigerators and freezers.
Drink Coffee, Garden Happy
Brewing up a fresh pot of coffee as you read this article? Now you know what to do with the grounds once you’re finished with your pot of java. In this article, you learned three ways to use coffee grounds in the garden. You learned the benefits of coffee grounds in the garden, and you learned what plants like coffee grounds. You also got a few tips for how to use your leftover coffee grounds around the house for those winter months.
Do you have a friend who is a coffee lover and loves gardening? Use the buttons below to share to Facebook, Twitter, and Pinterest.
Orchids (Phalaenopsis) are the revelation in terms of indoor plants. Most of us imagine that the orchid is a fragile plant, short-lived. But orchid flowers resist months in a row! But after the blooming ends, how can we trigger the reblooming? Here are some things to consider:
Both during blooming and in between the blooming intervals, the plant roots must at all times hold an adequate moisture level. In the summer, water the orchids every 7-10 days, and once every two weeks in winter. Very important: don’t let the water to puddle in the pot.
Another problem is the low humidity in homes, in winter. Avoid placing the orchid near radiators! Put the pot on a tray with gravel with enough water. The water that will evaporate will create an environment that will make the perfect climate for the orchid.
Fertilization
Fertilization is as important as watering and orchid should receive fertilizer once a month. You can find commercial fertilizer special for orchids. We recommend organic fertilizer because they are not pollutants.
Light
Neither too much nor too little. Most orchids refuse to bloom because they don’t have enough light. Note that orchids like natural light, but they suffer if placed in direct sunlight.
Chilly nights
A difference between day and night temperature (of 5-10 degrees Celsius) will stimulate the plant to resume blooming. If it is difficult to create this condition, you can place it for several days in a cool, shady place.
The pot
Orchid has aerial roots. So, besides the humidity, they must be well ventilated. You can kill two birds with one stone if after blooming you move the plant (not disturbing the roots too much) in a pot with side holes.
Warnings and Tips:
– The best method of watering is dipping the pot in a bowl of water for 5 minutes.
– Important: After watering, allow the pot to drain so that water doesn’t puddle on the plate!
– Avoid watering the leaves.
– Water the orchid only in the morning, never during the night!
– Orchids love tannins. So you can add a cork from a bottle of red wine in the soil, cut into small pieces.
– Very important: the growing tip of the plant (located at the base of the plant, in the center of the rosette) must always remain dry!
When it comes to trying to find a better way to grow cucumbers – we are always up for the challenge.
After all, cucumbers are one of our family’s favorite vegetables.
Not only are they amazing fresh from the garden, cucumbers, of course, but are also a necessity when it comes to making pickles.
And without homemade pickles, life would be difficult indeed! See: Our Favorite Pickle Recipes
And so last year, as one of our yearly garden experiments, we set out to see if we could find a simple way to add to our cucumber harvest – without adding additional space to our existing garden.
To do that, we turned to 2 simple straw bales – and the results were simply amazing!
Straw bale gardening has soared in popularity in recent years. Straw bales can be a great answer for those without space or time for a large garden.
And as we found out last year, they can be perfect for growing a bumper crop of cukes.
The Straw Bale Cucumber Experiment – How To Grow Cucumbers With Ease
For starters, the height of the straw bale is ideal. It allows a perfect space for cucumber vines to spread down and around the bale.
In addition, the straw surrounding the planting soil in bales holds and retains moisture perfectly. And if there is one thing that helps to grow cucumbers successfully – its adequate water!
Planting cucumbers in straw bales also keeps weeds and weeds to an absolute minimum.
This is great for the gardener – and the plants. Fewer weeds mean less competition for nutrients.
Planting
To plant our straw bale cucumbers, we cut 3 evenly spaced holes in the shape of a triangle on top of the bale. We made each hole approximately 8” deep and 6” in diameter.
We used a reciprocating saw with a 12″construction blade to cut out the holes. It works incredibly fast.
If you don’t have one, a simple knife or blade will complete the job too.
Next, we filled the holes with our super soil mix. It is a mixture we make from compost, potting soil and worm castings.
It works wonders for our pots, planters and hanging baskets, so it was a natural for our straw bale planting too.
Then we simply planted, watered, and watched our cucumbers grow!
We watered as needed, and fertilized a few times early on with worm castings at the base of the plants.
And they took off! So fast, that within about 4 weeks, you simply couldn’t see the bale anymore.
We planted Boston Pickling cucumbers in our bales. They are a great choice for pickling and obviously – straw bale planting.
The cucumber plant’s roots thrived in the soil and compost mix. And by the season’s end – the roots had grown throughout the bale.
We let the foliage and blooms trickle and grow over the bales to the ground below. They even grew up the fence behind the bale as well.
Hey there! My name is Chipp Marshal. In this article I am going to show you how to rid of ants quickly, naturally and permanently with an amazing new technique, I just learned.
I am sure that I don’t need to tell you how much of nuisance ants
can be. However, what most people fail to realize is that certain species of ants pose serious health risks by infecting your kitchen with harmful pathogens. So it is important that we get rid of these pesky insects as fast as possible.
Before we begin, I would just like to ask that if you find the information in this article to be helpful, please do me a huge favor and share this page on your favorite social media network (Pinterest, Facebook, Twitter, etc.). Your support allows me to continue doing what I love, which is providing free information like this that helps folks solve their pest control problems.
A New Age Solution for Ant Control
Rather than leaving toxic bait stations all around the house, we are going to roll up our sleeves and take the fight to the ants. Besides, the main ingredient in most bait stations available to consumers is boric acid. It is usually mixed with various sugary substances to attract the ants. The problem is that there are many different species of ants and they all have different preferences for food. These preferences even change throughout the year. Boric acid and sugar may work for getting rid of ants during certain seasons but it will have zero effect in almost every other situation. Using these outdated methods are a gamble at best.
I am going to teach you a method that I have used every single spring for the last 5 years to get rid of ants for the entire season. In addition to my experience, there is also scientific research that backs up my findings. It is the quickest, easiest and best way to get rid of ants in your house. You may already have these ingredients around the house. If you don’t, your entire cost will still be less than $20 dollars. That’s not bad to eliminate ants for the entire season!
Did you know?
The total mass of every ant on this planet is just about equal to the total mass of all living people! How is this possible? Scientists estimate that for every human on earth, there are close to 2 million ants!
How to Get Rid of Ants Naturally
Harsh chemicals always come with unintended consequences. You DO NOT need to use harmful insecticides to get rid of ants. This recipe is a safe, quick, natural and highly effective. This method is actually very popular with organic gardeners. Unfortunately, not many people outside of that community know about it.What you will need:
Water
Cayenne Pepper (spice)
100% natural therapeutic grade (undiluted) tea tree essential oil
Warning: Not all essential oils are created equal. Make sure you purchase 100% undiluted oil. Each bottle is very inexpensive and will last you for a few seasons. The ones that I use are listed below. I bought a bottle of each in the spring of 2013 and I still have plenty left for this season.
How to Eliminate Ants that are Already Inside of your Home
Before you eliminate ants at their source, you are going to need a game plan for the critters that already invaded your home. Fill a spray bottle with water and add the following ingredients:
20 drops of tea tree oil
20 drops of peppermint oil
1 tsp cayenne pepper (spice)
This cocktail will kill ants on contact. It will also provide a POWERFUL deterrent along ant trails and inside of any cracks or crevices where they are entering your home.
Getting Rid of Ant Outside of Your Home
Now that we have that out of the way, let’s take the fight straight to the nest. This step will require a little more effort but if done properly, you can get rid of your ant problems for the entire year.
Boil a large pot of water.
Add a couple of teaspoons of cayenne pepper, 20 drops of tea tree oil and 20 drops of peppermint oil.
Trace ant trails back to their nest. Once you find out where they are coming from, drive a stake into the nest to create a void for the hot water to flow through. I use a 1-inch stake and try to drive it at least 18 inches into the soil.
Remove the stake and slowly and CAREFULLY pour the hot water into the nest. The hot water will kill a large portion of the population and the cayenne pepper and tea tree oil will make the ground unsuitable the rest of the season for an ant colony. Repeat this process for each ant hole you find.
Arthritis wears away at the cartilage of a joint, which is the cushioning material between bones.
This can cause inflammation and irritation of the synovial lining, which produces the synovial fluid that helps protect and lubricate the joint.
When arthritis affects the joints of the hands, it can cause pain and stiffness. That pain can get worse whenever you use your hand a lot for repetitive tasks.
For example, typing on a computer keyboard or gripping utensils in the kitchen can cause discomfort. You may also lose strength in your hands.
Weakness in your hands can make it hard to do even the simplest everyday tasks, such as opening jars.
Treating hand arthritis
There are some medicinal options for treating hand arthritis.
You can take oral pain-relieving medications. You can also get steroid injections in your joints, and splint your hands to give them support.
If these options don’t work, you may need to have surgery to fix the damaged joint.
There are also many home treatments you can use to reduce the pain and disability of arthritis.
One easy and noninvasive way to keep the joints flexible, improve range of motion, and relieve arthritis pain is by doing hand exercises.
Hand exercises can help strengthen the muscles that support the hand joints. This can help you perform hand movements with less discomfort.
Movement can also help to keep ligaments and tendons flexible, which can help improve range of motion and hand function.
Finally, exercise can increase the production of synovial fluid, which can also improve joint function.
Exercise #1: Make a fist
You can do this easy exercise anywhere and anytime your hand feels stiff.
Start by holding your left hand out with all of your fingers straight.
Then, slowly bend your hand into a fist, placing your thumb on the outside of your hand. Be gentle, don’t squeeze your hand.
Open your hand back up until your fingers are straight once again.
Do the exercise 10 times with the left hand. Then repeat the whole sequence with the right hand.
Exercise #2: Finger bends
Start in the same position as in the last exercise, with your left hand held up straight.
Bend your thumb down toward your palm. Hold it for a couple of seconds.
Straighten your thumb back up.
Then bend your index finger down toward your palm. Hold it for a couple of seconds. Then straighten it.
Repeat with each finger on the left hand. Then repeat the entire sequence on the right hand.
Exercise #3: Thumb bend
First, hold your left hand out with all of your fingers straight.
Bend your thumb inward toward your palm.
Stretch for the bottom of your pinky finger with your thumb. If you can’t reach your pinky, don’t worry. Just stretch your thumb as far as you can.
Hold the position for a second or two, and then return your thumb to the starting position.
Repeat 10 times. Then do the exercise with your right hand.
Exercise #4: Make an ‘O’
Start with your left hand out and fingers straight.
Curve all of your fingers inward until they touch. Your fingers should form the shape of an “O.”
Hold this position for a few seconds. Then straighten your fingers again.
Repeat this exercise a few times a day on each hand. You can do this stretch whenever your hands feel achy or stiff.
Exercise #5: Table bend
Place the pinky-side edge of your left hand on a table, with your thumb, pointed up.
Holding your thumb in the same position, bend the other four fingers inward until your hand makes an “L” shape.
Hold it for a couple of seconds, and then straighten your fingers to move them back into the starting position.
Repeat 10 times, and then do the same sequence on the right hand.
Exercise #6: Finger lift
Place your left-hand flat on a table, palm down.
Starting with your thumb, lift each finger slowly off the table one at a time.
Hold each finger for a second or two, and then lower it.
Do the same exercise with every finger of the left hand.
After you’re done with the left hand, repeat the entire sequence with the right hand.
Exercise #7: Wrist stretch
Don’t forget about your wrists, which can also get sore and stiff from arthritis.
To exercise your wrist, hold your right arm out with the palm facing down.
With your left hand, gently press down on the right hand until you feel a stretch in your wrist and arm.
Hold the position for a few seconds.
Repeat 10 times. Then, do the entire sequence with the left hand.
Outlook for arthritis in hands
Make these exercises part of your daily routine for the best results.
Talk to your doctor if these exercises become difficult for you to do. Your doctor can recommend more specific exercises for you, or other treatments to help your pain.
Pain in the neck’— this phrase is often used derisively to imply a nagging annoyance. The person who coined this idiom must have lived through some real-life, physical neck pain. A painful neck can become a huge annoyance and make the simplest of tasks seem mountainous. Neck pain results in a sharp or dull ache in the neck and shoulder areas. It might also cause numbness, headache, stiffness, and difficulty while eating. Read on to learn about how to relieve neck pain at home.
You may end up with neck pain due to bad sleeping postures, tension and/or stress, long hours of leaning, lying on an excessively soft mattress, or bad body postures. An injury on the neck and muscle tension have become the root causes of neck pain in many individuals today. It is important to counteract the problem at the onset to cure the pain and prevent it from becoming worse.
The best way to heal neck pain is through chiropractic care. The good news is you can find relief with these simple home remedies.
Here are some of the best home remedies for neck pain that you can try to find some relief.
Simple Solutions To Alleviate Neck Pain
1. Exercises
2. Yoga
3. Essential Oils
4. Acupuncture
5. Apple Cider Vinegar
6. Massage Therapy
7. Ice Pack
8. Vitamins
9. Epsom Salt
10. Neck Collar
1. Exercises
Exercise can help greatly in relieving neck pain. Doing strengthening exercises and stretching will make your neck flexible and strong and reduce stiffness. Poor stomach muscles can cause your upper back to curve backward and result in your neck curving forward. Exercises, such as bent knee curls, will help in strengthening your abdominal muscles.
You can get instant relief from neck pain by performing a simple set of exercises. All you need to do is follow these steps:
Nod your head forward and backward for some time and then gradually start nodding from one side to the other.
Once your muscles feel less tense, slowly turn your head completely towards the left, and then completely towards your right. This might hurt a bit, so take it slow.
Repeat this exercise for at least 20 repetitions.
Do this exercise every few hours and you’ll find the stiffness in your neck vanish.
2. Yoga
Stress can also induce muscle tension. Pay attention to what stresses you and sort them out to get rid of neck pain. You can follow relaxation techniques, such as meditation and yoga. The asanas listed below work well for neck pain.
Bharadvajasana – This twisting pose will relieve the tension in the neck and shoulder muscles and alleviate pain.
Marjariasana – The Cat Pose will stretch out your spine and back muscles to relieve neck pain.
Uttana Shishosana – This pose will extend your spine like the Marjariasana and also increase blood flow to the neck and head.
Balasana – The Child Pose is a simple asana to gently stretch the neck and back. Use this asana as a resting pose in between the other poses.
Savasana – This relaxation pose will calm the mind and body and relieve stress.
3. Essential Oils
You Will Need
A few drops of peppermint oil
A few drops of lavender oil
A Few drops of basil oil
A few drops of cypress oil
1 teaspoon olive oil
What You Have To Do
Make a blend of the essential oils.
Mix a few drops of this blend with warm olive oil.
Massage this oil on the neck for a few minutes.
You can also use these oils individually or make any combination of the oils. Do not forget to dilute it in the carrier oil.
How Often You Should Do This
Apply this twice a day.
Why This Works
Peppermint oil has a soothing effect on the muscles and is often used to treat headaches and body pain. It also has anti-inflammatory properties. Lavender oil relaxes the mind and the muscles, thus relieving mental and/or physical stress. Basil oil is antispasmodic and analgesic in nature and will effectively reduce neck pain. Cypress oil treats muscular cramps and sore muscles. It also stimulates blood and lymph circulation.
4. Acupuncture
Acupuncture – a method in which tiny needles are inserted in specific and strategic points of the skin – has been widely used to treat any kind of pain. These points, when activated by the acupuncture, regulate the functioning of the body and also the circulation of blood and lymph in order to relieve pain. Consult a certified therapist to treat your neck pain through acupuncture.
5. Apple Cider Vinegar
You Will Need
Apple cider vinegar
A paper napkin or tissue
What You Have To Do
1. Soak the napkin in the vinegar and place this on your neck. 2. Leave it on for an hour or so.
How Often You Should Do This
Repeat this twice a day until you get relief from the neck pain.
Why This Works
Apple cider vinegar is an excellent home remedy for neck pain and stiffness. The antioxidants and anti-inflammatory agents present in ACV will relieve the stress in the neck muscles and thus reduce the pain.
6. Massage Therapy
You Will Need
Olive, mustard, or coconut oil
What You Have To Do
1. Take a hot shower and pat your skin dry. 2. Lightly warm up a tablespoon of the oil and massage your neck with it. 3. Use gentle circular motions for a couple of minutes.
How Often You Should Do This
Repeat this every morning. You can also massage your neck once again during the day.
Why This Works
A massage can heal any pain in the body. A gentle massage or rub the aching area to stimulate blood flow. A massage will help you sleep better too.
Caution
Don’t rub the injured area if it causes excess pain.
7. Ice Pack
You Will Need
Ice cubes
A small, thick towel
OR
Ice pack
What You Have To Do
1. Place the ice cubes inside the towel and place it on the area that is aching. 2. Alternatively, you can cool the ice pack and place it on the affected area. 3. Place the pack for a couple of minutes.
How Often You Should Do This
Repeat the ice application three to four times a day.
Why This Works
Ice helps to reduce inflammation and muscle soreness in the neck.
8. Vitamins
Vitamins play a key role in maintaining the healthy functioning of the body. When their quantities start decreasing in the bloodstream, a number of issues develop. One such issue is a pain, both acute and chronic. If you frequently suffer from neck pain, including these essential vitamins in your diet will help you to get relief.
Vitamin D is vital for bone development and health. When it is in deficit, the body tends to develop chronic pain in different areas, especially around the joints.
Vitamin B complex is a natural analgesic agent. It reduces pain and inflammation of both neuropathic and musculoskeletal origin.
Vitamin C is an antinociceptive agent, which means that it increases the threshold of pain. It contains antioxidants that increase this threshold by mitigating the pain.
Magnesium can also be very beneficial to supplement to help relax muscles.
9. Epsom Salt
You Will Need
1-2 cups Epsom salt
Warm water
A bathtub
What You Have To Do
1. Fill three-fourths of the bathtub with warm water and add the Epsom salt to it. 2. Mix the salt in the water and soak in this for 10 to 15 minutes.
How Often You Should Do This
Soak in the Epsom salt water twice a day.
Why This Works
Epsom salt contains sulfate and magnesium, which helps in regulating several enzymes in the body. It also increases blood circulation and reduces stress and muscle tension (12).
10. Neck Collar
You Will Need
A neck collar or brace
What You Have To Do
1. Wrap the collar around your neck and keep it on until the pain subsides. 2. At regular intervals, remove the collar and stretch your neck and shoulder muscles.
How Often You Should Do This
Use the collar as and when required to relieve neck pain.
Why This Works
The main purpose of the neck collar is to support the neck in bearing the weight of the head when it is healing from the pain. In case of injury, the collar will also keep the bones in your neck in line while they are healing.
Medical Disclaimer
The information on this site is not intended or implied to be a substitute for professional medical advice, diagnosis or treatment. All content, including text, graphics, images and information, contained on or available through this web site is for general information purposes only. Krobknea makes no representation and assumes no responsibility for the accuracy of information contained on or available through this web site, and such information is subject to change without notice. You are encouraged to confirm any information obtained from or through this web site with other sources, and review all information regarding any medical condition or treatment with your physician. NEVER DISREGARD PROFESSIONAL MEDICAL ADVICE OR DELAY SEEKING MEDICAL TREATMENT BECAUSE OF SOMETHING YOU HAVE READ ON OR ACCESSED THROUGH THIS WEB SITE.