Design a Fashion Magazine Cover in Adobe InDesign


Final product image
What You'll Be Creating
Magazine covers can showcase really creative design work. They can be aspirational, glamorous, or even iconic; and fashion covers are at the creative forefront of the magazine industry.

In this tutorial you’ll learn how to create your own cover for a fictional fashion magazine, with a glamorous winter feel. We’ll explore how to use layer images and text to create a dynamic, three-dimensional design, select and apply typography effectively and appropriately, and account for practical issues like pricing and binding.

You’ll need Adobe InDesign for this tutorial, and we’ll also be hopping over to Photoshop to do some image editing.
In this tutorial, we’ll be creating a magazine at a standard US size, 8 3/8 inches by 10 7/8 inches, although we’ll be working in millimeters throughout.

It’s important to note that we will be creating a front cover design only in this tutorial. If you are intending to prepare a final magazine cover for printing and binding, you will need to double the length of the document to accommodate a back cover, plus add an extra amount specified by your printer to allow for the width of the spine.
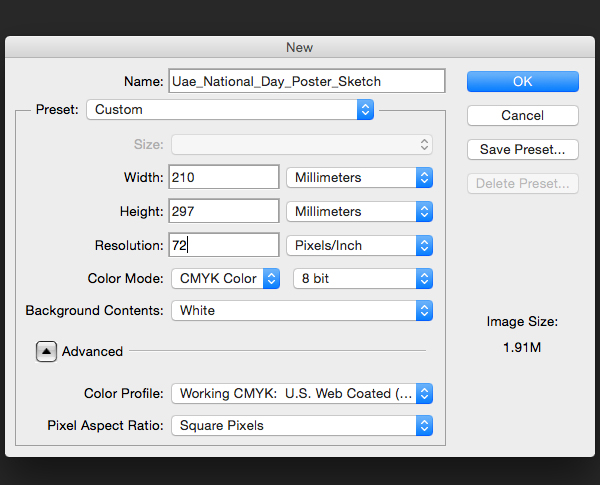
Open InDesign. In the welcome window, select New Document, or go to File > New > Document. Set the Intent to Print and No. of Pages to 1, and uncheck Facing Pages.

From the Page Size drop-down menu select Custom... and type US Magazine into the text box at the top of the window that appears. Set the Width to 213 mm and the Height to 276.5 mm (this equates to 8 3/8 in by 10 7/8 in). Click Add and then OK.
custom page size
Back in the New Document window set the Top, Bottom and Left Margins to 8 mm, and the Right Margin to 4 mm. Set the Bleed on all sides to 3 mm.
new document window
Click OK.
new document
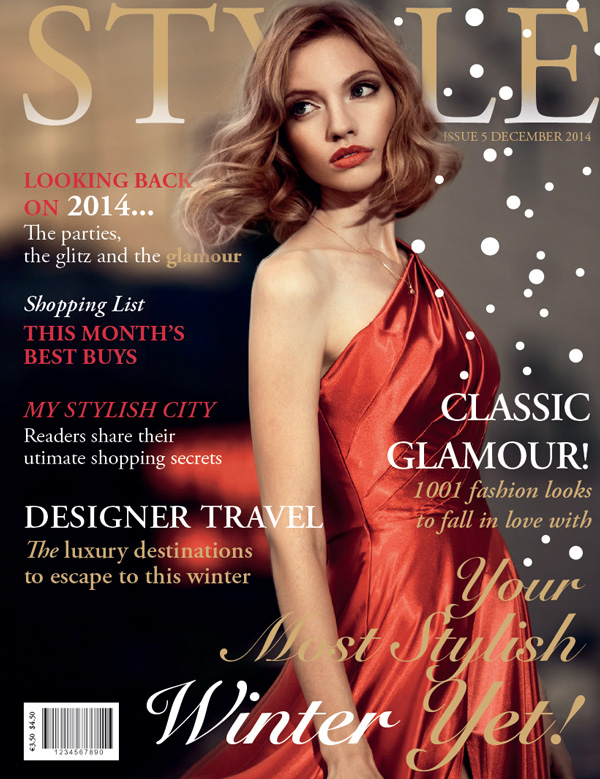
To create the effect shown below, where the magazine title crosses behind the image of the woman, but remains in front of the background of the photo, we’ll need to split the image using Photoshop.
image on cover
Save two copies of your chosen cover image on your computer. One version of the image we’ll keep as it is (save with ‘original’ in the filename), but the other image we’ll be editing to separate the image of the woman from the background of the photo.

Open Photoshop. File > Open the copy of the image you’re going to edit. Here, I’ve used this glamorous shot of a woman in a red dress.

Duplicate the Background layer to keep an intact copy of the image while you work. Switch off the visibility of the original Background layer.

What we want to do is to roughly cut out the image of the woman, and move it onto a separate layer. Select the Polygonal Lasso Tool (L) from the Tools panel (Window > Tools) and magnify the image to 300%.

Set the Feather to 30% from the top control panel and use the Lasso Tool to roughly create a path around sections of the edge of the woman, as shown, spilling into the background. Draw a little more carefully around the hair.
lasso tool in photoshop
Go up to the Refine Edge button in the top control panel. Check Smart Radius and set the Radius to around 70 px. Add a little Smooth and Feather, and Shift the Edge a little if needed. You can add or erase parts of the selection using the Refine Selection tools at the left of the window.
refine edge option
Once you’re happy with your selection, check Remember Settings and click OK. Delete the selection to erase the background of the image. Repeat around the whole edge of the woman until you have a layer with just the woman alone. Don’t worry if your edges don’t look perfect, as we’ll be layering the woman back on top of the background of the photo in InDesign, so it will look seamless.
delete background of image
Go to File > Save As and save the image as a PSD file, with something like ‘edited version’ or ‘no background version’ in the filename.
Return to InDesign. Open the Layers panel (Window > Layers) and double-click on the default Layer 1 name, to open the Layer Options window. Rename the layer as Background Image and click OK.
layer options
From the Tools panel select the Rectangle Frame Tool (F) and drag to create an image frame that extends across the whole page, right up to the edge of the bleed on all sides.

Go to File > Place and select the original, non-edited cover image. Click Open. Select Fill Frame Proportionally from the top control panel to arrange the image nicely in the frame.
Background Image layer
Lock the Background Image layer in the Layers panel.
Create a second layer by selecting the Create New Layer icon at the bottom right of the Layers panel. Double-click the default layer name as before, and rename the layer as Foreground Image. Click OK.

Select the Rectangle Frame Tool (F), as before, and drag to create an image frame that extends across the whole page, right up to the edge of the bleed on all sides.

Go to File > Place and select your edited image, the version without a background. Click Open, and then Fill Frame Proportionally as before, making sure the size of this image exactly matches the proportions of the background image.

Here, I’ve switched off the visibility of the Background Image layer to show you how the Foreground Image layer should look.
Foreground Image layer
Switch the visibility back on, for both layers, and Lock the Foreground Image layer.
layers panel
Return to the Layers panel and Create a New Layer, renaming it as Typography Behind. 
Grab the layer in the panel and move it to sit below the Foreground Image layer and on top of the Background Image layer.

Select the Type Tool (T) and drag to create a text frame about 205 mm in Width and 48 mm in Height. Sit this at the top of the page, as shown, positioning the frame closer to the right-hand margin than the left-hand, to allow a bit of space for where the magazine will crease once folded.

Type the name of the magazine into the text frame and set the Font to Adobe Garamond Pro Regular, Size 174 pt, All Caps, and Tracking to 20. It’s fine for some of the text to disappear behind the woman’s head, but you can insert a few extra spaces or increase the kerning between characters that sit directly behind the image, so that some parts of the letter can appear, visually constructing the whole title for the reader.
Set the Font Color of the title to [Paper].
cover header
Select the text frame and Edit > Copy and Edit > Paste in Place.
Open the Swatches panel (Window > Color > Swatches) and select the New Swatch icon. Create a new CMYK Swatch, a lovely gold color, C=20 M=31 Y=65 K=0. 
Swatch Options
Set the Font Color of the pasted, second text frame to this new gold swatch.
Font color
With the top text frame selected, go to Object > Effects > Gradient Feather. Set the Type to Linear and Angle to -90 degrees. Adjust the Gradient Stops so they are quite closely clustered together, as shown below.
gradient feather
This gives a subtle gradient effect to the text, making it look as if the text has been dipped in snow.
gradient effect on header
Remaining on the Typography Behind layer, select the Type Tool (T) and drag to create a small text frame. Position this just below the magazine title, to the far right of the page.

Type in the issue number and date, setting the Font to Adobe Garamond Pro Regular, Size 13 pt, All Caps and the orientation of the text to Align Right. Set the Font Color to C=20 M=31 Y=65 K=0. 
typography on header
If you look at examples of fashion magazine covers, you’ll notice that they are often crammed with sub-headings and article teasers. However, the cover will rarely look over-crowded. This is because the central image draws the eye, creating a central focus to the design. The text is also likely to be set in the same font and/or a complementary color palette.
Remaining on the Typography Behind layer, select the Type Tool (T) and drag to create a text frame about 87 mm in Width and 34 mm in Height. Type a sub-heading and a short description, as in the example below, and set the Font to Adobe Garamond Pro. Position the text frame below the magazine title, in the top left-hand corner of the page, resting the left edge of the frame against the left margin.

Select different sections of the text and vary the Font Size from 22 pt to 31 pt, and also vary the weight from Bold to Regular. Set the sub-heading in All Caps, and highlight individual words or phrases in [Paper] or C=20 M=31 Y=65 K=0. 

Add two new Swatches from the Swatches panel, a bright berry red, C=9 M=96 Y=81 K=2, and a darker red, C=23 M=97 Y=85 K=18.
Swatches panel with new colors
Set some of the text in one of the red swatches, to add contrast and depth to the cover.
caption typography
Introduce two more text frames on the Typography Behind layer, positioning them on the left-hand side of the page, resting against the left-hand margin.

Maintain the Font as Adobe Garamond Pro, but experiment with varying the Color and Weight (Bold, Italic, Regular, etc.) of the text. Keep the sizing within a range of 21 pt to 23 pt.
building up typography
Create a New Layer in the Layers panel, sitting above the Foreground Image layer, and rename it Typography in Front. 
Typography in Front layer
As in Step 2, create a couple of new text frames using the Type Tool (T) and vary the Font Size, Weight and Color of the text, as shown below.

Position one of the text frames to the right-hand side of the page, resting the right edge against the right-hand margin. Align the top edge of the text frame with the fourth text frame down on the left-hand side of the page.

Try increasing the Size of the sub-heading in this text frame to 40 pt, so it stands out a little more than the other sub-headings on the cover.

If your text is going to extend across the image of the woman, try setting the Font Color to [Paper] to allow it to really contrast and stand out.
Caption typography
A common tactic used on magazine cover designs is to introduce a second typeface to draw attention to a particular article in the issue. This should contrast against the other typeface, e.g. be more ornamental or decorative, but still complement the overall style of the cover.

In this example, I’ve used Snell Roundhand LT Std, which has a glamorous aesthetic.
Remaining on the Typography in Front layer, select the Type Tool (T) and drag to create a text frame about 158 mm in Width and 67 mm in Height. Position this in the lower right corner of the page.

Type "Your (paragraph break) Most Stylish (paragraph break) Winter Yet!" Set the text in Snell Roundhand LT Std, Bold Script, and the Font Color to C=20 M=31 Y=65 K=0.
Set the first line of text to Size 60 pt, Leading 72 pt, the second line to Size 69 pt, Leading 61 pt, and the final line of text to Size 83 pt and Leading 83 pt. Highlight "Winter" alone and set the Font Color to [Paper].
Snell Roundhand font
Lock the Typography in Front layer.
We can add this final flourish to our cover to make it look particularly wintry, perfect for magazine issues being published in the winter months.
Create a New Layer in the Layers panel, sitting above the Typography in Front layer, and rename it Snow.

Select the Ellipse Tool (L) and, holding down Shift, drag to create a small perfect circle about 3 mm in diameter. Set the Stroke Color to [None] and Fill Color to [Paper]. 

Now simply select the circle shape with the Selection Tool (V, Escape) and Edit > Copy, Edit > Paste repeatedly. Adjust the size of some of the circles, while holding Shift, to make the snow appear more natural.

Dot the circles around the right-hand side of the cover, allowing just a couple to cross in front of the woman and the magazine title. Be reasonably sparing and try not to obscure any of the typography.
snow effect using ellipse tool
Your cover design’s looking fantastic! Great work!
almost complete cover
Now you just need to add a final essential touch to the design. Unless you’re planning to distribute your magazine free, you’re going to need a barcode and pricing.

Select the Rectangle Frame Tool (F) and drag to create a small rectangular image frame about 34 mm in Width and 20 mm in Height. Set the Fill Color to [Paper]. Position the frame in the bottom left-hand corner of the page, resting against the margins.

Once you have a barcode image prepared, go to File > Place and Open your image, before arranging proportionally in the frame, leaving a little more room to the left-hand side of the frame.
Select the Type Tool (T) and create a small narrow text frame. Type the price of the magazine in whichever currency or currencies are appropriate, and set the Size to 8 pt.

Select the text frame and Right-Click (Windows) or Control-Click (Mac OS) > Transform > Rotate 90 degrees CCW. Position the text frame at the left-hand side of the barcode frame.
bar code and pricing
As recommended at the start of the tutorial, you should expand the Width of your cover to accommodate for a back cover and a spine before exporting for print (try using the Page Tool (Shift-P) to adjust the page size easily). If you’re using the cover for a digital (ePub) version of your magazine, you can maintain the page size as it is.

If you’re producing a hard copy of your magazine, you can export the cover to PDF for printing. Go to File > Export... to open the Export window. Select Adobe PDF (Print) from the Format drop-down menu. Name the file and click Save.
In the Export Adobe PDF window, select Press Quality from the Adobe PDF Preset drop-down menu.
export to PDF
Under the Marks and Bleeds section, click to select All Printer’s Marks under the Marks menu, and click to select Use Document Bleed Settings under the Bleed and Slug menu. Click Export.
All printers marks
Well done! You now have your magazine cover ready to be sent to the printers. Specify a minimum paper weight of 170 gsm (maximum weight of 250 gsm) for a beautiful printed result.
final cover design
In this tutorial, you have learned how to design a glamorous and audience-appropriate magazine cover, including how to layer images to create a three-dimensional effect, as well as how to apply typography to create a harmonious design. Great work!

Create a UAE National Day Poster Design in Adobe Illustrator


Final product image
What You'll Be Creating
In the United Arab Emirates (UAE), National Day is celebrated each year on December 2, with amazing fireworks, festive shows, concerts, heritage displays, and a no-work holiday for everyone!
The day marks the UAE's formal nationalization, which was when the seven emirates were united under one flag to form the United Arab Emirates. The seven emirates (Abu Dhabi, Dubai, Sharjah, Ajman, Umm Al Qaiwain, Ras Al Khaimah, and Fujairah) are headed by Sheikh Khalifa bin Zayed Al Nahyan, the federation's president. Dubai being the largest and most popular Emirate, I’ve decided to create a National Day poster showcasing the city’s iconic landmark and the world’s tallest tower, Burj Khalifa.

In this tutorial, we will use some new Adobe Illustrator features and enhancements, as well as the more traditional tools, to create a festive graphic style poster for the UAE National Day holiday.
Let the celebrations begin!                              
We start by sketching out the idea for our design. I suggest you browse online for images of the UAE, Dubai, and Burj Khalifa tower, to help you visualize the elements for your creation. When I sketch, I normally use Photoshop CS6, and my Wacom Intuos Pro Pen tablet.
In Photoshop CS6, open a new file: File > New (Command-N).
Name the file: Uae_National_Day_Poster_Sketch.
Select Preset: International Paper, Size: A4, Color Mode: CMYK, set a Resolution of 72 Pixels/inchand Background Contents: White. When the resolution is modified, you will see the Preset will change to Custom.
In case you are wondering why I sketched at 72 pixels, it is because I just wanted to roughly place in the outline of the artwork and not initially add in any details to the piece.

Abu Dhabi- Dubai- Sharjah - Ajman - Umm Al Qaiwain Ras Al Khaimah Fujairah Sheikh Khalifa bin Zayed Al Nahyan UAE National Day Poster Photoshop sketch Burj Khalifa Layer Design Color Wacom Intuos Color Mode Size Format Milimeter Pixels Custom Resolution

Select the Brush Tool (B), with a greyish foreground color for your brush, and draw your basic concept on the artboard. Sketching with the grey brush helps you trace the sketch easily in Illustrator.
I was visualizing the poster as being bright, edgy, and retro-inspired, with an architectural space theme. On the sketch I have added hand-drawn lettering of the Arabic translation of “We are all Emirates”.
With a wide round brush preset selected, color in the text area to give it a visual pop. Fill in the text area with the brush Mode set at Multiply.
Once your sketch is complete File > Save (Command-S) using the JPEG format, and move on to Illustrator CC.

Sketch  UAE National Day Poster Arabic English Save Brush Mode JPEG Multiply

In Illustrator CC, create a new file: File > New (Command-N). Name it as UAE_National_Day_Poster, set the Size to be A4, and click OK.

UAE National Day Poster Name Artboard Size Color Mode Pixel
Open the Layers panel: Windows > Layers. Name the first layer Sketch so we can place in our sketch image.
File > Place (Command-Shift-P), select the file Uae_National_Day_Poster_Sketch.jpg, and click OK. You will notice a graphics pointer appear, with a tiny preview of your selected image. Drag the pointer, and click it on the upper left corner of your artboard, to place your sketch on the artboard. Then double-click the Sketch layer, which will open the Layers Options panel. Select Lock & Dim Images to 50%. Click OK.

UAE National Day Poster Layer Sketch Name Color
To add a new layer above the selected layer, click the Create New Layer button in the Layers panel, and create a new layer called Burj Khalifa, as we will start tracing the tower’s first section.
File > Save (Command-S), and save the file as UAE_National_Day_Poster.ai.
Let’s start drawing our tower. Select the Rectangle Tool (M), and with a black Stroke, and Fill set to None, draw a rectangle to measure up to the dimensions of one of the tower’s sections. Then with the Direct Selection Tool (A), drag the left upper corner downwards in order to slant the top, while holding down the Shift key to constrain the anchor vertically.

Tracing Sketch Direction Rectangle Tool Direct UAE National Day Poster Sketch
Select the Pen Tool (P) and free-draw a curve to create the top face of the building. Open your Pathfinder panel: Window > Pathfinder. Select both of the shapes we just created with the Selection Tool (V) and from the Pathfinder panel click the Divide button.
Just as the name implies, it divides all overlapping shapes into distinct, non‑overlapping shapes. It also groups the shapes together. Select the shape, Ungroup (Command-Shift G) and delete the excess shapes.

Pen tool P Window Pathfinder UnGroup Shift Command Panel Selection Tool UAE National Day Poster
With the Line Segment Tool (\), draw a line from one side of the rectangle to the other, to connect the ends. Then you need to curve the line segment slightly upwards to give the impression of a curved form on the tower. So select the Anchor Point Tool (Shift-C), which is under the Pen Tool bin, and give the line a slight pull up.

Line segment Tool Achor Point Shift Selection UAE National Day Poster Sketch Burj Khalifa
Now duplicate the curved line segment to create the rest of the tower floors. So select the line segment we curved, hold down the Option and Shift keys, and drag downwards to copy and constrain your selected line segment. You will now have your first copy. All you have to do after that is fill in the rest of the floors by pressing Command-D to Duplicate the line. Continue to click Command-D, until the tower section is filled.

duplicate Command Shift Selection UAE National Day Poster Sketch Burj Khalifa Line Arc Curve
Take the Line Segment Tool (\) again, and draw vertical lines from top to bottom of our rectangle. Hold down the Option and Shift keys and drag downwards to copy and constrain your selected line and fill the floors in. Some of your lines will be shorter than the full height of the rectangle. So select the Direct Selection Tool (A) to manually extend the ends. Hold down the Shift key to constrain the lines vertically. File > Save (Command-S).

direct Selection tool Line Segment Tool Vertical Shift Selection UAE National Day Poster Sketch Burj Khalifa Sketch

Let's start coloring in our tower section.
Select the rectangle, and here’s a nice little trick to copy and paste an object in place. The keyboard shortcut for this is Command-C for Copy, and Command-F for Paste in Front and Command-B for Paste to Back. Make sure you Paste to Back. You won’t see the action, but if you drag the selection to the side you will notice the pasted copy right behind. Once you’ve duplicated the rectangle, do the same with the top half circle.

copy paste front back Duplicate Rectangle Selection UAE National Day Poster Sketch Burj Khalifa Sketch Layers
Open Window > Gradient, the Stroke panel, and the Swatches panel.
In the Gradient panel, select Type: Linear, Angle: -90°, and give the gradient sliders a red tone from light red to a darker shade, Stroke (X) to None. Then drag the gradient swatch from the Gradient panel onto the Swatches panel to save it, in case we need to use the same gradient at a later stage.
Select both half circles, and Object > Arrange > Bring to Front (Command-Shift-]), so we can cover the line segments. Give the lower half circle a flat pink-red color, and keep the one on top with a black stroke.
With one of the black stroke lines selected, Select > Same > Stroke Color, and you will find that this action selects all shapes with black strokes. Deselect the borderlines, by just holding down the Shift key. Group (Command-G) the inner lines together, and give them an orange-red stroke of 0.3 pt weight.
Windows > Transparency, and give the strokes a Screen: Blending Mode.

Window transparency Arrange Bring to Front Command Shift Linear angle Stroke Gradient Blending Mode Stroke Color copy paste front back Duplicate Rectangle Selection UAE National Day Poster Sketch Burj Khalifa Sketch Layers
Then select the borderlines of the rectangle, Group (Command-G), and give them a white stroke, Rounded Caps & Corners with 1 pt weight.
You will notice while browsing images of the Burj Khalifa that some of the towers' floors are highlighted, so we need to mimic that effect. Select All (Command-A), and Lock Selection (Command-2). Take the Pen Tool (P) and freehand draw a curved rectangular shape to fill at least three or four floors. Fill in with red and a Blending Mode: Screen. Object > Unlock all (Command-Option-2), and arrange the screened highlights to be behind the white borderlines.

Select all Lock Selection Group Pen Tool Window transparency Arrange Bring to Front Command Shift Linear angle Stroke Gradient Blending Mode Stroke Color copy paste front back Duplicate Rectangle Selection UAE National Day Poster Sketch Burj Khalifa Sketch Layer Screen Unlock All
Select all the tower elements and Group (Command-G) them together. We now have one section of the tower. All you have to do now to complete the render of the tower is to follow the same steps we did for the first tower section.
I wanted to give the tower the colors of the UAE flag: Red, Green, White and Black. However, black is too aggressive, and white won’t showcase clearly, so I worked on red, green, and white-bluish gradients.
Note: Each time you create a section, modify the arrangement to be behind the other section.
When you reach the top of the tower, it’s best you downsize the stroke weight of your lines, and for the head of the tower, just draw in vertical rectangles, with the Rectangle Tool (M).  
Once you are done, Select All (Command-A) and Group (Command-G) all the tower elements together. File > Save (Command-S).

File Save Rectangle tool File Color Group Window transparency Arrange Bring to Front Command Shift Linear angle Stroke Gradient Blending Mode Stroke Color copy paste front back Duplicate Rectangle Selection UAE National Day Poster Sketch Burj Khalifa Sketch Layer

Lock the Burj Khalifa layer, create a new layer, and name it Text.
Select the Type Tool (T), with a font size of about 43 pt, and type in the English text, We are all Emirates, with the desired font. I worked with Nova font, which you can download free.
Next, I notice some of the letters need space between them, so I use the Touch Type Tool (Shift-T) and select the I, S and L in the sentence to add in some breathing space between each letter.

touch type Tool Dafont Nova Arabic English Font Size Window transparency Arrange Bring to Front Command Shift Linear angle Stroke Gradient Blending Mode Stroke Color copy paste front back Duplicate Rectangle Selection UAE National Day Poster Sketch Burj Khalifa Sketch Layer
To type in the Arabic, you need the Adobe-ME (Middle Eastern) edition for full Arabic support, which you can get from the Adobe website. For Arabic fonts you can download the desired type free from Fonts2U.
Take the Type Tool (T), and type in the Arabic text, set at 50 pt font weight. Make sure Paragraph Direction is set to Right-to-Left Direction, because Arabic reads from right to left.

arabic Weight Right Left Arabic Direction Adobe Me edition Window transparency Arrange Bring to Front Command Shift Linear angle Stroke Gradient Blending Mode Stroke Color copy paste front back Duplicate Rectangle Selection UAE National Day Poster Sketch Burj Khalifa Sketch Layer Paragraph point
We need to slant the text, so select the Shear Tool, which you can find under the Scale Tool bin. To shear along the text’s vertical axis, drag anywhere in the document window in a down direction. Hold down Shift to constrain the object to its original width.

Shear type tool Arabic Slide Vertical Window transparency Arrange Bring to Front Command Shift Linear angle Stroke Gradient Blending Mode Stroke Color copy paste front back Duplicate Rectangle Selection UAE National Day Poster Sketch Burj Khalifa Sketch Layer
Then you need to expand your type to turn them into shapes, because we will give them effects at a later stage. Object > Expand. The Expand Options panel will open; make sure Object and Fill are checked, and click OK. Move the text into the placement you want.
Lock and hide the Text layer, and create a new layer above Sketch. Name it Background.
In our background layer, we need to trace the remaining elements. So select the Pen Tool (P) and start tracing all the other elements.
For the bridge, draw a long rectangle using the Rectangle Tool (M), then hold down Shift and AltWith both rectangles selected, click the Free Transform Tool (E). The free transform widget will appear with the button options to constrain, free transform, perspective distort, and free distort. Select Perspective Distort.
You will notice Perspective Distort is constrained, so there's no need to hold the Shift key when moving the anchors. To help you align the results the way you want, click Free Distort, and align accordingly.

Rectangle Tool E Vertical Distort Results Pen Window transparency Arrange Bring to Front Command Shift Linear angle Stroke Gradient Blending Mode Stroke Color copy paste front back Duplicate Rectangle Selection UAE National Day Poster Sketch Burj Khalifa Sketch Layer
Take the Rectangle Tool (M), and draw a rail on each end of the parallel lines. Object > Blend > Blend Options, and a Blend Options panel will appear. You can blend objects to create and distribute shapes evenly between two objects, so to capture that we select Specified Steps as 6, and click OK. Then Blend > Make (Command-Option-B), and rails will appear.

Rectangle Tool Blend Make Command Option Window transparency Arrange Bring to Front Command Shift Linear angle Stroke Gradient Blending Mode Stroke Color copy paste front back Duplicate Rectangle Selection UAE National Day Poster Sketch Burj Khalifa Sketch Layer
Object > Blend > Expand the blended object, so we can form the shapes. Select the rails and parallel lines and in the Pathfinder panel, click Shape Modes: Unite, to create a compound shape. Then finish off tracing the rest of the sketch, toggle visibility on the Text layer, and delete the Sketch layer.
Unlock the Burj Khalifa layer. Select the rail and the bridge ground and drag them to the Burj Khalifa layer to cover the tower's lower section. File > Save (Command‑S).
Now we need to color the rest of the poster, so we can start visualizing it better.

File Save Sketch layer Cover tower Blend Expand Window transparency Arrange Bring to Front Command Shift Linear angle Stroke Gradient Blending Mode Stroke Color copy paste front back Duplicate Rectangle Selection UAE National Day Poster Sketch Burj Khalifa Sketch Layer

Dubai has sun all year long, so we need to work with a bright color palette for the background, yet we need it to blend with the flag’s palette. For the background sky color, I chose a yellowish gradient, and the other shapes were either white, yellow, or in accordance with the UAE flag color hues.

Window transparency Arrange Bring to Front Command Shift Linear angle Stroke Gradient Blending Mode Stroke Color copy paste front back Duplicate Rectangle Selection UAE National Day Poster Sketch Burj Khalifa Sketch Layer colro Flag palette shapes form
While coloring, I began to notice some shapes were the wrong color tone. For example the tower section tops, with the pink-red color, were altered to white fills. Also the head of the tower wasn’t matching in hue so it was given a flat sky blue tone. For the smoky plane trails, I gave them a fading swatch fill. Move and rescale the cloud behind the smoke trails. For the white bridge, you need to transform it by slightly extending it. Also move the tower slightly to align it properly in the layout.
Now the illustration is starting to come to life.

Swatch color palette feel Design illustration sky blue tone Window transparency Arrange Bring to Front Command Shift Linear angle Stroke Gradient Blending Mode Stroke Color copy paste front back Duplicate Rectangle Selection UAE National Day Poster Sketch Burj Khalifa Sketch Layer
Lock the Background and Burj Khalifa layers, and unlock the Text layer.
When we expanded the Arabic text, all the elements were grouped together. So, Ungroup (Command-Shift-G) and then select each word’s letters and create a compound shape by selecting the Pathfinder panel: Unite. In the Pathfinder Panel Options, you will find in the drop-down menu the Make Compound Shape option. Select this option, and then hit the Expand button on the Pathfinder panel, so the shape is unified.
For the English text, Unite the whole sentence together.

English unite Compound Path Command Shift Panel Arabic Text Unite Option
Now you start noticing there is too much going on on one side of the poster, and the text doesn’t read properly, so unlock the Burj Khalifa layer and move the tower to the left, then scale down the size of the text slightly. That way it will give it some breathing space. Unlock the Background layer, and move the clouds and any other elements around to un-clutter the scene. Then lock the two layers again and leave the Text unlocked.
The English text looks squeezed in between the Arabic, so I decided to drag it below the Arabic, and I brought the Arabic text closer. With the Arabic text selected, Object > Path > Offset path at 2.2 mm, Round, and OK, to give it a border.

Offset Path Arabic Font Clouds Unlock Round Window transparency Arrange Bring to Front Command Shift Linear angle Stroke Gradient Blending Mode Stroke Color copy paste front back Duplicate Rectangle Selection UAE National Day Poster Sketch Burj Khalifa Sketch Layer
From the Pathfinder panel, click Unite, and then delete any holes that may appear in the new shape. You will also notice some gaps like the ones I have circled.

Pathfinder Panel Unite Window transparency Arrange Bring to Front Command Shift Linear angle Stroke Gradient Blending Mode Stroke Color copy paste front back Duplicate Rectangle Selection UAE National Day Poster Sketch Burj Khalifa Sketch Layer gap
Connect the gaps by adding in some new shapes with your Pen Tool (P). Select the new shapes you created plus the border created, and Unite in Pathfinder. In the Pathfinder Panel Options > Make Compound Shape and click Expand. Give the new shape a white fill and Send to Back (Command-[).

Send to Back Expand Pen Tool Options Command Window transparency Arrange Bring to Front Command Shift Linear angle Stroke Gradient Blending Mode Stroke Color copy paste front back Duplicate Rectangle Selection UAE National Day Poster Sketch Burj Khalifa Sketch Layer

Let’s add some effects to the text.
Draw two ovals with the Ellipse Tool (L) to mimic the curve of a light flare. Copy (Command-C), and Command-F to Paste in Front. From the Pathfinder panel, select Shape Mode: Intersect to create a compound shape from the two intersecting forms. Delete the extra oval. Give the new shape a black to grey gradient with an Angle: -90°.
Render the same effect for the lower text.

Ellipse Tool PAste Front Back Copy Angle Grey Window transparency Arrange Bring to Front Command Shift Linear angle Stroke Gradient Blending Mode Stroke Color copy paste front back Duplicate Rectangle Selection UAE National Day Poster Sketch Burj Khalifa Sketch Layer

Lock the Text layer, and unlock the Background and Burj Khalifa layers.
You may need to tweak some of your elements on the Background layer, so that they look in harmony. I thickened the borderlines of my tower, sheared my bridge form, gave the clouds a white fading gradient, adjusted the color and shape of the sun, and modified the jet planes. Once you are satisfied with the overall image, you can move on to add some sparkle to the scene.
Lock your Background layer and move onto the Burj Khalifa layer.
Hold and click your Rectangle Tool button, and select the Star Tool from the bin.
Click once on your artboard and the Star Option window will appear.
Fill in Radius 1: 0.5 mm, Radius 2: 7 mm, and Points: 8. Click OK.

Radius Star Tool  Rectangle Points Ok Window transparency Arrange Bring to Front Command Shift Linear angle Stroke Gradient Blending Mode Stroke Color copy paste front back Duplicate Rectangle Selection UAE National Day Poster Sketch Burj Khalifa Sketch Layer
Fill the star with the Radial gradient from white to black, and then apply a Screen Blending Mode from the Transparency panel.

Draw another sparkle, with the Ellipse Tool (L). Create a white fill circle, Effect > Distort & Transform > Pucker and Bloat. Give it a Pucker of -155%, and a Screen Blending Mode.

Transparency Effect Distort Pucker Bloat Panel Window transparency Arrange Bring to Front Command Shift Linear angle Stroke Gradient Blending Mode Stroke Color copy paste front back Duplicate Rectangle Selection UAE National Day Poster Sketch Burj Khalifa Sketch Layer

Draw a few more circles of different shapes around, give them gradients and Screen blending modes.

Open Windows > Symbols.
Drag the batch of stars and circles onto the Symbols panel to create a new symbol. Keep the settings in your Symbol Options, name the symbol Sparkle and click OK.

Symbols options Ok sparkle Panel Window transparency Arrange Bring to Front Command Shift Linear angle Stroke Gradient Blending Mode Stroke Color copy paste front back Duplicate Rectangle Selection UAE National Day Poster Sketch Burj Khalifa Sketch Layer
Select the Symbol Sprayer Tool (Shift-S), and with the Sparkle symbol selected, spray a number of copies of the symbol on the tower shape. Try to keep within the bounds of the shape, and not overdo it. The Symbol Sprayer Tools are a cool bunch of tools to test and have fun with. You can use the symbolism tools to modify your instances, disperse, enlarge, shrink, rotate or gradually tint the color of instances to make them look more realistic.

Symbol Sprayer Tool shift S Disperse Window transparency Arrange Bring to Front Command Shift Linear angle Stroke Gradient Blending Mode Stroke Color copy paste front back Duplicate Rectangle Selection UAE National Day Poster Sketch Burj Khalifa Sketch Layer

We are almost done.
Unlock all the layers, Select All (Command-A) and Group (Command-G) all the artwork and text together. Everything will move into the Text layer.
Delete the empty layers.

With the Rectangle Tool (M), draw a rectangle in the middle of the artboard, so that we can mask the artwork.

You may have to move or scale the grouped artwork, in order to capture everything inside the rectangle.

Select the rectangle and the grouped artwork, Object > Clipping Mask > Make (Command-7). Now the artwork looks as if it’s framed.
Voila, the festive National Day Poster is done! Let’s celebrate.
File > Print (Command-P), and paste it around your neighborhood.

Clipping Mask Object Select All Rectangle Tool Layer Print Window transparency Arrange Bring to Front Command Shift Linear angle Stroke Gradient Blending Mode Stroke Color copy paste front back Duplicate Rectangle Selection UAE National Day Poster Sketch Burj Khalifa Sketch Layer celebrate paste
Working with Illustrator CC helps you work on your designs faster and more effectively, if you know your tools and memorize the shortcuts. Hopefully you enjoyed this tutorial, and you’re on your way to creating your own festive national day artwork. Let’s showcase that patriotism!!


Copyright @ 2013 Krobknea.

Designed by Next Learn | My partner