
Before you dive into the full design of a booklet, there are a few essentials that we will look at in this tutorial. After you have the essentials down, be sure to check out my complete course on Designing Booklets.
Binding Options
It's important to consider the type of binding you want to use for your booklet, because it will affect your entire layout and also determine the overall look and feel of your booklet.Saddle Stitch

Saddle-stitched binding is the most common and cost-effective form of booklet binding. Booklets bound in this way have folded sheets that are gathered together one inside the other and then stapled through the fold line. This allows the booklet to open up fairly flat, meaning less of your design gets lost in the center binding. However, there is a limitation to this type of binding. Staples can only hold so many pages. Therefore, saddle stitching is best for smaller booklets containing less than 100 pages.
Coil Binding

Coil binding or spiral binding is similar to saddle-stitched binding except that it involves creating holes along the left edge of a booklet's pages and inserting a metal coil through the holes. This binding allows for a wide variety of sizes and page counts. It also offers the most versatility for the user to lay the pages flat, which is why this is a common binding method for spiral notebooks and journals.
Perfect Binding

Perfect binding is widely used in soft- and hard-cover books, and what is you see most often on bookstore shelves. The pages and cover are glued rather than stapled at the spine, and the other three sides of the booklet are then trimmed as needed to give them clean, "perfect" edges. Unlike saddle-stitched booklets, perfect-bound booklets often have heavier covers than interior pages to provide durability and improve appearance. Aside from author novels, perfect binding is widely used by businesses for annual reports, manuals, catalogs and thicker product brochures. Unlike saddle stitching, perfect binding allows for an unlimited number of pages because the spine can be adjusted to fit. If you opt for perfect binding, remember to add a little extra space around your center margins, especially if your booklet has a lot of pages. Perfect binding doesn't accommodate flat pages, so you'll lose any text or design you place directly in the center fold.
So how do you decide which binding is best for you? This ultimately comes down to budget, aesthetic and overall page count. If your project is smaller and doesn't require hard covers or a spine, then you would choose saddle stitching or spiral binding. If you need the extra pages and could benefit from a harder cover, or just want that clean look, then perfect binding will work best for your project.
Paper Options
Just like with any print project, the paper choice for your booklet is essential, and offers a variety of visual and tactile options. That being said, there are a few standards to get you started.The cover almost always requires a sturdier paper than the inside pages. This helps the binding and keeps everything together nicely. It also looks more professional and provides extra durability every time someone flips through the booklet. A great standard that I use when working with most booklets is an 80# cover stock that is either gloss or matte finish. Gloss finish is great for high-image designs, while matte works best for enhancing text, but this can also be a personal preference. You can always go up in weight as well. For example, 100# is another common weight that is slightly heavier and thicker than 80#.
The inside pages don't need to be the same heavy-weight stock as the covers. I typically opt for a 70# or 80# text stock that is either gloss or matte. Note the weight might be the same number, but the big difference is the choice of cover versus text stock. For continuity, you'll want to stick with one finish and texture for both the cover and inside pages. So if you go with a gloss cover stock, you'll want to stick with a gloss text stock as well.
Page Counts
Once you determine the binding and paper options for your booklet, it's time to think about page counts, spreads, and the flow of your content. If you're new to booklet design, determining how many pages you need to complete your booklet without extra blank pages can be tricky. No worries, though, we'll take it step by step.The first step in page counts is understanding how they work in booklets. For a traditional booklet, you are looking at four actual booklet pages per sheet of paper. This is because you fold a sheet in half, turning two into four. An eight-page booklet would utilize two sheets, 16 pages would be four sheets, and so on. You an apply this formula regardless of paper size. As long as you fold the booklet in half, this will work.
Next up, let's look at determining page sequencing in printer spreads. Thanks to InDesign, this process has gotten a lot easier, because you can literally design a booklet from the first page to the last page in order and use the "Print Booklet" feature to create the booklet. The best way to tackle this is to create a sample booklet and look at how the pages add up.
Step 1
Create a New InDesign document by going to File > New Document. Set the Number of Pages to 8, make sure Facing Pages is checked and the size is Letter - Half or 5.5 inches by 8.5 inches, and click OK.
Step 2
Next up, let's look at the spreads. Spreads are the two pages that lie side by side, and each booklet should have an odd number of spreads and an even number of pages. This will ensure you have enough pages to complete the booklet.
In the above example, you can see that an eight-page booklet has two double-sided spreads: one for the front and back cover and pages 2-3, and one for pages 4-5 and 6-7. Now you might be thinking that is even pages and even spreads when I just said you need even pages and odd spreads. Well, if you take a look at the bottom, InDesign calculates each page line as a spread, and that leaves us with an odd spread count and even pages. Voila!

These are two ways for configuring spreads. The first option is the way printers look at spreads, and the second is how InDesign looks at spreads. It's important to know both, so that you can calculate everything correctly and make sure you have enough spreads and pages to complete your booklets.
Printer Tips
There are some special considerations to take into account when working with a printer, especially for booklets. The following tips will help you understand some technical aspects, as well as specifics you'll need to know before handing off your booklet for print.Imposition is a step during the printing process that deals with the arrangement of your booklet's pages on the printer's sheet. This ensures faster printing, simplifies binding and reduces paper waste. Before InDesign's handy "Print Booklet" feature, designers had to set up booklets in this format at the beginning. You might recognize this from the example below. You can see that pages aren't placed in numbered order, rather how they would appear when printed, folded and trimmed. The example below features a 16-page booklet where eight pages are on the front and eight pages would print on the back of one sheet. Then both sheets are folded in half vertically (i.e. page 4 meets page 1, and page 5 meets page 8) and then folded in half horizontally (i.e. page 2 meets page 7, and page 1 meets page 8). Finally the sheets are trimmed and bound to create the final booklet.

Another way to visualize this flow is to take as many sheets of paper as you need to make a complete booklet. Size doesn't matter here, so good old copy paper would do the trick. So for a 16-page booklet, you'd need four sheets (four booklet pages to one sheet of paper). Then fold the stack in half vertically and start numbering your pages from one to 16 as you flip through each page of the mock booklet.
You end up with something similar to the below example when you unfold your sheets and lay them out. Note you see the front and back pages here, where in your physical example, pages 1 and 16 would be on the same sheet as pages 2 and 15 because they would print double-sided. This method is super handy for the planning stages of your booklet. Not only can you visualize the page numbering, you can also use this blank mockup to plan out your designs and content before diving into InDesign.

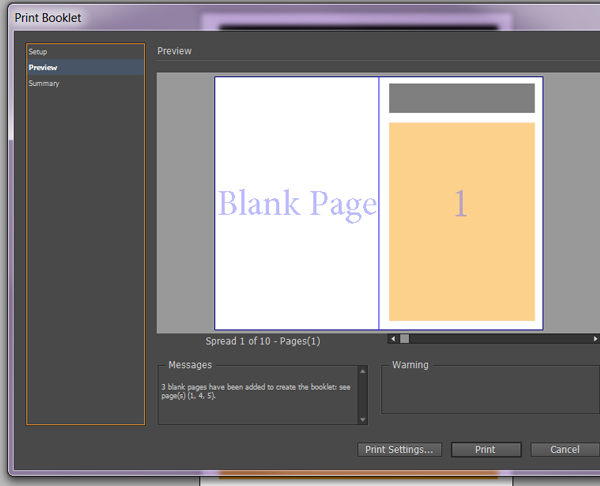
You can also see this in action straight in InDesign's "Print Booklet" feature, File > Print Booklet > Preview. This feature takes your single pages from InDesign—like what you would set up in Step 1—and arranges them side by side in printer-friendly spreads.

If you see a blank page that is not originally part of your booklet, it means you do not have enough pages to complete the booklet. InDesign then adds a blank page to the final PDF to accommodate this. Remember to maintain an even number of pages and odd number of spreads in InDesign to make sure you have the correct amount of pages to complete your booklet.
Conclusion
Now that you've seen the essentials for creating booklets, it's time to dive right into the design. In my complete course on Designing Booklets, you'll work through the design of a small, multi-page booklet. You'll see every part of the process from document setup and spreads to the outer covers and inside pages. You'll also discover how to use InDesign's "Print Booklet" feature so that you can send your new booklet to print.by


