
Tutorial Assets
You will need to download the following images to follow along with this tutorial. They are free from www.pixabay.com but do require a user registration.1. Prepare the House
Before we can just drop any old house into a forest, we need to do a bit of remodeling. Of course, the house needs to look dilapidated and abandoned. But it also needs to fit the environment we aim to set it in.Step 1
Open the abandoned house image called abandones-house-177105.jpg in Photoshop. Craft a selection around the main portion of the house, ignoring the additions to the structure on the far left and right.
Step 2
Copy the house selection to a new layer with Layer > New > Layer Via Copy (Control-J), and then delete the original background layer. This is so that the resulting smart object isn't carrying additional pixels.
Step 3
Create a selection around the door and copy it to new layer. Then go to Edit > Transform > Flip Horizontally and reposition the door to cover the first window on the left side of the house.
Step 4
The bright shine on the rest of the windows will not work for our dark forest setting. Momentarily hide the door layer and create a selection around the top portion of the first window (the one without a bright shine on the glass). Copy that to a new layer and reposition over the top portion of the second window. Use Edit > Transform > Distort to fit the window into the new position. Copy the layer twice more and position over the other windows too.
Step 5
We are done with the basic house preparations. Now we can place our creepy house into a spooky forest setting. Reveal the door layer again and save this file as House.psd and close the file.
2. Enter the Forest
Forests are a beautiful slice of nature! Perfect for a quaint little cottage. Except, of course, on a dark and foggy night! Then they are truly terrifying.Step 1
Open the misty forest scene file, pine-273828.jpg. Then deposit the house as a smart object by going to File > Place > Place Embedded and choose the House.psd file. Position and scale the house so that the path appears to lead up to the doorway.
Step 2
Duplicate the background layer with Layer > Duplicate Layer and place the copy over the top of the house layer so that it hides the house completely. This will serve as the foreground forest area.
Step 3
To create the semi-transparent areas of the fog, set the image Luminosity by going to the Channels panel. Control-Click on the composite RGB channel to load the bright areas as a selection. Then return to the Layers panel and hold down the Alt key while pressing the New Layer Mask icon. This will turn the selection into a layer mask, but invert it too!
Step 4
The foreground trees need to be completely opaque, and right now they are semi-transparent. Make sure the layer mask is still selected and go to Image > Adjustments > Levels (Control-L). Pull the right-most handle towards the center to increase the contrast until the house is not visible through the tree trunks.
Step 5
Some of the tree trunks that should be behind the house appear faintly in front of it. Correcting this requires manually brushing the mask with a soft-edged brush. Set the paint color to black and the brush Opacity to 10% and slowly build up the effect, using multiple strokes, until the wayward tree disappears behind the house.
Step 6
Enhance the effect by creating a duplicate forest layer. Set the blending mode to Multiply and reduce the Opacity to 66%. Then use a large, soft-edged, black brush on the mask to make the doorway area of the house slightly more visible.
Step 7
To start creating the atmospheric effects, add a Photo Filter Adjustment Layer and set the filter to Deep Blue and the Density to 33%
Step 8
Duplicate the Photo Filter and set the blending mode to Soft Light and reduce the Opacity to 36%. Then use a Radial Gradient on the mask going from Black to Transparent, to remove the effect from the foreground path area.
Step 9
The house is slightly off color from the rest of the forest scene. So add a Hue/Saturation Adjustment Layer and clip it to the House layer. Leave the Hue at 0, and set the Saturation to -27 and Lightness to -21.
Step 10
Even in this heavy fog, the house appears a little too washed out. Increase the contrast by adding a Curves Adjustment Layer clipped to the top of the house layer as well. Then adjust the curves to create a gentle S-shape. Be careful not to brighten the house, instead keeping the curve points below their original position so the overall effect is darker.
3. The Fog Creeps In...
The mist obscuring visual elements is part of what makes the scene so spooky. The very idea that there are things out there that we can't see. We always assume they can see us through the same fog though. Maybe ghouls have "fog-vision"?Step 1
Add a new layer over the house adjustment layers called Gradient Fog. Use a Linear Gradient set to Foreground to Transparent. Set the foreground color to756860 and
create a gradient rising up from the bottom of the scene. Because this
layer is still behind the foreground tree layers, it won't be as visible
along the path, but mostly seen at the base of the house.
Step 2
The fog is too smooth and perfect; it needs some variation to appear more realistic. Go to Filter > Noise > Add Noise. Set the Amount to 10%.
Step 3
Target the House layer and create a selection just around the top window. Go to Layer > New > Layer Via Copy (Control-J) to copy the window onto a new layer. Move that layer up over the Gradient Fog layer.
Step 4
Give the window an unearthly yellow glow by clipping a Hue/Saturation Adjustment Layer to the Window layer. Check the Colorize box and set the Hue to 55, Saturation to 100 and Lightness to -21.
Step 5
The yellow window needs a spooky glow. Add an new layer to the very top of the stack called WindowGlow. Create a rough selection around the window frame and fill it with the bright yellowebe47a. Cancel the selection with Select > Deselect (Control-D) then set the Blend Mode to Screen. Go to Filter > Blur > Gaussian Blur and use a Radius of 20 pixels. 
Step 6
A light of that brightness would cast a visible area glow in the heavy fog. Add a new layer, AreaGlow, then use the Polygonal Lasso Tool (L) to create a selection in the shape of a light beam shining out from the window. Use a Radial Gradient from the same yellow color,ebe47a to transparent. Start the gradient up in the window and stretch it out to the end of the beam selection. 
Step 7
Set the Blend Mode to Soft Light and reduce the Opacity to 60%. Then go to Filter > Blur > Gaussian Blur and use a Radius of 5 pixels.
Step 8
The light beam should have more impact on the appearance of the house behind it. Control-click the AreaGlow layer to create a selection and then add a Brightness/Contrast Adjustment Layer. The selection automatically becomes the Layer Mask on the adjustment layer. Set the Brightness to 33 and the Contrast to -50.
Step 9
The fog could use some variation to break up the solid appearance. So let's create a swirling, undulating fog texture of our own! First create a new layer, FogSwirlTexture. Then tap the D key to set the colors to Default black and white. Go to Filter > Render > Clouds to fill the canvas with the cloud texture.


Step 10
Create a rectangular selection over the fog texture and copy it to a new layer with Layer > New > Layer Via Copy and name it AreaGlowTexture. Hide the original texture layer and transform the AreaGlowTexture layer to roughly fit over the window area glow. Brighten the texture with Image > Adjustments > Levels (Control-L) by sliding the right-most handle towards the left.
Step 11
Set the Blend Mode to Overlay and reduce the Opacity to 80%. Then Control-click on the AreaGlow layer to create a selection to use as a Layer Mask.

4. Create Spooky Lighting Effects
The fog plays with light and shadows in interesting ways. creating another subtle nod towards spookiness, because the way the light dissipates in fog feels unfamiliar to us.Step 1
Create a new layer called DarkerMist and set the Blend Mode to Hard Light and the Opacity to 62%. Control-click the House layer to create a selection and go to Select > Inverse to select the area other than the house. Grab a large, soft-edged brush and keep the Brush Opacity at around 15%. Hold down the Alt key and sample a dark color from the fog. Then gently paint in darker areas surrounding the roof of the house.
Step 2
Cancel the selection with Select > Deselect (Control-D). Add a new layer just under the WindowGlow layer and name it HouseShadows. Set the Blend Mode to Multiply and the foreground color to default black. Still using the soft brush, paint in darker shadows on the house. Focus on creating shadows under the eaves and inside the doorway. If the shadows develops too quickly, reduce the layer opacity.
Step 3
Create another layer over the HouseShadows layer and name it YellowGlow. Set the Blend Mode to Color Dodge. Go to the Channel panel to select the image Luminosity again by Control-clicking on the RGB thumbnail. Then use this selection as a Layer Mask on the new YellowGlow layer.
Step 4
Make sure the YellowGlow layer is the active layer, not the mask. Use the brush now to paint in spills of yellow light (paint colorbbb84e)
along the pathway and the inside edge of the trees. The luminosity mask
makes sure the paint is only applied to the highlight areas, which
makes this step considerably easier!
5. What Lurks in the Dark?
To make the scene truly terrifying, it needs a few hidden surprises. The bright window always draws the eyes, but once the viewer begins to explore the scene, let's reward them with a few spine tingles!Step 1
Add a new layer named Silhouette over the YellowGlow layer. Hold down the Alt key to sample a darker grey color from one of the tree trunks. To the far right, near one of the trees, use a soft-edged brush to sketch in a vague human shape.
Step 2
Let's turn the shadow into a ghoul. Go to Edit > Place Linked and choose the skull image named skull-219795_1280.jpg. Set the Blend Mode to Color Dodge and the Opacity to 20%. Scale and position the skull layer so that it fits inside the hood area of the shadow. Then add a Filter > Blur > Gaussian Blur with a Radius of 1.0 pixels.
Step 3
Open the image of the cat named cat-174526.jpg. (That's the file name, I highly doubt that's the cat's name). Use the Quick Selection Tool to select the cat's eyes and go to Edit > Copy (Control-C).
Step 4
Back in the main project file, go to Edit > Paste (Control-V) to deposit the eyes as a new layer. Change the Blend Mode to Screen, so that only the bright yellowish-green is visible. Scale the eyes down to an appropriate size and hide them in the shadow area. A quick touch of Filter > Blur > Gaussian Blur with a 1.0 Pixel Radius will help the eyes blend in more seamlessly.
Step 5
Duplicate the eyes layer to put in other shadows around the woods. The idea is to give a sense that the viewer might be surrounded by unseen creatures of the night!
Step 6
Add some swirling mist to the walkway by duplicating the FogSwirlTexture layer. Use the Edit > Transform > Perspective tool to make the texture generally match up with the walkway's perspective. Set the Blend Mode to Overlay and the Opacity to 29%. If hard edges are visible, use the Eraser (E) tool with a soft-edged brush tip to remove them.
Step 7
Reveal the original FogSwirlTexture layer again. Set the Blend Mode to Overlay and the Opacity to 27%. Add a Layer Mask and use a Linear Gradient going from Black to White on the mask to fade the texture away as it moves further up from the ground.
6. Finishing Effects
To cap off the piece, let's use a technique that makes the scene feel as if even the trees are reaching in to get us!Step 1
Hold down the Alt key and go to Layer > Merge Visible to create a merged layer at the top of the layer stack. Then go to Filter > Camera Raw Filter. In the Basic tab set the Clarity slider to 100 and the Vibrance to 5.

Step 2
Add a layer named Burn above the Merge layer. Go to Edit > Fill and choose 50% Gray from the Content options and hit OK. Change the layer's Blend Mode to Overlay so the gray fill is rendered completely invisible. Then using the soft-edged brush, loaded with black paint, gently start darkening the main shadow areas.

Step 3
Add a new layer named Dodge. Fill it with 50% Gray the same way the Burn layer was filled. Again, set the Blend Mode to Overlay. This time, use white paint on the layer to accentuate the highlights of the glowing window and the reflection of light along the path.

Step 4
Create another merged layer by holding down the Alt key while going to Layer > Merge Visible.
Step 5
Go to Filter > Camera Raw Filter. In the Basic tab, set the Contrast to +42 and the Clarity to +39.


Step 6
The final effect to add is a lens blur vignette that will blur the outside edges of the scene, and help to keep the focus on the center. Go to Filter > Blur Gallery > Iris Blur. Keep the Blur set to 15 px, and draw out the blur ellipse to fit just inside the bounds of the canvas area.
Conclusion
So here's our final Spooky Forest scene.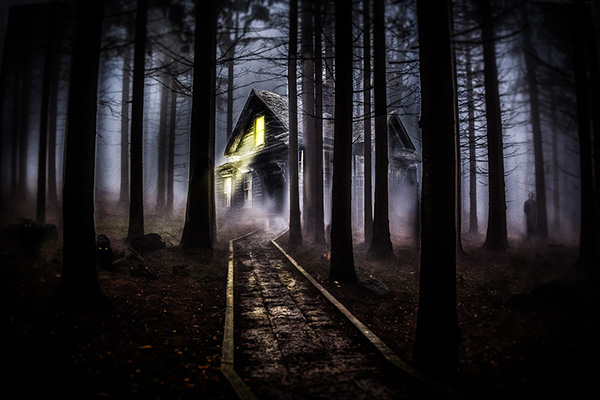
If you'd like to see more examples of fun photo manipulation projects, be sure to check out my profile here at Tuts+.


