1. Creating special paint brushes
Step 1
First, create a new document in following dimensions: 600 px height and 600 px width.Now we need to create two new brushes.
Image 1. To create a new brush, take the Ellipse Tool (L), draw a very long and thin oval shape (fill color R=35 G=31 B=32). Move it to the Brush panel. A new window will appear. Choose New Art Brush and press OK. In the second window, choose Colorization Method Tints. Width of this New Art Brush should be 100 % and make sure that the Direction is from left to right. We will call this brush, "Brush 1".
Image 2. To create the second brush, take the Ellipse Tool (L) and draw a long oval with the same fill color. After that, take the Convert Anchor Point Tool (Shift-C) and click on the left anchor point of the oval and then the right. Now, drag it to the Brush panel and create the new brush like you did in the previous step. We will call this brush, "Brush 2".

2. Drawing the pink flowers
Step 1
Using Brush 1, we will now draw the pink flowers.Image 1. Take Brush 1, delete the fill color and set the stroke color at R=232 G=112 B=96. From here on, we will use just the stroke color. Then, on the Stroke panel, make the stroke weight 5 px. Draw the two first petals. Make the stroke color lighter (R=245 G=141 B=121) and draw the next two petals. Then make the color darker (R=234 G=115 B=99), decrease the stroke weight to 3 px and draw a shadow.
Image 2. Increase the stroke weight to 5 px, change the color to yellow (R=239 G=174 B=12), and draw the center part of the flower. Keeping the same stroke weight, change the color to R=249 G=170 B=143 and draw in two more petals. Make the color lighter (R=251 G=194 B=173) and draw in the highlight. You can also add dark yellow dots which will imitate the stamens of the flower.
Group the whole flower (right-click > Group) for convenience.

Step 2
We will use Brush 1 for this next flower as well. While keeping the same stroke weight (5 px), set the stroke color at R=249 G=170 B=143 and draw pink petals. Then make thinner stroke (2 px) and darker color (R=232 G=112 B=96) to draw the shadow on the petals. Using the Eyedropper Tool (I), take the same yellow color as at the previous flower to draw the center part of the flower with stamens.Group the whole flower (right-click > Group).

3. Drawing the green twig
Step 1
We will continue using Brush 1 to draw the twigs. Change the color to R=132 G=114 B=38 and make the weight 1 px. Draw a line to create the stem. Set the color at R=184 G=160 B=59, weight 4 px - for the leaves. For the petioles, the small stems that connect the leaves to the bigger stem, use the same stroke color and stroke weight as we did for the stem. Group the whole twig (right-click > Group)
4. Drawing the brown twig
Step 1
Continue using Brush 1, set the color at R=155 G=66 B=35, weight 0.5 px - draw the stem. For the leaves, we will use Brush 2, which you created in Step 1.1. Take Brush 2, set the color at R=206 G=99 B=52 and the weight at 0.75 px, and draw the leaves.Group the whole twig.

5. Drawing rose hips
Step 1
Image 1. Using Brush 1 (color R=87 G=27 B=11, weight 0.5 px), draw the twigs. Increase weight to 5 px, change color to R=158 G=18 B=21 and draw berries.Image 2. Now let's add in some details - color R=53 G=61 B=51, weight 1 px. Add some highlights - color R=172 G=59 B=44, weight 3 px. Group the whole branch.

6. Drawing the berries
Step 1
Using Brush 1 (color R=87 G=27 B=11, stroke weight 0.5 px), draw the twigs. Go to the Brush panel and in the lower left corner, find Brush Libraries Menu button. Go to Artistic > Artistic_Calligraphic > 10 pt Round. Make the color R=105 G=106 B=109 and draw the berries. Take Brush 1 again, (color R=35 G=34 B=29, stroke weight 0.25 px) and draw the sepals. Group the whole branch.
7. Arranging the plants
Step 1
We have now drawn enough plants to start the arrangement. In the center of the composition, place the three pink flowers. As you can see, I copied the flowers made in step 2_1 (Control-C, Control-V) along with some branches and twigs. Using the Direct Selection Tool (A), you can change the position of the branches and twigs as you like. Arrange them to your own taste!
Step 2
Let's add in more leaves. I used Brush 2 (color R=184 G=160 B=59, weight 2 px) for the blade, Brush 2 (color R=140 G=119 B=28, weight 0.25 px) for the midrib, and Brush 2 (color R=140 G=119 B=28, weight 0.15 px) for the vein.
8. Drawing the yellow flowers
Step 1
Let's draw in more flowers - yellow ones! Use Brush 2 (color R=54 G=71 B=36, weight 0.75 px and 0.5 px).
Step 2
Now the petals. Use Brush 2 (color R=239 G=174 B=12, weight 1 px).
Step 3
For the center of the flower - color R=124 G=72 B=20, weight 0.75 px.
Step 4
For the leaves - use Brush 2, color R=31 G=43 B=16, weight 0.75 px for the blade and color R=54 G=71 B=36, weight 0.15 px for the petiole. Group the whole flower (right-click > Group).
Step 5
Keeping the just created yellow flower selected, right-click your mouse. Then choose Transform > Reflect. In the new dialogue window, select Vertical axis of reflection and angle 90 degrees. After that, press Copy and place newly created flower on the right side of the composition. Send it to the back (Control-X, Control-B).
9. Drawing blue flowers
Step 1
Use Brush 1 (color R=88 G=73 B=52, weight 0.5 px) and draw the branches.
Step 2
Make the stroke weight bigger (3 px), color R=90 G=161 B=132, and draw the flowers.
Step 3
Weight 1 px, color R=166 G=197 B=181 - for highlights.
Step 4
Weight 1 px, color R=88 G=73 B=52 - for three sepals for each flower.
Step 5
Using Brush 2, add some leaves (color R=51 G=39 B=24, weight 0.75 px).
10. Drawing the yellow flowers
Step 1
Brush 1 (color R=54 G=71 B=36, weight 0.75 px) and draw the stem.
Step 2
Use color R=147 G=100 B=24, weight 4 px - for petals.
Step 3
Use color R=106 G=33 B=29, weight 1 px - for stamens.
Step 4
Use color R=198 G=149 B=48, weight 4 px - for three new lighter petals.
Step 5
Use color R=54 G=71 B=36, weight 0.5 px - for petiole. Use color R=93 G=122 B=66, weight 2 px - for blade. Group the whole flower.
Step 6
Make a new copy of the flower created in the previous step (right-click > Transform > Reflect; Vertical, Copy). Place it on the left side of the composition. You can practice drawing a different looking flower to add to this bouquet.
11. Drawing the black currants
Step 1
Brush 1 (color R=48 G=44 B=28, weight 0.5 px) for the stem and color R=48 G=44 B=28, weight 0.25 px for the petiole.
Step 2
Use brush 10 pt Round (color R=33 G=21 B=30 weight 1 px) for the berry and color R=56 G=42 B=53 weight 0.5 px for the highlight.
Step 3
Add few lighter berries. Brush 10 pt Round (color R=61 G=39 B=54 weight 1 px) for the berry, and color R=84 G=61 B=79 weight 0.5 px for the highlight.
Step 4
Use Brush 1 (color R=25 G=16 B=14 weight 0.5 px) for the styles.
Step 5
Add the leaf. Color R=48 G=44 B=28, weight 0.25 px - for petiole and for the vein. And Brush 2, color R=94 G=86 B=51, weight 0.5 px - for blade. Group it.
Step 6
Create few copies of the black currants by copy-paste and place them as you wish. As you can see, I also added one more branch of the blue flowers on the right side of the composition.
12. Creating the background
Step 1
Now create a new layer by pressing the Create New Layer button on the Layers panel. Drag it under the existing one. Lock the layer with flowers.On the newly created layer, draw a large square by using the Rectangle Tool (M). Click on your artboard. In the new dialogue window, make the following rectangle options: Width 600 px and Height 600 px. Set the fill color to R=35 G=31 B=32.
Step 2
Then create another third layer, over the layer with flowers. Leave it as it is, go to the layer with black square (Layer 2) and make a copy (Control-C, Control-F). Keep the new copy selected and transfer it to the third layer (Layer 3). Press Control-X, then select the third layer and press Control-F.Set the fill color to R=213 G=185 B=139. Keeping it selected, go to Effect > Texture > Texturized and select Texture: Canvas (Scaling 200%, Relief 30, Light: Top). On the Transparency panel (Window > Transparency), make Overlay and Opacity 80%.
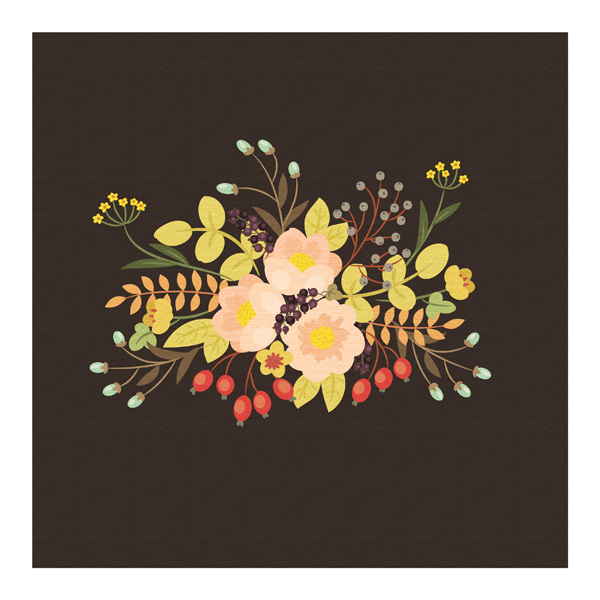
Once you zoom out, you can see that your illustration looks like a canvas painting.

Conclusion
You just made vintage style floral arrangement illustration—congratulations! Having mastered this technique, you can draw any floral painting you want.


