
Geometry with the numbers 4 and 8 means we'll be constructing squares, octagons, octagrams and a few patterns based on them. Let me first quickly define a couple of new words:
- Words ending in -gon mean: x-sided shape. An octagon is 8-sided, a decagon is 10-sided, etc.
- Words ending in -gram mean: x-pointed star. An octagram is an 8-pointed star, a hexagram a 6-pointed star, etc.

Whereas there is only one regular -gon for each number, there can be several ‑grams (or stars), depending on how the points connect. The more points a polygon has, the more possible stars it contains.
Two more words we will use frequently to describe shapes are: static and dynamic. Very simply, a static shape sits on a side, while a dynamic shape stands on one point.

These adjectives neatly express the feeling we get from these two positions. (Yes, geometry and feeling in the same sentence!)
When constructing any shape, we have to decide whether we want it static or dynamic, and use the appropriate construction method. But these are not the only two possible premises: often we are not starting from scratch, but have to work around a given, such as an existing point, or segment, or a circle, or a specific measurement. Each of these situations calls for a different construction method.
I won't go through each and every one of them, as there are dozens, but I'll show you at least a couple per figure, to explore different ways of doing things.
Shapes
Square (on a Side)
As the title says, this is the method to use if one of the sides is already defined, but it can also be used if you're starting from scratch. In this case, you define the segment yourself before step 1.
Step 1
With AB as your compass opening, draw an arc centered on A. Throughout this entire construction, the compass opening remains the same.

Step 2
Now move the dry point to B and cut the first arc at C.

Step 3
Move the dry point to C to draw an arc that cuts the original arc (centered on A) at another point D.

Step 4
Now move the dry point to D to mark a point E on the arc we just drew.

Step 5
Connect E and A to find F. So far we've done all this to find the perpendicular to AB at A.

Step 6
One last arc: dry point on F, draw an arc to find the fourth point in the square, G. It will cut the arc that had B as its centre.

Step 7
Join G to F and B, to complete the square.

Although this is a useful method, I notice in traditional arts a marked preference for the methods that start with a circle. Perhaps it is a symbolic habit, a reminder that the One (for which the circle is a symbol) precedes all things, or maybe it's just more elegant. Don't discard the above as redundant, though: if all you had was a rusty compass, which is the compass with a fixed opening that our ancestors used, the following method would not be practicable.
Dynamic Square (in a Circle)
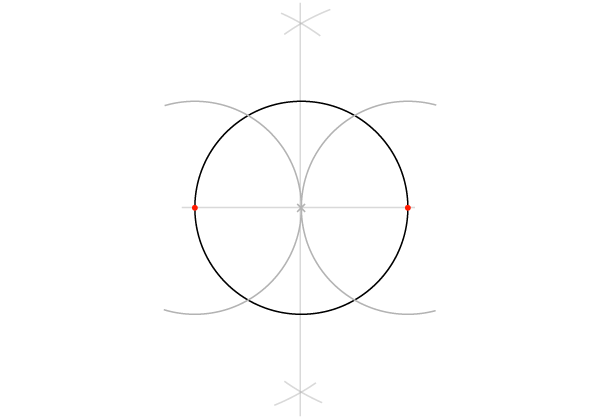
Our starting point is a circle with one diameter drawn. Whether the circle or the diameter came first doesn't matter!

Step 1
Draw the bisector to this diameter, as learned in lesson 1. Start by drawing two intersecting arcs...

Step 2
... and connect the intersections. The bisector cuts the circle at two points, so we have a total of four defined points on the circle.

Step 3
Connect the four points.

Static Square (Around a Circle)
Steps 1–2
This is the same as in the previous construction: Starting with a circle with a horizontal diameter, find the bisector so that the circle is cut into four.

Step 3
With your compass opening equal to the circle radius, place the dry point on each of the two original points again, to draw two arcs that form a tangent in the centre.
Step 4
Repeat this, centered on the points defined by the bisector. The four arcs define four points outside the circle.

Step 5
Connect these four points.

With just two more steps, we can create two four-pointed stars.
Static and Dynamic Four-Pointed Stars
Step 6
Join the four points on the circle with the four corners of the static square as shown here:

Step 7
Outline the desired star.

Static Octagon and Octagram (in Square)
Step 1
We start with a square. Draw the diagonals.

Step 2
Dry point on A, compass opening from A to the centre, mark two points on the square.

Steps 3–5
Repeat with dry point on B, C and D.

Step 6
For an octagon, connect the eight points you have marked.

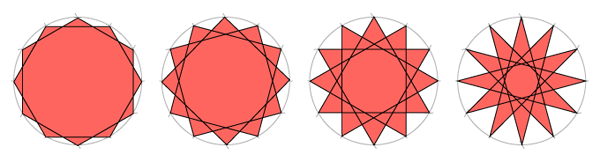
For an octagram, connect the points as shown below. You are basically skipping every other point as you connect them. Notice that this octagram, the classic eight-pointed star, is made of two perfect squares.

If you skip two points when connecting, you get a different octagram:

Notice the smaller octagram created at the heart of the large one!
Dynamic Octagon (in Circle)
Steps 1–4
These are the same steps we followed to construct a static square. Just stop short of joining the four outer points.

Step 5
Connect the outer points diagonally. The diagonals cut the circle at four new points, so that it is now cut in eight.

Step 6
For a dynamic octagon, join these eight points.

For a dynamic octagram, join them skipping every other point, as below, drawing two squares.


Patterns
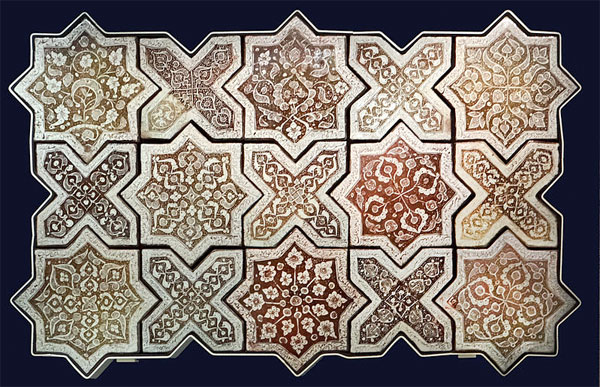
So far we've been constructing individual shapes, but we can now start putting them together into tiled patterns or tesselations. One thing to know about tiling: equilateral triangles, squares and hexagons are the only regular polygons that tile without leaving any blank space.

All others, including octagons, will leave spaces of various shapes. This is a drawback in, for instance, packaging, because that space is then considered wasted storage or shipping space. It is not at all a drawback in art, where these small in-between shapes serve as counterpoints to the main shapes, contrasting in size and colour, or merging with them to create unusual new shapes.

Back to our current activity: Three different, simple patterns can be constructed with eight-pointed shapes, and they all have the same basic grid. The grid is based on four circles around a fifth, therefore a grid of squares is also known as a five-circle grid. Let me also mention, just in case you come across the term, that patterns and constructions based on the square are sometimes referred to as root two (√2) patterns. All these terms are different ways of saying we are working with 4 and 8 (and 12, 16 and other multiples).
In constructing the grid, I can't stress enough the importance of working with great precision, especially now we're moving to patterns. Make sure your pencil is sharpened, and take your time.
The Five-Circle Grid
Step 1
Draw a horizontal line and a circle centered on this line, knowing that the sides of the squares in the grid will be equal to this circle's diameter, and that this circle will be the very centre of the grid.

Step 2
Find and draw the bisector. You'll need it to be as long as the horizontal line, but you can always extend it as you go.

Steps 3 & 4
Draw the four arcs again, this time making them full circles. These are the five primary circles that give the grid its name.


Step 5
Draw four more circles with the centres shown here...

Step 6
... and four more.

Step 7
Now draw eight more circles with the centres below. Notice we are simply adding new circles where earlier circles intersect. This can go on over as wide an area as needed, but we're going to add just one more set.

Step 8
Square off this grid by adding the circles at the corners.

We now have 25 circles, but many of them are only needed to build the grid itself. When we start working on a pattern, only the nine tangent circles shown here, which are inscribed in as many adjacent squares, will be our focus.

Step 9
The last step in the grid is to add the diagonals. Connect one way—the circles in the corners are missing the points needed to draw those diagonals, but that will be solved in a minute.

Connect the other way...

Finally fill in the missing ones, thanks to points created by diagonals intersecting the circles.

Here is the grid as needed for the next steps, cleaned up of anything no longer required. The outer square has been drawn to bound the pattern, but that is optional.

Tiled Dynamic Octagons
No further construction is required, because each circle is already divided into 8. All you have to do is connect the dots in each circle.


Breath of the Compassionate
This poetic name refers to a pattern of octagrams that are tiled leaving a cross-shaped space between them. Our starting point is again the five-circle grid.
Step 1
The dynamic squares are already marked by the diagonals. To draw the dynamic squares, join the horizontal sides...

Step 2
... then the vertical sides.

Step 3
Now simply outline the eight-pointed stars.

In the finished pattern you can see where the idea of breathing came from: the octagrams are like squares "breathing out" (they expand), while the crosses are squares "breathing in" (they contract).
Tiled Static Octagons
This pattern is based on the static octagon construction we tried earlier, so we need to apply that on the grid. Happily, there's no need to draw all the squares and then mark eight points on every single one of them! We only need the outermost points, because everything joins up together.
Step 1
Dry point on the corner of your bounding square, opening to the centre of the circle, mark two points.

Step 2
Repeat this at the other three corners of the bounding square, marking six more points.

Step 3
Continue doing this with the dry point on the intersections below, which are essentially the corners of the (virtual) smaller squares around each circle.

Step 4
Using a softer pencil so that you can see these lines better over the old grid, connect diagonally all the peripheral points you just marked. This is a new grid with new intersections.

Step 5
Connect the intersections to obtain octagons that are adjacent on one side.


And to finish, here's a whole other pattern that appears if you connect the lines so the octagons overlap:


That's all for this lesson. Solely working with 4 and 8, we learned to construct squares, octagons and both four- and eight-pointed stars in two different states, then the square grid associated with these numbers and four patterns directly yielded by this grid—and there are more out there than can possibly be listed. Next month we will follow the same process with another pair of numbers: 6 and 12.


