
Nature is the most inexhaustible source of inspiration! Follow me in this tutorial and let’s make a dedication to the beauty of nature by painting a lovely cartoon landscape in Adobe Photoshop, using default brushes with textured edges, creating a pastel drawing effect. We’ll start with a blank page and go through the full process of creating our sketch, enlivening it with colors, and filling our artwork with details. Let’s get started!
1. Create a Rough Sketch and Make a Quick Underpainting
Step 1
Make a New Document from a Preset, selecting Film & Video and choosing the desired size. After you hit OK, you’ll get a blank canvas with the Guides already placed automatically, helping you to build the composition.
Since we’re working with raster graphics, which can’t be scaled without losing their quality, let’s increase the size of our canvas. Go to Image > Image Size and increase the Resolution to 4000 px Wide (increasing the Resolution as well).

Step 2
Create a New Layer for our sketch and take the Brush Tool (B). Click the right mouse button to call out the Brush list and proceed to options (the gear icon). SelectDry Media Brushes in the drop-down menu and append the selected set to your brushes list.
Select the Wax Pencil brush from the new list and let’s start sketching. Don’t think about the tidiness of your sketch and the smoothness of your lines at this stage. Concentrate on the overall idea and composition of our future landscape. Start by depicting two rounded hills in the bottom of the canvas.

Step 3
Place a large tree in the left part of our image, partially hiding its crown and trunk, so that the tree looks bigger and closer to the viewer. Proceed by sketching a big curved ridge of mountains in the distance. Add another hill in the right part of the canvas in order to balance the composition.
Finish up by depicting another tree of a smaller size, closer to the center, and fill the image with minor details, such as clouds and plants, making some rough strokes for the grass, tree-bark and stone texture. Lower the Opacity of our sketch layer to prepare it for coloring.

Step 4
It may be hard to define the overall palette of our future landscape at first glance. We may color separate objects and then find out that the colors don’t match or that we’ve lost the right direction of the light while working on separate pieces.
So, in order not to lose time editing inappropriate coloring later, let’s define our palette at the very beginning and create a so-called undercoating or underpainting. In other words, we create a colored sketch, choosing the basic colors, which we will be refining. This will save a lot of time and make the actual painting process much easier.
Create a New Layer beneath the outlines layer for our underpainting. To start with, select one of the default Photoshop brushes from the Round Brushes with Sizeset, called Airbrush Pen Opacity Flow.
Check the upper control panel and set the brush Opacity to 100% and Flow to approximately 80%. Enable the Pressure for Opacity and Air-brush functions to make the strokes softer and more versatile. Pick a dark-turquoise color in the Colorpanel and start coloring the tree crown, making wide strokes.

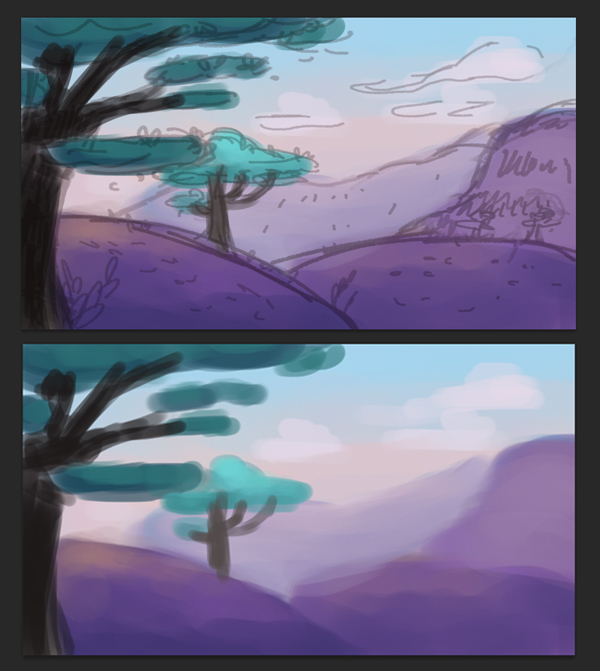
Step 5
We'll vary the brightness of the colors depending on the location of the objects. Let's use the darkest shades for the foreground and the lightest ones for the distant elements in the background. Paint the second tree with lighter turquoise color. Make both tree trunks dark brown and move on to the front hills, filing the ground with rich violet tints.
Add a touch of yellow to the hills, filling them with sunlight, and paint the sky with a gentle gradient from light blue on top to a very light yellow closer to the mountains.

Make the background mountains much lighter than the foreground hills, emphasizing the distance between the objects. The colors look harmonic at this step, so now that we’ve set up the palette, let’s move on and start painting the clean copy.
2. Color the Base of the Landscape
You can toggle the layer visibility by clicking the eye-icon next to the layer in theLayers panel. This way you can hide and disclose the underpainting layer, picking the colors from it with the Eyedropper Tool (I) (or by holding the Alt key while you have the Brush Tool (B) selected).
Another convenient way to use the created palette is to save the underpainting as a new file, open in in a new window and pick the colors from there, while you’re painting the main picture.
Step 1
Start by making a New Layer for basic colors. Use the Soft Pastel Large brush and pick the foreground hill color (dark-violet). Start painting the hill that is closer to our viewpoint, making wide grungy strokes. We need to keep this texture of the brush in order to achieve a grainy effect of our artwork.

After filling the whole hill with dark-violet color, pick the lighter hue and make some strokes on top, adding dimension.

Step 2
Use the red-yellowish tint to add a gentle touch of sunshine to the top of the hill. Make “tapping” moves with your brush to create grungy elliptical spots, making the strokes look like real pastel marks.

Step 3
Paint the tree trunk with dark-brown color, adding bright lilac spots for the overtone. Start covering the right side of the trunk with light-pink spots, creating a subtle tree bark texture.

Step 4
Fill the second hill with lighter violet color, adding texture with our pastel brush.

Step 5
Let’s continue and apply a linear gradient from light-blue to gentle pink to the sky. Select the Gradient Tool (G) and click on the gradient drop-down menu in the control panel above to access the Gradient Editor. Select the appropriate colors at the edges of the slider.

Apply the created color harmony to the sky by making a vertical line with theGradient Tool (G).

Step 6
Build up the most distant mountains by painting them with greyish-lilac color and adding lighter grey spots on top. This way we’re forming a so-called aerial perspective between the objects. There is a thick layer of air between the viewer and the distant object, so as the object moves away from the viewer, it becomes lighter, more blurred and desaturated. We can apply this natural effect to our artwork by making the closest elements much darker than those in the distance. This makes the picture much more realistic and three-dimensional.
Make short tapping strokes, adding vertical spots to our mountains in order to maintain the direction of the strokes that we’ve made before. This adds a specific rhythm to our painting.

Step 7
Let’s make our composition more intricate and add contrast colors by forming the dark-green foliage for the trees. Start with the darkest shades and then gradually add lighter green strokes on top of the crown, moving with the same short vertical strokes. Make the closest tree darker than the one in the distance, showing the perspective.
Feel free to create New Layers for separate objects or even for separate color layers. This helps to maintain a more flexible workflow, because you are be able to fix a small part of your image much more easily when you don’t need to redo the entire object.

3. Outline the Main Objects & Add Minor Details
Step 1
Let’s use another brush and make our artwork sharper and more detailed. Select the Conté Pencil on Bumpy Surface brush from the same Dry Media Brushesset. Pick the darkest violet tint from our front hill by holding the Alt key, and start tracing the edge of the hill with the Brush Tool (B). Make a thick and steady line, at the same time adding shorter strokes here and there, creating a “hairy” cartoonish effect.

Step 2
Draw several wisps of grass showing above the edge of the hill, and start doodling some simple branches with leaves, separate grass-blades and schematic floral silhouettes on the ground.
Don’t make the elements too overloaded with details. Otherwise, our artwork will seem too messy, because all these strokes, leaves and flowers are too small, hence they won’t be distinctive when you zoom out the image. Let it be, for example, just a curved line for the plant’s stem and some tiny loops depicting leaves.

Step 3
Add a few larger and darker plants on the foreground, next to the trunk, and start drawing out the tree itself, forming its bark. Use dark-brown, dark-violet and light-pink colors, making short vertical strokes, reminiscent of the cracks and notches of real tree bark.

Step 4
Increase the light spot on the right side of the tree by making the bright-pink strokes thicker. Fill the foreground with flowers and plants, covering the blank space near the tree. Add thin outlines to the farthest tree as well.

Step 5
Use separate layers for the outlines and details. In this case, you won’t damage the color layer beneath if you use the Eraser Tool (E) to fix the outlines. Fill the front hill with more spots, grass-wisps and stems. Use light pink to vary the brightness of the strokes, making the composition more diverse.

Step 6
Let’s move on to the bushy part of the trees and form the crown. Start drawing small curved lines or half-loops, depicting the silhouettes of the leaves. Gradually move from one edge of the crown to another, covering it with separate leaves of lighter-green color.

As soon as you finish with one piece of the tree crown, switch to another, using the same technique.

Step 7
Move on to the right part of our composition and cover the second hill with dark and bright floral elements, depicting tiny flowers, grass-blades and spots.

Step 8
Switch to the mountains and cover them with rows of short vertical stokes, like scratches. This way we are forming the rock texture that differs from the foliage and lawns that we’ve painted on the foreground.

Step 9
Let’s make the sky more vivid to create a sunshine effect, while the sun is still hiding behind the mountains early in the morning, filling the sky with bright hues of pink and orange. Add brighter pink and blue with thick, wide strokes.

Then blend these colors with each other, softening the edge between strokes by lowering down the Opacity of the brush and painting above with the same “tapping” movements. Add a gentle touch of orange next to the top of the mountains.

Step 10
Fill the empty space in the upper part of our artwork with light watercolor clouds by forming several feathered white shapes with light, semi-transparent strokes. Make the shapes smooth and flowing to create a sense of motion in the air. Emphasize the curved shape with thin strokes and outlines.

Step 11
Any artwork becomes more interesting and fancy if you enliven it with creatures or characters. Let’s add some! Sketch a flock of sheep browsing the grass on the hill. Make the sheep simple, consisting just of a cloud-shaped body, head and legs.

Step 12
Color the sheep, moving from the blurred spot to a defined shape with curly outlines.

Step 13
Color other sheep in the same way. These cute little fellows help us to fill the empty space and to add depth to our composition by showing the size difference between the objects and their true scale.

Great Job! Our Pastel Painted Landscape Is Finished!
Finally we’ve worked out all the pieces of our artwork and created a well-balanced composition with a harmonic palette. I hope you’ve enjoyed using Dry Media Brushes and discovered some useful tips and tricks about preparing a custom palette, building a composition and perspective, and forming the overall style of such landscape paintings. Good luck, and let the inspiration guide you!


