
In this tutorial you’ll learn how to create a uniform grid for laying out a single-sheet A2 calendar, as well as using Tables in Adobe InDesign to design simple, easy-to-edit layouts for each month of the year. You can apply the retro-themed colors and styles suggested in this tutorial, or use the calendar as a template for applying your own colour palettes and font styles.
1. Create an A2 InDesign Document for Print
Step 1
Open InDesign. In the welcome window select New Document, or go to File > New > Document. Set the Intent to Print, No. of Pages to 1 and uncheck Facing Pages.From the Page Size drop‑down menu select Custom... and type 'A2 Calendar' into the text box at the top of the window that appears. Set the Width to 420 mm and the Height to 594 mm. Click Add and then OK. This creates a new Custom Page Size.

Step 2
Back in the New Document window, set the Top Margin to 48 mm, Bottom to 30 mm, and both the Left and Right Margins to 25 mm. We won’t have any colour bleeding over the trim edge of the calendar in this example, but just in case you want to apply any all-over colour to the design later, set the Bleed to 5 mm on all sides.We want to create a grid structure for our calendar, to allow the months to sit evenly spaced on the page. Creating columns is the easiest and most foolproof way to do this. So set the No. of Columns to 4, with a Gutter value (the space between the columns) of 20 mm.


2. Create a Dieline
When printed, your calendar will also need to have a hole cut towards the top to allow it to be pinned or nailed to a wall.Step 1
Open the Layers panel (Window > Layers) and double-click on the default Layer 1 to open the Layer Options window. Rename the layer Die Line and click OK.
Step 2
Navigate to the top of the page, and pull a guide down from the top ruler (View > Show Rulers) to Y position 12 mm.Select the Ellipse Tool (L) from the Tools panel (Window > Tools, if not shown by default) and, holding down Shift, click and drag to create a perfect circle. From the top control panel, adjust the diameter of the shape to 9 mm.
Position the circle centrally on the page, the top edge just touching the guide you created.

Double-click on the swatch name in the Swatches panel to open the Swatch Options window. Here, you can redefine the color as a Spot Color from the drop‑down menu. This tells InDesign that the color of the line is unique, and not simply a blend of the normal printing inks. Click OK.


3. Choose a Typeface and Color Palette
Step 1
For now, you can lock the Die Line layer, by clicking in the blank space to the left of the layer’s name in the Layers panel. Click the Create New Layer icon at the bottom right of the panel, or select New Layer... from the drop‑down menu accessible from the top-right of the panel.Double-click the new layer and rename it Calendar Artwork. Click OK.

Step 2
I’ve decided to go for a retro-inspired, colorful, mimimal calendar design, which will look stylish in a kitchen or home office.To complement the design, I’ve used Quicksand, a lovely, free sans serif font with a mid-century feel.
Step 3
Our calendar’s going to be filled with color, giving a different look to each of the 12 months.Open the Swatches panel (Window > Color > Swatches) and select New Color Swatch from the drop‑down menu.

- C=45 M=0 Y=26 K=0
- C=22 M=26 Y=100 K=0
- C=2 M=30 Y=17 K=0
- C=0 M=0 Y=0 K=79
- C=3 M=52 Y=78 K=0
- C=34 M=47 Y=63 K=8
- C=0 M=76 Y=32 K=0
- C=0 M=85 Y=68 K=0
- C=43 M=0 Y=8 K=0
- C=43 M=0 Y=45 K=0
- C=22 M=26 Y=57 K=0
- C=0 M=41 Y=50 K=13

4. Create a Grid for the Calendar
We already have half of our grid set up, by creating four columns earlier, in the New Document window. We can now divide up the grid further to create uniform sections for the title and months on the calendar.Step 1
Remaining on the Calendar Artwork layer, pull horizontal guides down from the top ruler to the following Y positions: 156 mm, 181 mm, 290 mm, 315 mm, 422 mm, and 447 mm.
Step 2
Navigate to the top left of the page. This is where we’ll place the title of the calendar and a small ‘Notes’ section.Select the Type Tool (T) and drag to create a text frame that fits snugly within the first two columns, towards the top of the page.
Type ‘2015 (paragraph break) Calendar’. Set all the text to All Caps from the Character Formatting Controls panel running along the top of the screen, and set the Font to Quicksand.
Highlight ‘2015’ alone and set the Font Weight to Light, Size to 159 pt, and Font Color to a yellow-green, C=22 M=26 Y=100 K=0.
Highlight ‘Calendar’, keep the Weight as Regular, set the Size to 95 pt, Leading to 114 pt, and the Font Color to a muted grey swatch, C=0 M=0 Y=0 K=79.

Step 3
Select the Line Tool (\) from the Tools panel and, holding Shift, drag the mouse from left to right to create a horizontal line 175 mm in Length.Open the Stroke panel (Window > Stroke) and set the Weight to 13 mm and Type to Right Slant Hash. Set the Stroke Color to the same yellow-green as before, C=22 M=26 Y=100 K=0.
Position this line just below the text frame, resting on the guide that sits at Y position 156 mm.

Step 4
You may have counted up the sections formed by the grid and sussed out that there are 14 free sections remaining on the grid. That’s no problem—that gives us two sections to fill with something extra. You could drop in a photo or illustration, or, as I’ve done here, create a useful ‘Notes’ section where you can write down important upcoming events or even a to-do list.Select the Type Tool (T) and drag to create a text frame 175 mm in Width and 110 mm in Height. Position this below the line you created in Step 3, above, resting comfortably in the grid section, straddling the first two columns.
Type ‘Notes:' into the frame, setting the Font to Quicksand Bold, Size 28 pt, All Caps and Font Color to C=0 M=0 Y=0 K=79.
With the text frame selected, go to Object > Text Frame Options and set the Inset Spacing to 6 mm. Click OK.
Then hop up to Object > Corner Options and set the Size to 6 mm and Shape to Rounded. Click OK.


5. Use the Table Function to Create a Dates Grid
This is what we’ll be creating. A simple layout with a text frame and colored shape at the top, a table for the dates below that, and a formatted line at the base of the design.You will need an accurate 2015 calendar to copy the dates from. I placed a basic calendar image lifted from the Internet into the Pasteboard, and used this as reference for the dates.

Step 1
Select the Type Tool (T) and create a text frame, Width 77.5 mm, and position it centrally in the first (far left-hand) column on the page, below the ‘Notes’ section, with the top edge of the frame resting on the guide.Type ‘January’, set the Orientation to Align Center (from the Character Formatting Controls panel, at top), Font to Quicksand Bold, Size 40 pt and Font Color to C=45 M=0 Y=26 K=0, a minty blue.

Step 2
Select the Rectangle Tool (M) and drag to create a shape 77.5 mm in Width and 19 mm in Height, setting the Stroke Color to [None] and the Fill to C=45 M=0 Y=26 K=0.Position this at Y position 332.5 mm, just below the ‘January’ text frame.
Step 3
To create a table, you first need to create a frame for it to sit in. So select the Type Tool (T) and drag to create a text frame 77.5 mm in Width and 62 mm in Height. Position this frame just below the mint-green rectangle.With your cursor sitting in the text frame go to Table > Insert Table.


Step 4
Type M, T, W, T, F, S and S into the top row of the table. You can highlight the whole row using the Type Tool cursor to format the text.

Step 5
Using a basic 2015 calendar as reference, type the dates for the month into the relevent cells of the table. Highlight the rows with the type cursor and set the Font to Quicksand Regular, Size 17 pt, Align Center and Font Color to C=0 M=0 Y=0 K=79.
Step 6
To get rid of the visible grid around the table, highlight the cells (you may need to highlight the Header Row and Body Rows separately) and go to Table > Table Options > Table Setup. Under the Table Border options, select [None] as Color. Click OK.


Step 7
Select the Line Tool (\) and, holding Shift, drag from left to right to create a line 77.5 mm in Length. From the Stroke panel (Window > Stroke) set the Weight to 6 mm, Type to Right Slant Hash and, from the top control panel set the Stroke Color to C=0 M=0 Y=0 K=79.
6. Build the Months for Your Calendar
Step 1
Your first month is finished, great work! Drag your cursor over to select the text frame, colored rectangle, dates table and hashed line; and right-click (Windows) or Control-click (Mac OS) > Group for convenience.Select the grouped elements and Edit > Copy and Edit > Paste. Repeat ten more times to create a template for each month. Arrange them on the page using the grid structure you created earlier.

Step 2
Now all you need to do is edit the names of the months and the dates accordingly. Apply a different swatch, from the set we created earlier, to the title, rectangle shape and day letters of each month, giving each a unique look.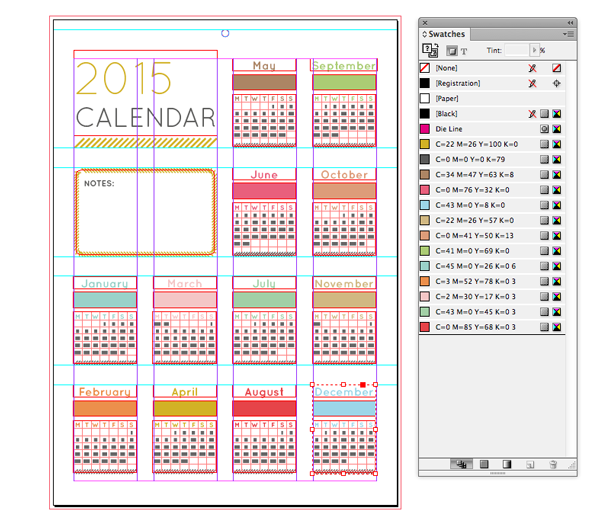

7. Export your Calendar for Print
You’ve finished your calendar—well done, it’s looking great!Now, all you need to do is export it to PDF, to make it ready to send to print. Before you send your calendar to print, you should get in touch with your chosen printer and ask if they have any recommendations for how you should provide the final artwork for print. They should also be able to advise you on paper/card weights and finishes, and what would be a better value choice if you’re on a tight budget.
Step 1
Go to File > Export and select Adobe PDF (Print) from the drop‑down menu. Name the PDF file and click Save.
Step 2
From the Adobe PDF Preset drop‑down menu at the top of the window, select [PDF/X-1a:2001].

Congratulations, Your Calendar is Ready for Printing!


.webp)


