
Many people find noses to be quite difficult, but in fact they are pretty simple: just a cone shape with two holes!
Okay, maybe not that simple, but you get the gist of it. Let's dive right in!
1. Building the Base of the Nose
Let's start off with a generic nose, to see some tips on how to get it right.
Step 1
The nose is a trapezoidal structure, with three big blobs at the bottom: a larger center one, and two smaller side ones. Simple as that!

Step 2
Create a new document, and set your background color to white
#ffffff.
Then set your foreground color to black
#000000 and grab the Brush Tool (B), setting it to a hard, round, small sized brush.
Using the image above as reference, draw a basic sketch of a nose. Make sure to include two small holes for nostrils:

2. Shapes and Types of Noses
Noses come in all shapes and sizes. You can have so many combinations and variations of each combination that it's safe to say each nose on Earth is unique.
However, you can narrow them down to a few standard shapes and sizes, based on genetic heritage.
As artists, we need to remember that noses also reflect our character's personality at all times. For example, noses with large "blobs" usually express friendliness and a bubbly personality, while crooked, thin noses are associated with witches!
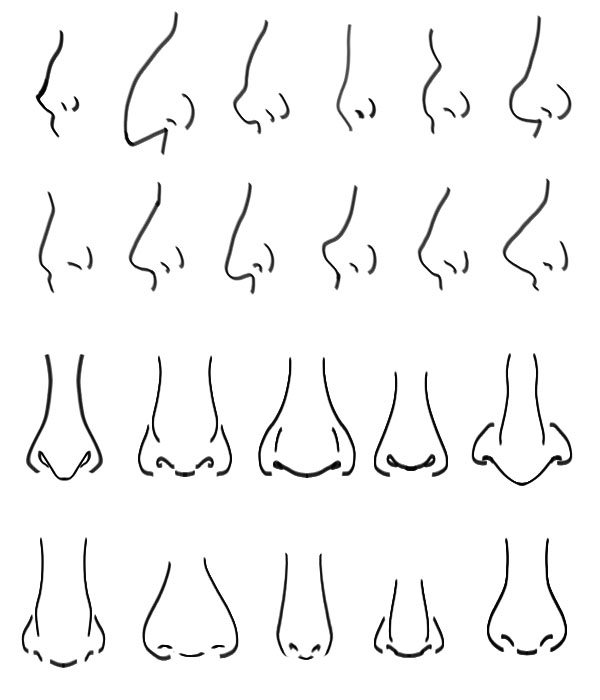
3. Various Nose View Angles
Of course, as the head tilts, the view angle of the nose changes. Below are a few examples:

4. Painting the Base
Let's go back to the sketch we made earlier.
Name the sketch layer... "Sketch". Very original name, isn't it?
Create a new layer and place it under your "Sketch" one. Name it "Base Coloring".
Set your Foreground color to
#d59077 and using a hard, round Brush (B) fill in the base of the nose with color: 
5. Adding Base Shading
Step 1
Set your Foreground color to
#f5bd98 and set your Brush (B) to a hard, round one, with Opacity Jitter turned on and set to Pen Pressure. Draw around the center of the nose, where it has the tallest "elevation". When you get to the bottom and the tip, draw a rounder highlight. Repeat for the "wings" of the nose (aka, the two side blobs that hold our nostrils). 
Step 2
Next, set your Foreground color to
#fee0d6 and brush a narrower version of the previous step:
Step 3
Next set your Foreground color to
#76352b and brush around the bottom, the sides, and the edges of the primary central area:
Step 4
Next, use the Smudge brush provided in the downloaded ZIP (or any randomized angle chalk smudge brush for that matter) to blend the colors a little bit, like this:

6. Painting the Nostrils
Step 1
Set your Foreground color to
#2f1512 and lower your brush size to a 5–6 px one, and draw the base of the nostrils: 
Step 2
Pick a lighter brown such as
#8a4538 as your Foreground color and paint lightly around the bottom ends of the nostrils. This will emphasize the darker color the deeper within the nostril we go: 
Step 3
Next, choose an even lighter color such as
#f0b48a and lower the size of yourBrush (B) to only 2 or 3 pixels. Paint around the top edges of the nostrils. Then increase the brush size to 5 or 6 pixels and brush around the bottom of the "wings", as well as the bottom side of the main tip: 
7. Finishing the Nose Base Coloring
Step 1
Set your Foreground color to
#ce8469 and, taking the Brush Tool (B) again, set it to a round, 50% hardness one. Start with the top half, and brush on either side halfway between the edge and the middle, to blend the colors and create a uniform coloring. Don't be afraid to use the Eyedropper Tool (I) to sample other colors if needed! 
Step 2
Repeat the process for the bottom part. Use the dark brown
#6a2b22 to paint around the bottom of the nose and nose tip, for a more 3D look: 
8. Painting the Skin Texture
Step 1
Next grab the "Skin Texture" brush from the provided .abr file, and set your Foreground color to
#b45d48. Create a new layer, and set it to Multiply blending mode. Brush around lightly, to create a faint dark texture, similar to freckles. Lower the layer Fill to taste.
Step 2
Continue with the lighter skin pores. Using the same brush, make a new layer and set it to Screen blending mode.
Then set your Foreground color to
#fdd5b9 and brush around. Again, lower Fill as needed for a realistic effect:
9. Adding Personality: Beauty Marks and Piercings
Step 1
Create a new layer on top of your others. Name it "Beauty Mark".
Set your Foreground color to
#390c0c and take a hard, round brush and paint a small, oval shape anywhere you like on the nose. You don't have to make the edges very sharp—blur them a bit into the existing skin.
Step 2
Next take the lighter
#7e3e2e and draw a small highlight point on the beauty mark.
After that, set your working color to a dark reddish brown such as
#1a0505 and paint opposite the light source, to create a shadow that the beauty mark casts on the skin. Don't make it too dark or large—it's just a small beauty mark, not a wart.
Step 3
Now make a new layer, again making sure it's on top of every other layer, and name it "Piercing".
Take a light, neutral gray like
#9c9c9c and with a small hard, round Brush (B) paint half a circle:
Step 4
Next, take a dark gray like
#444343 and paint on the inside of the half circle. Also slightly darken the bottom half: 
Step 5
Let's set the Foreground color to white
#ffffff now. Lowering the size of our brush to only a couple of pixels, paint a few highlights:
Step 6
Once that is done, create a new layer and move it under the "Piercing" one. Name it "Hole".
Set your Foreground color to
#57211f and your Background one to #ffdcc2. Draw a small dark oval next to the inner end of the piercing. Then press the X key to switch your Foreground and Background color and, lowering your brush size to a few pixels only, brush a tiny highlight: 
Step 7
Create a new layer, move it under your piercing-related layers, and name it "Piercing Shadow". Set it to Multiply blending mode. Set your Foreground color to
#552119and brush a small curved line over the skin area: 
10. Shading the Skin Around the Nose
Step 1
Create a new layer and place it under your main nose one. Name it "Skin".
Let's quickly create some skin, to illustrate the point at hand. So set your Foreground color to
#d79280 and grabbing the Brush Tool (B) again, block in an area behind the nose:
Step 2
Next set your Foreground color to
#72271b and paint around the sides and the bottom. At the bottom, create an inverted U shape for the shadow of the crease between the nose and the lips:
Step 3
Grab the very light
#f7be98 and enhance the crease folds and the areas around the left and right, where the cheeks should be. Use the Eyedropper Tool (I) to sample colors and block in to create a smooth texture:
Step 4
Take the "Skin Texture" brush and, setting your Foreground color to
#94361e and the Background one to #f6c09b and on a new layer, start brushing skin texture. Always press X to switch your foreground and background colors for a more realistic effect: 
11. Painting Environmental Light and Light Sources
Step 1
Of course, light can come from any direction. Here are a few examples:

Step 2
Let's go over the process for one of them.
First, duplicate all your nose layers. Then flatten the duplicates into a single layer. Name it "Flattened Nose".
Then create a new layer and move it on top of your flattened nose one. Right click on it and choose Create Clipping Mask. Set it to Linear Dodge blending mode and lower its Fill to about 40%.
Set your Foreground color to
#bb8a41 and taking a soft, round brush, paint around one side. Paint until approximately the middle of the nose: 
Step 3
Create a new layer. Again right click on it and assign it as a clipping mask to the main flattened nose one. Set your Foreground color to
#42120c and brush on the other half of the nose. Then set the layer to Multiply blending mode and lower itsFill and Opacity to about 70%.
Step 4
Lastly, set your Foreground color to a nice
#ffa800 and create a new layer which you'll clip mask just like the previous two. Set it to Color Dodge and lower its Fill to about 50%.
Grab the Brush Tool (B) and set it to a soft, round, small one, and then brush on top of the piercing to create the light reflection:

Hope you found this useful. Feel free to let me know in comments if you hit any bumps or need a more detailed explanation for a step! Stay artsy!


