
Animating vector icons and designs is made easy with Adobe Illustrator and Adobe Photoshop. Simply create simple flat icons and import them into Photoshop for easy GIF creation. We'll create three animated icons and explore a couple techniques for creating smooth, easy animations.
1. Draw the Envelope
Step 1
Create a New Document in Adobe Illustrator. I'll be using Adobe Illustrator CC, but you can easily adapt these techniques and designs to earlier versions.
With the Rectangle Tool (M), draw a light-blue rectangle. Select the bottom two anchor points with the Direct Selection Tool (A), and pull the Live Corners inward to round out those two corners. Use the Pen Tool (P) to draw a stroked line in medium blue that defines the opening of the envelope.

Step 2
Draw two lines either with the Pen Tool or the Line Segment Tool (/) that meet near the center of the envelope. Expand your strokes under Object, and use the Shape Builder Tool (Shift-M) to select the non-intersecting portions of the lines from the rectangle in order to delete them. This is our basic envelope object.

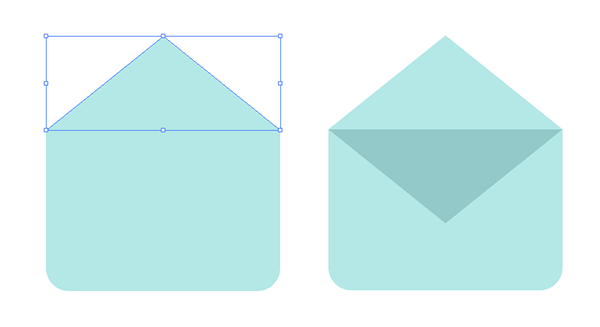
Step 3
Copy (Control-C) and Paste (Control-V) the envelope design. Draw a triangle from top corner to top corner for the opening of the envelope. Select the triangle while holding down Alt, and drag out a duplicate of the triangle. Rotate (R) it around to create the opening of the envelope, and set the fill color to a darker blue. For the sake of this demonstration my lines are missing from the design below, but will be used in the final version.
Step 4
Now you should have two envelopes: one open and one closed. Our goal is to create several iterations of envelopes that bridge the gap between the closed envelope and the open envelope for our final animation. Group (Control-G)together each of your envelope's components.

2. Create Different Forms of the Envelope
Step 1
Duplicate the open envelope. Use the Direct Selection Tool to grab the top triangle's top anchor point and drag it downward until it almost completely covers the dark triangle. Duplicate this envelope group and pull the lighter triangle's lower point upward a bit so the envelope looks like it's opening more. We'll continue duplicating each envelope and moving the triangle upward until it's back to the starting point again.

Step 2
In the end, including the closed and open envelopes, I have nine envelopes for my animated icon. You can check out the placement of the triangles and their anchor points below. Make sure each envelope is grouped separately so they'll be easy to import into Adobe Photoshop later.

3. Create the Letter
Step 1
Draw a light-yellow rectangle and Copy and Paste it over each envelope. The goal is to have the rectangle move upward in even increments as it's opening. I decided to go with seven rectangles total for my design.

Step 2
Select the first envelope and its overlapping rectangle. Using the Shape Builder Tool, select the portion of the yellow rectangle that intersects with the inside of the envelope. Delete the non-intersecting portion of the yellow rectangle so you're only left with a small triangle of the yellow rectangle. Repeat this technique on the other envelopes.

Step 3
Continue defining the yellow letter shape for each envelope. You can see what my letters look like with their corresponding envelope below.

Step 4
Draw several thin rectangles to simulate lines written on the letter. Alignand Distribute the rectangles in the Align panel. Then, Unite them in the Pathfinder panel.

Step 5
Place multiple sets of rectangles over each envelope. Note how some letters show more lines than others. I've placed sets of rectangles on six of my nine envelopes.

Step 6
Select the letter shape and the rectangles. Using the Shape Builder Tool, select the non-intersecting portion of each rectangle and delete them. Repeat step this for all of your envelopes.

Step 7
Group together each envelope and its components so you have nine separate groups in total. Now we're ready to animate our design!

4. Animate the Envelope
Step 1
Open Adobe Photoshop and create a New Document. Since we're creating a simple web graphic, I've set my document size at 72 dpi (no reason for a higher resolution since we're not printing our artwork), 250 px width, and 300 px height. You can create a larger or smaller file if you wish, and also crop your document whenever you need to do so.
In Adobe Illustrator, Copy each envelope group and Paste them into your Adobe Photoshop document. If you want to resize your image without a loss in quality, paste each group in as a Smart Object. If you're happy with the size, Paste them into a new layer as Pixels.

Step 2
Make sure each object is layered sequentially. Additionally, you'll want to select all nine layers and Align them to their centers and bottom edges.

Step 3
Open the Timeline panel and create a New Frame Animation. Starting with the closed envelope layer (hide the others), create a New Frame and set the frame's delay to 0.1 second. For each frame, unhide the next layer and hide the previous layer until the envelope is open. Then, set the delay at 0.2–0.5 seconds.
Repeat unhiding and hiding layers, but this time go in reverse order so the envelope is closing again. Make sure it's looped "Forever" so the animation keeps opening and closing.

Step 4
Sit back and hit Play on the Timeline panel to watch your gif loop. You can adjust your frame delays for a slower or faster gif as well as change how long the closed or open envelope is seen in the Timeline panel. Let's move on to the other icons and additional techniques for animating.

5. Draw a Chat Icon
Step 1
Back in Adobe Illustrator, either in a new document or on a new layer, draw a circle using the Ellipse Tool (L). Then, overlap the circle with a small triangle and Unitethe two shapes together: this is your basic chat bubble. Draw three circles for ellipses to be used in the animation later.

Step 2
Copy and Paste the chat bubble and Reflect it over a Vertical Axis. Change the second bubble's color to a darker hue. Scale the ellipses down so they fit into the chat bubble. Next we'll add some text.

Step 3
Draw or type out simple words like "hey" and "hi", either using a handwritten-style font you enjoy or drawing each letter with the Paintbrush Tool (B) using a default calligraphic brush. Make sure any text or strokes are converted to objects and that each letter is a separate object.

Step 4
Type or draw simple text emoticons within the chat bubbles. Alternatively, you can draw emojis instead. It's your chat icon and the overall style is up to you. In total, there are 14 separate components below: three ellipses, five letters, two chat bubbles, and four objects creating emoticons. Each one will be Copied and Pastedinto a new document in Adobe Photoshop as a separate layer.

6. Animate the Chat Icon
Step 1
In Adobe Photoshop, Paste each of the 14 icon components into your document as a new layer. Group together like objects as I've done below in the Layers panel: the components for each word, emoticon, ellipses, and chat bubbles. This keeps your document organized and makes animating your GIF easier overall.

Step 2
To begin, I want my first chat bubble to come in from the left side. I've hidden all of the components except for the first chat bubble and placed it outside my document frame for the first Timeline frame. Within seven frames, I've moved my chat bubble to the center of the document from the left side. You can move and alter a layer for each new frame without affecting the frame before it.
Once the chat bubble is in view, I start the "typing" effect. Each ellipse is visible one at a time within the first chat bubble, followed by the first message of "hi". Then I begin to slide the second chat bubble into the frame, while the first chat message (grouped together in the Layers panel as "hi") is reduced in opacity (by 20% each frame) in the Layers panel.

Step 3
Here's a look at my Timeline panel for the entire GIF. I have over 30 frames in total and most of them have a 0.1 second delay. Some components, like the ellipses, go "dot, dot, dot" at a 0.3 second delay, while the fading of words or typing of letters and emoticons is faster when possible. You can adjust your preferred delays as you see fit. You want the typing to be smooth and readable without being too slow and choppy.

Step 4
You can check out my final animation below: the first chat bubble enters and starts typing, the second bubble responds, and both send emoticons and then move back out of frame. We have to make one last animated icon that combines the ideas and techniques used previously.

7. Draw the Camera
Step 1
In Adobe Illustrator, draw a rectangle. Select the top two anchor points with the Direct Selection Tool, and pull the Live Corners inward. Draw a second, darker rectangle below the first, and round out its bottom corners. Note that the second rectangle is smaller than the first, but both share the same width measurement.

Step 2
In dark gray, draw a thin rectangle for the instant film opening on the bottom half of the camera. Draw rounded rectangles and a circle for the camera's lens, viewfinder, and additional designs on the camera's face.

Step 3
Add a red circle and a dark, warm gray circle for the camera's button. For the lens, stack gray and blue circles on top of each other, alternating between dark and light. Use the Direct Selection Tool to push the top anchor point of the inner circle downward so the lens looks shiny (see the design below).

8. Create Camera Animation Components
Step 1
For the shutter animation I wanted a simple open and close animation. You can, of course, create more complex shapes if you want. For my shutter I drew a dark-gray circle. Copy and Paste the circle and cut it in half (overlap the horizontal center of the circle with a line segment, and then Divide the two shapes in the Pathfinder panel).
Copy and Paste the two circle halves. Move each half away from the center and use the Direct Selection Tool to move the bottom two anchor points to squish up each circle half slightly. Repeat for six total iterations that bring the shutter from closed to open. All six of these groups will be Copied and Pasted into the Photoshopdocument during the animation stage.

Step 2
Now we can work on the instant film. Essentially you're drawing a series of rectangles that get larger and larger. Start with a thin, light-gray rectangle in the center of the lower half of the camera icon. After a couple of rectangles, you'll add a dark-gray rectangle to the light-gray one. Notice how they both get longer and longer as you go.

Step 3
Here's a final look at all of the camera components: the camera, the six shutter shapes, and the eight (including the one on the camera) film shapes. In total I'll be copying and Pasting 15 components into the Photoshop document in the next section. Let's animate this camera!

9. Animate the Camera
Step 1
As with the icons before, Copy and Paste each component into your Photoshopdocument. I found it easiest for each icon to have its own document within Photoshop so that I was concentrating on one animation at a time.
Group together the shutter layers and the film layers in the Layers panel above the camera layer. I started with the shutter animation: close and open the shutter so the lens looks as if it's blinking.

Step 2
Then, you'll want to animate the film going in and out of the film slot (alternatively, it can fall off of the camera, as it really would). Once again you'll cycle through each film component, one after the other, and then create a frame for each in reverse.

Step 3
Finally, a quick note on saving your GIF files. Go to File > Export > Save for Web (Legacy) (Alt-Shift-Control-S) and select GIF from the drop-down menu. Limit the GIF to 32 colors or less, if possible. You can preview the animation, resize your file, and decide on the file's quality before hitting Save.

Step 4
Here's a look at my final camera icon in action!

Great Job, You're Done!
Whether you're creating a gif with each frame drawn in Adobe Illustrator, manipulating components while in the GIF creation stage, or a mix of both techniques, animating vector graphics is simple and fun. Share your creations in the comment section below, or push these ideas to their limits and create a whole set of animated icons or even scenes ready for web publishing and more!


