Creating digital art is like prepping for a great match. You can be one incredible victor if only you manage to defeat your biggest opponent—yourself. To win, it'll involve intense commitment, patience, and tons of strategy.
Does Drawing Everyday = Success?
If you draw a stickman for ten weeks straight, do you think that by week ten you'll have the skills to take on hyper-realistic portraits?
Sadly, no.
The biggest misconception I've seen artists make is the idea that if they draw every day their technique will automatically improve. This couldn't be further from the truth. Whether you digitally draw or paint every day, creating the same thing over and over again will only limit your skill sets.
The only way you'll ever learn how to get better is to challenge yourself. Artists can experience plateau too, so if you don't see your skills improving it may be a sign that you've become complacent. Switch things up and learn how to train like a creative athlete.
Train Like an Athlete
We all know that six-pack abs don't happen overnight, nor do Olympic gold medals. But if you want to see an incredible transformation in your art then you'll need to train like an athlete. And athletes don't get better by playing a sport the same way and expecting different results.
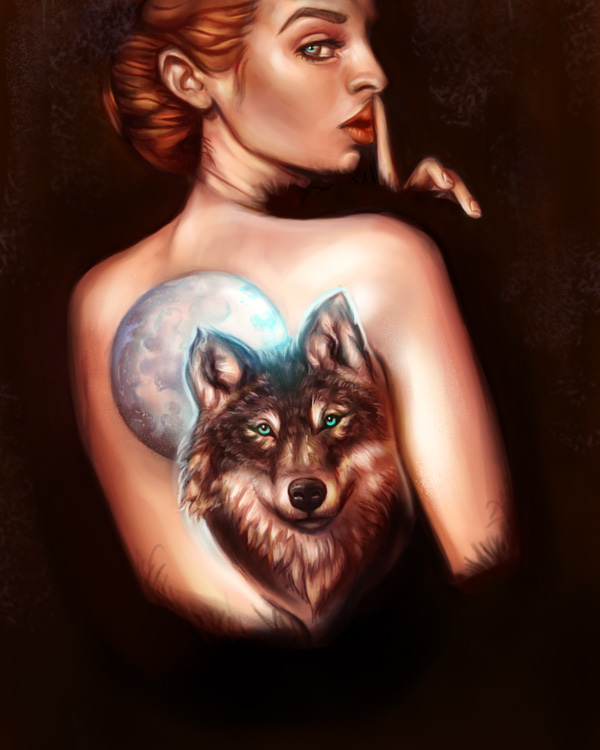
To see what I mean in action, here is what it took to get to the final result of the painting above. Follow along as I break down ten easy ways you can improve your technique for better digital paintings.
1. List Your Strengths and Weaknesses
Open a new document or take out a sheet of paper and divide it into two panels. On one side title it "Strengths", and for the other, "Weaknesses". List your creative strengths and weaknesses to get a better idea of where you're currently at. If you're having trouble filling out the list, ask a trusted peer for help.

Let's take a look at mine. Although it's relatively easy for me to get inspired, executing my ideas is often the problem. It can take me several weeks to finish one painting, and initially I wasn't really sure why. However, in the next steps I'll be able to discover this and other the reasons why I'm having issues during the painting process.

2. Determine Your Old Habits
What are the habits that are holding you back from creative success? There's no better way to determine them than to look at some of your old work. Place a couple of your old paintings side by side. Unless we're actively trying to get better, we tend to retain the same habits over time.

Here are a couple things that I notice looking back at my old work:
- I mostly paint portraits in one head position (straight-on).
- Zooming in at 100% view, my paintings look choppy.
- Sometimes I paint everything really dark.
- My initial sketches are incomplete.
The first step to improvement is knowing your weaknesses, but with this step you realize your bad habits by actually putting them in front of you. Keep a collage of your old work as a reminder of how far you've come and the things you'd like to improve.
3. Target Your Creative Goals
Now that you have an idea of what you need to work on, it's much easier to target your creative goals. Rome wasn't built in a day, so try not to take everything on all at once. The main areas that I want to improve are the line quality of my sketches, my overall sense of lighting, and switching up the body position of my subjects.

Here I'll tackle this by challenging myself to a new painting. With this painting, I'll do my best to stay aware of my habits and try to overcome them one step at a time.
4. Learn Strategy From Process Videos
Screenshots, animated GIFs, and videos are just three ways artists show the step-by-step process of their digital paintings. We live in a time in which professional artists are literally sharing their secrets, so take advantage of the goldmine of knowledge before you! It's easy to get lost in the wonder of these videos though, so I urge you to focus on picking up specific strategies artists use in completing their work.
As opposed to just watching in pure amazement, follow traditional and digital art videos with a mindful eye. Nowadays there are many tools in Photoshop that artists use other than brushes. Try to pick up on one new method you would like to incorporate into your process. Since improving my sketches would be absolutely paramount, it's important that I personally research videos specifically for cleaner line art.
I've bookmarked a video from artist Aaron Blaise. Not only does it cover great tips for likeness and line art, but I love using videos like this to motivate me before a new painting.
5. Develop Ideas Efficiently
If you don't work out your idea before actually painting it, you'll end up with dozens of files of unfinished work.
Trust me, I've got the desktop to prove it!
One of the best ways you can develop ideas efficiently is to create web diagrams or word lists to draw out all the characteristics you want in that painting.

For this painting, I want a lifelike tattoo design that steals the show from the subject. So I'll create a web diagram to properly develop this idea. At the center of the diagram is the main idea, which then branches off into different sections where I describe the details even further. And because I've already done similar paintings before, I'm keeping the general composition in line with those works.
6. Cheat Composition With Photo Manipulations
If creating compositions isn't in your forte, here is one way to cheat the process. Gather all your image references and simply photo manipulate them into the concept that you want in Photoshop. For my painting I used three free images from Pixabay, which I cut and pasted together to fully realize my idea.

Use your new photo manipulation as the guideline for your composition. This makes the process much easier because you don't have to waste a lot of time trying to figure out the different lighting scenarios, body positions, or details you'd like to include.

7. Improve Line Art and Sketch Quality
Because the previous photo manipulation did all the work for us, sketching your art should now be a breeze. As opposed to being overwhelmed by the composition process, now you can dedicate time to perfecting the quality of your line art.
In order to end up with the final line art, it will take several passes before you come up with something nice and clean. Yes, that means you will have to technically draw or at least trace the same sketch over and over again.
Start off with a rough sketch to understand the placement of all your details.

Then, lower the opacity of the rough sketch and create a New Layer (Control-Shift-N) above it dedicated to a cleaner version. The key to clean lines (as I discovered from my video research earlier), is to make fluid, deliberate strokes. Any time that one stroke seems out of place or doesn't go well with the rest of sketch, start that stroke over until it blends perfectly.
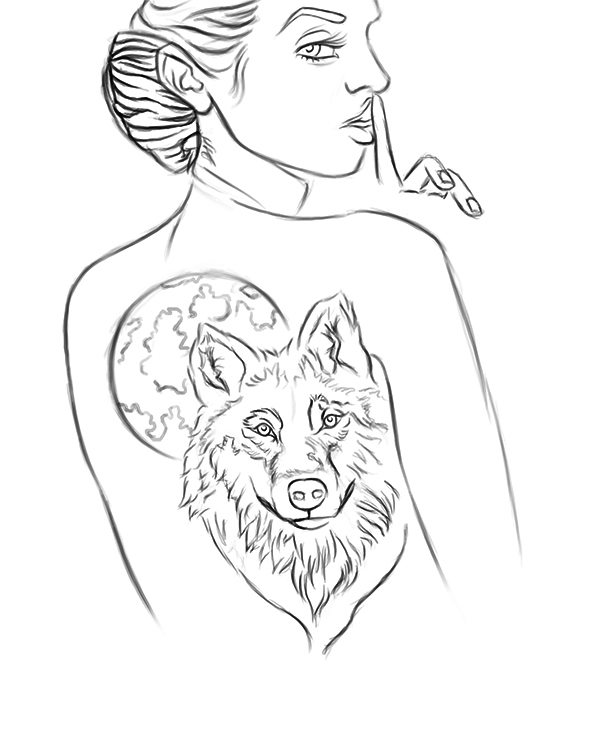
And here is the final result for my line art. It's probably one of the cleanest sketches I've ever made!
8. Work on Speed
There are a number of ways you can improve the speed at which you create digital art. One way in particular is by taking your initial sketch, and converting it into several thumbnails where you practice the lighting and coloring schemes.

The very act of practicing not only develops muscle memory, but also allows you to test-drive your sketch before you commit to the painting. I know this probably seems like giving yourself extra work, but actually you shave time off your overall painting hours by having a definitive game-plan before you start.
It can be a very discouraging feeling to know that your art didn't turn out the way you had imagined. Bypass those yucky, unproductive feelings so that you can rise above them and triumph in creating better art.
9. Study Small Details
Even if you're working on speed, it's a good idea to take a break every once in a while from your painting. If there are details in your painting that you've never painted before, create smaller studies dedicated to understanding the lighting, colors, or textures of those items.

As I mentioned previously, my goal for this particular painting is to improve the overall quality. This means that I want my brush strokes to be smooth and my textures to be realistic. So some of the studies that I do focus on the skin, hair, and animal hair textures. I make sure to experiment with Photoshop's preset brushes to create the look that I want. Once you've got the hang of those textures in your studies, tackle them in your final painting.
10. Develop Your Painting Formula
Just because you finish a painting, it doesn't mean you're done learning. Any time that you see improvements in your work, you should definitely take the opportunity to learn what you did differently to get there.
Break down the process into a formula. Remember, you're still a creative athlete, so you have to train your mind by exercising it often. For me, I chose to break down the formula into three different sections:
- What I need to do before I start (self-assessment, diagrams, and photo manipulations)
- What I need to do during the painting (line art, thumbnails, and studies)
- What I need to do to complete it (final tweaks and adjustments)
Once you get into the rhythm of your customized formula, I assure you that you will be cranking out paintings in no time.
Remember what I said earlier about taking weeks to finish a painting? Well, I finished this painting in just two days! Two days! One day was dedicated to concept development, photo manipulation, and line art, and the second was dedicated to the painting.

Conclusion
Despite the title, some might still consider these steps "hard". But the concept of hard work is subjective. And honestly, unproductive feelings only waste time. What you may consider hard to paint is different from person to person. But at the end of the day we all have one thing in common:
We just want to make better art.
Take a leap in trusting yourself, but be honest with your strengths and weaknesses. Picture yourself as a mad scientist experimenting with different methods for the perfect painting formula. Master that formula and your work will reflect it.
I hope you've enjoyed learning these steps to creating better digital illustrations. Good luck along your creative journey; feel free to share your own progress with us, and leave any questions below!
by


