1. Start a New Project
Launch Illustrator then go to File > New to open a blank document. Type a name and set up the dimensions then select Pixels as Units and RGB as Color Mode.Next, go to Edit > Preferences > General and set the Keyboard Increment to 1px and while there, go to Units & Display Performance and set the Units as shown below. I usually work with these settings and they will help you throughout the drawing process.

2. Create the Shape of the Avocado
Step 1
You will spend some time to create the shape of the avocado and I will explain it step by step because this is an important part of the tutorial. If you want to replicate the avocado, you will need the same shape that I used. Of course you can use a different shape but then all the settings for the Offset paths and the live effects will generate a different result and you will need to adapt these settings to your shape. This being said, let’s begin with the avocado shape.Grab the Line Segment Tool (\) and click on your artboard to open the Line Segment Tool Options window. Type 91.5px in the Length field and set the Angle to 0 degrees then hit OK. You will get the first horizontal line. Having this line selected, go to Object > Path > Add Anchor Points in order to add an extra point in the middle.
Next, use the Line Segment Tool (\) to draw a vertical line having the dimensions shown. Now arrange the two lines like in the image. Use the anchor point from the middle as reference and place the vertical line slightly to its left.

Step 2
Now that you have the two lines, use them as reference to draw a triangle between the end points as indicated. After that, delete the lines because you won’t need them again.
Step 3
While the triangle stays selected, go to Object > Path > Add Anchor Points twice in order to add three extra points on each side of the triangle. I’ve attached a number to these points because we will work with each one of them separately. Now, select anchor point “1” and go to Object > Transform > Move, type 33px in the Horizontal field and 10px in the Vertical field then hit OK. Next, select point “2” then go to Object > Transform > Move, type -32px in the Horizontal field and 10px in the Vertical field then hit OK. After these actions your shape should look like in the following image.
Step 4
Select point “3” and this time move it 36px horizontally and 2px vertically. Continue with point “4” and use the settings shown to move it as well.
Step 5
Next, select the points “5” and “6” then go to Move again and use the settings indicated for each point.
Step 6
Take the Delete Anchor Point Tool (-) and click on the points indicated to remove them then select point “7” and move it 2px horizontally and -18px vertically.
Step 7
Use the Direct Selection Tool (A) to select only the point indicated and press the Convert selected anchor points to smooth option in the Control panel. As a result you will get a pair of handles. Still having this point selected, go to File > Scripts > Extend Handles and apply a percentage of 200. This will make the handles double as long. Of course, you can extend the handles manually with the Direct Selection Tool (A) but using this script you will keep the symmetry and the angle.If you don’t have the Extend Handles script, you can go to this article 20 Free and Useful Adobe Illustrator Scripts to download it then follow the instructions to install it. After that you will be able to access the script by going to File > Scripts > Extend Handles. Using this script you can easily extend, shorten, remove or reverse handles. Values over 100 lead to an extension of the handles, values under 100 lead to a shortening of the handles and 0 removes them.

Step 8
Select the point indicated with the Direct Selection Tool (A) then press the Convert selected anchor points to smooth option in order to generate the handles. To make the handles longer run the Extend Handles script and apply a percentage of 200 again. Next, select only the point at the bottom and press the Convert selected anchor points to smooth option in the Control panel.
Step 9
Select point “8” with the Direct Selection Tool (A) and press the Convert selected anchor points to smooth option then run the Extend Handles script and apply a percentage of 220 this time.
Step 10
Select the two points indicated and transform them from corner points to smooth points as you did before. After that, make slight adjustments regarding the angle of the handles in order to obtain smoother curves (1).Next, select the four points indicated and press the Convert selected anchor points to smooth option again to generate the handles. At this point you can make slight adjustments if needed otherwise the avocado shape is ready (2).

3. Create the Avocado Style
Step 1
Fill the avocado shape with dark green then from the fly-out menu of the Appearance panel choose Add New Fill. As a result you will get a second Fill above the first and you can use the shade of green indicated as the fill color. Having this Fill attribute selected in the Appearance panel, go to Effect > Path > Offset Path and apply a -2px Offset. You have just created the peel of the avocado.
Step 2
Still having this Fill attribute selected in the Appearance panel, go to Effect > Distort & Transform > Transform and type 0.5px in the Move Vertical field then hit OK. This will make the peel slightly thicker at the bottom of the avocado.
Step 3
Use the Add New Fill option to add the third fill above then select yellow as the fill color. Having this Fill attribute selected in the Appearance panel, go to Effect > Path > Offset Path and apply a -5.5px Offset. Until now we have created the peel, the green edge and the pulp of the avocado.
Step 4
Next, we will create a smooth transition between the green edge and the yellow pulp. Select the Stroke attribute in the Appearance panel (which at this point is set to none) and use the shade of green indicated then set the Stroke weight at 2pt. Now, go to Effect > Path > Offset Path and apply a -6.5px Offset. At this point the stroke should be right next to the green edge but if in your case it doesn't, you can make slight adjustments (-6.4px or -6.6px). Remember that this is a live effect and you can change the values at any time.
Step 5
Having the Stroke attribute from the previous step selected in the Appearance panel, press the Duplicate selected item icon at the bottom. You will get a second stroke above the first. Double click on the Offset Path effect to open the Offset Path window then change the value from -6.5px to -8.5px and hit OK. Set the Opacity for this second stroke to 50%.
Step 6
Having the second Stroke attribute selected in the Appearance panel, press the Duplicate selected item icon in order to get a third stroke above. Open the Offset Path window and change the value from -8.5px to -10.5px then hit OK. Also reduce the Opacity to 25%.These three strokes should be right next to each other like in the close-up. If needed, you can adjust the Offset values until you get the right result.

4. Create the Seed of the Avocado
Step 1
Select your avocado and from the fly-out menu of the Appearance panel choose Add New Fill. Drag this new fill under the three strokes but above the yellow pulp and select any fill color for the moment. While this Fill attribute stays selected, go to Effect > Distort & Transform > Transform and apply the settings shown below.
Step 2
Still having the Fill from the previous step selected, go to Effect > Convert to shape > Ellipse and type 160px in the Width and Height fields then hit OK. This effect will force your fill to turn into a circle.
Step 3
The avocado seed is not perfectly round therefore we will apply some Warp effects to distort it. Make sure that you still have this Fill selected in the Appearance panel then go to Effect > Warp and apply the Arc Upper effect first, then Inflate and Arc Lower. You can see the end result in the following image.

Step 4
The seed is ready and you can now replace the fill color with the radial gradient shown then use the Gradient Tool (G) to change the radius. Just to make things easier to understand I will name this Fill attribute “Seed Fill”.
Step 5
Select the “Seed Fill” in the Appearance panel then press the Duplicate selected item icon at the bottom. Select the copy underneath and replace the existing gradient with yellow. Now, open the Transform Effect window, change the settings as shown and hit OK. Leave the other effects as they are.
Step 6
Still having the Fill from the previous step selected, go to Effect > Stylize > Outer Glow and apply the settings shown.
Step 7
Still having the Fill from the previous step selected, press the Duplicate selected item icon at the bottom of the Appearance panel. Focus on the copy above and double-click on Ellipse to open the Shape Options window. Instead of 160px, type 172px in the Width and Height fields then hit OK. Just set the Opacity for this Fill to 40% and leave the other effects as they are.
Step 8
Duplicate the Fill from the previous step then focus on the copy above which is the third of this kind. Open again the Shape Options window and type 185px instead of 172px in the Width and Height fields then lower the Opacity to 20%. These last three fills will give you the yellow glow around the seed of the avocado.
5. Add Highlights on the Seed
Step 1
Make sure that the “Seed Fill” is selected in the Appearance panel and duplicate it as you did before. Focus on the copy above and replace the existing gradient with any color for the moment. To get the result shown in the next image you need to change some of the settings of the live effects.

Step 2
Next, replace the fill color that you have chosen with the radial gradient shown. Set this Fill attribute to Blending Mode Screen and 40% Opacity.
Step 3
Make sure that the last Fill (from the previous step) is selected and duplicate it. Focus on the copy above and first replace the existing gradient with a white to black linear gradient at a -100 degrees Angle. Now, open the Transform Effect window and change the settings as indicated. Keep the Angle at -10 degrees and hit OK. Leave the other effects as they are and also keep the Blending Mode and the Opacity settings.
Step 4
Now let’s add a different kind of highlight, on the upper left side of the seed. For this, select the “Seed Fill” in the Appearance panel then press the Duplicate selected item icon at the bottom. Focus on the copy underneath and replace the existing gradient with the linear gradient shown at a 40 degrees Angle. Open the Transform Effect window then change the Horizontal and Vertical Move values as shown. Basically, you are moving this new fill 1px up and 1px to the left. Set the Blending Mode to Screen (black becomes transparent).
6. Add the Shade of the Seed
Select again “Seed Fill” and duplicate it. Focus on the copy underneath and replace the existing gradient with the linear gradient shown at a -60 degrees Angle. Next, remove the Inflate effect by dragging it into the Trash then modify the settings for the Arc Upper, Arc Lower and Transform effects. Set this Fill to Blending Mode Multiply and 50% Opacity.

7. Add Highlight on the Avocado
While your avocado shape stays selected, go to the Appearance panel and from the fly-out menu choose Add New Fill. Move this new fill above everything then select the linear gradient shown and set the Angle at -40 degrees. Set this Fill to Blending Mode Screen (black becomes transparent) and 50% Opacity.
8. Save the Avocado Graphic Style
At this point the avocado is prettymuch ready. You can save the style now or wait till later after you add the shadows.While the avocado shape stays selected, press the New Graphic Style icon at the bottom of the Graphic Styles panel (Window > Graphic Styles). Double-click on the thumbnail then type a name for your style and hit OK. I named mine “Avocado Graphic Style no shadow”.

9. Add the Shadow of the Avocado
Step 1
Select the Fill attribute from the bottom of the Appearance panel which is actually the first one that you've added (the peel) and duplicate it. Focus on the copy underneath, go to Effect > Stylize > Drop Shadow and apply the settings shown below. You can keep the same fill color.
Step 2
Having the Fill from the previous step selected in the Appearance panel, press the Duplicate selected item icon again. Focus on the copy underneath and double-click on the Drop Shadow effect to open the Drop Shadow window. Change the settings and hit OK.
Step 3
Duplicate again the previous Fill then open the Drop Shadow window and change the settings.
Step 4
Duplicate the previous Fill one more time then change the settings for the Drop Shadow effect as shown below. You are done with the shadows.
10. Create the Stem
At this point the avocado is ready but if you want, you can create a small stem although this is optional. Grab the Pen Tool (P) and draw a shape like in the following image at the top of the avocado. Fill it with the linear gradient shown at a 90 degrees Angle then set the Opacity at 40%.
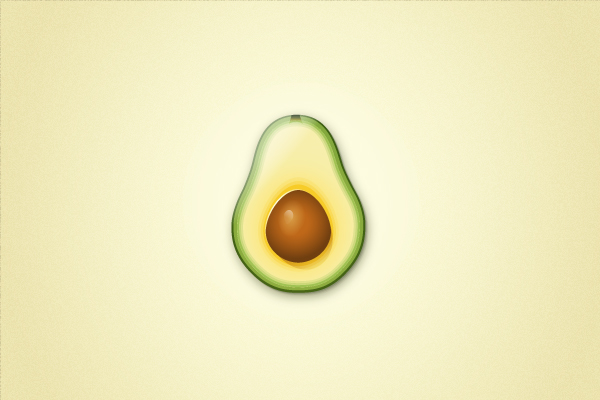
11. It’s time to recap!
Step 1
In the next image you can see all the Fill attributes that we have used to create the avocado. Yours should be in the same order. If everything looks good, you can save the style. While the avocado shape is selected, press the New Graphic Style icon at the bottom of the Graphic Styles panel. Double-click on the thumbnail then type a name and hit OK.If you want to apply this style to another shape, you will need to make some adjustments and to change the settings for the live effects until they fit with the shape of your choice.

Step 2
As you can see in the Outline mode, we have used only one shape to create the avocado. Well, except for the stem but that is optional.Of course, you can add even more appearances. For example, you could add more details, you could add a texture on the pulp and a texture on the seed to make it look more realistic but we will stop here for now.


.png)

