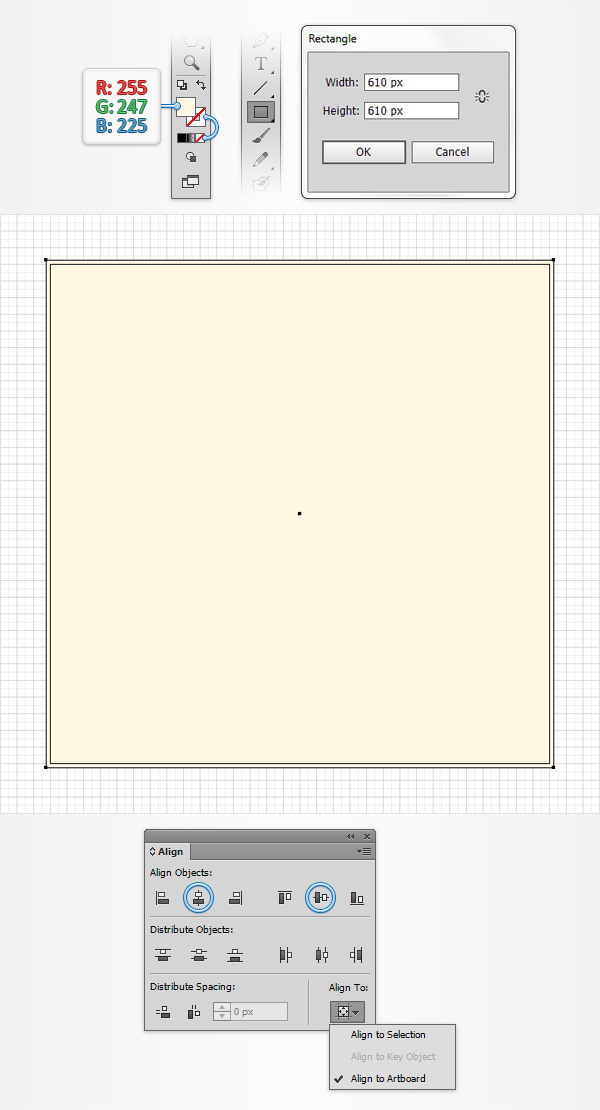
1. Create a New Document and Set Up a Grid
Hit Control-N to create a new document. Select Pixels from the Units drop-down menu, enter 600 in the width and height boxes then click on the Advanced button. Select RGB, Screen (72ppi) and make sure that the Align New Objects to Pixel Grid box is unchecked before you click OK.Enable the Grid (View > Show Grid) and the Snap to Grid (View > Snap to Grid). You will need a grid every 5px, so simply go to Edit > Preferences > Guides > Grid, enter 5 in the Gridline every box and 1 in the Subdivisions box. Try not to get discouraged by all that grid, it will ease your work and keep in mind that you can easily enable or disable it using the Control-" keyboard shortcut. You should also open the Info panel (Window > Info) for a live preview with the size and position of your shapes. Do not forget to set the unit of measurement to pixels from Edit > Preferences > Units > General. All these options will significantly increase your work speed.

2. Create the Background
Step 1
Focus on your Toolbar, remove the color from the stroke then select the fill and set its color at R=255 G=247 B=225. Pick the Rectangle Tool (M) and simply click on your artboard to open the Rectangle window. Enter 610 in the Width and Height boxes then click the OK button.You need to center this new shape, so open the Align panel (Window > Align). Set the aligning to Artboard (open the fly out menu and go to Show Options if you can't see the Align To section as shown in the following image), make sure that your shape is selected then simply click the Horizontal Align Center and Vertical Align Center buttons. In the end your square should cover the entire artboard as shown in the following image.
Step 2
Reselect your square, open the Appearance panel (Window > Appearance) and add a second fill using the Add New Fill button (pointed by the blue circle in the following image).Make sure that this new fill stays selected, open the Gradient panel (Window > Gradient) and simply click on the gradient thumbnail to add the default black to white linear gradient.
Keep focusing on your Gradient panel, select Radial from the Type drop-down menu then move to the gradient colors. Select the right slider and set the color at R=241 G=90 B=41 then select the left slider, set the color at R=255 G=247 B=225 and lower its Opacity to 0%. Grab the Gradient Tool (G), focus on your artboard and stretch your radial gradient as shown in the following image.
Return to the Appearance panel and click on the little arrow icon that stand for your newly added fill. Simply click on that "Opacity" piece of text to open the Transparency fly-out panel and then lower the Opacity to 10%. Move to the Layers panel (Window > Layers), open the existing layer, simply double-click on your shape and rename it "bg".
Keep focusing on the Layers panel and lock your "bg" shape to make sure that you won't accidentally select/move it.

3. Create the Main Shape
Step 1
Set the fill color at R=255 G=198 B=95, pick the Rectangle Tool and create a 335 x 220px shape. Make sure that this new rectangle stays selected, focus on the Appearance panel, select the existing fill and go to Effect > Stylize > Outer Glow. Enter the properties shown in the following image and click OK.Move to the Layers panel and rename this newly created shape "main".

Step 2
Make sure that your "main" rectangle stays selected, focus on the Appearance panel and add a second fill using that same Add New Fill button. Select this new fill, set its color at R=239 G=145 B=72 and go to Effect > Distort & Transform > Transform. Enter the properties shown below, make sure that you check the middle, bottom reference point (pointed by the blue circle in the following image), click OK and then go to Effect > Stylize > Inner Glow. Enter the properties shown in the following image and click OK.
Step 3
Make sure that your "main" rectangle stays selected, focus on the Appearance panel, select the stroke and set its color at black (R=0 G=0 B=0).Keep focusing on the Appearance panel and simply click on that "Stroke" piece of text to open the Stroke fly-out panel. Set the Weight at 4px, check the Align Stroke to Outside button then return to the Appearance panel. Open the Transparency fly-out panel for your stroke, lower its Opacity to 50% and change the Blending Mode to Soft Light.

Step 4
Make sure that your "main" rectangle stays selected, focus on the Appearance panel and add a second stroke using the Add New Stroke button (pointed by the blue circle in the following image). Select this new stroke, set the color at R=219 G=129 B=60 and the Weight at 1px then open the Stroke fly-out panel and check the Align Stroke to Outside button.Keep focusing on the Appearance panel, make sure that your entire path is selected (simply click on the "Path" piece of text from the top of the Appearance panel) and go to Effect > Stylize > Rounded Corners. Enter a 7px Radius and click OK. In the end your shape should look like in the following image.

4. Create the Subscribe Button
Step 1
Set the fill color at R=255 G=232 B=125, pick the Rectangle Tool, create a 235 x 45px shape and place it exactly as shown in the following image. The Snap to Grid feature will ease your work.Move to the Layers panel, double-click on this new shape and rename it "button".

Step 2
Make sure that your "button" rectangle stays selected, focus on the Appearance panel and add a second fill using that same Add New Fill button. Select this new fill and replace the existing color with the linear gradient shown in the following image. Keep in mind that the white numbers from the Gradient image stand for Location percentage. This simply means that you have to select your gradient slider, focus on the Location box (from the Gradient panel) and insert that number. You can easily add a new gradient slider for your gradient by clicking on the gradient bar.
Step 3
Make sure that your "button" rectangle stays selected, focus on the Appearance panel, select the top fill and go to Effect > Distort & Transform > Transform. Enter the properties shown below, don't forget to check the middle, bottom reference point (pointed by the blue circle in the following image), click OK and then go to Effect > Stylize > Inner Glow. Enter the properties shown in the following image and click OK.
Step 4
Make sure that your "button" rectangle stays selected, focus on the Appearance panel, select the stroke and set its color at R=235 G=182 B=75. Open the Stroke fly-out panel for this orange stroke, set its Weight at 1px, check the Align Stroke to Outside button then return to the Appearance panel. Make sure that your entire path is selected and go to Effect > Stylize > Rounded Corners. Enter a 22.5px Radius and click OK. In the end your shape should look like in the following image.
Step 5
Reselect your "button" shape, focus on the Appearance panel, make sure that the entire path is selected and go to Effect > Stylize > Drop Shadow. Enter the properties shown in the top, left window (in the following image), click OK and go again to Effect > Stylize > Drop Shadow. Enter the properties shown in the top, middle window, click OK and go once again to Effect > Stylize > Drop Shadow. Enter the properties shown in the top, right window, click OK and go one more time to Effect > Stylize > Drop Shadow. Enter the properties shown in the bottom, left window, click OK and go one last time to Effect > Stylize > Drop Shadow. Enter the properties shown in the bottom, right window and click OK. In the end your "button" shape should look like in the following image.
Step 6
Pick the Type Tool (T), simply click on your artboard, add the "SUBSCRIBE" piece of text and set its color at R=139 G=94 B=60. Make sure that your text remains selected and open the Character panel (Window > Type > Character). Select the "Calibri" font, set the size at 20px and the tracking at 50. Finally, go to Effect > Stylize > Drop Shadow. Enter the properties shown in the following image and click OK.
5. Create the Text Field
Step 1
Set the fill color at R=239 G=145 B=72, pick the Rectangle Tool, create a new 235 x 45px shape and place it exactly as shown in the following image. Move to the Layers panel, double-click on this new rectangle and rename it "textField".Make sure that it stays selected and focus on the Appearance panel. Select the existing fill and go to Effect > Stylize > Inner Glow. Enter the properties shown in the following image, click OK and go to Effect > Stylize > Drop Shadow. Enter the attributes shown below and click OK.

Step 2
Make sure that your "textField" rectangle stays selected, focus on the Appearance panel, select the stroke and set its color at black. Open the Stroke fly-out panel for this new stroke, set the Weight at 1px and check the Align Stroke to Inside button then open the Transparency fly-out panel, lower the Opacity to 10% and change the Blending Mode to Soft Light.Return to the Appearance panel, make sure that your entire path is selected and go to Effect > Stylize > Rounded Corners. Enter a 22.5px Radius and click OK. In the end your shape should look like in the following image.

6. Create a Tiny "X" Button
Step 1
Set the fill color at R=255 G=198 B=95, pick the Ellipse Tool (L), create a 15px circle and place it exactly as shown in the following image. Move to the Layers panel, double-click on this new shape and rename it "xButton".
Step 2
Make sure that your "xButton" shape stays selected and focus on the Appearance panel. Select the existing fill, lower its Opacity to 70% and go to Effect > Stylize > Outer Glow. Enter the properties shown in the following image and click OK.
Step 3
Make sure that your "xButton" circle stays selected, focus on the Appearance panel and add a second fill using that same Add New Fill button. Select this new fill, set its color at R=232 G=125 B=58 and go to Effect > Convert to Shape > Rectangle. Enter the properties shown in the following image, click OK and go to Effect > Distort & Transform > Transform. Simply enter a 45 degrees angle and click OK.
Step 4
Make sure that your "xButton" circle stays selected, focus on the Appearance panel, select the top fill and simply duplicate it using the Duplicate Selected Item button (pointed by the blue circle in the following image). Focus on your new fill, open the existing Transform effect and replace that 45 degrees angle with a 135 degrees angle. In the end things should look like in the following image.
Step 5
Make sure that your "xButton" circle stays selected, focus on the Appearance panel, select the stroke and set its color at black. Open the Stroke fly-out panel for this new stroke, set the Weight at 1px and check the Align Stroke to Outside button then open the Transparency fly-out panel, lower the Opacity to 10% and change the Blending Mode to Soft Light.
Step 6
Finally, you can add a simple email address inside that text field. Pick the Type Tool (T), click on your artboard, add the address and set its color at R=139 G=94 B=60. Again, use the "Calibri" font, set the size at 15px then go to Effect > Stylize > Drop Shadow. Enter the properties shown in the following image click OK and you're done.
Congratulations! You're Done!
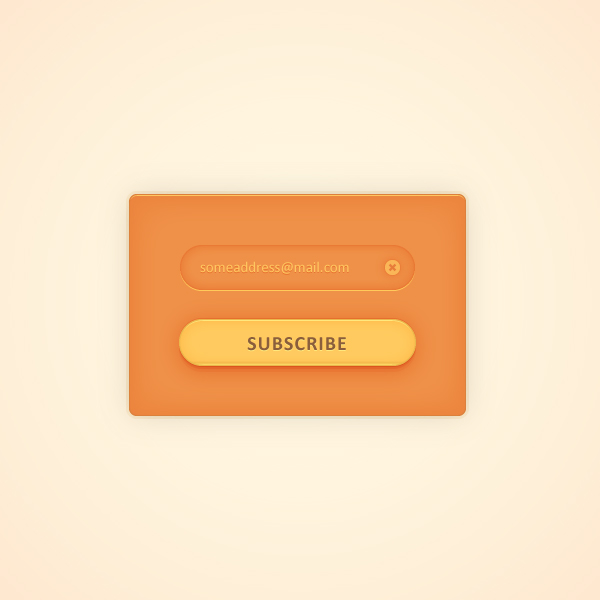
Here is how it should look. I hope you've enjoyed this tutorial and can apply these techniques in your future projects.


