If you're a game developer, you've probably heard of the terms gamma and gamma correction. You may or may not know what they mean, but they should not be lightly dismissed.
Game
developers tend to ignore gamma because its effects are subtle enough
to be approximately corrected by adjusting light intensities, specular
intensities, and the like, but to achieve true image quality with
realistic-looking lighting, it's important to understand the gamma value
and steps needed to work around its presence in digital imaging, so as
to receive the best possible quality. Applying proper gamma correction
is one of the most effortless ways to radically improve the look of your
real-time 3D graphics.
Introduction: How Monitors Work
The CRT monitors that were originally used for computer displays have
a curious property: the color response on their screens is non-linear in respect to raw values passed from the graphics card.
Non-linear,
in this sense, means that increases in one of your color components by a
constant ratio (say, if a red component of a color becomes twice as
high) will not result in an increase of the monitor-emitted light
intensity by that same ratio (that means, the red light emitted from the
screen will not be twice as high).
The color response of a CRT monitor is actually an exponential
function. (As in all physics, this is way more complex than we're
describing, but for simplicity's sake, we'll stick to this assumption.)
That is, the function EmittedLight(C), where C is a color component value (red, green, or blue) ranging from 0 (no light) to 1 (full light intensity), is C raised to some power γ.
This number, γ, is called the gamma exponent or just gamma.
Typical gamma values range from 2.0 to 2.4, and when dealing with gamma
in the general sense, the value is agreed upon to be 2.2 as a
compromise, and a lot of newer monitors are designed to have the gamma value of precisely 2.2 In
a common scenario of gamma=2.2, this is how the monitor actually
displays color intensities from your game (green curve). The dotted red
line shows how a linear monitor would display the same intensities.In
practice, this means that black and white will be shown undistorted on
the screen (because zero raised to any power is zero, and one raised to
any power is one), but all values in between will be skewed with no
reliable way to perceive this happening just by watching.
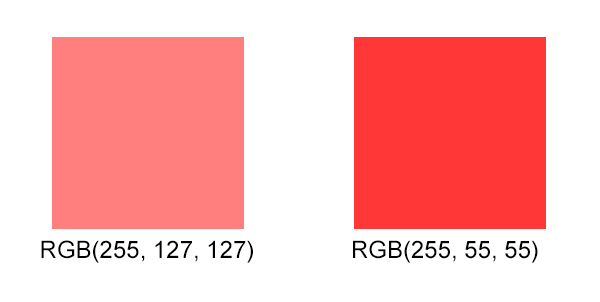
For example, if you're displaying a color that is supposedly two times darker than black—that is, RGB(0.5, 0.5, 0.5)—it will actually be shown as less than four
times darker, given the common gamma value of 2.2, since 0.5 raised to
2.2 is around 0.22. Clearly, this is not what you intend, and this is
not the case just with CRT monitors: LCDs, while not unintentionally
having this property, are designed to be compatible with their older
counterparts, and thus display your color values stretched like this.
Moreover,
as red, green and blue components are treated independently, the
intended color tones of images can be easily mangled as intensities of
the three color components will not scale uniformly. What will happen
when you're displaying the color value RGB(1, 0.5, 0.5)?
The red component will stay at 1, but the other ones will drop down to
half their values, completely changing the tone of your color. The
second color was obtained from the first one by applying the nonlinear
scale that monitors employ. Notice how not only the brightness of the
color, but also its saturation, was affected by this transformation.Now
that we've seen what effects this monitor property has on the color
data given to the monitor, we can see what steps there are to combat
them.
What is Gamma Correction?
Gamma correction is the act of undoing the monitor's unfortunate
work. Gamma-correcting an image is essentially raising its color
intensities to 1/gamma, so that when the monitor in turn raises the value to gamma, these cancel out, and the result is the color we originally intended to be shown.
(Remember that A raised to B, and then raised to C, is the same as A raised to B×C, and this is why these operations will cancel out, as gamma × (1/gamma) is 1.)
Since
the average user does not calibrate their monitor to have a linear
response, many images they encounter are corrected so that they never
feel the difference. As a convention, most image files on the Internet
are distributed in what is called the sRGB color space—this means that original, intended color values are roughly raised to the power of 1/2.2
before putting them into files (although more complex equations take
place in reality). This ensures that all users with conventional
displays see the real colors. Scanners, cameras and a lot of digital
imaging devices all take this into account, and correct their output for
you when saving in conventional image formats. This
image shows the mapping of color intensities as sent to the monitor by
the graphics card, and intensities that are displayed by the monitor.Take
a look at the above image. If we do not account for gamma, the curve
will be exponential (lower green curve). If we perform gamma correction
the actual response will be linear, as it ought to be. For comparison,
the image also shows how the graph looks when we perform gamma
correction but the monitor actually has a linear response. In this case,
the intensities will be distorted in the opposite fashion, and we can
see that when a nonlinear monitor distorts them in turn, this cancels
out, and we end up with a straight line.
When Do I Need to Worry?
So far, we have explained the theory behind these phenomena—sure,
monitors are non-linear and most images are corrected so they look right
on these monitors, but what seems to be the problem? Why should I, an
aspiring 3D game developer, concern myself with gamma correction and do
anything besides just knowing about it?
The answer is simple: as long as images are created just to be
displayed, the problem actually doesn't even exist. However, as soon as
you want a program to do something to these images (scale them, use them
as textures, you name it), you have to take care that the program knows
that the values are not real and are just corrected so that they look real on a monitor.
Particularly,
this happens in a renderer when it takes texture maps, such as diffuse
surfaces, as input. It does operations on them assuming their color
values accurately represent light intensities; that is, assuming a linear correspondence with real-life phenomena they are representing.
But this is a fundamental error: if you want to sum color values and they are gamma-corrected (raised to 1/gamma) you get the wrong values. It doesn't take a math genius to realize that A raised to 1/gamma plus B raised to 1/gamma does not equal (A+B) raised to 1/gamma. The problem also happens when a renderer outputs some values, such as when it outputs light contributions: if it sums two light contributions but doesn't know the result will be raised to gamma when displayed on the screen, it has produced wrong values.
And this is precisely where the problem occurs: whenever a renderer
assumes that the colors it gets linearly correspond to real-life
phenomena when they don't, or assumes that colors it outputs will
linearly correspond to light intensities on the screen when they won't,
it's made quite a serious error which can affect the look and feel of
images it produces.
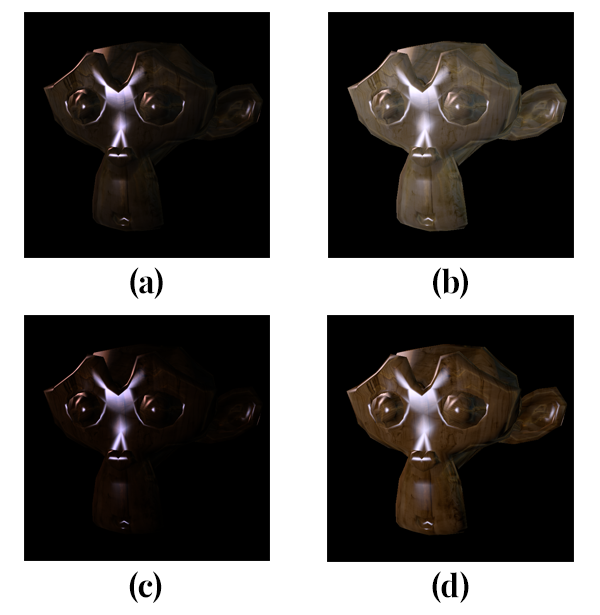
If you don't correct any of the mistakes, don't make sure input
texture colors fed into the renderer are linear, and don't make sure the
renderer's output image will be linear in respect to the screen, these
images will cancel each other out to some degree, much like how they
cancel each out when showing precorrected JPEG files in a web browser.
However, as soon as you include some intermediate calculations that
assume linear correspondences, your math will be wrong. (a) Not correcting textures and not correcting the final image, (b) not correcting textures but correcting the final image, (c) correcting textures but not correcting the final image, (d) correcting both the textures and the final image.
Recall what we said about changing color tones earlier—that fact can
(sometimes) help you spot non-linearity. A rule of thumb is: if, when
you apply linear tweaks to parameters (such as doubling the brightness
of lights in the scene), the resulting image changes not only in
brightness but also in color tones (for example, an area going from a
reddish-orange hue towards yellow), this means that some nonlinear
intermediate process is most likely taking place.
This can happen with texture maps that were retrieved from various
sources—the Internet, a digital camera that saves to sRGB JPEG, a
scanner, or if the texture was painted on a monitor which was not
explicitly calibrated to have a linear response or not explicitly
corrected afterwards. Any math done on these texture maps will be wrong,
and deviate slightly from theoretically right values. This is visible
with texture filtering and mipmaps: since filtering assumes linear
responses when averaging color values, you will see pronounced errors:
smaller textures (distant ones) will appear noticeably darker than
larger ones (that is, when they're nearer you): this is because when
they're distant, the filtering algorithm averages more samples and their
non-linearity affects the result more.
Illumination will also suffer from improper gamma: light contributions to surfaces sum
in real world, and consequentially in a renderer, but summing is not a
faithful operation if the result is non-linearly skewed. If you have
complex fragment shaders doing sophisticated lighting, such as
subsurface scattering or HDR, the errors become more and more
pronounced, up to the point that you actually wonder what's
wrong with the image, as opposed to having an uneasy feeling of "maybe
kinda wrong lighting, but it's probably just me" which can also happen
often. Darkening the textures or brightening the final images by a
constant or linear factor don't kill the effect, because they are also
linear operations, and you need a non-linear one to combat the inherent
exponential response curve happening in the monitor.
How Do I Fix It?
Now, hopefully, you're fully aware of what gamma and gamma correction
are, and why this is such a big deal when doing real-time 3D graphics.
But, of course, there must be some way to fix these problems?
The
answer is yes, and fixing gamma is a rather simple operation that
doesn't require you to change anything besides adding a few lines of
code, not counting additional parameter, intensity, and color tweaks you
will need to perform to get right lighting if you've been setting your
scenes to look good on non-linear monitors without correcting them.
There are three basic steps to ensure you stay linear as long as possible and do the correction at the right point:
1. Make Sure Your Texture Colors Are Right
You should not normally alter the source images so that they contain
linear colors; having colors gamma-corrected for the typical monitor in
eight-bit color fields affords you necessary added resolution in darker
areas where the human eye is more sensitive to intensity
variations. However, you can make sure that color values are linear
before they reach your shaders.
Normally, in OpenGL, you can do this by passing GL_SRGB8 instead of GL_RGB8, and GL_SRGB8_ALPHA8 instead of GL_RGBA8, to glTexImage2D(), when specifying a texture. This will ensure that all values read from this texture through a shader sampler will be corrected back from sRGB color space to a linear one,
which is precisely what we need! If you're using a rendering or game
engine which does texture loading for you, it might take this into
account or you might need to specify it manually; consult the
documentation of the library or ask someone for help if you're unsure.
However, be sure not to erroneously do this to images that, by
definition, do not represent color information, and were explicitly
painted with this in mind. Examples include normal maps,
bump maps, or height maps, which all encode some data other than color
in the color channels of a texture and hence are not likely to need this
kind of precorrection.
From the demo included in this article (some parameters swapped with their actual values for clarity):
This
will load the texture in an uncorrected color space. However, if the
data in the texture file is in the sRGB color space, we ought to change
the third parameter to GL_SRGB8, yielding:
This will ensure OpenGL corrects the texture data when we look them up.
2. Make Sure Your Output Image Colors Are Right
Now you have to apply color correction to the final output images of
your renderer. Be sure not to apply correction to anything but the final
framebuffer that is to be displayed on the screen. (Don't touch the
intermediate buffers that are input to other post-processing shaders, as
these will still expect to work with linear values.)
This can be
done in OpenGL by specifying the renderbuffer (the final,
non-sampleable framebuffer) to have an sRGB color encoding by passing GL_SRGB instead of GL_RGB as a parameter to glRenderbufferStorage(). After that, you have to raise the GL_FRAMEBUFFER_SRGB flag by calling glEnable. This way, shader writes to sRGB buffers will be corrected so they are displayed right on a typical monitor.
If
you're using an engine or a framework, it probably includes some kind
of option to create an sRGB framebuffer for you and set it up properly.
Again, you can consult the documentation of the library or ask someone
to clarify this for you.
In the demo, we use the GLFW library,
which offers us a painless way to request an sRGB framebuffer. In
particular, we set a window hint and then, later, tell OpenGL to enable
the framebuffer operations to be in the sRGB space:
1
2
3
glfwWindowHint(GLFW_SRGB_CAPABLE, TRUE);
...
glEnable(GL_FRAMEBUFFER_SRGB);
3. Fix Your Tweaked Light Intensities and Color Parameters
If this is not a start of a new project, chances are that
gamma-incorrect illumination and filtering have taken their toll on you.
Maybe you've tweaked your diffuse reflectance colors, light intensities
and whatnot in an attempt to make up for subtle nuisances that
neglecting gamma has brought to you.
You need to go through these
values once again and tweak them so they look right again—however, this
time, your scenes will look more natural due to illumination more
accurately representing real world circumstances. Corners will not look
too dark so you won't need to add more intensity to lights (thereby
wrecking illumination of brighter objects which will then look
artificially bright for that amount of light in the scene).
This
will pay off: revisiting your parameters to create a natural ambient
with gamma correction will go a long way towards providing your users
with an experience and brightness distribution which looks just right to
their eyes, so accustomed and sensitive to how light works in real
life.
Advertisement
Demo
Included with this article
is a small OpenGL 3.3 demo which shows a simple scene with some
textures lit by two moving light sources. It allows you to switch
between several scenarios: not correcting textures but correcting the
final image; correcting textures but neglecting to correct the final
image; correcting both (that is, doing everything right); and failing to
correct either (effectively making a double mistake).
The demo
is written in C++ (with two GLSL shaders) and uses portable GLFW and
GLEW libraries so it should run on a broad variety of platforms. The
source code is ripe with comments so you can go about and explore every
aspect of this short application. The demo in action.Use the 1 key on your keyboard to cycle between correcting textures and not correcting textures, and the 2
key to cycle between correcting the framebuffer and not correcting the
framebuffer. To cycle both of these at the same time, press 3—useful
to see the difference between neglecting gamma completely (two errors
that cancel each other out for the most part) and doing everything
right. When the demo starts, none of these corrections are being
performed, so hit 3 to see the benefits of proper gamma correction.
I
have included a Microsoft Visual C++ 2013 project, compatible 64-bit
versions of the GLFW and GLEW libraries, and a 64-bit Windows
executable. However, you can compile this rather easily on any platform
with GLFW and GLEW support: just compile main.cpp and loader.cpp together and link them against those two libraries. On Linux, installing these libraries via your package manager and passing -lglew -lglfw to g++
should do the trick. (Please note that this was not tested on operating
systems other than Windows, but it is supposed to work—if you encounter
any problems, please let me know in the comments and I'll fix them as
soon as possible.)
As you can see when running the demo, the
effects are quite noticeable even with a simple model and simple scene
like this. Of course, in this simple case, you could maybe get away with
tweaking the shader parameters so the image looks good when
uncorrected. However, as soon as you start building up complexity in
your scenes, the difference will simply be too visible to ever
compensate in this way.
Conclusion
In this article we've covered terms such as gamma, gamma correction,
non-linear inputs and outputs, and non-linear math. Hopefully, I've
managed to convince you that you should start worrying about gamma
correction right now if you'd neglected it so far, and if you've been
careful with gamma before encountering this article, I just hope it's
given you some new tiny piece of information to tackle the issue with.
We
have, most importantly, learned how to fix problems that arise when you
do incorrect manipulation on color values, assuming they're linear, and
we've reviewed common pitfalls and symptoms that occur when you neglect
this important aspect of computer graphics.
I hope you've had fun and learned something new while reading this article. Until next time!
Unknown
Lorem ipsum dolor sit amet, consectetur adipisicing elit, sed do eiusmod tempor incididunt ut labore et dolore magna aliqua. Ut enim ad minim veniam, quis nostrud exercitation.
Medical Disclaimer
The information on this site is not intended or implied to be a substitute for professional medical advice, diagnosis or treatment. All content, including text, graphics, images and information, contained on or available through this web site is for general information purposes only. Krobknea makes no representation and assumes no responsibility for the accuracy of information contained on or available through this web site, and such information is subject to change without notice. You are encouraged to confirm any information obtained from or through this web site with other sources, and review all information regarding any medical condition or treatment with your physician. NEVER DISREGARD PROFESSIONAL MEDICAL ADVICE OR DELAY SEEKING MEDICAL TREATMENT BECAUSE OF SOMETHING YOU HAVE READ ON OR ACCESSED THROUGH THIS WEB SITE.