
In this tutorial, you will learn to create marine life wallpaper in a vintage style, using Adobe Illustrator. You will use the Pencil Tool to draw different elements, and learn to make the wallpaper seamless. You can follow these steps precisely to make the nautical pattern pictured above, or you can use the steps this tutorials shows to make a pattern with any objects you'd like that repeats perfectly.
1. Creating the Marine Life elements
Step 1
Press Control-N button to create a new document at size 600 px in the width and height. Select the Pencil Tool (N) and on the Stroke panel, select Round Cap. Then adjust the Pencil Tool (N) options: double-click on it on the Tools panel (Window > Tools) and in the new dialogue window, make Tolerances Fidelity 3 pixels and Smoothness 40%. Check Fill New Pencil Strokes and then press Okay.Let's draw a seagull as in the image below. To close the path, you need to hold the Alt button as you finish the path. For the feather decoration on the wing, make the pencil stroke slightly thicker and for the legs, very thick.

Step 2
Select the wing and legs, and expand them (Object > Expand). Also you need to expant the beak.
Step 3
Now remove the strokes and add the fill colors as in the image below.
Step 4
Let's draw another element—the anchor. Using the Pencil Tool (N), draw two circles. While keeping them selected, on the Pathfinder panel, press Exclude button. Then draw bottom part. Now, draw the left arrow. Don't forget to hold the Alt button when as you finish the path. Make sure that the left part of the anchor (arrow) is selected and right-click your mouse. Select Transform > Reflect. Check Vertical axis of reflection and Angle 90 degrees, then press Okay. Shift the right arrow to the right. Select the whole anchor, delete the stroke and make the fill color orange (R=214 G=84 B=59). Keep the whole anchor selected, and on the Pathfinder panel press the Unite button.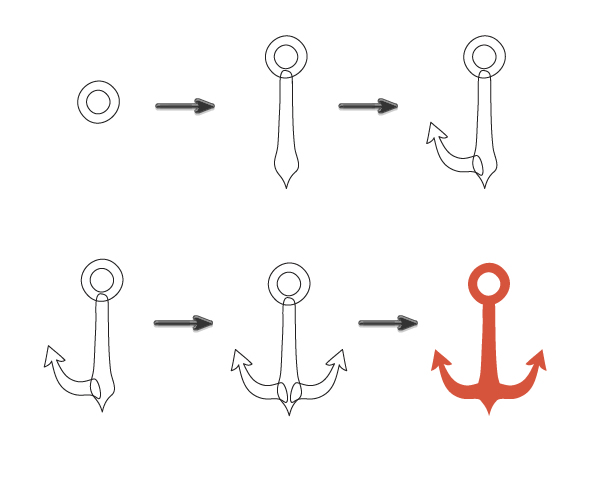
Step 5
Now, let’s draw the lifesaver buoy. Draw two circles again and press the Exclude button on the Pathfinder panel. Make the fill color R=232 G=229 B=209. Then make very thick stroke on the Stroke panel (stroke color R=178 G=31 B=41) and draw stripes using the Pencil Tool (N) as in the image below. When you are finished, select red stripes and expand them (Object > Expand).Now, make one more copy of light gray circle (Control-C) and send it to the front (Control-X, Control-F). You now have two copies of light gray circles. Keep the upper copy selected and while holding the Shift key, select the red stripes. Then press the Crop button on the Pathfinder panel.

Step 6
Let’s draw the helm—the steering wheel. Using the Pencil Tool (N), draw the helm with thick strokes. Be sure to select the Round Cap button on the Stroke panel. When you are finished, select the whole thing and expand it (Object > Expand). Set the fill color to R=188 G=166 B=109.
Step 7
We now have all the elements we need to create the seamless wallpaper! As you can see in the image below, I added one more anchor with the same fill color as a body of the seagull. To easily use the same fill color, you first need to select the new anchor, then take the Eyedropper Tool (I) and click on the body of seagull.
2. Creating the Background
Step 1
Let’s draw a large square by using the Rectangle Tool (M). Click on your artboard and in the new dialogue window, make the following rectangle options: Width 600 px and Height 600 px. Set the fill color to R=61 G=66 B=73. Send this square to the back (Control-X, Control-B). Randomly scatter all elements (seagull, two anchors, helm, lifesaver buoy) all over the square.
3. Creating a Seamless Pattern
Step 1
Pick the Selection Tool (V) and select all the marine life elements, without the background. Group them together (right-click > Group). Press the Enter key and Move window should pop up. Enter in Horizontal Position 600 px, Vertical Position 0 px, Distance 600 px and set the Angle b 0 degrees. Now, press the Copy button.
Step 2
Select all the elements inside the artboard again and press the Enter key. In the Move window, make Horizontal Position -600 px, Vertical Position 0 px, Distance 600 px and Angle 0 degrees. Press the Copy button.
Step 3
Select all the elements inside the artboard once again and press the Enter key. In the Move window, make Horizontal Position 0 px, Vertical Position 600 px, Distance 600 px and the Angle 90 degrees. Press the Copy button.
Step 4
Select all the elements inside the artboard for the last time and press the Enter key. In the Move window, make Horizontal Position 0 px, Vertical Position -600 px, Distance 600 px and the Angle -90 degrees. Press the Copy button.
Step 5
Now, you need to ungroup everything. Select all the elements (Control-A) and ungroup them (right-click > Ungroup). You need to delete all the marine life elements that do not cross the background.Important point—if you want to move, for example the seagull on the top of the wallpaper, you need to select the corresponding seagull on the bottom of the wallpaper at the same time. Or you need to move the helm from the left side of the wallpaper, you need to move the same corresponding helm from the right side of the wallpaper.
Your result should look like the image below:

4. Cropping the wallpaper
Step 1
Group all the marine life elements without the background. For this, you can select everything (Control-A) and while holding down the Shift key, then uncheck the background. Now that you have selected just seagulls, anchors, helms and lifesaver buoys, group them together (right-click > Group). Make another copy of the background (Control-C, Control-F) and send it to the front (Control-X, Control-F). Keeping the new copy of the background selected, hold down the Shift key and select the grouped marine life elements. Go to Pathfinder panel and press the Crop button.And last but not least: keep the cropped wallpaper selected, and go to Object > Path > Clean up, then Okay. You need this to delete the paths without the fill and stroke.

Step 2
You should now have something like the image below:Step 3
You did it! Now your summer vintage marine life wallpaper is done! You can drag the whole pattern to the Swatches panel and use it for printing, set as a background, fill the shapes that you created in AI, and more.
Conclusion
Congrats, you got your seamless pattern created, and it looks beautiful! Now, go find a unique way to put it to use, or make another seamless pattern using other elements you've made.


