
I have crafted up this tutorial for a popcorn box printable, to bring the spook to your party. You will learn to create a template for your work, use freehand art brushes, and take advantage of some Adobe Illustrator tips and tricks. I'll cover traditional Illustrator tools as well as new features like Perspective Distort, and will teach you how to share work on Behance, how to use Live Corner Widgets, and more.
Let’s get the party started!
1. Create and Set Up a Template
Step 1
To start, we need to create our template. Creating a template can save you time, and you won’t need to reinvent the layout every time you need to decorate a popcorn box. Create a new file: File > New (Command-N). Name it “Popcorn” for now, set the Size to A4, and make sure orientation is Horizontal. Click OK.We will begin by drawing the first side of our box template. I did the homework for you, so you won’t have to calculate the dimensions.
I wanted to create a medium-sized popcorn box, and because most people have A4 printers, I came up with the solution of designing half a box template, with two sides instead of four. This way, we'll get a bigger volume of popcorn for our guests. All we have to do is print the template twice, and stick it together. If we created a four-sided popcorn box on A4 paper, you would need to arrange a party for small monsters.
Let’s start by selecting the Rectangle Tool (M). Click the artboard once to open the Rectangle Dialog box, and enter a Width of 9.4 cm and Height of 14.7 cm, to define the shape.

With the Free Transform Tool (E) chosen, you will notice you get a transparent widget on your board, which you can grab and move around. The widget contains four icons; choose the third one, Perspective Distort. Perspective Distort is always constrained, so no need to hold the Shift key when moving the anchors.
Select the lower anchor points and subtract your width until you reach Height of 78% (preview measurements from Info Window). If you are wondering why we are subtracting from the base, it is to give the box a cone-like shape, so the guests can hold the box more easily.
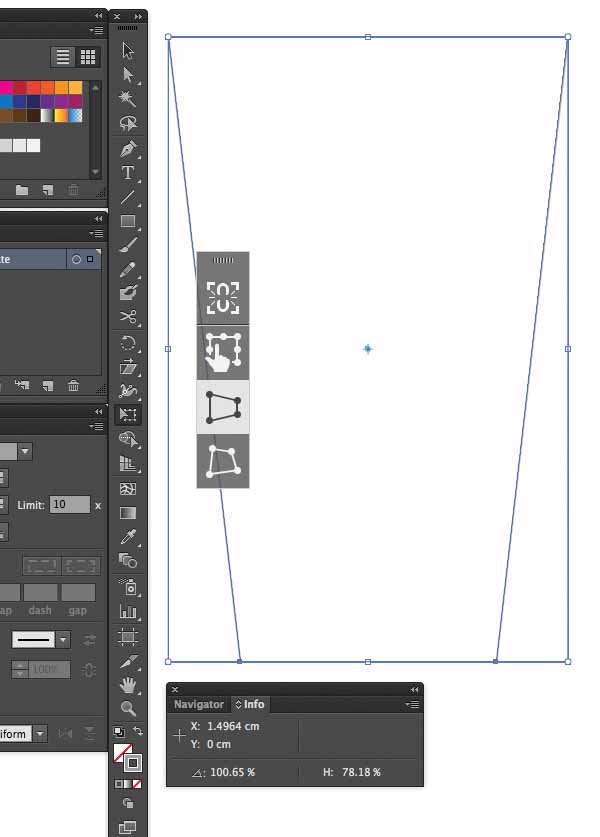
Click the two points to measure the distance between them, by clicking over the first point and dragging your Measure Tool to the second point (Shift‑drag to constrain the tool).
The Info panel will not only show you the horizontal and vertical distances from the x and y axes, but also the total horizontal and vertical distances, the total distances, and the angle measured.
So you'll see that our base distance is about W: 6 cm.


Step 2
To create the second side of the box, Group (Command-G) the top and lower rectangles of the first side together. Then drag the group, by holding down the Shift-Alt keys. Hold down the Shift key and you‘ll notice that the shape is constrained to moving only on a horizontal or vertical plane. Hold down Alt and it will make a copy that is lined up horizontally or vertically. So drag the group until the generated copy base points meet in the middle as shown below.

Select the second side group, then select the Rotate Tool (R). You will see the center reference point (light-blue circle) appear in the middle of your selection; the rotation will originate at that point. Drag it to the meeting point of the two box sides and rotate the selection until both sides meet on the top box fold.


We also need to create two other layers besides the “Template”. At the bottom of the Layers panel, you will see the Create New Layer icon. Click and a new layer will appear. Change the layer's name to “Artwork”. Drag the “Artwork” layer under the “Template” layer. Then create another layer under “Artwork” and name it “Sketch”.

Step 3
File > Save (Command-S), and save it as Illustrator Template, which has the extension “.ait”. Or you could just select File > Save as Template, and it will select the “.ait” format in the dialog box for you automatically. You will see the icon for the file is a little different from an AI file; it has a fold on the right-hand corner of the icon.Step 4
Now we print the file, and sketch the scary, gory elements on it. Or you have the option of exporting the file, File > Export. Export into PNG format, with Use Artboards selected. The PNG Options panel will open; set Resolution as Medium (150 ppi) with Background Color of White. Open the file in Adobe Photoshop, and start your sketching using a pen tablet, if you have one at hand.One one side I drew a rotting zombie eating raw intestines, an eyeball, and a finger, and on the other side I wrote the word “Scary” in slimy, melting text.
After you are done, scan your illustration or save the file as “Popcorn_Sketch.png”.

2. Brush Setup
Step 1
File > Open (Command-O) the template "Popcorn_Box_Template.ait". When you do this, you will see that the document’s name is “Untitled”. That’s because when you open a template, you open a new version of it, so you can create a brand new document with it, without overwriting any existing work and settings.Select the “Sketch” layer in the Layers Panel. Then File > Place, and select “Popcorn_Sketch.png”. A graphics pointer will appear with a small preview of your selected image. Drag the loaded graphics pointer, and place it on the upper left corner of your canvas. This will place your image exactly under your template. If you don’t get it right the first time, just select your image and drag it into position.
Double-click the “Sketch” Layer, and the Layers Options panel will open. Select Lock and Dim Images to 50%. Click OK.
File > Save (Command-S), and save the file as AI. Name it Zombie_Popcorn_Box.ai. Now that our file is imported, we can prepare our art brushes.

Step 2
Before we begin tracing, we need to create a couple of freestyle art brushes.Make sure you are on the “Artwork” layer.
Select the Pen Tool (P), which will allow you to draw all sorts of straight and smooth lines, curves, and closed shapes.
Start rendering some gothic-looking brush strokes, with spikes or blood-like drool lines.
Tip: you can group several shapes together and create a single brush for a more deadly effect. Check out the shapes I created.

Step 3
Open the Brushes panel (F5 or Window > Brushes).Select each shape you wish to make a brush out of, drag and drop onto the Brushes palette, and a New Brush window will pop up. Select Art Brush, and OK. The Art Brush Options panel will open. There is no need to name each stroke, since you will identify them by their preview. Just select Stretch to Fit Stroke Length, set the Width as Fixed, and set the Colorization Method as Tints, so that we can give it color at a later stage.
Voila, your art brush is created!
Now do the same steps for all the other shapes, and fill your Brushes library.
Delete all the shapes from your artboard after, or select all the shapes and hide them; Object > Hide (Command-3), in case you wish to edit them later.
Tip: Test the art brushes to make sure they capture the effect you need, and delete the ones you don’t need from your Brushes panel.

3. Tracing
Step 1
Let’s start tracing! Select the Paintbrush Tool (B), and pick a brush from the Brushes panel with a black stroke and a size of 1 pt. Then start tracing over the lines on your sketch. The key is to vary the stroke weight with your brushes. It’s all a matter of variety. Use a bit of trial and error, and see what works for your design.Have a look what I accomplished with just the Paintbrush Tool (B).

Step 2
You will notice that we left some parts out while tracing the illustration. That’s because we will fill those parts in with the Pen Tool (P).We need to Select > All (Command-A) to single out all the line-work, and lock these lines so that we can trace freely over the artwork. Object > Lock > Selection (Command-2).
Select the Pen Tool (P), with a black fill and stroke set to none, and trace over the rest of the sketch.

Step 3
After filling out the larger parts, unlock your strokes: Object > Unlock All (Command-Option-2).Now you can add in the finishing touches to your tracing and edit the shapes.
Illustrator CC (update 17.1) has a feature in which you can easily edit the corners and paths of objects.
Take the Direct Selection Tool (A), select an object, and on the corners you will see some new control elements appear. These are called Live Corner Widgets, and are displayed by a circle with a point at the center. You can select a Live Corners Widget and change the shape of the corner by double-clicking on it. A Corners dialog window will appear. Here you can choose from three types of corner: Round, Inverted Round, or Chamfer. You can also set the value and type of rounding Radius you need.
Note: When dragging the Live Corner Widgets, note that when the highest possible point of the rounding is reached, it will be highlighted in red.

Step 4
Once you have finalized the details of the artwork, lock your “Artwork” Layer. Then delete the “Sketch” layer, by dragging it from the Layers panel to the trash icon on that panel.Want to show off your work in progress? You can upload your new artwork directly to Behance from Illustrator, if you are signed in with an Adobe ID. Click the Behance icon at the lower-left corner of the active window, or click File > Share on Behance, fill in all the details of the work on the Share on Behance dialog, and post it as a Work in Progress on Behance! If you don’t want to, just move on to the next step.

4. Color
Step 1
Once we have finished tracing, we can color in the creepy artwork.Select the Create New Layer icon at the bottom of the Layers panel. Double-click the layer, and name it “Colors”. With the Pen Tool (P) selected, fill in the space with the Fill color of your choice, no stroke. The trick is to divide the illustration into blocks of color at first. There is no need for perfection when tracing. All you need is the Pen Tool (P), and learn to Arrange objects in your layer:
Arrange > Bring to Front (Command-Shift-])
Arrange > Bring Forward (Command-])
Arrange > Send Backward (Command-[)
Arrange > Send to Back (Command-Shift-[)
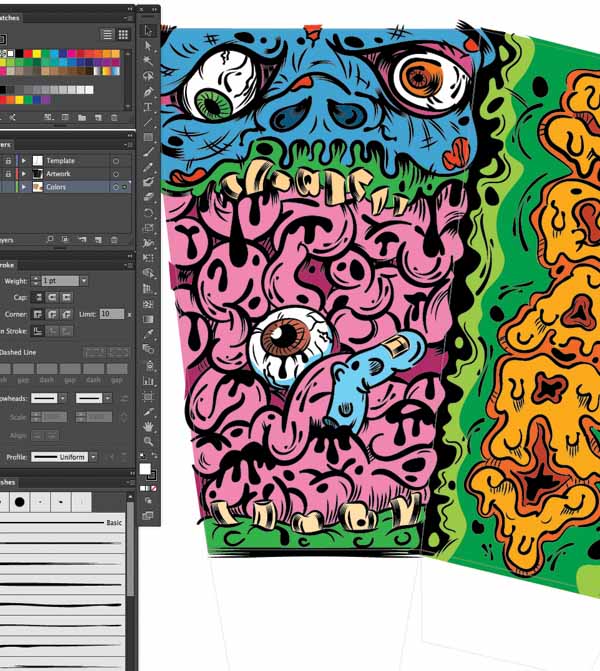
Step 2
Once you have filled in the main color blocks, start adding in darker shades, by selecting a shade/hue darker than the one originally chosen. The darker parts will make the artwork pop, and should be applied where there are wrinkles, folds, and deeper areas to the artwork.Take the Eyedropper Tool (I), and click on one of the color shades. Then double-click the Fill from the Tools panel. The Color Picker dialog window will open, and you will see a circle icon selecting the color gradient. Drag the circle icon around to select a darker shade, and click OK. Then select the Pen Tool (P) and add a darker shade to the artwork.

Step 3
After adding in the deeper hues, we need to add highlights to the artwork. Follow the same process as in Step 2, except select lighter shades, and apply.
Step 4
The final step is to lock the “Colors” layer, and give colors to some of the strokes and shapes you have in black. For example, I gave the eye veins red strokes, and added white shiny highlights and drops to the intestines.
And We Are Done, Design-Wise!
Print your file. File > Print (Command-P).Cut out the template, glue the parts together, and pop your popcorn. Fill the box and serve with a spook!
Advice: Print on A4 printing paper that's thicker than 80g/m2. Once you print and craft, make sure the glue and ink has been dry for a long time before putting in the popcorn, or the popcorn will smell and taste like glue!

Enjoy, and let’s hear those screams pop!


