
1. Creating the Head
Step 1
Hit the Ellipse Tool (L) and create an ellipse. Remove the stroke color if you have one, and set the fill color to R=216 G=217 B=218. Take the Direct Selection Tool (A) and select the left and right anchor points, then move them down.
Step 2
Now let's create the ears. We need to draw a triangle (using the same fill color) and we will create it from the Polygon Tool. Take the Polygon Tool and click on your artboard. In the new dialogue window, type 3 Sides with any Radius. Then click OK.Keep it selected and go to Effect > Warp > Bulge. In the new window, Warp Options will pop up. Be sure to set the Style to Bulge, Bend 60%, Distortion Horizontal 0%, Vertical 0%. Make one more copy of the ear in front (Control-C, Control-F), then make it smaller and set the fill color to R=243 G=117 B=121. We just created one ear of the kitten.

Step 3
Rotate the ear a little bit and place it on the head. Keep the whole ear selected and right-click your mouse. In the pop-up window, select Transform > Reflect. Select Vertical axis of reflection and press Copy.Move the second ear and place it on the right-hand side. To make the ears right in the middle of the head, you can select both ears, right-click the mouse and select Group. Press the Shift key and hold, and then select the head and the ears together. Go to the Align panel (Window > Align) and press Horizontal Align Center.

Step 4
Now on to the eyes. Choose a green fill color (R=141 G=139 B=0) and using the Ellipse Tool (L) draw an oval. Draw another oval over it and make the fill color darker (R=96 G=91 B=3). Draw a small white circle as a highlight.Rotate the eye a little to the left. Then create another eye: right-click the mouse and hit Transform > Reflect, Vertical, Copy. Move the new eye on the right-hand side.

Step 5
Draw a pink oval with the fill color R=243 G=117 B=121. Keeping it selected, hit the Convert Anchor Point Tool (Shift-C) and press on the lowest anchor point to make this sharp. We just created the nose. Place the nose between the eyes, slightly lower.
Step 6
Using the color from the head, we will draw the fur. Adjust the Pencil options: double-click on the Pencil Tool (N) and set the Tolerances Fidelity to 4 px and Smoothness to 40%. Check Fill New Pencil Strokes and then press OK. Try to draw something like in the image below. To close the path, you need to hold the Alt button as you finish the path. Draw three different pieces of fur: on the top of the head, and on the left and right cheek. The head is done!
2. Creating the Body
Step 1
Using the Ellipse Tool (L) draw an oval (fill color R=216 G=217 B=218). Take the Direct Selection Tool (A) and, moving the handles, create a shape like in the image below.
Step 2
Put the body under the head (Control-X, Control-B).
Step 3
Now, we will create a division between the head and the body. Just select the head, make a copy behind (Control-C, Control-B) and move it down a little bit. Make the fill color darker (R=201 G=202 B=204). Then select the body, and make a copy in front (Control-C, Control-F). While holding the Shift key, select the darker copy of the head, and on the Pathfinder panel press the Intersect button.
Step 4
This next shape is designed to show the hind paw of the kitten. Draw an oval using the Ellipse Tool (L) with a fill of R=201 G=202 B=204. To make the top and bottom anchor points sharp, take the Convert Anchor Point Tool (Shift-C) and press on these anchor points. Then go to Effect > Warp > Arc. In the new dialogue window, enter the following: Style Arc Vertical, Bend 50%, Distortion Horizontal 0%, Vertical 0%. Press OK. Then expand this shape (Object > Expand Appearance).

Step 5
To draw the front legs, start with an oval. Using the Direct Selection Tool (A), move the handles to create the shape shown below. Make another copy (Control-C, Control-B) and make it darker (R=201 G=202 B=204) and a little wider.
Step 6
Take the two shapes you made in the previous step and put them into their places. Then take just the darker shape and place it where the second paw has to be. Send this second front paw to the back (Control-X, Control-B).
Step 7
The last part of this cutie is a tail! Again, draw an oval (the same fill color as the body and head). Send it to the back (Control-X, Control-B) and go to Effect > Warp > Arc. In the new dialogue window, enter the following: Style Arc Horizontal, Bend -30%, Distortion Horizontal -65%, Vertical 0%. Press OK. Then expand this shape (Object > Expand Appearance). This cute kitten is done!
3. Creating the Witch Hat
Step 1
Hit the Polygon Tool and click on your artboard. In a new dialogue window, type 3 Sides with any Radius. Set the fill color at R=0 G=0 B=24. Go to Effect > Warp > Arc. In the new window, select Style Arc Vertical, Bend -30%, Distortion Horizontal 0%, Vertical 0%. Press OK. Then expand this shape (Object > Expand Appearance). Using the Direct Selection Tool (A), move the handles of this shape to achieve the following result.
Step 2
Make a new copy in front (Control-C, Control-F). Make the new copy lighter (R=23 G=23 B=44) and make sure that the tops of these two shapes are at the same point.Set the fill color to R=234 G=96 B=19 and draw a circle on the top. To create a nice round circle, hold the Shift key when creating this shape. Create one lighter (R=243 G=115 B=33) copy of this orange circle to add volume.

Step 3
Draw an oval for the bottom part of the witch hat. Make a copy of it in front (Control-C, Control-F). Take the Direct Selection Tool (A), select the lowest anchor point on this new copy, and move it up. Keep the last created shape selected, and again make one more copy in the back (Control-C, Control-B). Move it up and set the fill color at R=66 G=66 B=84. The witch hat is done!
Step 4
Let's decorate this hat with a bow to make it even more adorable. Draw an oval (did you notice that we are creating this illustration mostly from ovals?). Hit the Eyedropper Tool (I) and take the same orange fill color as the pompom on the top of the hat. Move the top and bottom anchor points to the left using the Direct Selection Tool (A).Create a second copy of it (Control-C, Control-V) and put them together as shown in the second image. Keep these two shapes selected, right-click your mouse and select Transform > Reflect. Then select Vertical axis of reflection, Angle 90 degrees, and press Copy. Move the two new copies to the right.

Step 5
Create an oval (fill color R=243 G=115 B=33) in the middle to make the knot of the bow. The two dark narrow ovals behind the knot will show us the folds of the bow.
Step 6
Group the whole bow and place it on the hat.
4. Putting the Witch Hat on the Kitten
Select the whole hat, don't group it, and place it on the kitten's head. Just select the back part of the hat and press Control-X, Control-B to send this to the back.
5. Pumpkin Carving
Step 1
First we need to draw a pumpkin. Draw an orange oval, fill color R=243 G=115 B=33. Move the left and right anchor points a down a little.
Step 2
Make another copy in the back (Control-C, Control-B), move it to the left, and rotate a little to the right. Set the fill color for the new copy at R=234 G=96 B=19. Keep it selected and create a reflection of this (right-click the mouse and hit Transform > Reflect, Vertical, Copy). Move this third part to the right.Select the copy you made in this step (image 1) and create a new one behind (Control-C, Control-B). Slide it to the left and set the fill color at R=221 G=83 B=14. Make a reflection of this copy (right-click the mouse and Transform > Reflect, Vertical, Copy), and slide it to the right.

Step 3
Now let’s start carving the eyes. We will start with a triangle (R=191 G=60 B=2). Go to Effect > Warp > Bulge. In the new dialogue window, enter the following: Style Bulge Vertical, Bend 50%, Distortion Horizontal 0%, Vertical 0%. Press OK.
Step 4
Create the second eye. Keep it selected and hold the Alt key to move it to the side.After that, draw two circles and place them as in this image. Select the two circles together (remember to hold the Shift key for this), take the Eyedropper Tool (I) and take the same color from the corresponding part of the pumpkin.

Step 5
To carve the mouth, create an oval with a dark orange fill color, the same as the triangular part of the eye (use the Eyedropper Tool (I)). Make the left and right anchor points sharp (use the Convert Anchor Points Tool (Shift-C). Then go to Effect > Warp > Arc. Enter Style Arc Horizontal, Bend -50%, Distortion Horizontal and Vertical 0%. Press OK. Add two rectangles, (using the Rectangle Tool (M)) with the same fill color as the corresponding part of the pumpkin.
Step 6
Position the mouth where it should be.
6. Putting the Kitten on the Pumpkin
Let’s help the kitty climb on the pumpkin.
7. Drawing the Spider
Step 1
A gray oval (R=109 G=110 B=112) will make the body of the spider. Slide the left and right anchor points down.Draw an eye using two circles with light gray and black fill colors. Make two eyes by copying and pasting, and place them as shown.

Step 2
Make the stroke color the same as the body of the spider and on the Stroke panel check Round Cap. Then go to the Tools panel and double-click on the Pencil Tool (N). In the new dialogue window, make Tolerances Fidelity 4 px and Smoothness 40%. On the Stroke panel, make the Stroke Weight very thick (relative to the body of spider) and draw four legs.Keep these legs selected and make a reflection to create four more legs. Move them to the right.

8. Creating the Spider Web
Step 1
Set the stroke color at R=64 G=64 B=65 and delete the fill color. Take the Polygon Tool and click on your artboard. Type 10 Sides with any Radius. Create two more of the same polygons, each one being smaller than the one drawn before.Take the Line Segment Tool and hold the Shift key to draw a straight line. With the same fill color, draw two tiny circles on the ends. Group the circles and the line. Place this line in the middle of the polygons.
Keep the line selected and press the Rotate Tool (R), then press the Enter key. A new window will pop up. Type 15 or 20 degrees and press Copy. Keep pressing Control-D to repeat your last movement. The spider web is done.

Step 2
Settle the spiders there.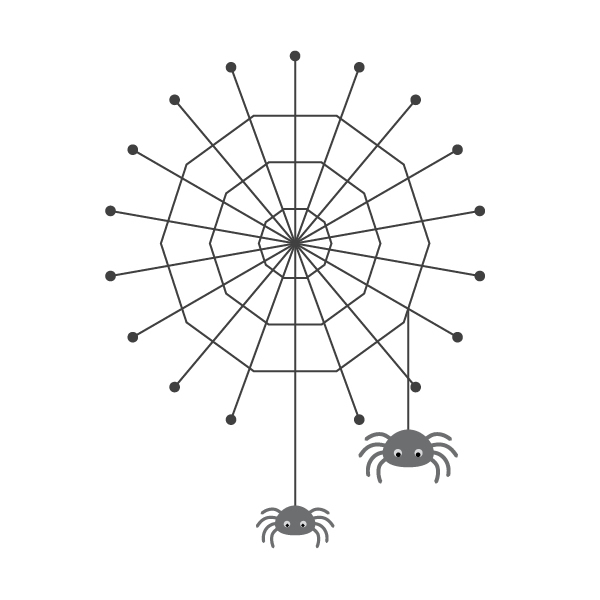
9. Creating the Background
Create two circles as shown in the following image. The smaller circle should have a fill color of R=35 G=31 B=32, and the bigger one R=88 G=89 B=91.Keep the bigger circle selected and go to Effect > Distort and Transform > Zig Zag. Then enter Options Size 4 px, Absolute, Ridges per Segment 20, Points Smooth, and press OK.

10. Placing the Background
Place the two circles you made in the previous step behind everything you created before. As you can see, I made a few spiders and a couple of spider webs. Arrange everything as you like.
11. Creating the Striped Background
Now we need to create another background. Take the Rectangle Tool (M) and create a rectangle with 600 px width and height. Put it behind everything. Set the fill color at R=243 G=242 B=227.Afterward, create one more copy in the front, and make it darker (R=216 G=214 B=168) and more narrow.
Keep the new green stripe selected, hold Shift and Alt, and move this stripe to the right. Then keep pressing Control-D to repeat your last movement. Stop when you fill up the light green square.

12. Placing the Striped Background
Select the light green square and darker green stripes together, and place them behind everything you made before. Your illustration is done! Congratulations!


