What You'll Be CreatingIn
this part of the series we're going to learn how to draw small rodents
like mice, rats, squirrels and others. First we'll learn about the
general traits of rodents and then about all the features of actual
species.
1. General Rodent Anatomy
Though
very different, small rodents share some body features you can use to
learn faster about multiple species at the same time.
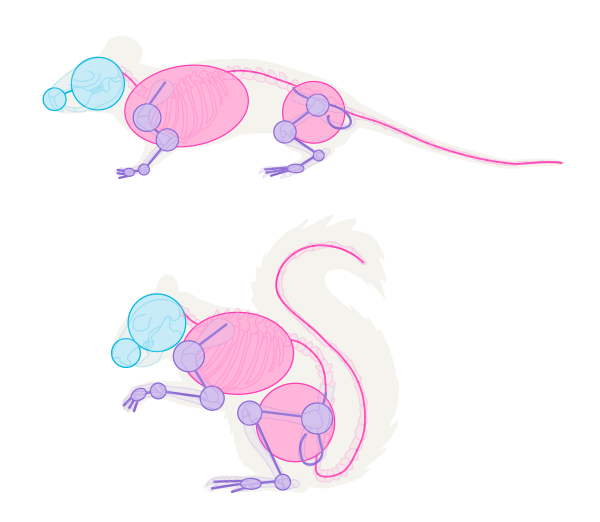
Skeleton
The
skeletons of mammals generally look alike, but you can find even more
resemblance among species. The most characteristic features of rodents
are:
Elongated, tapered skull with huge incisors
Big head
Small chest
Flexible spine
Narrow hips
Sharp, prehensile claws
Short legs
Hind feet slightly larger than front ones
Ability to sit upright
Very agile forelimbs
Don't be confused by this iconic "sitting squirrel" pose—a squirrel is built the same way as a mouseThe
skeleton of every animal can be simplified to basic forms that are easy
to reproduce in various poses. This is a kind of artistic skeleton—it
makes a proper base for the rest of the body without engaging us with
the shape of bones or other unnecessary things. To learn more about
using a simplified skeleton check my tutorial about poses.
Body
Fortunately
for us, a rodent's body is covered with quite loose skin that conceals
the outline of the muscles. When you add fur to it, it's obvious there's
no need to learn the actual musculature of these animals. Still,
muscles define the shape of the body, so there are structures that you
need to remember.
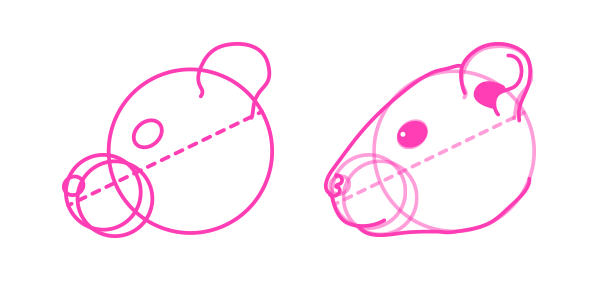
Head
Since
rodents' skulls are very similar, their heads can be drawn in a similar
way too. For now we're focusing on similarities—we'll talk about
particular species later. I'm going to show you three views at the same
time, so that you can see different perspectives.
Step 1
Start with a big ball for the brain case and two smaller balls for the upper jaw.
Step 2
Add a ball below the upper jaw to create the lower jaw.
Step 3
Add details like the nose, eyes and ears. The eyes are big and oval, and should be placed on the sides of the head.
Step 4
Use the guide lines we've created to finish the head.
Eyes
The
eyes of small rodents are dark and oval. If you're drawing them on a
small scale, feel free to make them out of black ovals with white shine
dots. On a bigger scale you can add more details: Rodents' eyes can be drawn as simple black beads
Feet
Rodents
have various number of fingers among species, but their feet are rather
similar. Because they're not heavily furred (or at all), the fingers
and their bending is clearly visible. Most rodents have four toes on
their front feet and five toes on their hind feet, with the middle ones
visibly longer.
Nose
The
nose of small rodents is tiny, so you'll rarely need to draw it in
detail. The most important thing to remember about it is a little hump
above the nose, crucial for a proper rodent look.
2. Mouse
Body Features
Slender body
Tail longer than the whole body with head
The tail is covered with "scales" and hair
Big head in comparison to the body
"Naked" feet covered with thin, light hairs
House mouse
Color
Wild mice (house mouse, field mouse) are usually gray or brown. For pet mice you can use almost any coloration you want!
Head
Pointy muzzle
Big, round, hairless ears
Big eyes in comparison to the head
3. Rat
Body Features
Stocky body
Shorter tail
The tail is covered with "scales" and hair
Head proportional to the rest of the body
"Naked" feet covered with thin, light hairs
Rat
Color
Natural colors for rats are gray, grayish brown, and black. You can also use the coloration types of mice.
Head
Rounded muzzle
Small, hairless ears
Small eyes in comparison to the head
4. Gray Squirrel
Body Features
Slender body
Curved claws
Strong hind legs
Long, bushy, but slightly flattened tail
Small head in comparison to the body
Eastern gray squirrel
Color
Gray squirrels are primarily gray, with a brown or blond tint on the head and the sides. The underside is white.
Head
Rounded muzzle
Small ears
Large eyes in comparison to the head
5. Red Squirrel
Body Features
Slender body
Curved claws
Strong hind legs
Long, bushy, but slightly flattened tail
Small head in comparison to the body
Red squirrel
Color
Coloration can vary within the species, but the coat is usually red, brown or reddish gray, with a white underside.
Head
Slightly pointed muzzle
Pointy, tufted ears
Large eyes in comparison to the head
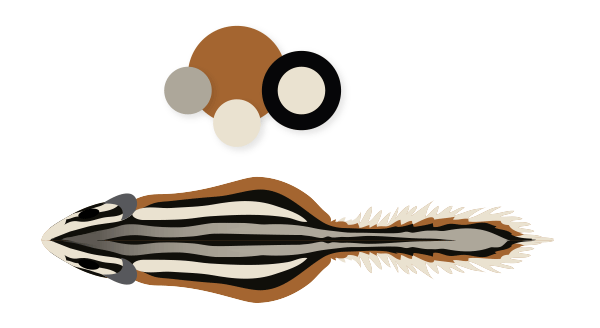
6. Chipmunk
Body Features
Small, slender body
Head proportional to the body
Long, quite bushy tail
Chipmunk
Color
Chipmunks are mainly reddish brown, with a white underside and characteristic
stripes. To draw them correctly, start with wide black stripes and add
narrow yellow‑cream stripes inside (the inside stripes can be a less saturated version of the main coat).
Wild gerbils are typically yellowish brown with a lighter underside and white tip of the tail. Domesticated gerbils have a wide variety of coloration.
Head
Rounded muzzle
Small, hairless ears
Large eyes in comparison to the head
9. Guinea Pig
Body Features
Very stocky, round body
Very big head in comparison to the body
No visible tail (human-like tail)
Four toes on the front feet, three toes on the hind feet
Neck merged with the body
Guinea pig
Color
There's no typical coloration for a guinea pig, but you can choose from a variety of coats. For simplicity's sake, you can choose a plain color like blond or brown.
Head
Rounded muzzle
Floppy ears
Proportional eyes
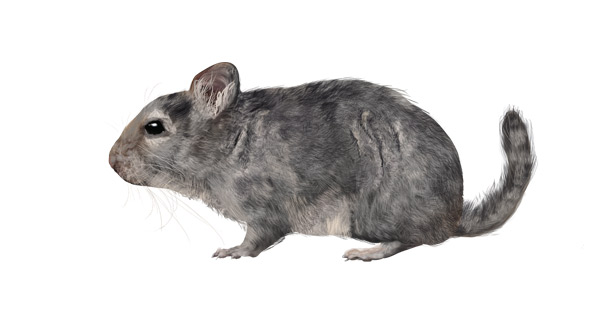
10. Chinchilla
Body Features
Stocky body
Very soft, thick fur
Medium long, fluffy tail
Big head in comparison to the body
Four toes on every foot, with "thumbs" on both the front and hind legs
Chinchilla
Color
Chinchillas are traditionally dark gray, with a light underside and darker back. They can also be black, beige, or almost white.
Head
Rounded muzzle
Very big, almost hairless ears
Big eyes in comparison to the head
Very long, straight whiskers
"Sleepy" eyes
11. Practice Exercise—Draw an Illustration
Let's use all this knowledge in practice!
Step 1
The
biggest problem with a planned picture is that it's very hard to get
started while keeping it interesting. To avoid it, start with a simple
sketch of your idea. Don't think about anatomy, just draw what you
imagine.
Step 2
Use the messy sketch to build a pose-skeleton on its base. Look how easily these simple forms can be converted to 3D view!
Step 3
Add the muscle mass. Remember—muscles and the actual shape of the body may differ depending of the amount of fur on the species.
Step 4
Add the fingers. By using only two fingers as a base, you make it more clear, and the rest of them will follow their rhythm.
Step 5
Add the head following the perspective.
Step 6
Now you can sketch the picture emerging from the guide lines.
Step 7
You can leave the sketch as it is, or clean it up to create line art.
Unknown
Lorem ipsum dolor sit amet, consectetur adipisicing elit, sed do eiusmod tempor incididunt ut labore et dolore magna aliqua. Ut enim ad minim veniam, quis nostrud exercitation.
Medical Disclaimer
The information on this site is not intended or implied to be a substitute for professional medical advice, diagnosis or treatment. All content, including text, graphics, images and information, contained on or available through this web site is for general information purposes only. Krobknea makes no representation and assumes no responsibility for the accuracy of information contained on or available through this web site, and such information is subject to change without notice. You are encouraged to confirm any information obtained from or through this web site with other sources, and review all information regarding any medical condition or treatment with your physician. NEVER DISREGARD PROFESSIONAL MEDICAL ADVICE OR DELAY SEEKING MEDICAL TREATMENT BECAUSE OF SOMETHING YOU HAVE READ ON OR ACCESSED THROUGH THIS WEB SITE.