
1. Drawing the Monitor
Step 1
Open Adobe Illustrator CC 2014 (the techniques and designs can be created in earlier versions of the program, but Live Corners and the Pattern Options panel were introduced in versions CC and CS6 respectively) and create a New Document.Using the Rectangle Tool (M), draw a horizontal rectangle. With the Direct Selection Tool (A), select the rectangle and pull the Live Corners inward, rounding out the corners of the rectangle. Set the fill color to gray (
#bcbdac).
Step 2
Let's turn this rounded rectangle into a computer monitor.- Copy (Control-C) and Paste (Control-V) the rounded rectangle. Draw a smaller rectangle over the lower half of the newly copied rectangle.
- Select both rectangles and hit Minus Front in the Pathfinder panel. Set the overlapping rectangle's fill color to dark purple (
#3b2d38). Make sure the two shapes are Aligned to the top edge of each other. - Draw a smaller rounded rectangle for the screen of your monitor. Set the fill color to light blue (
#8ee2e4). - For the monitor's stand, draw a small vertical rectangle and place it behind the other shapes in the Layers panel. Then, draw a narrow horizontal rectangle at the very bottom (see below).

Step 3
Now let's add some details to the monitor design.- For the glare on the monitor, draw a large curving shape that overlaps the screen with the Pen Tool (P).
- Select the blue rounded rectangle and the newly drawn curving shape. With the Shape Builder Tool (Shift-M), select the non-intersecting portion of the curving shape. Deselect all shapes. Delete the extraneous portion of the curving shape.
- Set the fill color of the overlapping glare shape to light blue (
#8ee2e4). In the Transparency panel, set the Blend Mode of this shape to Screen.
#87707a).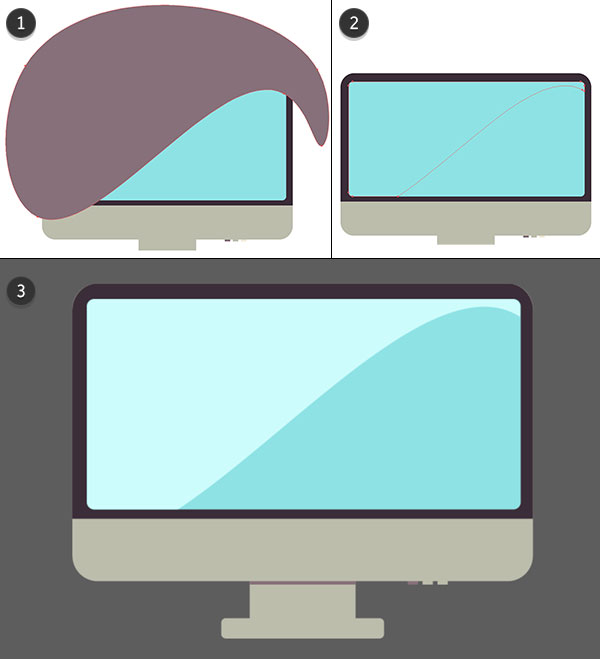
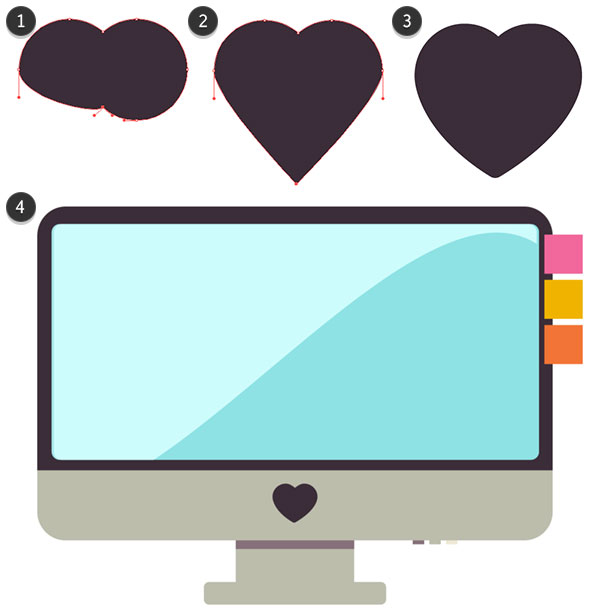
Step 4
Let's add some flare to the monitor design.- Using the Ellipse Tool (L), draw two identical circles. Make them overlap slightly and hit Unite in the Pathfinder panel. Using the Delete Anchor Point Tool (-), delete the left and right bottom anchor points.
- With the Direct Selection Tool, pull the bottom center anchor point downward. Use the Anchor Point Tool (Shift-C) to convert the anchor point to a sharp point.
- Again, use the Anchor Point Tool to convert that bottom-most anchor point to a curve. Manipulate the anchor point's handles so the bottom of the heart curves softly.
- Place the heart on the bottom portion of the monitor. Draw brightly colored squares with the Rectangle Tool on the right side of the monitor to create little sticky notes.
2. Drawing a Graphic Tablet
Step 1
The tablet begins quite simply with a dark, warm gray rectangle overlapping a rounded dark purple rectangle. Move the gray rectangle to the right, slightly, so there's more space on the left side of the design.Draw two narrow gray rectangles that are the same width as the large dark purple rectangle. Place them at the top and bottom of the gray rectangle (see below).
Create a curving shape for glare on the tablet's surface with the Pen Tool and the Shape Builder Tool as was done with the monitor previously. Set the curving shape's Blend Mode to Screen in the Transparency panel.

Step 2
For the buttons on the left side of the tablet, draw four rounded rectangles in gray, a circle in gray, and a smaller circle in dark purple. Align all six objects to their centers and place them on the left side of the tablet design.
Step 3
The USB cord portion of the design is once again mostly comprised of rectangles.- Draw a vertical rounded rectangle for the plug.
- The connection from the plug to the cord is a horizontal rectangle whose rightmost anchor points were moved inward with the Direct Selection Tool and whose corners were rounded out in the Transform panel.
- I drew the cord with the Paintbrush Tool (B) and set the brush to the first default brush in the Brushes panel: 5 pt. Round.
- The casing of the USB is a rectangle that has been Rotated slightly.
- Once again, this portion of the USB is another rotated rectangle. This time, though, the fill color was set to gray (
#bcbdac). - Finally, the little holes in the USB are two dark purple rectangles.

Step 4
Put your USB components together on the right side of the graphic tablet design. Group together all of the graphic tablet components, and let's move on to the accessories.
3. Drawing a Stylus and Stand
Step 1
The stylus starts with a long, narrow rectangle in dark purple. Use the Direct Selection Tool to move the rightmost anchor points inward, as though you're pinching the right side of the rectangle (not literally pinching, but giving it that look). Round out the rightmost corners in the Transform panel.
Step 2
For the tip of the stylus, draw a vertical rectangle (the same height as the stylus's rectangular base) in warm gray. Either use the Pen Tool or the Polygon Tool to draw a triangle of the same height.Unite the rectangle and triangle in the Pathfinder panel. Add a small overlapping rectangle on the left side of the newly united object.
Select both shapes and hit Minus Front in the Pathfinder panel.

Step 3
The rest of the stylus's components are assorted rectangles.- On the left you have the stylus's tip that was just created.
- Make sure the tip and the base rectangle line up perfectly.
- The right end of the stylus has a dark purple rounded rectangle (it almost looks like a little pill).
- Overlapping the right half of the rectangle is a warm gray shape. Create it by adding a gray rectangle overlapping the rightmost third of the base rectangle. Use the Shape Builder Tool to delete the non-intersecting portion as you did previously when drawing the curving glare shape on the computer monitor.
- Draw a long, narrow rounded rectangle for the outline of the stylus's buttons.
- Draw a smaller dark purple rounded rectangle for the stylus's buttons themselves.
- Choose a bright color, like teal (
#009989), and draw a narrow, vertical rectangle for the colorful portion of the stylus's tip. - Draw another, even smaller, narrow rectangle in dark purple. Use the Shape Builder Tool, as was done before, to make sure the new shape fits the contour of the stylus's tip perfectly.
- Finally, draw a small, rounded rectangle for the stylus's nib.

Step 4
The stylus's stand is rather simple.- Draw a rectangle and bring the bottom anchor points toward the center of the shape so it forms a trapezoid.
- Using the Ellipse Tool, draw two narrow ellipses that match the width of the top and bottom of the trapezoid.
- Copy and Paste the top ellipse. Set the stroke color to warm gray. Draw a small ellipse within the copied one and Unite them in the Pathfinder panel to create the little bump seen in the shape below. Use the Pen Tool to draw a slightly curving stroke near the bottom of the stylus stand.

4. Drawing a Notebook and Smartphone
Step 1
One of my most useful tools is my notebook filled with to-do lists and tutorial outlines and notes. Recreating it is a rather easy feat.- For the bookmark's tail, draw a small vertical rectangle. Use the Add Anchor Point Tool (+) to add an anchor point to the bottom edge of the rectangle. With the Direct Selection Tool, pull the anchor point upward until you get the split edge you want. Set the fill color to dark teal (
#11766d). - The book itself is a rectangle whose right corners are rounded more than the left. You can do this in the Transform panel by making sure the link icon is toggled off and manually changing each corner's radius.
- Draw a long, thin rectangle for the elastic that holds the book closed, and add three brightly colored squares for little sticky notes that stick out from beneath the book's cover. Put all of the components together in the manner seen below (adjust object position in the Layers panel).

Step 2
A smartphone is another set of rectangles piled on top of each other.- Start with a dark purple rectangle. If you fancy your phone having rounded corners, do so. If you'd rather create a phone that resembles your own (or one you wish to own), aim to recreate that design instead.
- The screen is a smaller rectangle, this time filled with off-white (
#efe8d5). - For the third time in this tutorial, I've drawn a curving shape to replicate glare on my gadget's screen. Set the fill color to off-white and the Blend Mode to Screen in the Transparency panel.
- Draw a thin horizontal rectangle at the bottom of the rectangle and set the fill color to warm gray.

Step 3
Let's add something simple to the phone's screen: chat bubbles!- Draw a bright green (
#cfbe27) rectangle. - Pull the Live Corners inward to round out the shape.
- Use the Pen Tool to draw a curving tail.
- Close the shape and Unite the rounded rectangle and the tail in the Pathfinder panel.

5. Drawing Other Office Supplies
Step 1
The pattern needs some large sticky notes strewn about. Draw a square with the Rectangle Tool. Use the Pen Tool to draw a triangle in the lower right corner of the square. Copy and Paste the triangle and rotate it 180° with the Rotate Tool (R). All three objects are the same color, yellow (#f0b300), but the upper triangle is set to Overlay and the lower triangle is set to Multiply.
Step 2
Let's draw a cute mechanical pencil for the pattern. Its parts are very similar to the stylus drawn previously:- A small rounded rectangle forms the graphic lead.
- The top of the pencil is a warm gray triangle.
- A bright yellow rectangle forms the body of the pencil.
- Draw a horizontal gray rectangle for the pencil's clip.
- A pink rounded rectangle forms the eraser.
- Finally, two small gray rectangles form the band connecting the eraser and clip to the pencil itself.

Step 3
What desk is complete without a pink eraser? Draw a bright pink (#f1679b) rectangle. Using the Shear Tool, skew the rectangle to your liking. Pull the Live Corners inward so the eraser is slightly rounded out.
Step 4
An assortment of highlighters is an easy feat when broken down into five simple shapes.- A rounded rectangle in gray forms the highlighter cap's clip.
- A rectangle with the top corners rounded forms the cap itself.
- Overlap the cap with an ellipse and use the Shape Builder Tool to delete the non-intersecting portion of the shape.
- A large rounded rectangle, the same width and corner radius as the cap, forms the base of the highlighter.
- Finally, a smaller rounded rectangle, whose Blend Mode is set to Multiply, serves as a decal or label on the highlighter design.

Step 5
Finally, a small spiral notebook is simply a matter of rectangles, circles, and triangles.- Draw a vertical rounded rectangle with the fill color set to warm gray. Copy and Paste the rectangle five times for a total of six spiral shapes.
- Draw six circles with the Ellipse Tool. Set the fill color to off-white (
#efe8d5) and their Blend Mode to Multiply in the Transparency panel. Make sure the circles are distributed evenly and aligned with the spiral shapes (by way of the Align panel). - Draw a large rounded rectangle with either the Rectangle Tool or the Rounded Rectangle Tool.
- Finally, use the Pen Tool to draw an overlapping triangle in the bottom right of the design. With the Shape Builder Tool, delete the non-intersecting portion of the triangle from the rounded rectangle, as was done previously with the glare shape on the computer monitor. Copy, Paste, and Rotate the shape. Both shapes' fill colors are set to off-white, and their Blend Modes are set to Screen (top) and Multiply (bottom).

Step 6
Arrange your components in whatever fashion you'd like. At this point, you can either arrange a flat icon desktop illustration for use as a desktop background or as desktop icons on their own, or continue on ahead to create the final pattern.
6. Putting the Pattern Together
Step 1
Move and Rotate elements around your artboard. This is why I advised grouping each element's components together: so they'd be easy to move around.Select all of your elements and hit Make Pattern in the Pattern Options panel. From here, you can further arrange and rearrange your pieces. Feel free to Copy, Paste, recolor, or even create completely new shapes while in editing mode.
When satisfied with your design, hit Done at the top of your document window. You'll find this new pattern in your Swatches panel.

Step 2
I like to layer designs like this. Draw several little circles, each a different color from your design. Arrange them to the best of your ability so they seem to be scattered about. Then hit Make Pattern in the Pattern Options panel. Adjust their position or add additional circles as needed.
Great Job, You're Done!
The final product is two overlapping rectangles with each of the patterns created set as the fill color. Since both were transparent, you can add a third rectangle below the other two for a pop of color behind your design. Share your pattern with us in the comment section below. Go further and recreate your own desk or favorite supplies you use in design.


