
Wallpaper makes a great backdrop for portraits, but the thought of drawing it can be incredibly daunting. In this lesson, I'm going to show you how a single piece of tracing paper can help you create elaborate wallpaper designs with ease.
What You'll Need

- Small piece of tracing paper
- Drawing paper
- Pencil (preferably a 2B or 4B)
- Pen
- Eraser
- Ruler
1. Prepare Your Wallpaper Design
Step 1
Open up your wallpaper image in Adobe Photoshop. If you don't already have a wallpaper image, Google and Getty Images are great places to look for vintage designs.

Step 2
Crop your image down to the simple repeating pattern.

Step 3
Move a guideline onto the center reflecting line of the design.

2. Draw the Design on Your Tracing Paper
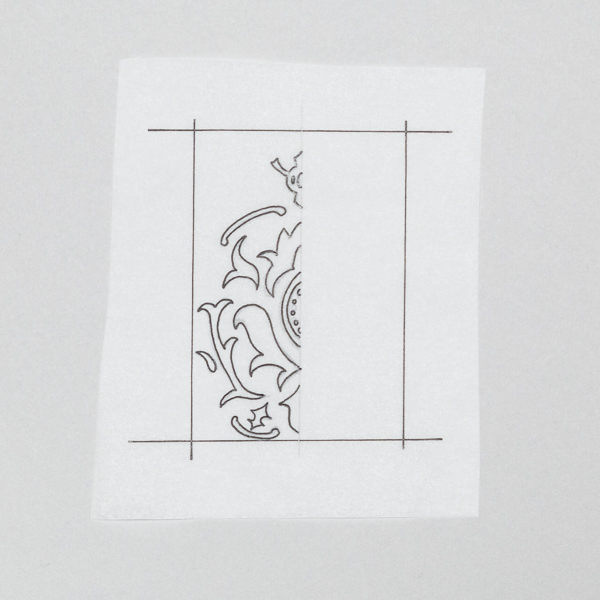
Step 1
Measure out a bounding box on your tracing paper in pen. Your design will fit within this box. Think of it as a tile on a floor. The size of the tile will determine the pattern. So the bigger the box, the bigger the end pattern will be.

Step 2
Draw a reflecting line in your box with your pencil to match the reflecting line on your photo reference.

Step 3
Looking at your photo reference, sketch in pencil your wallpaper design in half of the bounding box.

Step 4
Draw over your pencil with pen. This will make things much easier as we move along, because it won't get lost in the pencil.
Step 5
Flip your tracing paper over and with your pen, trace the design you just drew. You should now have the full repeating pattern drawn out on the top of your tracing paper.

Step 6
Using your pencil, shade the entire back side of your tracing paper. Essentially we're creating a carbon paper so that we can now transfer our designs onto the final paper.

3. Draw Out Your Wallpaper
Step 1
Draw a bounding box on your paper. There's no right or wrong here. You simply create a box as large as you would like your end wallpaper design to be. You also need to draw a guideline to figure out where to draw the first repeating pattern. If the reflecting line on your tracing paper is vertical, draw a vertical line down the middle of your paper. If your reflecting line is horizontal, draw a horizontal line across the middle of your paper. Then divide your paper in half the other way.

Step 2
Using the lines you just drew, place your tracing paper, pen side up, on your paper. Align the reflecting line with the first line you drew on your paper. Then shimmy it up and down (or left and right) to figure out where it fits best. It's always a good idea to not have your design end on the bounding box.

Step 3
Using a pencil, trace over the pen lines of your pattern. You'll want to push fairly hard so that a lot of the pencil lead transfers over to the paper. Lift up your tracing paper when you're done. You should now have one repeat pattern on your paper.

Step 4
Move your pattern over to the next location. At this point you might want to open the original wallpaper image you used to see how it repeats. Some patterns repeat in perfect alignment left and right, up and down. Others stagger by row or by column. For me, my design repeats in alignment left to right. So I'm going to move my tracing paper to the left, trace the pattern again, move it right, and trace it again.

Step 5
Once you have one row or column of your wallpaper design drawn out, you need to draw new guidelines for the second row or column. In my case, the rows are staggered halfway between the one above them. So I drew my vertical guides in halfway between the previous guidelines.

Step 6
Continue moving and tracing your design until you have covered the entire space within the bounding box. You may need to apply more lead to the back of the tracing paper after a few traces.

4. Finish Your Wallpaper Design
Step 1
Now that you have your whole design penciled in, it's time to turn it into your final piece. This will depend on what sort of artwork you're making. You may want to paint the wallpaper or use colored pencil to color it in. For me, I'm just doing a simple black ink and white background design, so I'll start going over the pencil lines. Going over your pencil lines first ensures that you don't rub them out by accident as you go along.

Step 2
Fill in your wallpaper shapes to finish it up!

You're Now on Your Way to Being William Morris!
You can use this wallpaper tracing paper trick to create other wallpaper designs, fabric designs, or even repetitive landscapes in your own drawings. This transfer method also works on canvas, and can be painted over instead of inked.


