Water splashes are a beautiful phenomenon. The randomness of liquid physics ensures that every splash is unique. The result is a natural struggle of the fluid as an external force flings it around and gravity insists it return to a resting state. This struggle takes place in the span of a fraction of a second, and it often happens too quickly for us to be able to capture and appreciate the simple majesty of the effect.
Because water splashes are so familiar, yet elusive, they make for excellent compositional elements. The image of a splash also conveys movement and mood. If you want to use them in your own designs, you probably consider purchasing stock images as your only option. This Quick Tip is here to show you that with a bit of effort, you too can create your own beautiful water splashes to use!
1. It's All About the Light
The absolute first thing to discuss is the mechanics of capturing the water splash with a DSLR. It's more challenging than it looks. The main issue is the speed. The splash only lasts for a moment, and it will not be still. To capture it appropriately, the camera needs a very quick shutter speed. I found that anything slower than a speed of 1/1000 of a second resulted in motion blur.
The image below was captured at a shutter speed of 1/800 of a second.
The movement and shape of the water is beautiful, but the shutter speed isn't quick enough to freeze the motion and provide sharp results.
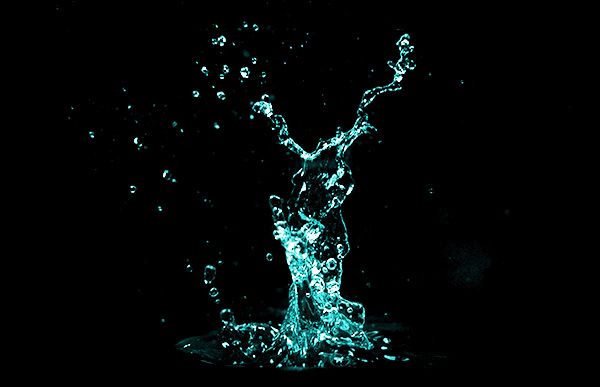
The problem then with increasing the shutter speed is that light becomes a major issue. The faster the shutter, the less light gets through. In this image, the shutter speed is set at a blazing 1/2000 of a second. The drops are sharp and clear, but the overall image is way too dark.
Now there are professional solutions to this problem. Off-camera strobes are ideal in this situation, especially ones that can fire off several times per second. If you have one of those, use it! But I'm guessing those pieces of equipment aren't all that common for graphic designers, especially since the price can range from hundreds of dollars to thousands!
The other aspect of this speed issue is timing. Catching the water splash directly in frame is nearly impossible when working with a single exposure. The better option is to use a continuous release and capture several frames to ensure you get one that is useable. This compounds the light problem, as not every flash is capable of firing off continuous exposures.
My solution? Clamp lights! And lots of them!
I found these lamps at my local hardware store for about $10 apiece. They are very simple and clamp onto almost anything. I use them for just about everything now! I also recommend Natural Daylight colored light bulbs with as high a wattage as you can find. In my setup I'm using three 23 Watt CFL bulbs and one 50 Watt flood light bulb.
This much light is needed to compensate for the shutter speeds. Just for comparison, here's a shot of my hands holding some water under those lights with a "regular" shutter speed of about 1/100.
Now here's how it looks with the shutter speed dialed up to 1/3200.
For your own project, you will need to experiment with the lighting and shutter speeds to get the right balance for you.
2. Surface Splash Technique
This is the first of two techniques to capture water splashes. It's the easier of the two and should be used to build confidence in the shots, before attempting the second technique.
Step 1
For this approach you will need a simple glass aquarium filled about a third of the way with water. Set up the clamp lamps pointing down into the water. It's important to use a dark background, like a black sheet or curtain. Fortunately, due to the high shutter speeds, it's unlikely you will need to worry about any light spills onto the curtain showing up in the shots.
Step 2
Mount the camera on a tripod right at the water level. The lens should be looking over the surface of the water. Be watchful of reflections, although the shutter speed will help keep most of those out since they generally won't be bright enough to be visible. In this shot, I brightened up the reflections just to give a better idea of the camera position.
Step 3
To create the splash, drop an ice cube into the water right in front of the camera. Why an ice cube? Because there's no color in it to reflect into the splash. They float and are easy to fish out of the water, and they are cheap and readily available! Drop the ice while holding down the shutter to shoot continuous shots.
Step 4
Remove the ice cube from the water, and then carefully use a napkin to wipe the splash drops off the sides of the aquarium.
Step 5
Repeat the process several times. This will require patience.
I ended up taking around 100 shots just to get four or five images worth using.
3. Hand Splash Technique
Ready for the next level of water splash shots? This technique is a bit more difficult due to the additional moving parts. Basically the idea is to cup water into your hands in front of the camera, and then capture the splash as you let the water go into a mid-air splash. The results are quite different from the previous technique as there's no surface for the splash to interact with.
Step 1
The setup for this technique is a little different. It requires a bowl of water, a large basin to catch the water, and an assistant who doesn't mind getting a little wet!
Step 2
Mount the camera on the tripod and aim the lens at a point about 2 feet in front of it—the lamps should all be focused on this same point. Scoop up some water between your hands (or have your assistant do the wet work!) and hold it in front of the camera.
Step 3
While the camera is shooting continuous shots, release the water! Pay attention to the hand movements. Different release techniques will create different shaped splashes.
Step 4
Repeat the release technique slightly higher than the camera lens to capture the drops as they fall. Just as with the prior technique, have patience and keep trying until you have several good frames.
4. Going Digital
Time to dry off the hands, stow the lights and camera gear, and get those images into Photoshop! The goal is to create a set of custom brushes that will be readily available for future digital projects.
Step 1
Select an image to begin working with. The clearer and sharper the splash appears, the better the results will be.
Step 2
Increase the contrast with Layer > New Adjustment Layer > Levels. Adjust the slider handles by pulling the outer handles inwards until the image appears crisp and sharp.
Step 3
Photoshop brushes disregard any color information, so it's the best practice to do likewise when crafting custom brushes. Add a Hue/Saturation adjustment layer and pull the Saturation slider down to -100.
Step 4
Add a New Layer above the image layer. Use a soft edged brush with black paint to paint over the surface of the water, the top edge of the aquarium, any hint of a reflection and any out of focus drops. The idea is to isolate the splash shape as completely as possible.
Step 5
Photoshop determines brushes by dark pixels over white. The splash photos are the opposite of that. So add an Invert adjustment layer to reverse the colors.
Step 6
Go to Edit > Define Brush Preset. Give the brush a name and hit OK. This brush will now be added to your library of brush presets.
5. Use My Brushes
I fully encourage you to create practical effect brushes on your own. It's not a very difficult task and it is incredibly rewarding. Cultivating the skill to transition visual effect from practical to digital will open up new possibilities for your digital designs. But if you don't have the time or capability to create these brushes on your own, I've included mine here for you to use on your personal projects.
Step 1
Download the attached file for this tutorial, WaterSplashBrushes.abr. Then go to Edit > Presets > Preset Manager. In the Brushes section, use the Load button to navigate to the downloaded file.
This will add 13 new Water Splash brushes to your Brush Preset library
Advertisement
Step 2
Go be amazing! Use these brushes to add an interesting natural element to your digital artwork.
Water splashes are a beautiful phenomenon. The randomness of liquid physics ensures that every splash is unique. The result is a natural struggle of the fluid as an external force flings it around and gravity insists it return to a resting state. This struggle takes place in the span of a fraction of a second, and it often happens too quickly for us to be able to capture and appreciate the simple majesty of the effect.
Because water splashes are so familiar, yet elusive, they make for excellent compositional elements. The image of a splash also conveys movement and mood. If you want to use them in your own designs, you probably consider purchasing stock images as your only option. This Quick Tip is here to show you that with a bit of effort, you too can create your own beautiful water splashes to use!
1. It's All About the Light
The absolute first thing to discuss is the mechanics of capturing the water splash with a DSLR. It's more challenging than it looks. The main issue is the speed. The splash only lasts for a moment, and it will not be still. To capture it appropriately, the camera needs a very quick shutter speed. I found that anything slower than a speed of 1/1000 of a second resulted in motion blur.
The image below was captured at a shutter speed of 1/800 of a second.
The movement and shape of the water is beautiful, but the shutter speed isn't quick enough to freeze the motion and provide sharp results.
The problem then with increasing the shutter speed is that light becomes a major issue. The faster the shutter, the less light gets through. In this image, the shutter speed is set at a blazing 1/2000 of a second. The drops are sharp and clear, but the overall image is way too dark.
Now there are professional solutions to this problem. Off-camera strobes are ideal in this situation, especially ones that can fire off several times per second. If you have one of those, use it! But I'm guessing those pieces of equipment aren't all that common for graphic designers, especially since the price can range from hundreds of dollars to thousands!
The other aspect of this speed issue is timing. Catching the water splash directly in frame is nearly impossible when working with a single exposure. The better option is to use a continuous release and capture several frames to ensure you get one that is useable. This compounds the light problem, as not every flash is capable of firing off continuous exposures.
My solution? Clamp lights! And lots of them!
I found these lamps at my local hardware store for about $10 apiece. They are very simple and clamp onto almost anything. I use them for just about everything now! I also recommend Natural Daylight colored light bulbs with as high a wattage as you can find. In my setup I'm using three 23 Watt CFL bulbs and one 50 Watt flood light bulb.
This much light is needed to compensate for the shutter speeds. Just for comparison, here's a shot of my hands holding some water under those lights with a "regular" shutter speed of about 1/100.
Now here's how it looks with the shutter speed dialed up to 1/3200.
For your own project, you will need to experiment with the lighting and shutter speeds to get the right balance for you.
2. Surface Splash Technique
This is the first of two techniques to capture water splashes. It's the easier of the two and should be used to build confidence in the shots, before attempting the second technique.
Step 1
For this approach you will need a simple glass aquarium filled about a third of the way with water. Set up the clamp lamps pointing down into the water. It's important to use a dark background, like a black sheet or curtain. Fortunately, due to the high shutter speeds, it's unlikely you will need to worry about any light spills onto the curtain showing up in the shots.
Step 2
Mount the camera on a tripod right at the water level. The lens should be looking over the surface of the water. Be watchful of reflections, although the shutter speed will help keep most of those out since they generally won't be bright enough to be visible. In this shot, I brightened up the reflections just to give a better idea of the camera position.
Step 3
To create the splash, drop an ice cube into the water right in front of the camera. Why an ice cube? Because there's no color in it to reflect into the splash. They float and are easy to fish out of the water, and they are cheap and readily available! Drop the ice while holding down the shutter to shoot continuous shots.
Step 4
Remove the ice cube from the water, and then carefully use a napkin to wipe the splash drops off the sides of the aquarium.
Step 5
Repeat the process several times. This will require patience.
I ended up taking around 100 shots just to get four or five images worth using.
3. Hand Splash Technique
Ready for the next level of water splash shots? This technique is a bit more difficult due to the additional moving parts. Basically the idea is to cup water into your hands in front of the camera, and then capture the splash as you let the water go into a mid-air splash. The results are quite different from the previous technique as there's no surface for the splash to interact with.
Step 1
The setup for this technique is a little different. It requires a bowl of water, a large basin to catch the water, and an assistant who doesn't mind getting a little wet!
Step 2
Mount the camera on the tripod and aim the lens at a point about 2 feet in front of it—the lamps should all be focused on this same point. Scoop up some water between your hands (or have your assistant do the wet work!) and hold it in front of the camera.
Step 3
While the camera is shooting continuous shots, release the water! Pay attention to the hand movements. Different release techniques will create different shaped splashes.
Step 4
Repeat the release technique slightly higher than the camera lens to capture the drops as they fall. Just as with the prior technique, have patience and keep trying until you have several good frames.
4. Going Digital
Time to dry off the hands, stow the lights and camera gear, and get those images into Photoshop! The goal is to create a set of custom brushes that will be readily available for future digital projects.
Step 1
Select an image to begin working with. The clearer and sharper the splash appears, the better the results will be.
Step 2
Increase the contrast with Layer > New Adjustment Layer > Levels. Adjust the slider handles by pulling the outer handles inwards until the image appears crisp and sharp.
Step 3
Photoshop brushes disregard any color information, so it's the best practice to do likewise when crafting custom brushes. Add a Hue/Saturation adjustment layer and pull the Saturation slider down to -100.
Step 4
Add a New Layer above the image layer. Use a soft edged brush with black paint to paint over the surface of the water, the top edge of the aquarium, any hint of a reflection and any out of focus drops. The idea is to isolate the splash shape as completely as possible.
Step 5
Photoshop determines brushes by dark pixels over white. The splash photos are the opposite of that. So add an Invert adjustment layer to reverse the colors.
Step 6
Go to Edit > Define Brush Preset. Give the brush a name and hit OK. This brush will now be added to your library of brush presets.
5. Use My Brushes
I fully encourage you to create practical effect brushes on your own. It's not a very difficult task and it is incredibly rewarding. Cultivating the skill to transition visual effect from practical to digital will open up new possibilities for your digital designs. But if you don't have the time or capability to create these brushes on your own, I've included mine here for you to use on your personal projects.
Step 1
Download the attached file for this tutorial, WaterSplashBrushes.abr. Then go to Edit > Presets > Preset Manager. In the Brushes section, use the Load button to navigate to the downloaded file.
This will add 13 new Water Splash brushes to your Brush Preset library
Step 2
Go be amazing! Use these brushes to add an interesting natural element to your digital artwork.
Want More?
Can't get enough custom creative brushes in Photoshop? Check out the rest of our series on creating Photoshop Brushes from Scratch. Hungry to learn more about how to use custom brushes in photo manipulation projects? Check out my profile of courses and tutorials here at Tuts+ and find all that, and much more!
Creating your own library of digital resources pulled from real-world practical effects is a skill that will pay off exponentially in the future. Instead of searching stock sites for interesting textures, try creating some for yourself! I'd love to see them in the comments below.
TDasany
Lorem ipsum dolor sit amet, consectetur adipisicing elit, sed do eiusmod tempor incididunt ut labore et dolore magna aliqua. Ut enim ad minim veniam, quis nostrud exercitation.
Medical Disclaimer
The information on this site is not intended or implied to be a substitute for professional medical advice, diagnosis or treatment. All content, including text, graphics, images and information, contained on or available through this web site is for general information purposes only. Krobknea makes no representation and assumes no responsibility for the accuracy of information contained on or available through this web site, and such information is subject to change without notice. You are encouraged to confirm any information obtained from or through this web site with other sources, and review all information regarding any medical condition or treatment with your physician. NEVER DISREGARD PROFESSIONAL MEDICAL ADVICE OR DELAY SEEKING MEDICAL TREATMENT BECAUSE OF SOMETHING YOU HAVE READ ON OR ACCESSED THROUGH THIS WEB SITE.