
A light tent is like a custom made mini-studio. It is usually a square or rectangle and features semi-transparent white windows and space inside to comfortably fit an object. The thin windows allow in light and diffuse it as it passes through. It's this diffusion that softens the light, and soft light is more flattering for photography than hard light.
A light tent is perfect for small to medium size craft. Light tents are available to buy but they're also really easy (and cheap) to make at home. Another benefit of making your own is that you can tailor it to your needs by using a cardboard box in just the right size for your craft. Here's how to do it.
Materials

- Rigid cardboard box
- Marker
- Ruler
- Utility knife (or tough scissors)
- Cutting board
- Semi-transparent white paper
- Thicker white paper (optional)
- Tape
1. Prepare the Box

You'll need one rigid cardboard box to start this project. The size is really up to you, because it depends on the size of your craft. If your items are quite small, you'll only need a medium box, whereas, if they're large, you'll need an extra-large box.
Just keep in mind the theory that the larger the box, the more light it will contain, and, the more light bouncing around inside the box, the lighter and brighter your setting will be.
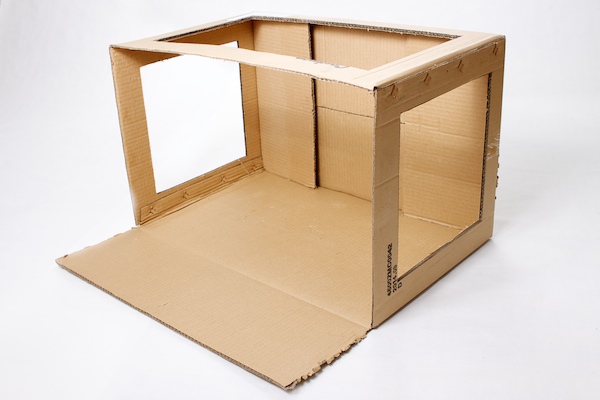
Here, I've used a box approx. 60 cm wide x 40 cm tall x 35 cm deep. I have also removed three flaps (the top and sides of the box) to leave only one, which will act as an extension of the base.
2. Measure the Windows

Take the marker and ruler and measure straight lines a short distance from the top and sides of the box. The distance needs to be short enough to create a window as large as possible on these three sides, but long enough to maintain the structural integrity of the box.
For this large box, I've placed my guidelines at 6 cm for the weakest part of the box (the edge where the flaps used to be) and 5 cm for the other three. If you're using a utility knife to remove the top and sides, you may find it easier to mark the lines on the inside of the box.
3. Cut Out the Windows
Use your utility knife or tough scissors to cut along the window guidelines. If you've marked the lines on the inside of the box, use the cutting board. Another pair of steady hands may come in handy for this step, especially if you're using a utility knife without a cutting board. A ruler, preferably metal, may also make this step safer and easier.
A tip for cutting through tough corrugated boxes like this one with a utility knife and metal ruler is to use single passes across the markings and ridges until you've cut all the way through. This method is much easier on your hands than the back-and-forth saw method. You now have a box with the top and sides removed, while the back and base remain intact.
4. Measure and Cut the Paper for Windows

Take your semi-transparent white paper and measure pieces that are wider than the newly created windows. Cut each piece to size. I've used baking paper from a roll; tracing paper also works well. If the paper is wide enough to cover the windows, you can make this step faster by measuring one long piece that will cover all three windows at once.
5. Attach the Paper

With the paper cut to size, use tape to attach the paper to the inside of the box.
6. Measure and Cut the Paper for the Runway


The final piece of paper is used to cover the inside back and floor of the box, just like a runway. When measuring the runway, allow extra length to extend out the front of the box. This will cover the flap that you left attached to the box, and will give you a little extra room to shoot, should you need it.
If your ruler is larger than the box, measure the lengths on the outside, as shown above. Semi-transparent paper, such as what you've used to create the windows, may make a fine runway, but you can also try a thicker white paper for a more opaque look.
7. Attach the Runway

Tape the runway paper to the back of the box at the top. Allow the paper to gently drape down to the floor of the box, along the floor and out the front. The gentle curve at the back of the box and the floor helps to create a seamless look in the photos. You now have a box that is almost all white on the inside. Don't be tempted to use different coloured papers for the windows or runway; when the light enters the tent it will reflect the colour of the paper and this will cause a colour cast.
8. Position the Tent

When light enters the newly created windows it will bounce around the inside of the tent to create a bright, light and airy setting. You'll have greatest success if you move the tent into a well-lit position. Position the tent to allow light to enter at the top or from one side.
When working with a light tent, you have the flexibility of using whatever light source you prefer, or indeed the light source that is most abundant on that day. For example, if light is low in your home or office, take the tent outside (as shown above) or place it near a window to use natural light, or use desk lamps for artificial light. Natural light is usually the more flattering option of the two.
When using artificial light, be aware of the colour that the light bulb is emitting. To mimic natural light, daylight-balanced bulbs are available and are a good investment if you like the effect and use them frequently. To compensate for the colour emitted by other light bulbs, such as tungsten bulbs, which are often used for desk lamps, adjust the white balance setting on your camera accordingly. Adjusting the white balance will help to display colours correctly and avoid a green, blue or orange tint to your photos.
9. Position Your Craft
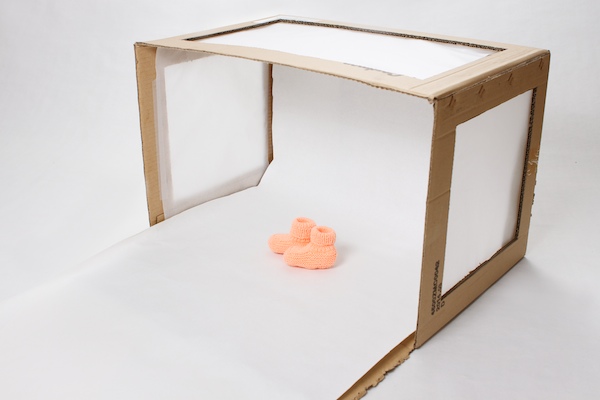
Position your craft in the centre of the tent. Using the centre will create space around the craft that will help you frame the photo, allowing options for various crops and 'breathing space' around the craft. Keeping the craft away from the back curve of the runway will also maintain the seamless look.
10. Shoot

Your cheap-as-chips, portable, soft white and softly lit mini-studio is complete, and you're ready to shoot! You'll see how the softened light creates soft shadows that form on the side of your craft opposite the main light source.
Experiment with direct sunlight, cloud cover, shade, window light, and artificial lights. If direct sunlight is working well but becomes too harsh (and causes dark shadows and areas within the photo that are too bright and the detail is lost or 'blown out'), you don't always have to move into shade or wait for cloud cover; you can affix more paper to the top and sides until you're allowing in just the right amount of light. You can also experiment with props and styling inside the box.
Final Tips
- With time and use, your light tent will become grubby and creased. When this happens, just replace the windows and runway with fresh paper.
- For an even lighter, brighter tent, spray-paint the inside of the box white before you attach the paper windows and runway.
- If you make and sell large items like clothing or homeware and you've been struggling to find a well-lit, soft, white space in which to photograph them, it is possible to take the following structure as inspiration and make your own super-size light tent using a lightweight wood frame and semi-transparent white fabric. For the flooring it may be better to use white-coated MDF (medium-density fibreboard). Using a hard floor won't give you the gentle curve at the back of the runway, but the greater distance of your craft from the back of a larger-size tent should mean that the seam is subtle.
Now, Start Shooting!
You've seen how easy it is to make your own light tent—it's a great afternoon or weekend project—so why not give it a go? Come back and tell us how it goes.
Peachy booties from the South West Rocks Arts & Craft Association Inc.


