In this tutorial we're going to take a cute character from starting sketch to finished product using Adobe Illustrator. We'll be focusing on how to achieve an efficient workflow and how to use the Eraser Tool in a creative way, as well as creating unique brushes and giving our finished design a handmade, distressed effect.
Before we get started, you're going to need to download the sketch that we're going to be tracing for this tutorial, unless you want to work on your own. You can alsodownload the color swatch I've used for the illustration.
1. Tracing the Sketch
Step 1
After opening a new file in Illustrator, let's set up our sketch for tracing. Go to File > Place, or simply drag and drop the file onto the Artboard, in order to import the sketch into Illustrator.

Since the file is pretty large, feel free to resize it to fit into your Artboard. Don't worry about distorting the image as you're resizing, as we are only going to be using it for tracing purposes.
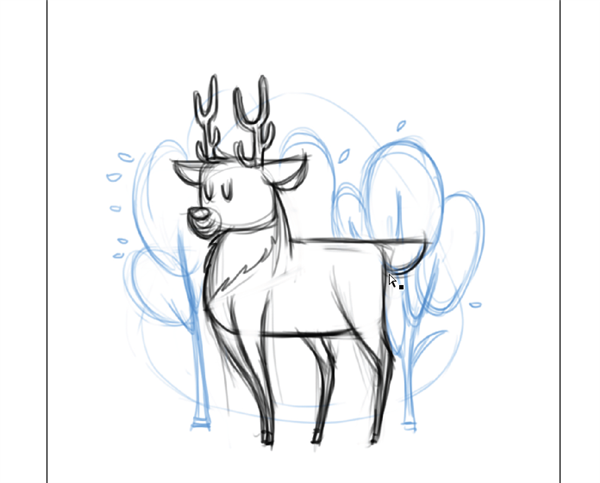
Next we're going to set the Opacity of the sketch down to 50% from the top toolbar, so that we'll be able to clearly see the shapes we're going to be tracing on top.

Now let's lock the layer containing the sketch from the Layers panel, which you can find in the top menu under Window > Layers, so that we won't have to worry about accidentally moving the sketch.

Now that we have the sketch imported and prepared for tracing, we can move on to the tracing step.
Step 2
Create a new layer above the sketch, and if you want to be thorough don't forget to name your layers.

At first we're not going to be focusing on the colors too much—we're going to be tracing the deer using the Pen Tool and a bright orange 2 pt Stroke. Start with the head, and focus on tracing the shapes while thinking about how they are layered. For example, the ear that is facing us will be connected to the bulk of the head, while the ear in the back will be a separate shape since it's in a different plane from the rest of the head.
Don't worry about overlaps in this step. Adjust the stroke until you are pleased with the shapes, and only trace the large shapes—don't go into the details just yet.

Proceed with the rest of the deer, tracing the large shapes and taking into account the layering on the legs.

Step 3
Now that we're done with the body, it's time to add antlers to our little deer. So that we won't have to worry about keeping the thickness constant, we're going to use larger strokes that we're going to expand. Select a stroke width of 8 pt andRounded Cap as well as Rounded Corners, and trace the antlers from the sketch.

Now we're going to adjust the thickness towards the ends of the antlers so that they taper off a bit. Select the Width Tool from the left hand toolbar. Double-click on the anchor point at the end of the antler and you'll see a window with the width option. Use a Total Width of 4.5 pt.


Do the same for the other end anchor points along the antlers. The end result should look like this:

Repeat the process for the antler on the other side of the head. Then select both antlers and go to Object > Expand Appearance and turn them from strokes into shapes.

After expanding the strokes, you'll notice that each one has become a separate shape, so use the Pathfinder panel (Window > Pathfinder) to Unite the shapes into a single one.

2. Adding Colors
Step 1
Now it's time to add color to our deer. Start selecting the outlined shapes that we've traced, and invert the fill and stroke.

Step 2
Load the swatch that has been provided (if you don't want to use your own color scheme) by clicking on the Swatch Libraries Menu in the Swatches panel and clicking on Other Library, and then browsing to the downloaded swatch file.

Step 3
Start adding fills to the outlined shapes from our color palette after inverting the stroke and fill for each shape.

Keep the layering of the objects in mind and arrange the shapes in order. Send shapes backward by right-clicking and selecting options from the Arrange context menu.

The end result should be something like this:

3. Adding Details
Step 1
We're going to create an Art Brush with a handmade, distressed feel to it. First create a tapered shape like the one below using the Pen Tool, approximately 320 ptin length.

Then go to Effects > Distort & Transform > Roughen to make this shape a bit more jittery with these settings:
- Size: 0.3%
- Detail: 10/inch
- Points: Smooth


Go to Object > Expand Appearance to expand this effect on the shape. With the shape selected, click New Brush in the Brushes panel, and select the Art Brushoption.


Set the Width to 25% and the Colorization Method to Tints.

Now that we have our detail brush ready, it's time to add some details to our deer.
Step 2
Now with the Paintbrush Tool selected and stroke colors from our swatch, add the eyes, mouth, and details on the fur. Adjust the stroke width if you feel that it might be too heavy or too thin in places. You may also turn off the sketch layer to get a better picture of the finished product.

Add as much as you like, but for me the result ended up looking like this:

4. Adding Shadows
Step 1
Now we want to add some shadows to our deer to give it a more layered, 3D look. So select the body shape and Copy/Paste to Front by hitting Control-C and thenControl-F on your keyboard. With this front shape selected, use the Eyedropper Tool (I) to sample the darker brown color from the legs in the back, and then set the opacity of this shape down to 40%.

Step 2
Now select the Eraser Tool (E), press Enter to bring up the options panel, and make it a 3 pt brush.

Then start ”cutting” out the shaded part from this large shape. The argument for this technique is that it is a quick way of creating a perfect match for the outer contours of the main shape while maintaining the flexibility of drawing the interior edges yourself. Keep the shape you want to cut out from selected, so that you only erase from that shape.

Step 3
After cutting out the shape, use the Direct Select Tool (A) to delete the extra parts and adjust the anchor points to your liking.

Step 4
Repeat this process for the head and fur on the neck.

Step 5
For the antlers, repeat the Copy/Paste to Front procedure, selecting a darker beige for this new shape and moving it to the left of the original. Then ungroup them so that we can use the Pathfinder to intersect them.


Select the original antler shapes again and Copy/Paste to Front again. Then select each light antler and the dark overlay and, using the Pathfinder, select the Intersectoperation. The fact that we copied the underlying shape means that we keep the original background for the shadow part.

Now use the Eraser Tool (E) again to erase the parts from the center stroke of the antler and create a nice rounded shape. Adjust the anchor points with the Direct Selection Tool (A) if needed.

Now repeat the process for the other antler, and don't forget to Copy/Paste to Frontthe original shape before using the Intersect operation.
After adding a few more strokes for details with the custom brush we made, the finished deer looks like this:

Step 6
The finishing touch for our deer will be another Roughen Effect, with the initial large shapes that we traced selected, and using the following settings:
- Size: 0.15%
- Detail: 40/in
- Points: Smooth
Without deselecting after hitting OK, go to Object > Expand Appearance to apply the effect to the shapes. This creates a nice distressed effect similar to how edges bleed when screen printing.

5. Adding the Background
Step 1
Let's turn our sketch back on so that we can see the background we have to vectorize, and create a new layer in between the Deer layer and Sketch layer in which we'll place our forest background.

Start off by adding some orange ellipses as base shapes for our trees in the background. Use the Ellipse Tool located in the left-hand toolbar and the lighter orange color from the provided swatch file.

Now let's add a contrasting background to bring out both the deer and the forest. Select the Draw Behind option beneath the Fill/Stroke swatches.

Step 2
Now add a large ellipse with the dark navy color from the swatch in the center of the composition. Notice how the ellipse will appear behind everything we've drawn so far.

Select the light green color for the stroke and select the Draw Normal option beneath. Add another flattened ellipse as a base for the entire illustration.

Step 3
It's time to add the tree trunks. Select a light beige color for the stroke and with an8 pt Rounded Cap & Corner stroke, add the main parts of the tree trunks to the illustration.

Add some thinner strokes with 6 pt thickness to add some visual variety to the tree branches.

Now select the Width Tool (Shift-W), double-click on the anchor points at the base of the tree trunks, and give them all a 13 pt total width.

Then select all the tree trunks and branches and go to Object > Expand Appearance. That will expand the trunks but not the branches, so go to Object > Expand afterwards and that should transform the branches to shapes as well.


Step 4
Now select all the orange ellipses and go to Effects > Distort & Transform > Roughen and use the following settings:
- Size: 1%
- Detail: 31/in
- Points: Corner

Then go to Object > Expand Appearance to apply the effect to the shapes.
Step 5
Now it's time to add some details to these trees, like leaves and some details on the trunks. Create a leaf with the Pen Tool then Copy & Paste it along the treeline that we've created, resizing it to smaller and larger sizes and using the darker orange and dark green color from the palette provided.


This will create a nice, irregular leaf pattern reminiscent of actual foliage. Now select the Art Brush that we created earlier for detailing the deer, and start adding dark beige strokes to the tree trunks.

Use the dark green color for some more brush strokes to emulate blades of grass on the ground, and you're done!

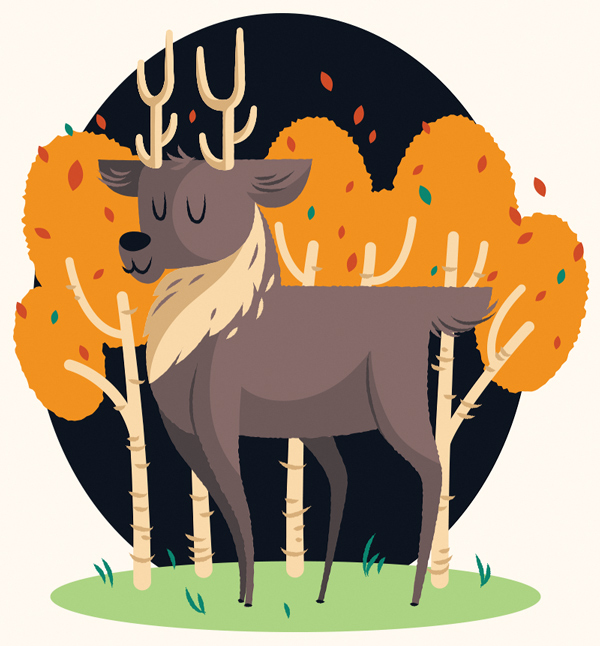
Congrats! Our Cute Deer Illustration Is Finished!
We've successfully created a cute deer illustration ready to be used in any way you see fit, such as for print, web, t-shirts or other apparel. We've learned about using the Eraser Tool in a creative way, creating distressed brushes using the Width Tool to quickly create expressive strokes, and working efficiently with all these tools at our disposal. All these techniques can easily be applied to many styles of illustration or design, so feel free to adapt them to your own workflow!


