
One of my favorite things in the world is creating flowing, seamless patterns, but I’m not a very precise person by nature and I was always intimidated by all the math and careful calculation that goes into making a repeating pattern tile. This is why I came up with a fairly painless way of creating a seamless pattern, that doesn’t require any complicated steps—it just sort of happens! Here’s how you do it:
1. Sketch Out Your Pattern
Step 1
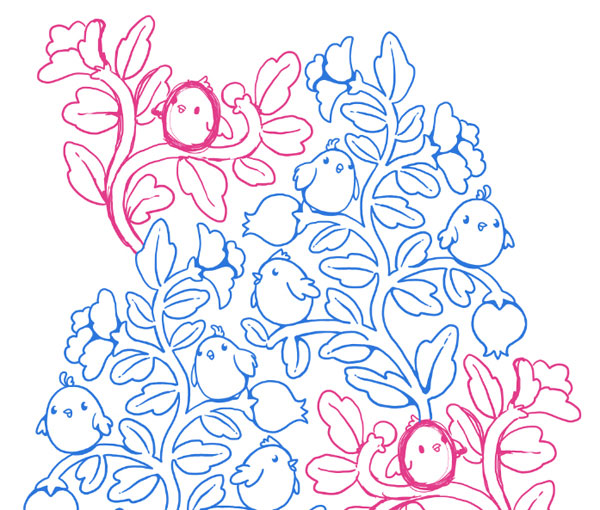
Do a bit of sketching to decide what elements you want to use in your pattern. Branches and flowers are always a good idea because they have a natural, organic flow. But this method works with any subject you’d like.

Step 2
Start growing your pattern spontaneously. This can be a rough draft and doesn’t have to look great—you’re just trying to get a good rhythm for the piece. You can grow out one big patch, or a bunch of smaller ones—it doesn’t matter. We’ll put them all together later on.

Step 3
Once your sketch has grown a bit, you’ll want to start forming your tile, so if you’ve been working on paper so far, scan your drawing at 300 dpi at least.
You want to give yourself a lot of breathing room, so make a fairly large new file in Photoshop—I suggest at least 5000 x 5000 px. You can always reduce the size if you feel it’s too big, but you can’t scale up in raster, so the worst thing is creating your beautiful pattern and then realizing it’s too small for the use you had intended for it.

Step 4
If your sketch or scan is fairly clean, you can use it as a starting point for your pattern tile. You’ll want to delete the white paper part and leave only your artwork on the layer.
You can do this best by adjusting the Image > Adjustments > Levels sliders. Move the left slider inward to make your blacks blacker, move the right slider inward to make the whites whiter, and then play with the middle slider until you have the best balance.
Then simply select the white parts with the Magic Wand Tool and Delete. If your sketch or scan is rough, you can always use it as a guide and draw out your lines cleanly on a separate Layer. Set the sketch as the top Layer and bring down itsOpacity so you can follow its lines without obscuring your view.

2. Create the Pattern Layout
Step 1
There are no strict rules as to how much artwork you should develop, but the more unique elements you have, the richer your pattern will be. That said, don’t go crazy! Too many different elements can make a pattern feel overly busy or messy.
Remember you can use the same elements more than once if you modify them with functions such as Edit > Transform > Rotate, Scale, or Flip. When you’re adding new sections of pattern, it helps to sketch them out first in a different color so you get the layout right, and then draw the final lines over that sketch.
Step 2
Play around with your different elements and tie them together to make one solid patch of pattern. The shape of the patch is not important, but it’s better for it to be a relatively compact blob.
At this stage it’s best to still be working with just one color—we can add more colors later, once we know our repeat is working. If we start to color the pattern before the repeat is done, we’ll have to go back and fix every color layer for every little change we make. (Trust my voice of painful personal experience on this one!) This doesn’t mean you can’t set the colors of your line work and background to something you find pleasant to work with.

Step 3
When the patch looks big enough, make a copy of your pattern layer usingControl‑J, and move it to one side of your tile in a straight line. It’s important for this new layer to move in a perfectly straight line, so hold down the Shift key before you start dragging it to ensure it’s locked in horizontal movement only.
Place the new layer at a small distance away from your original pattern layer, leaving enough room for the connecting elements you’ll draw in to tie the two together.

Step 4
Go back to your original pattern layer and continue to grow your design towards the new boundary. Be careful you don’t make the edge part of the pattern too dense or too sparse—you want to maintain an even flow.
If you find you’re having to squeeze elements in, move the control tile a bit further away (but still in a straight line). If you have too much room to fill, move it in closer. You’re aiming to achieve a seamless flow between the two sections.

Step 5
When you’re done, discard the control layer and make a new copy of your original pattern layer using Control-J. This time Shift-drag it vertically, either up or down.
You only need to see the edge of the control tile closest to your original pattern tile, but if you feel cramped, you can always increase your canvas size (Image > Canvas Size) to give yourself more breathing room.

Step 6
Go back to your original pattern layer and keep growing your pattern towards the new boundary set by the vertical control layer. Again, aim for a seamless meeting of the two.
Once you’re done, huzzah! Your pattern tile is essentially complete!! Discard the second control tile and we’re ready to do some testing.

3. Test Your Repeat
Step 1
Copy your pattern tile into a new file (Control-A > Control-C > Control-N >Control-V) so you can test out the repeat.
If it’s huge, reduce the size to around 1000 px. You’ll lose some quality, but for the test it doesn’t matter much—just make sure you’re doing this with a copy, and not your original file.
Then drag a selection box over the right side of your pattern, select approximately one fifth of the tile width (it doesn’t really matter how much, so just take a chunk) andShift-drag it to the far left side of the tile.
Be careful not to release the selection until you’re happy with where you’ve placed it—you can use the arrow keys to move it in small increments left and right until it looks like a good fit.
Release the selection (Control-D) and repeat the same for the vertical repeat—select a chunk off the bottom of the tile and move it up so that the two inner edges meet nicely. You now have a beautiful pattern tile!


Step 2
Drag the Rectangular Marquee Tool around your tile to select the whole thing. (This selection needs to be precise—if you’re having a hard time with it, set someGuides on the edges of your tile and the Marquee Tool will stick to them.) Then go to Edit > Define Pattern, name your new pattern, and save it.

Step 3
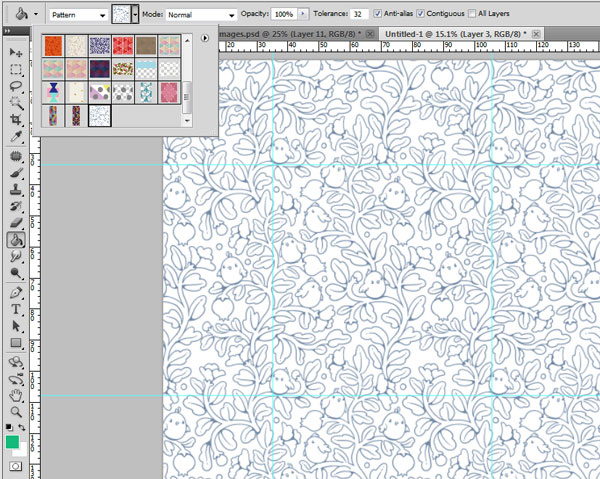
Now make a new empty file, at least three to four times bigger than your tile, and fill the whole surface with your new pattern by clicking the Paint Bucket Tool, changing the little drop-down menu option from the default ‘Foreground’ to ‘Pattern’, and picking your pattern from the menu (it’s always the last one). Look at your pattern and see if any odd bits are showing, or if some parts seem not to be flowing well.
Step 4
Note where those glitches are, and go back to your original pattern tile to fix them. You may have to go back and forth a few times until it’s looking just right, depending on how much of a perfectionist you are.
What you’re trying to achieve is a sort of ordered variety—no element should be too different from the others, so look for pieces that look markedly smaller or larger than the others. Those aren’t noticeable within the tile itself, but they become pretty glaring once you’re looking at the repeat. It sometimes helps to squint at it a little—that blurs out the details and makes you focus on the flow of the forms.

4. Adding Color
Step 1
Now you’re ready to add some color to your pattern! The easiest way to do this is by way of Color Overlays.
For each new color you want to use, add a new layer and set its color through theOverlay function (on the bottom of the Layers panel, click the ‘Fx’ button, choose ‘Color Overlay’, and then set your color). That way you always know which layer you’re working on, and you don’t have to keep selecting your colors, because the color is determined by the layer itself, rather than your brush.
You can use as many colors as you like, but it’s worth remembering that if you intend to send the file for screen printing, four to eight colors will work best. If you work in solid shapes, your base layer will be on the bottom, and the color layers above it. If you work in outlines, your line-work layer will be on top, and all the color layers below it.

Step 2
Before you start coloring, Control-click your main pattern layer to select it, and then click Control-H to hide the ‘marching ants’ selection so it’s not distracting you while you paint. Now when you paint on any color layer, you will only be able to lay color down within the selected area, so you don’t have to worry about painting over the lines.
Of course this only works if your base pattern consists of solid shapes, and not just outlines. If you work in outlines as I did here, you can fill them in first to create a solid base (Control-J to make a copy of the outlines layer, and then fill them in), and then use it to control the painting you’ll do on the other color layers.

Step 3
Once you’re finished with adding colors, if you can see a faint outline of the base color around your colored parts, you can fix that simply by selecting the artwork on the base layer (Control-click on the thumbnail image for that layer on the Layerspanel), and then going to Select > Modify > Contract, typing ‘1’ into the dialogue box, and clicking OK.
This contracts your whole selection by a single pixel, all around. Now click Control-Shift-I to invert your selection, and then hit ‘Delete’. This will shave a single pixel off the entire circumference of your base tile, and the annoying edge won’t show any more.

5. Final Touches
Step 1
Now your artwork is effectively complete, and you want to fold it into a perfectly rectangular tile again, so you can use it as a pattern, upload it to print-on-demand sites, or send it to manufacturers or buyers.
The easiest way to do this is with Guides. Drag one vertical and one horizontal Guide from the Rulers at the edges of your Artboard (if you’re not seeing the rulers, go to View > Rulers and switch them on), and place them within your pattern tile.
The exact location doesn’t matter—you can see roughly where I placed them and it works really well. Select the part of the pattern base that’s sticking out on the left side of the guide, and Shift-drag it over to the right side until it sits comfortably against the remainder of the tile.


Step 2
Once you’re happy with where it’s sitting, use the Zoom Tool to zoom in really close, and set the second Guide pixel-perfect at the clean outer edge of your new tile.
Now repeat the same with each color layer, and the section you’re moving will stick to the guide and automatically slot into the right place.
Once you’re done, zoom in once again to make sure nothing went wrong—small errors in this process can mean big headaches later on. If all is good, do the same with the vertical repeat.
At the end of all this, you may want to do one final test to make sure your pattern is repeating exactly the way you want it to.

Step 3
A layered file like the one we just made lets you make new color schemes effortlessly. Clicking on the Overlay effect on any of your color layers opens a Color Palette that lets you see in real time how the colors you’re choosing work with the rest of your piece, and it makes coming up with new color schemes a piece of cake.

And You’re Done!!
Wasn’t that easier than you thought?
If you want to send your pattern off to be printed on products or upload it to print-on-demand sites, you’ll often need just a flat PNG, JPG or TIFF image. But make sure you always save your original layered file. The layered file is ‘print-ready’, meaning it can be used without any alterations in the screen-printing process, which is a big plus for some buyers. Also you can always go back to it and make changes easily.
Well, I hope you enjoyed that, and I hope it has convinced you that making seamless patterns is nothing to be afraid of! Most fledgling pattern enthusiasts stick to tossed repeats, because naturally these are the easiest to do, but there’s a lot of joy to be had from a nice, flowing, seamless repeat.
Can’t wait to see what you do with this!


