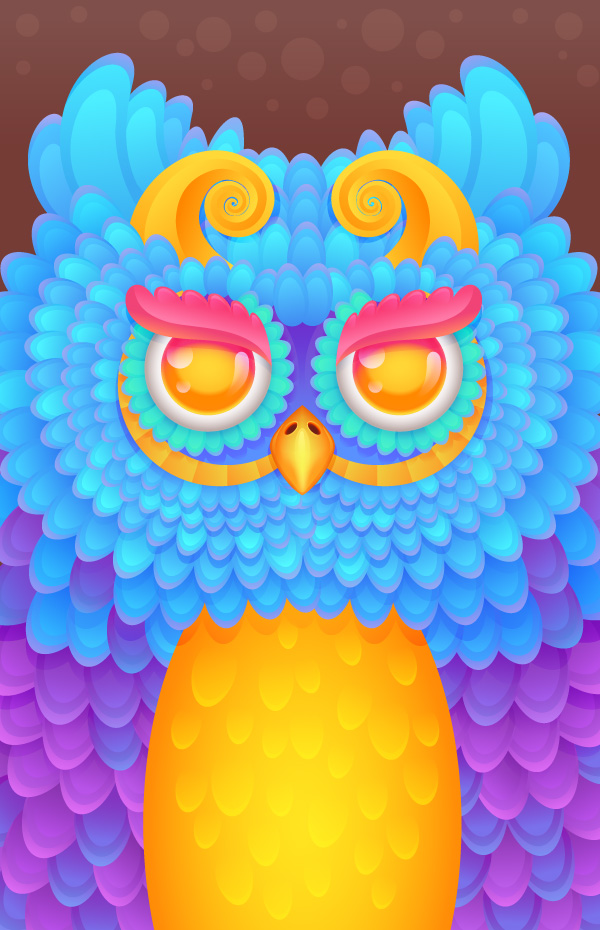
In this tutorial we’ll go through the process of creating a stylish smartphone case with a colorful, detailed owl. We’ll work with gradients to create a vivid color palette, use the Blend Tool to simplify the process of making the feathers, and add some mesh and other effects to give our case a completed look. Let’s get started!
1. Find the Proper Smartphone Case Template and Make a Sketch
Step 1
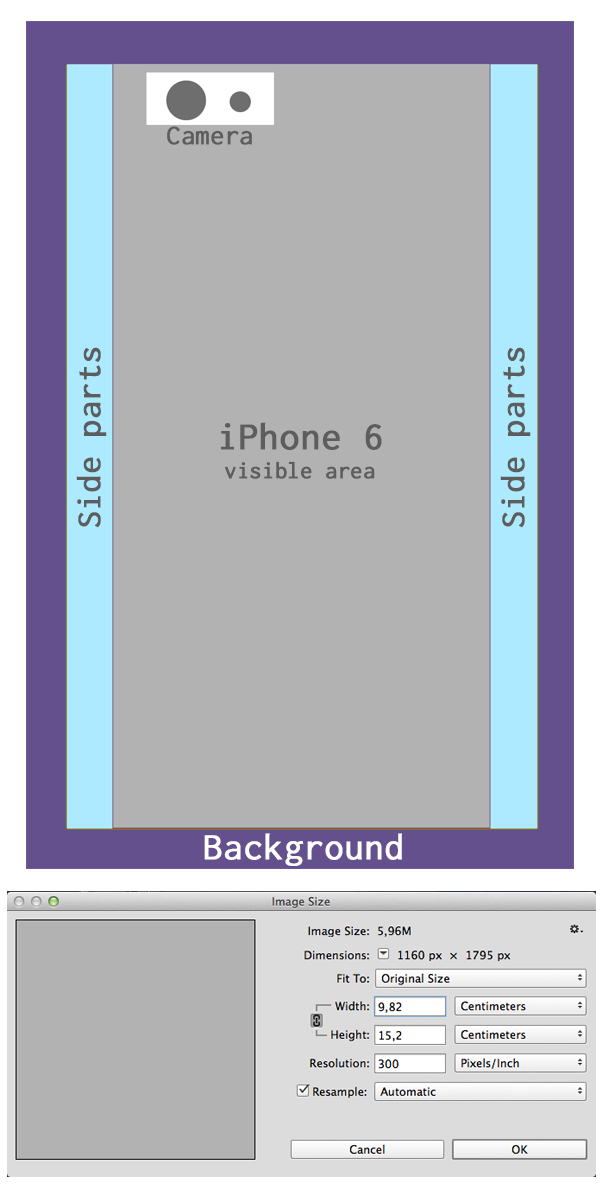
Fist of all, we need to know the size of our future case. In this tutorial we’ll be creating a case for iPhone 6, but you can use the size of any other device. I’ve searched for “iPhone 6 case template” and found some websites providing real-size templates in Photoshop and Illustrator formats. They differ a bit, depending on the website, but mostly they look quite similar. For example, you can get a template foriPhone 6 or for Phone 6+ and use it to make your own design to print on the real case later.
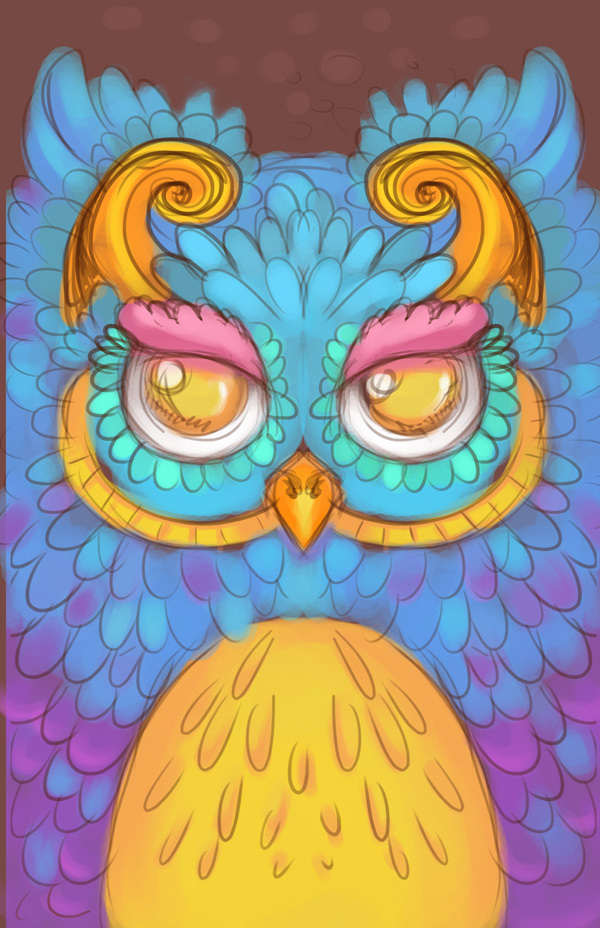
I’ve used this simple template (you can find the *.psd version in the attachment to this tutorial) to paint a sketch, based on the template sizes.
Step 2
I’ve made this sketch right above the template. Remember to keep all the main elements of our image, such as eyes, beak and the face itself, in the visible area of the case, closer to the center. Make the sketch of your owl symmetrical by drawing only one part of it and then flipping it horizontally. This will save a lot of time and will look more cohesive and neat.
Step 3
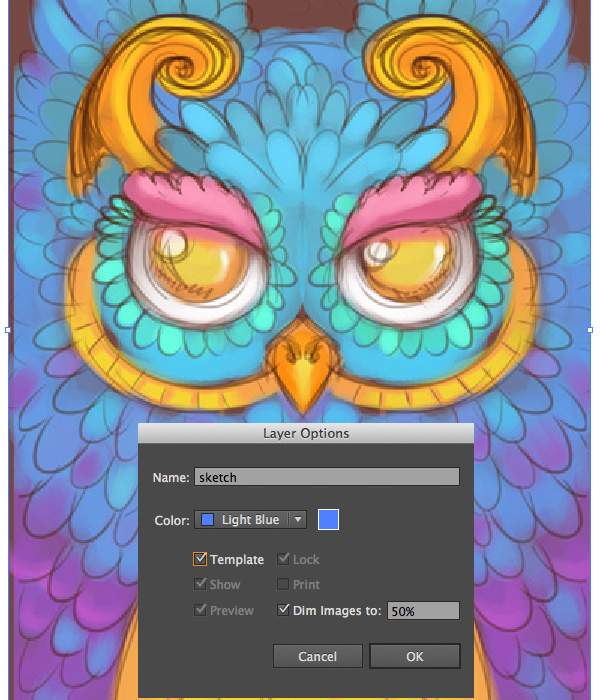
File > Place your sketch in Adobe Illustrator and turn it into a template by double-clicking the sketch layer.
2. Form the Beak Using the Mesh Tool
Step 1
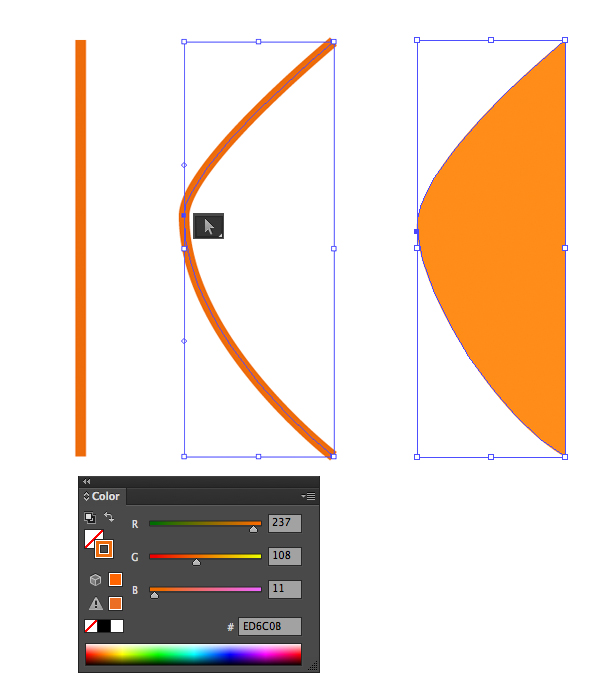
Start by making a vertical line either with the Line Tool (\) or with the Pen Tool (P).Add the anchor point in the middle of the line with the Add Anchor Point Tool (+)and drag it to the left with the Direct Selection Tool (A). Swap Fill and Stroke (Shift-X) colors, thus forming the left part of the beak.
Step 2
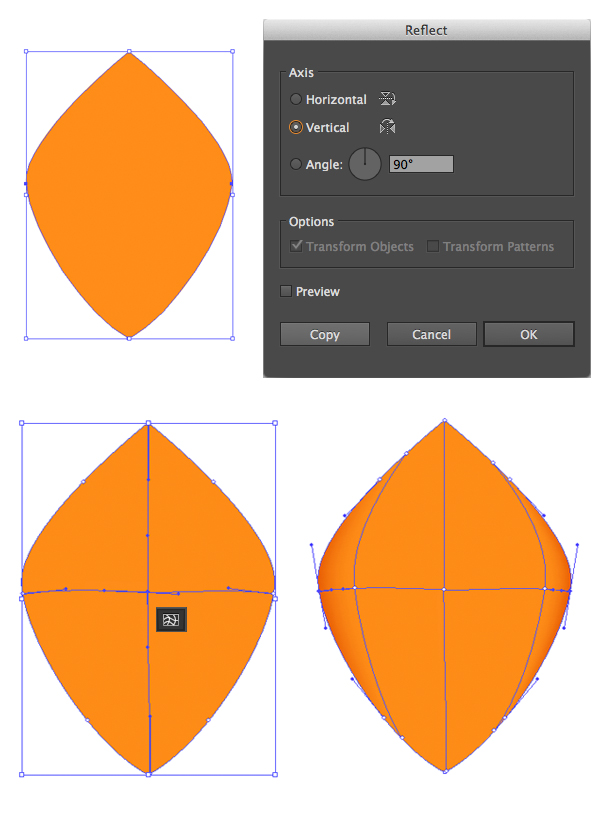
Use the Reflect Tool (O) to mirror the beak over the vertical axis and Unite both parts in Pathfinder to form a single shape. Take the Mesh Tool (U) and click in the middle of the created shape to create a crossing row and column. Click on the horizontal line to create more columns and make the edges of the beak darker by selecting the edge anchor points with the Direct Selection Tool (A) and filling them with darker orange, thus adding dimension to the beak.
Step 3
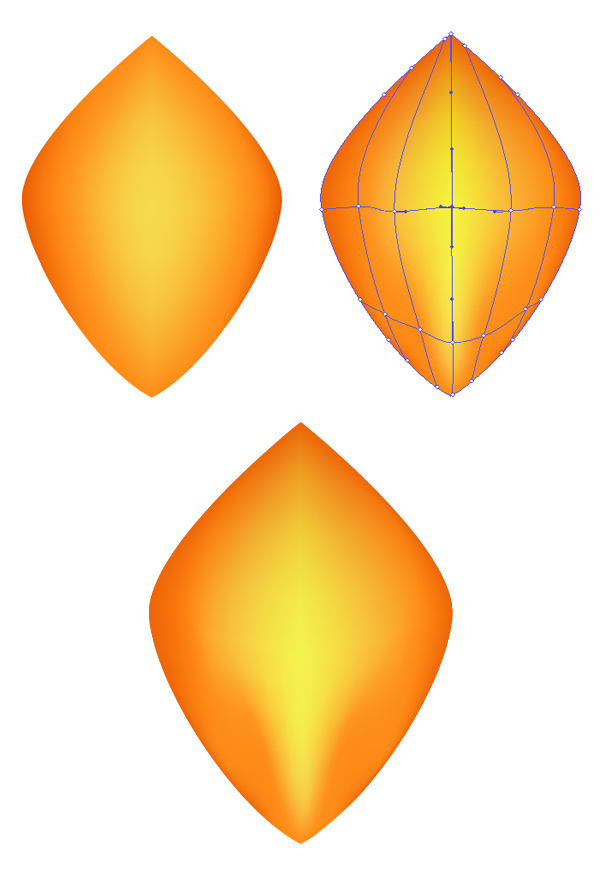
Add some more columns with the Mesh Tool (U) and make the middle part of the beak brighter by selecting the anchor points along the central vertical line and filling them with yellow color. Move the lower anchor points around to achieve a more realistic effect for the bird’s beak, as in the screenshot below.
Step 4
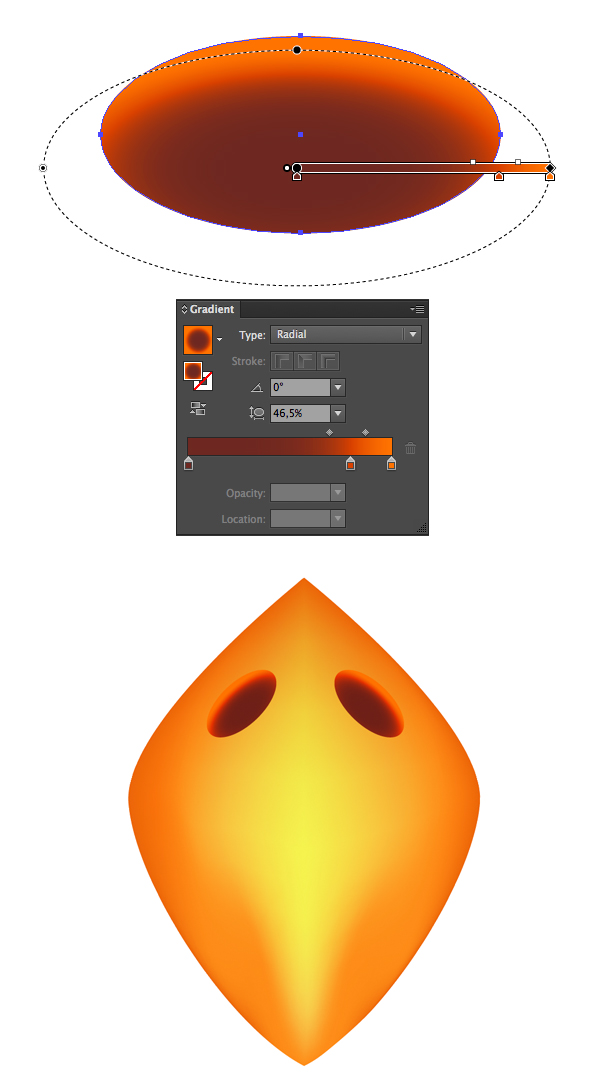
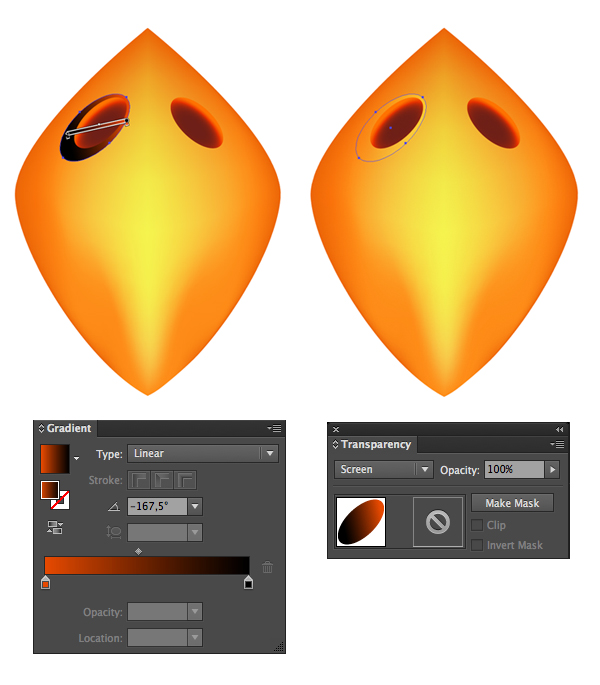
Let’s form the nostrils. Create an ellipse with the Ellipse Tool (L) and fill in with radial gradient from bright-orange to dark-brown, forming the depth. Place two ellipses in the upper part of the beak, depicting the nostrils.
Step 5
We need to add some details to make our beak look more interesting and realistic. Create a bigger ellipse beneath the nostril and fill with orange-black linear gradient. Switch the Blending Mode to Screen, turning it into a highlight.
Step 6
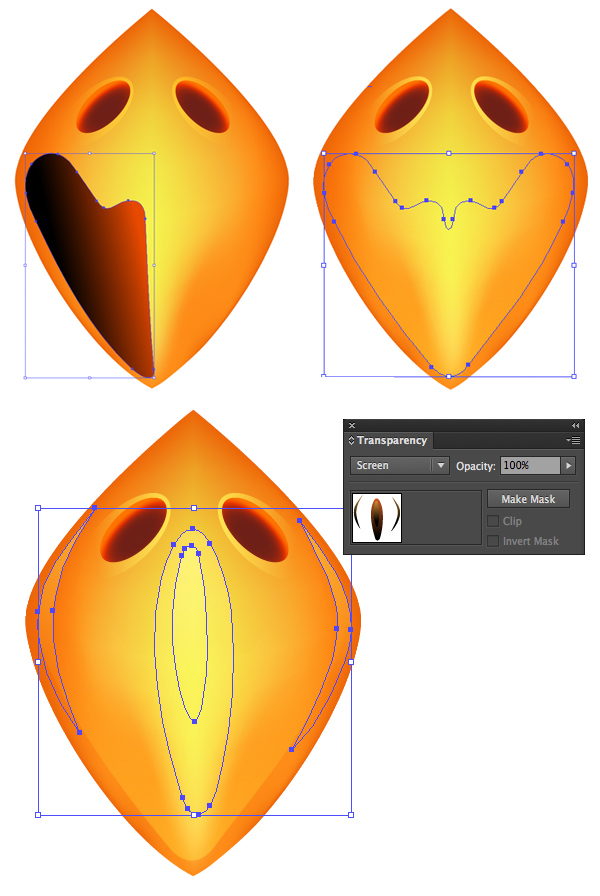
Take the Pencil Tool (N) and add more highlights to our beak, using the same orange-black gradients and Screen Blending Mode.
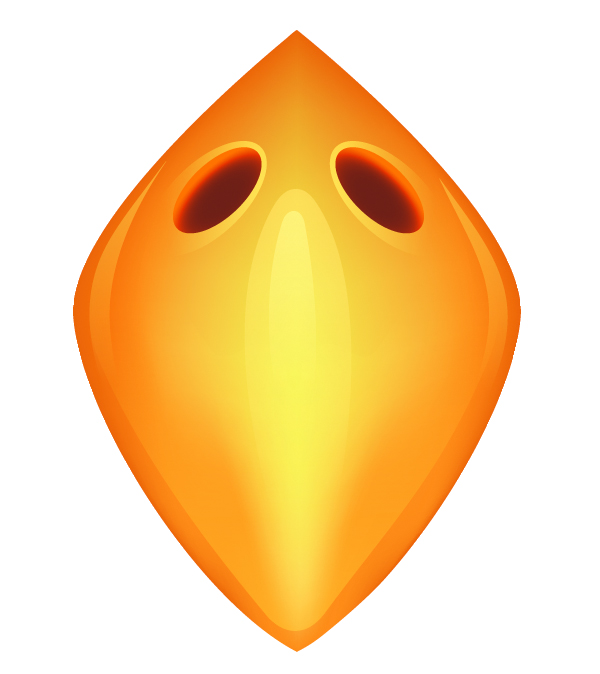
Here is how the beak looks now.
3. Form a Radiant Plumage With the Blend Tool
Step 1
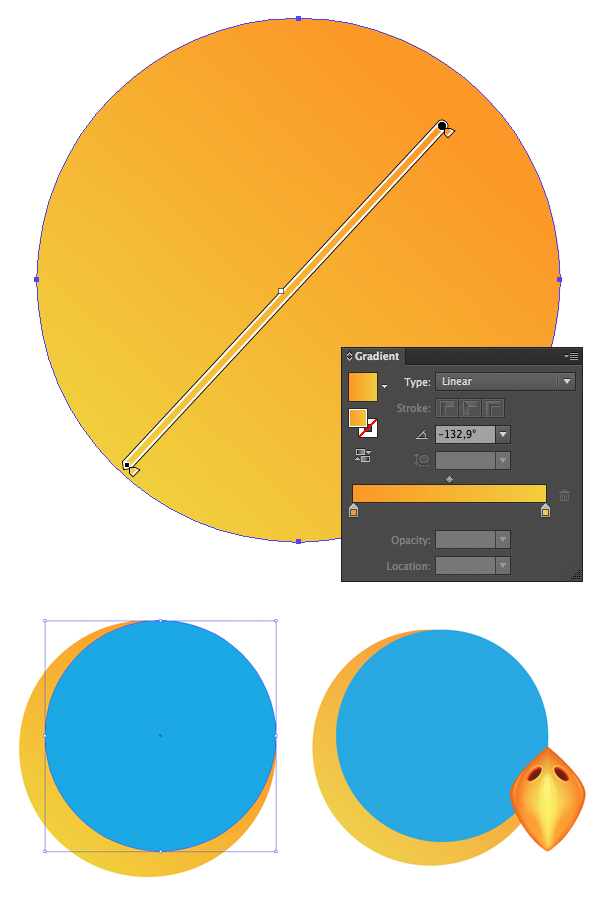
First of all, we’ll render the area around the eyes and then start adding feathers around it row by row. Form an even circle with the Ellipse Tool (L) by holding theShift button and fill it with golden linear gradient from orange to yellow. Add a smaller circle above and fill it with blue color. Send both circles to back (Shift-Control-[), under the beak.
Step 2
Let’s split the golden circle into parts to make it more detailed. Start by making a vertical line with the Line Segment Tool (\) and place in right in the center of the golden circle, making the gold circle a Key Object by clicking it while holding the Altkey and then using the Horizontal Align Center function of the Align panel.
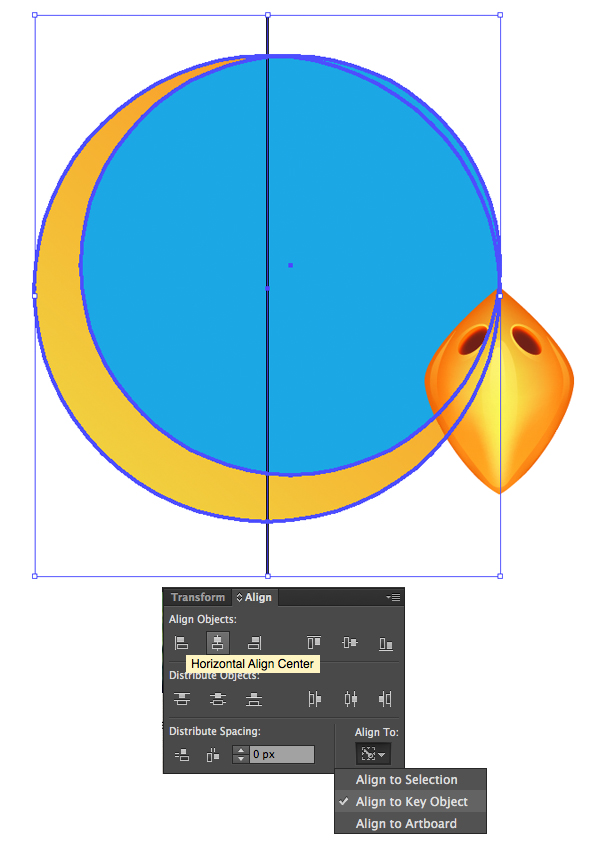
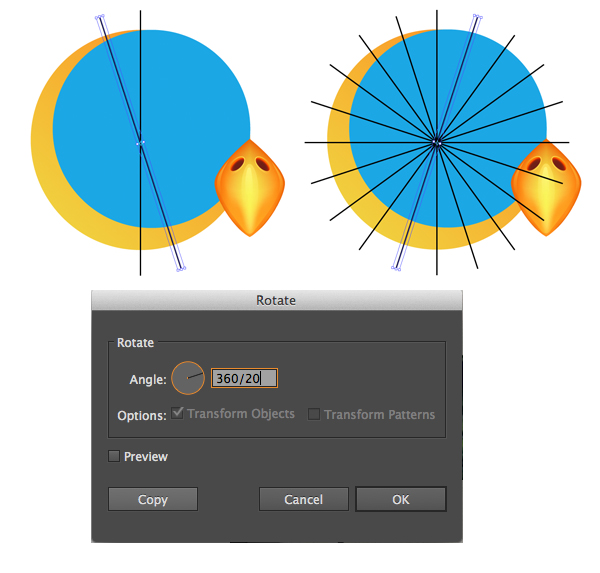
Keeping the line selected, double-click the Rotate Tool (R) to call the pop-up options window. Set the Angle value to 360/20, so that Adobe Illustrator can automatically calculate the necessary angle for 20 copies of our object. Press Control-D multiple times to repeat our last action and make as many copies as needed.
Step 3
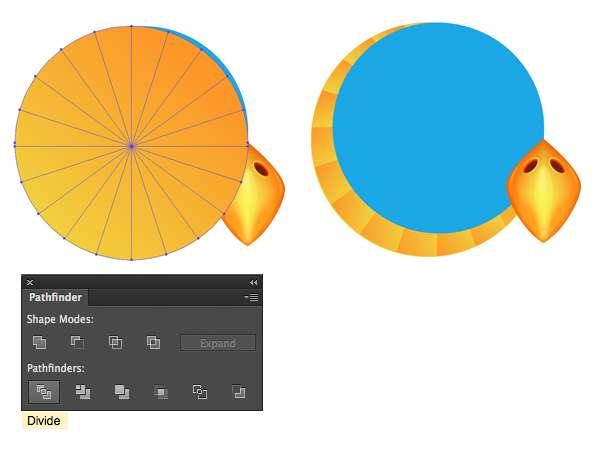
Now we can select all the created lines and the gold circle and slice it into pieces like grandma’s pie with the help of the Divide function in the Pathfinder panel. Use theGradient Tool (G) to reposition the linear gradient for each piece, creating an interesting effect.
Step 4
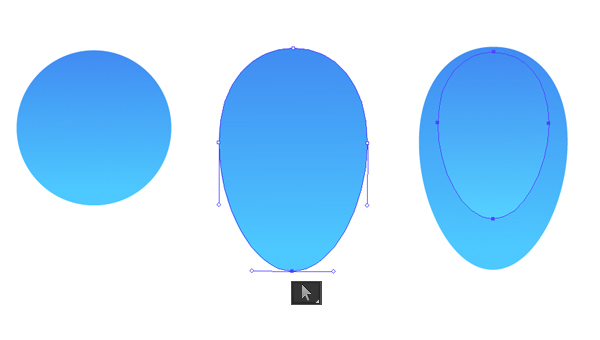
Let’s start forming the feathers! According to our initial sketch, the owl will have a radiant blue plumage. We’ll stick to this color palette, picking the colors from the sketch with the Eyedropper Tool (I) and creating an even circle with the Ellipse Tool (L), filling it with vivid linear gradient from dark blue on top to lighter blue in the bottom.
Drag the lower anchor point down using the Direct Selection Tool (A) to give the circle an upside-down egg shape. Finally, Copy the shape, Paste in Front (Control-C > Control-F) and make the copy slightly smaller and the colors a bit lighter.
Step 5
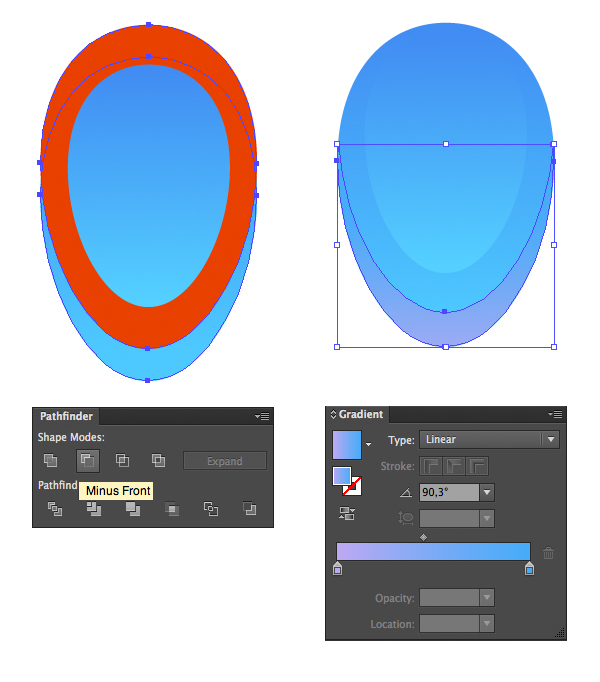
Duplicate the lower shape twice and move one of the copies up a bit (shown red in the screenshot). Select the replaced copy and the one beneath it and use the Minus Front function of the Pathfinder panel to cut off the unwanted pieces, leaving only a narrow crescent-shaped part on the tip of our feather. Fill this part with a gentle lilac-blue gradient.
Step 6
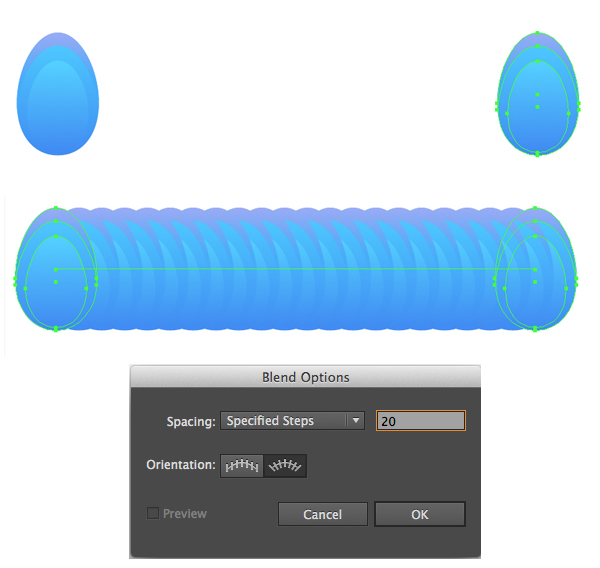
Now that our feather is ready, let’s group (Control-G) all its parts and make a copy of the feather, placing it aside at some distance. Keeping both feathers selected, go to Object > Blend > Make and then to Object > Blend > Blend Options (or double click the Blend Tool (W) in the Tools panel). Set the Spacing to Specified Stepswith value equals 20, thus creating a row of repeating feathers.
Step 7
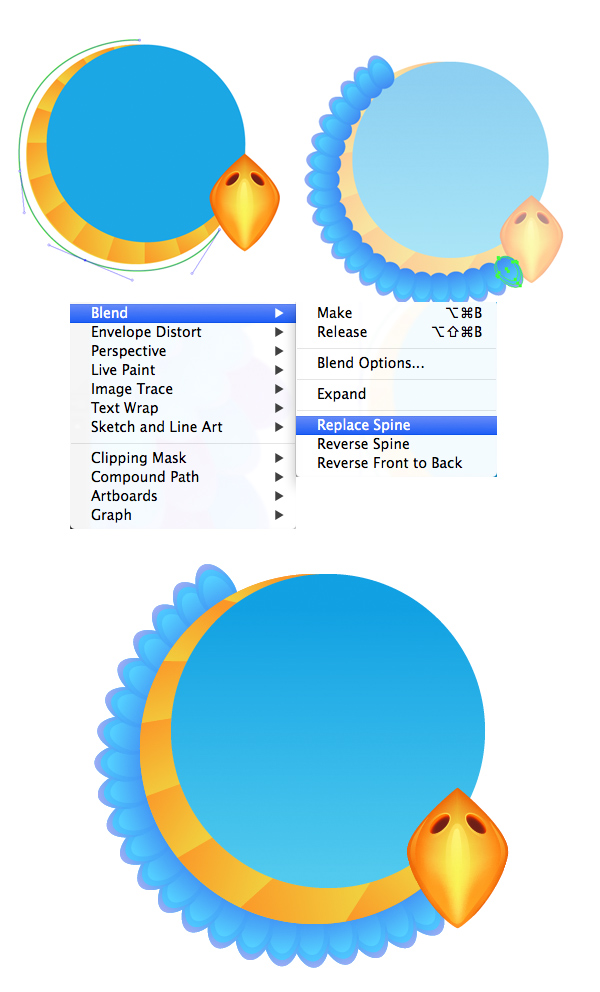
Take the Pencil Tool (N) and draw a rounded line along the edge of the golden circle. Select both the line and the blend group and go to Object > Blend > Replace Spine. Great! Now we have a smooth row of feathers running along the circle eye area.
Step 8
Draw a bigger arched line with the Pencil tool (N), and then duplicate our first blending group of feathers and reapply the Replace Spine effect to a new curve, thus forming the second row.
Place the created feathers under the first group (Control-[) and add the next row in the same way. You can double-click on the row to enter the Isolation Mode and edit the initial feathers of the blending group separately. For example, let’s make the upper feather bigger and the lower one smaller. All other feathers between them will gradually change their size too.
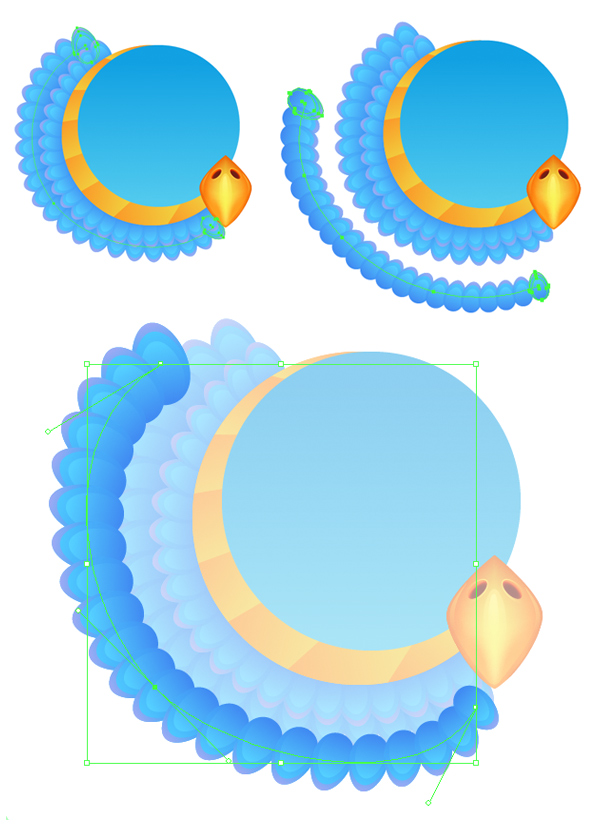
Continue forming new rows of feathers, making a fluffy plumage by varying the size of some feathers, making the feathers in the lower rows much larger than those around the eye.
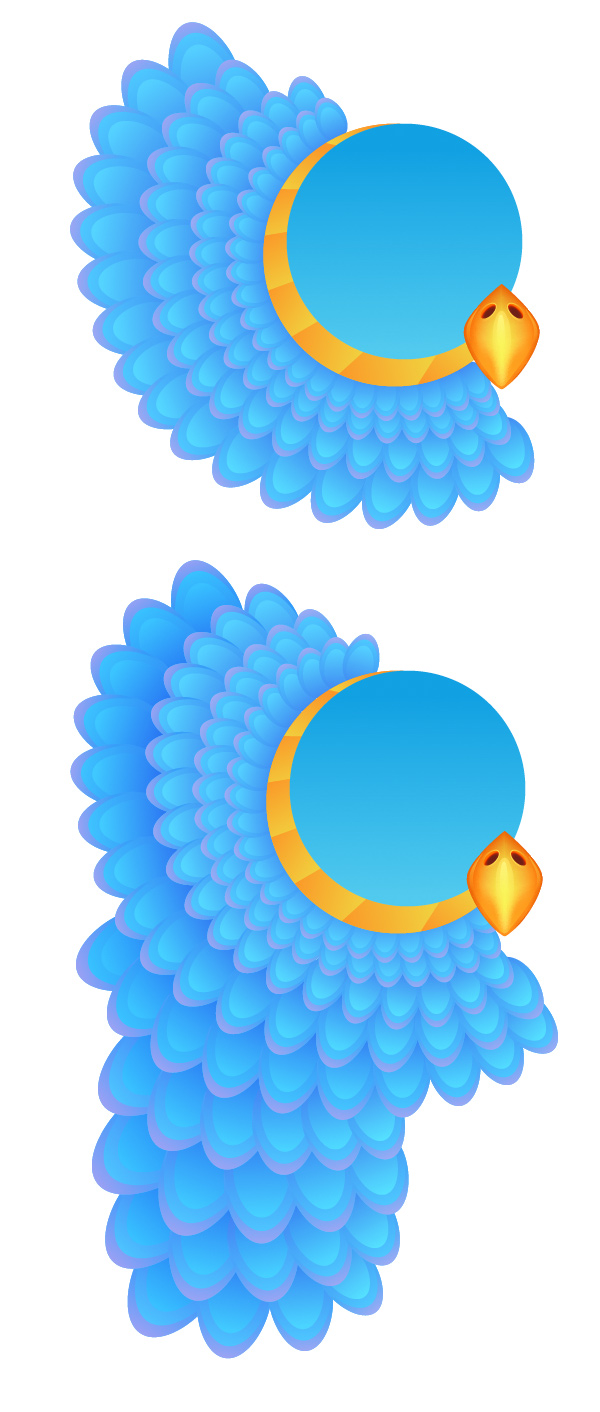
Step 9
Compare the created forms with the initial sketch and use the Reflect Tool (O) to flip the created parts over the Vertical Axis, forming the second half of our owl.
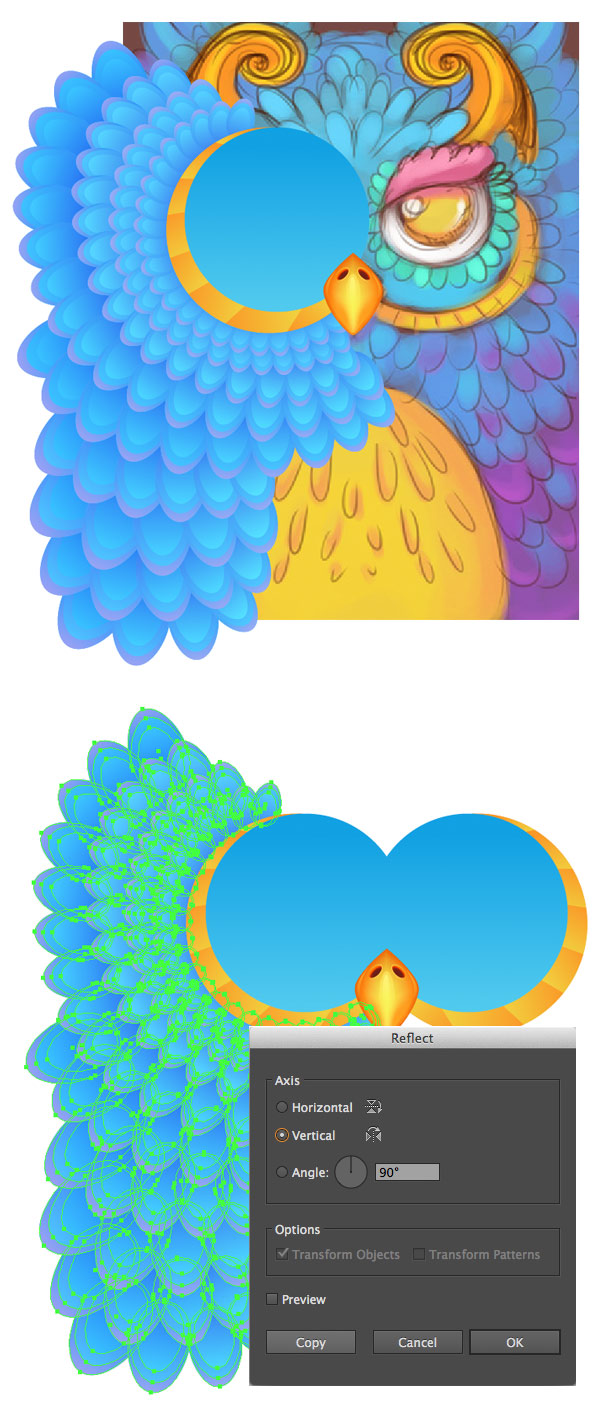
Step 10
Now that the plumage is formed, let’s make the colors more diverse. Select one of the blending groups of feathers in the lower part of the owl and this time make the first feather in the group bright lilac and fill the second one with a gentle gradient from violet to blue. The colors of other feathers in the group will be adjusted automatically, forming a smooth gradient inside the blending group.
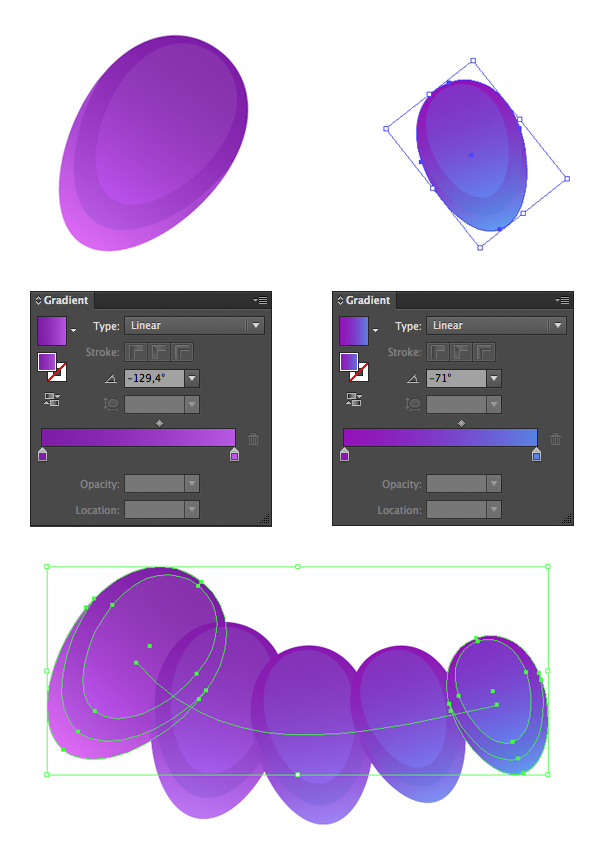
Step 11
Apply new vivid colors to the lower rows of feathers on both sides of our owl.
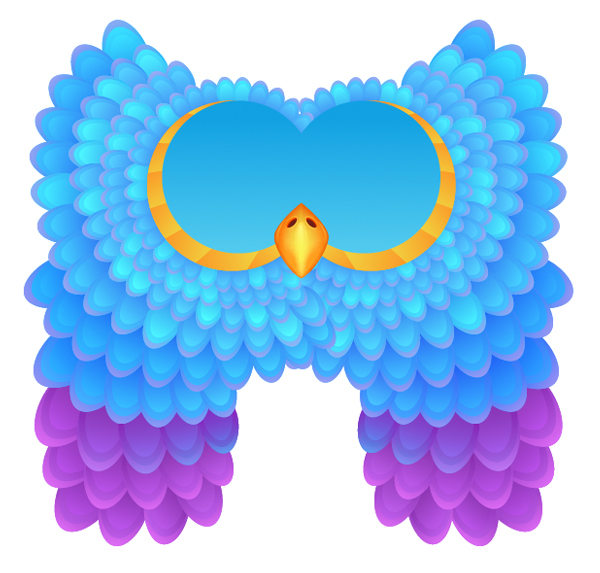
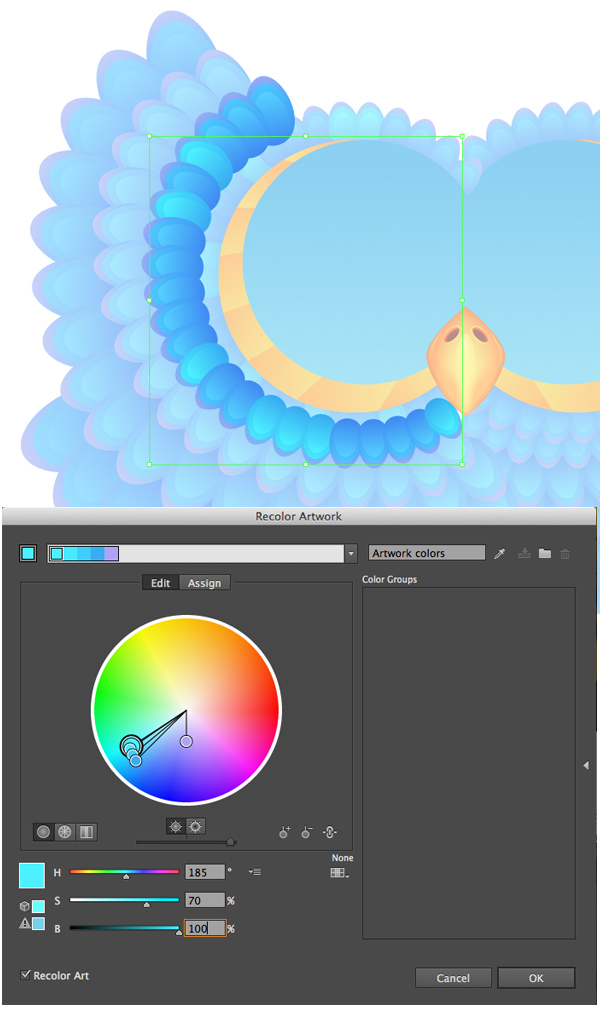
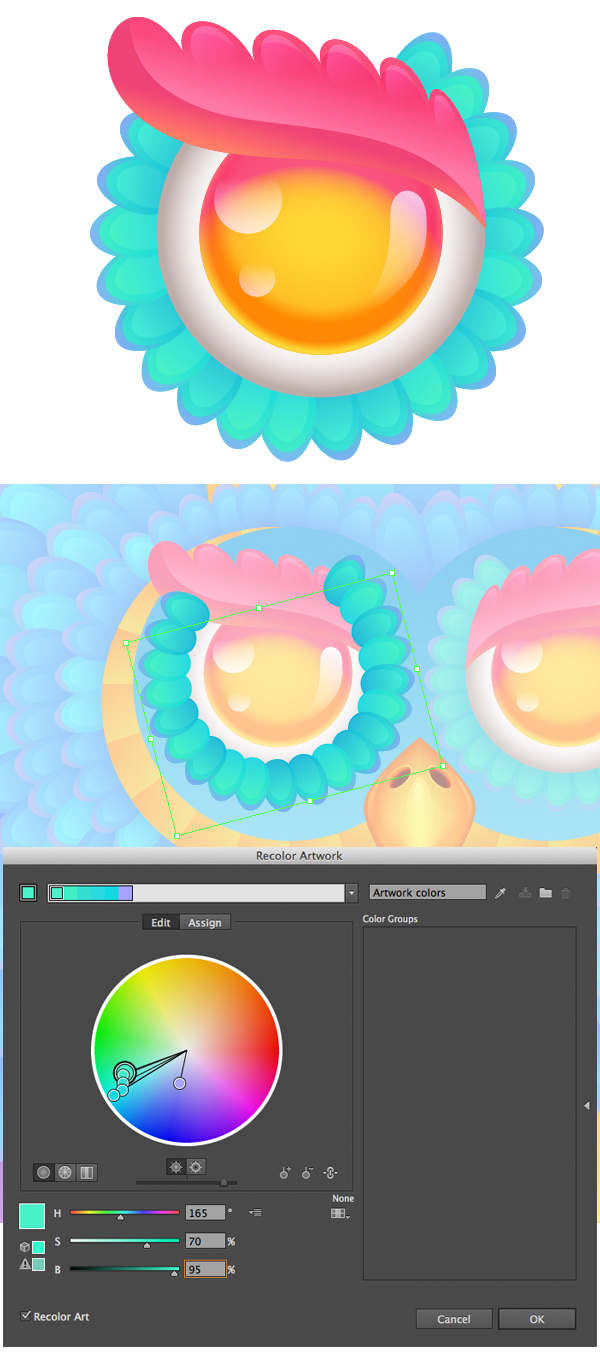
Object > Blend > Expand all the rows to turn the blending groups into sets of separate objects. Now we can select separate feathers and make some of them brighter with the help of the Recolor Artwork function, which is located in the upper control panel. Select random feathers around the eye area and open the Recolor Artwork options window. Go to Edit, press on the chain icon to Link harmony colors and set the Hue value to 185, Saturation to 70 and Brightness to 100, making the selected feathers lighter.
Step 12
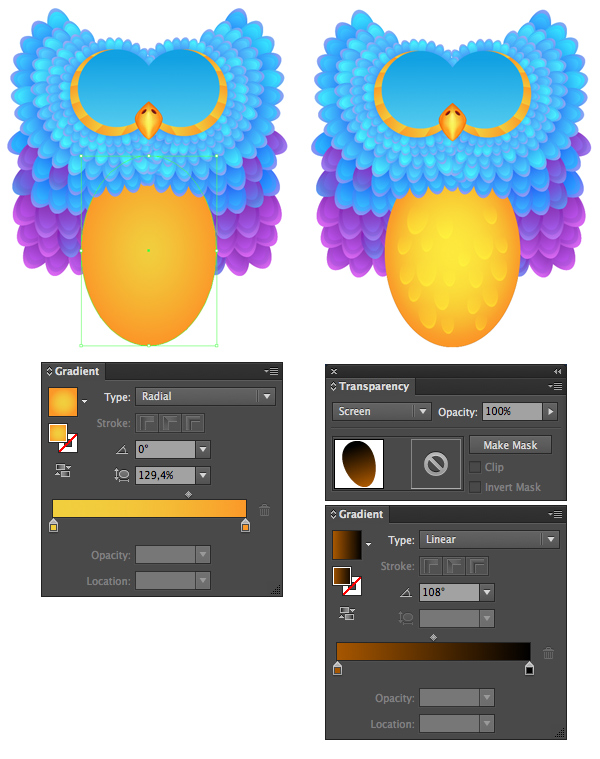
Add some more lilac feathers here and there to make the image more diverse. Form the owl’s tummy by creating an ellipse with the Ellipse Tool (L) and filling it with radial gradient from darker orange at the edges to bright-yellow in the center. Speckle small feathers all over the tummy, filling them with the same colors as the highlights on the owl’s beak and switching to Screen Blending Mode.
Step 13
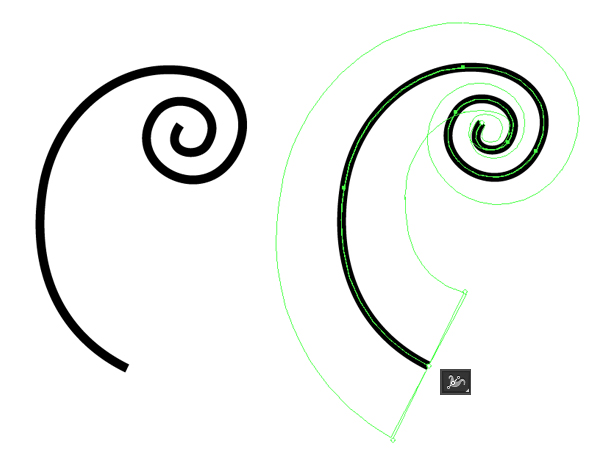
Let’s add some swirly elements to the head of the owl to make it look more intricate. Draw a smooth curve with the Pencil Tool (N), select its bottom anchor point with the Width Tool (Shift-W) and drag to make the whole shape wider.
Step 14
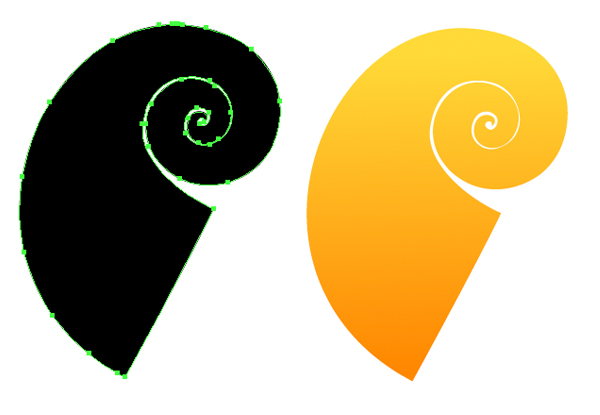
Object > Expand Appearance of the line and use the Direct Selection Tool (A) to move the anchor points of the created shape, giving it a twisted spiral look. Fill the shape with golden gradient, the same as we have in the eye area.
Step 15
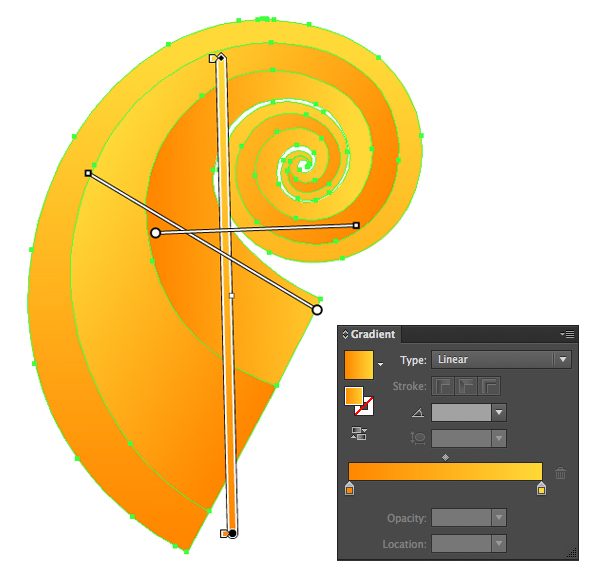
Draw two more swirls inside the golden shape with the Pencil Tool (N). Select all three objects and Divide them in Pathfinder to split the golden shape into three separate parts.
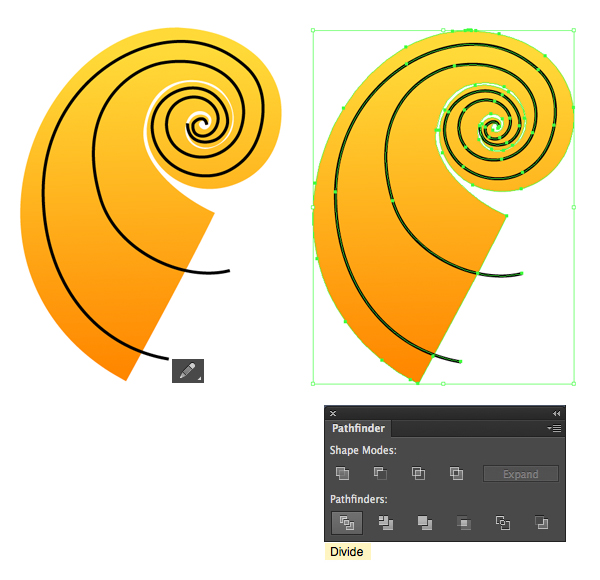
Change the direction of linear gradients for each piece with the Gradient Tool (G), making the shape more three-dimensional and realistic.
Step 16
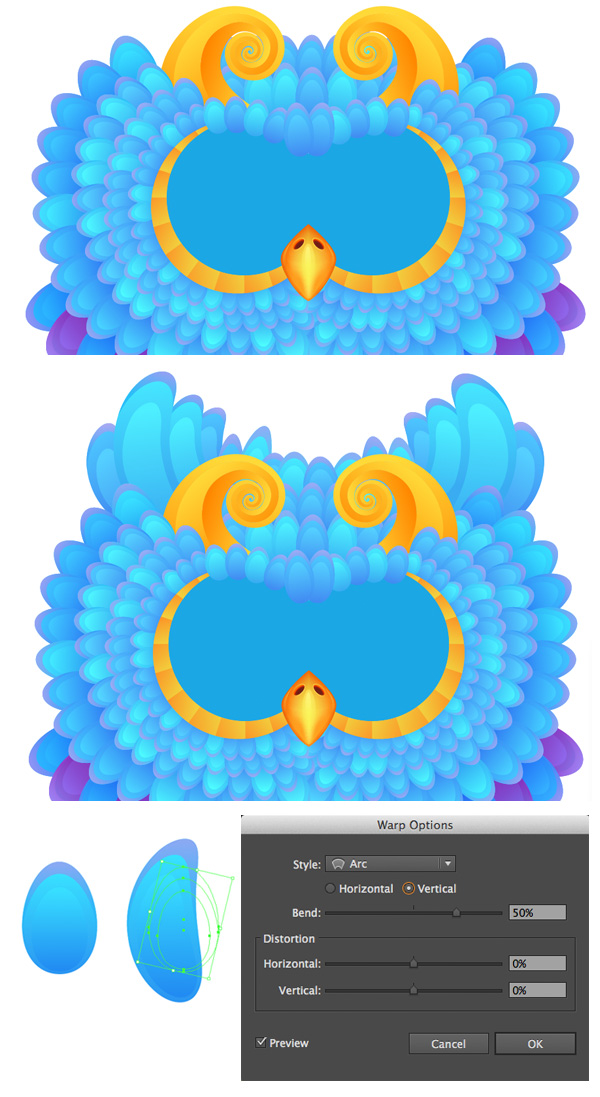
Place the created golden horns on top of the owl’s head and surround them with feathers. Add some larger arched feathers in the upper part of the head, transforming them with the help of the Warp Effect. For this purpose, select a feather and go to Effect > Warp > Arc, setting the Vertical Bend value to 50%. Expand Appearance if you're happy with the result to apply the effect.
4. Render the Eyes of the Owl
Step 1
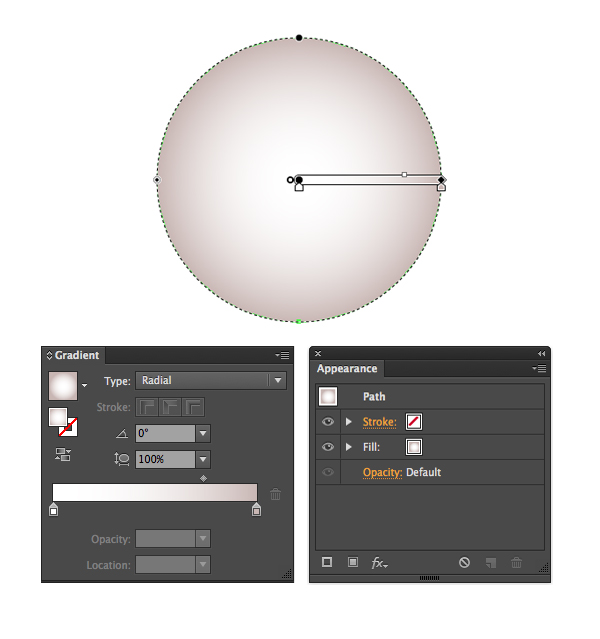
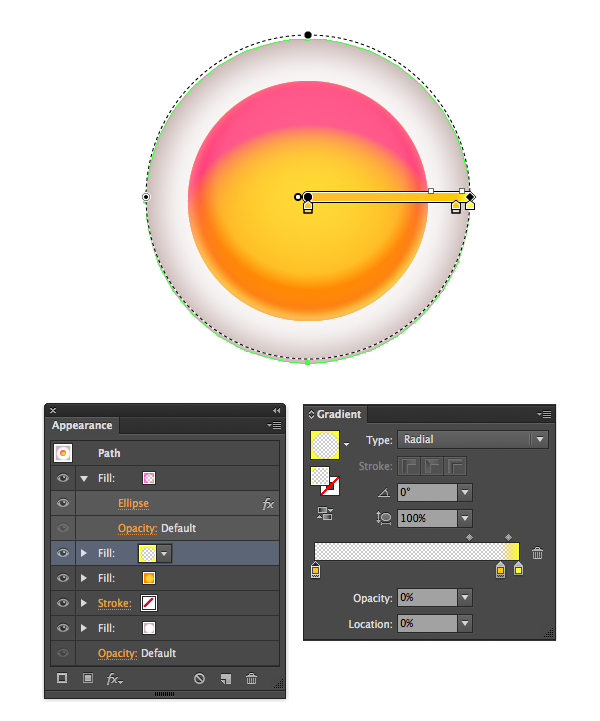
To make the creation process simple and time saving, we’ll use the advantages of the Appearance panel. Start by making an even circle and fill it with radial gradient from white in the center to darker grey at the edge. It will be displayed as the Fill in the Appearance panel.
Step 2
Add New Fill in the Appearance panel and apply a vivid radial gradient from bright-yellow to orange. Move the center of the gradient closer to the top part of our circle.
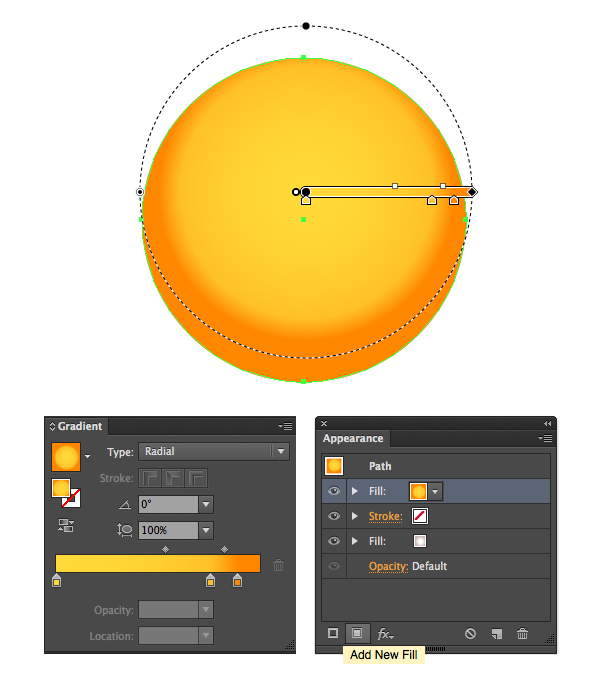
Step 3
Keeping the new yellow Fill selected in the Appearance panel, Add New Effectand select Convert to Shape > Ellipse.
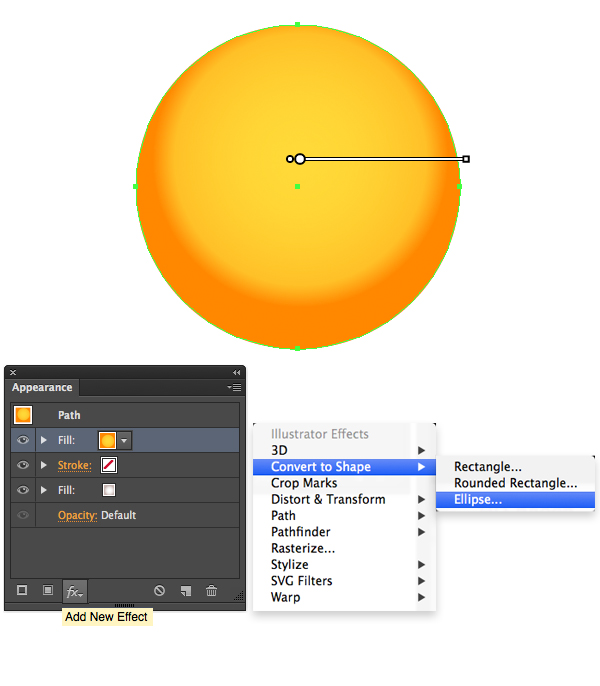
In the pop-up Shape Options menu, reduce the Absolute size of the Fill, setting itsWidth and Height to 20 px (or another value that makes the yellow circle smaller than the grey one). Go back to the grey Fill, select it in the Appearance panel and edit the gradient, making the white area larger and moving the grey closer to the edge.
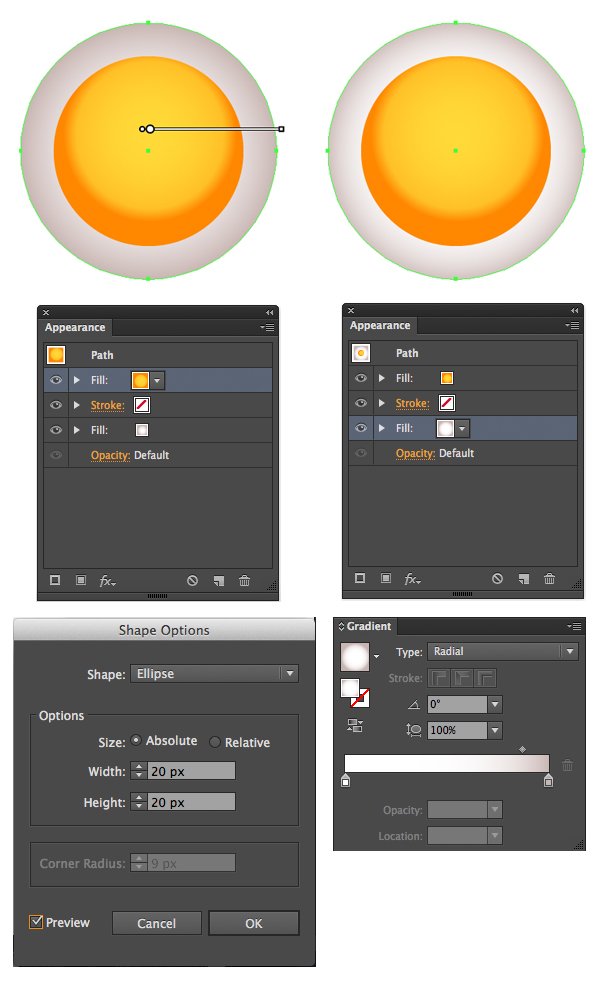
Step 4
Duplicate the yellow Fill in the Appearance panel and change the color of the copy to linear gradient from yellow to bright-pink. Set the Opacity of the yellow side to 0%and the Opacity of the pink side to 60% in the Gradient panel. Squash the gradient with the help of the Gradient Tool (G) and make it cover the upper part of the yellow Fill.
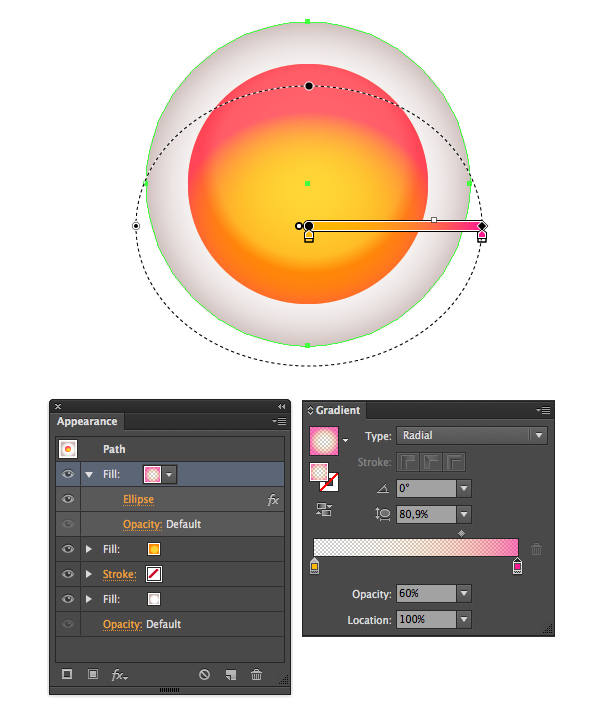
Step 5
If you wish to add more glow to the eyes, add another Fill above the yellow one and fill it with radial gradient from transparent yellow to bright yellow, creating a bright glowing ring around the iris.
Step 6
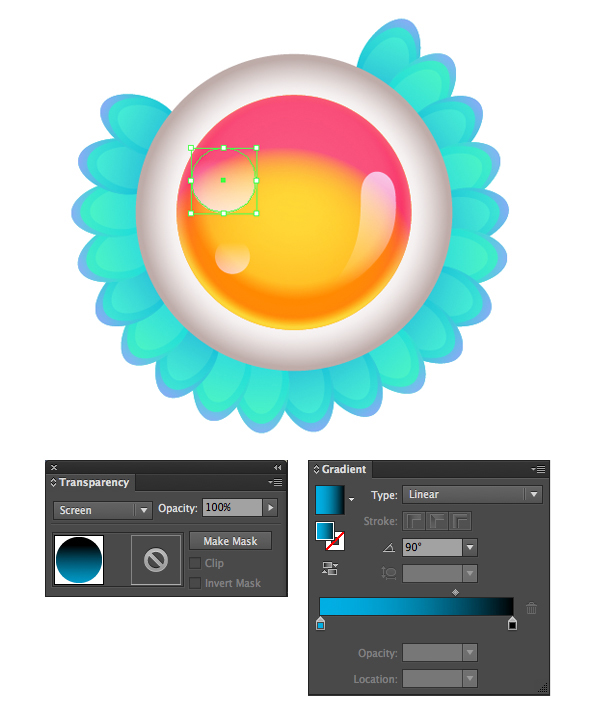
Surround the eye with tiny turquoise feathers and add highlights to the eye, filling them with black-to-blue gradient and switching to Screen Blending Mode.
Step 7
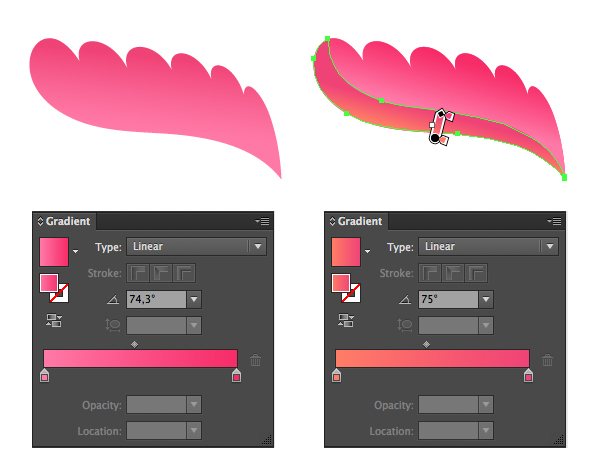
Let’s create a whimsical brow to make the owl’s look more serious. Draw a freehand shape with the Pencil Tool (N) and fill it with yummy-looking pink gradient. Split the shape into two parts the same way as we did with the golden horn, and edit the fill color of the lower part, making it an orange-pink gradient.
Step 8
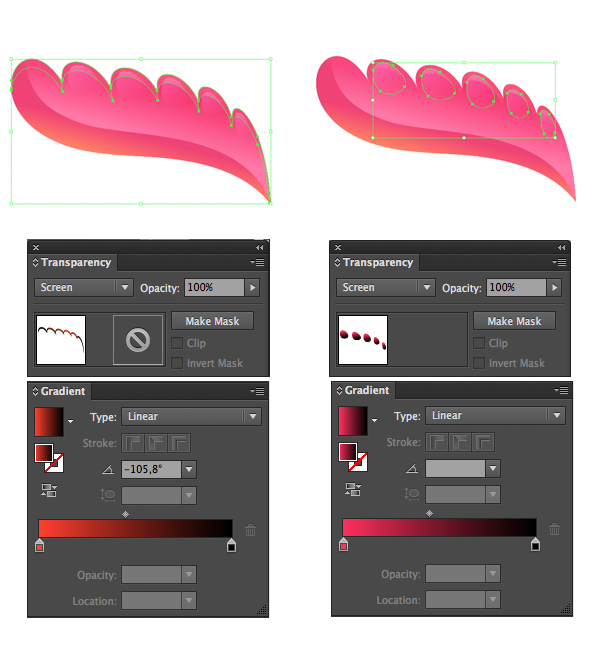
Add some highlights on top of the shape, switching to Screen Blending Mode.
Step 9
Place the brow on top of the eye and edit the feathers, making some of them brighter with the Recolor Artwork option.
5. Add Minor Details to Give the Case a Finished Look
Step 1
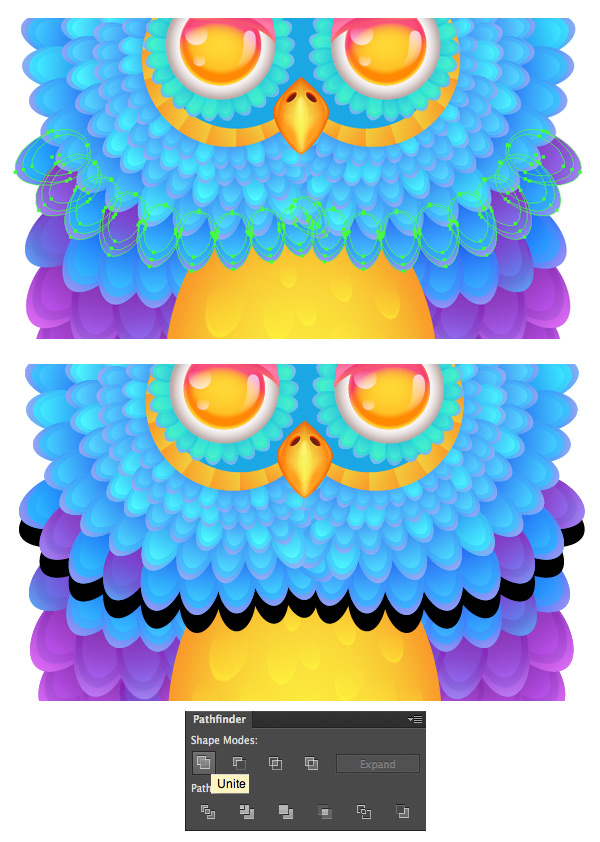
Let’s make our owl more three-dimensional by adding shadows to separate the rows of feathers from each other. Select a group of feathers, Copy it and Paste in Back (Control-C > Control-B). Unite the parts of the copy in Pathfinder, turning it into a single silhouette.
Step 2
Fill the created silhouette with linear gradient from white to purple and switch it toMultiply Blending Mode, thus creating a subtle shadow.
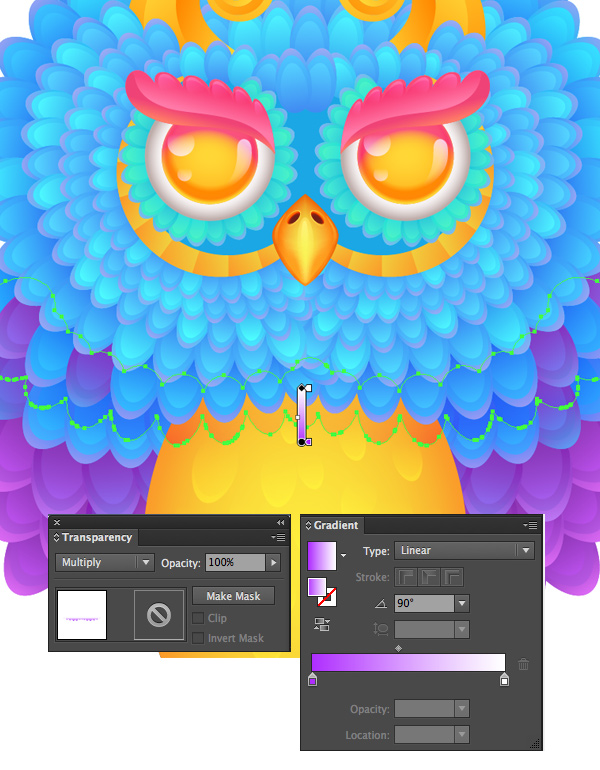
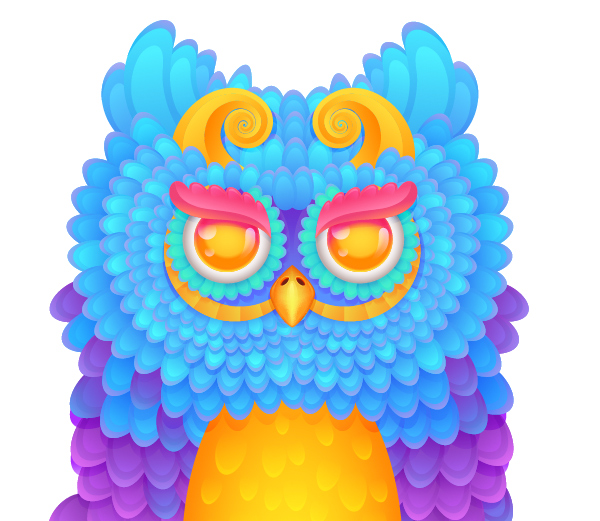
Add more shadows between feather groups and around the eyes, using the same technique.
Step 3
Now we can File > Place the iPhone case template in our file and put additional feathers at the edges, covering the blank spaces. Remember to keep the owl’s face in the center of the template. Add a dark-brown background beneath the owl with theRectangle Tool (M) to fill the empty space above its head.
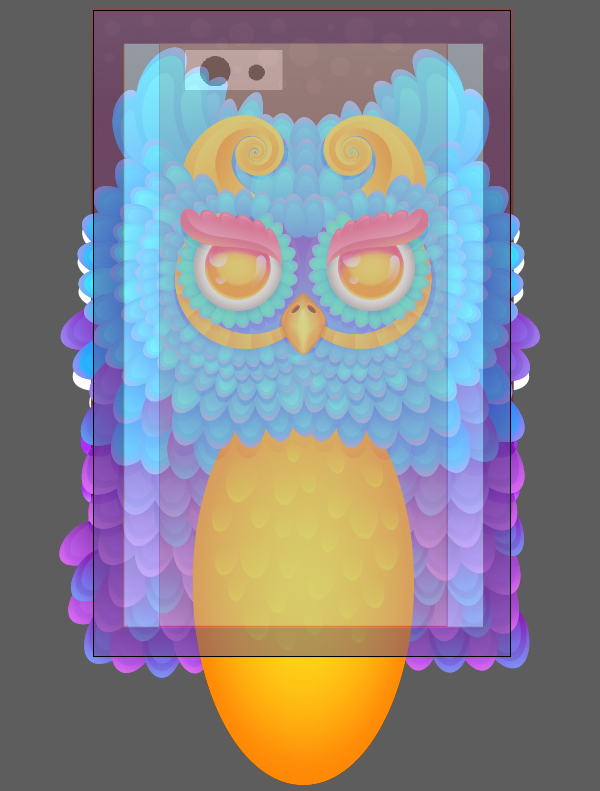
Step 4
Adjust the size of our Artboard according to the size of the template with the help of the Artboard Tool (Shift-O). One of the advantages of vector graphics is that you can scale down your artwork and set a size several times smaller than the original and then just Export it with the necessary dimensions (for example, 300 dpi for print).
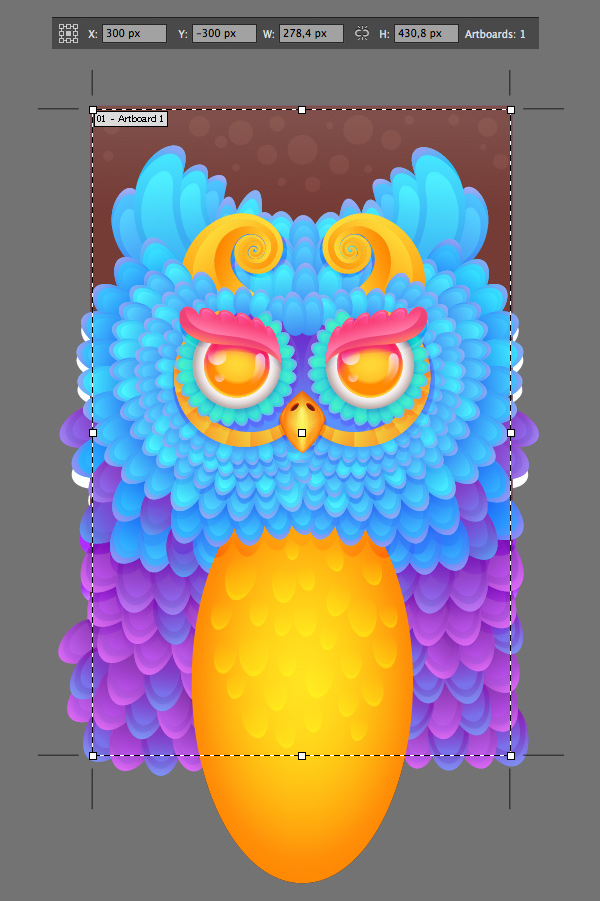
Step 5
Let’s hide the unwanted parts that are crossing the edges of our Artboard to make our work look neater and cleaner. Copy the background rectangle and Send it in Front, placing it on top of all other objects (Shift-Control-]). Select all the created elements, including the upper rectangle, press the right mouse button and choose Make Clipping Mask in the drop-down menu.
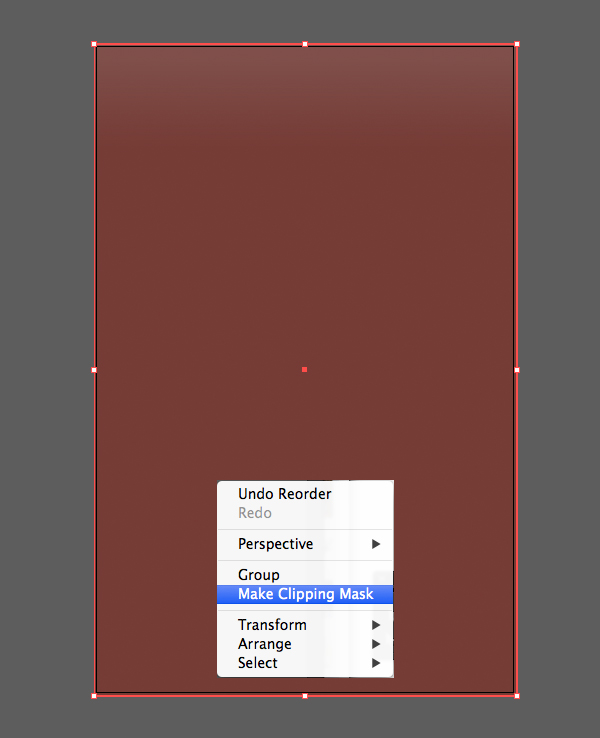
Step 6
Now we can try uploading our design on various websites that offer iPhone case printing and choose the most suitable one.
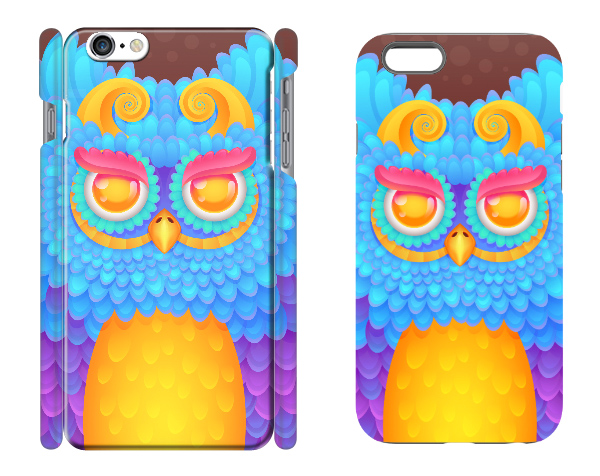
Great Job! We’ve Finished!
Our radiant owl iPhone 6 case design is ready! I hope you’ve enjoyed following this tutorial and found some useful tips and tricks on using the Blend Tool and other Adobe Illustrator features. Good luck in creating your fancy and stylish smartphone cases!


