
This tutorial was originally published in October 2013 as a Tuts+ Premium tutorial. It is now available free to view. Although this tutorial does not use the latest version of Adobe Photoshop, its techniques and process are still relevant.
As we push further into autumn (in some parts of the world) many designers might be thinking about how to create autumn-inspired artwork for the projects they are working on. In this tutorial, we will show you how to create text made of hay using Photoshop's 3D features as an aid. Let's get started!
Speed Art Video
Tutorial Assets
You will need to the following image to complete this tutorial. Please download it before you begin. If it is not available or if you would prefer not to pay for it, feel free to find an alternative.
1. Create the Basic Layers and Layout
Step 1
- Open the downloaded field picture.
- Go to Image > Image Size and change its parameters as shown in the picture below.

Step 2
Now you will bring in the original picture as a Smart object. You need to do that to have one bigger hay bale in front of the picture later on.
- Open Mini Bridge.
- Navigate to the image file on your disk.
- Grab it and drag it onto the canvas.
- Change its name to "Harvest_final".

Step 3
In the Paths panel, create a new path and call it "hay bale". Activate the Pen Tool (P) and draw a shape around the hay bale. Create a selection from this path by pressing the dashed circle [1]. Alternatively you can press Command and press on the Path thumbnail to make a selection from it.

Step 4
Press Command-J to create a new layer. Call it "Hay bale 1".

Step 5
Duplicate this layer twice (Command-J). Place them as in the screenshots, using the Transform Tool (Command-T). You will adjust their position later.

2. Create 3D Typography
Step 1
Activate the Type Tool and type "HARVEST" in the middle of the canvas. Set the type properties as in the screenshot.

Step 2
Press Command-T and transform the typography to fit better on the canvas. Then press the Right Mouse Button and choose New 3D Extrusion from Selected Layer.

Step 3
With Scene selected in the 3D palette, adjust the typography position using the 3D transform tools. Position the typography so that the margins on the left and right sides are equal.
- Use the 3d transform tools to position the letters:
- [1] Rotate will allow you to rotate the object on X, Y, and Z axes.
- [2] Roll will allow you to rotate the object in screen space.
- [3] Drag will allow you to move the object in all directions.
- [4] Slide will bring the object closer or further away from you based on the XYZ axes of the currently selected object.
- [5] Scale will make the selected object bigger or smaller.

Step 4
Set the Environment position as shown in the screenshot. You can type values in the appropriate fields to speed up the process.

Step 5
Set the Current View position as shown in the picture below.

Step 6
You can change the Extrusion Depth by selecting the Mesh object in the 3D panel.

Step 7
Select Light and in its Properties palette turn off Shadow [1]. Change the name of this layer to "HARVEST extrusion".

Step 8
Duplicate the extruded text layer to simulate sunlight in the scene.
- Duplicate the extruded text layer.
- Change its name to "HARVEST shadow".
- Drag it below the "HARVEST extrusion" layer
- Turn on Shadow and adjust its position by dragging the small light source [3].
- Try to match the shadows' direction in the picture.

Step 9
Now select the HARVEST extrusion layer and from the Right Click Menu chooseRasterize 3D.

3. Adjust the Placement of the Hay Bales
Step 1
Select the "Harvest_final" layer [1] and turn off its visibility. Then select the "Hay bale 1" layer [2] and press Command-T to activate transform. Move it to the front of the letter "S" as shown in the picture.

Step 2
Select the "Hay bale 3" layer [1] and drag it below the "HARVEST extrusion" layer. Press Command-T to activate transform. Move it behind the letter "T" as shown in the picture.

Step 3
Now select the "Hay bale 2" Layer and press Command-T to activate transform. Move it to the front of the letter "H" as shown in the picture.

Step 4
Turn off visibility of the "HARVEST shadow" layer [1]. Then duplicate the "Background" layer [2].

Step 5
Activate the Clone Stamp Tool (S) and paint with grass to hide the unnecessary part of the image [1].

Step 6
Keep painting until the front is free of old hay bales.

Step 7
Select "Hay bale 2" layer and paint with the Clone Stamp Tool until there are no seams between the bale and the rest of field.

Step 8
Select the "Hay bale 3" layer and paint with the Clone Stamp Tool until there are no seams between the bale and the rest of field.

Step 9
Select the "Hay bale 1" layer and paint with the Clone Stamp Tool until there are no seams between the bale and the rest of field.

4. Create Textured Letters
Step 1
Select the "Harvest_final" smart object layer in the Layers panel and the "hay bale" path in the Path panel. Press the dashed circle [1] to make a selection, and pressCommand-J twice to create new layers.

Step 2
Change the names of those layers to "Extrusion base" [1] and "Extrusion front" [2]. Make sure that Extrusion base is on top of the layers stack.

Step 3
Select the "HARVEST extrusion" layer, activate the Wand Tool (W), and click on the front of the HARVEST letters to create a selection.

Step 4
Turn off visibility of the "HARVEST extrusion" and "Extrusion base" layers [1]. Select the "Front base" layer and activate the Clone Stamp (S) layer.

Step 5
Start cloning the texture for the hay bale to the front of the letters.
- Set Clone Scale to 80% [1]. This way you will get impression of perspective. Textures that are far away from you are smaller.
- With left Alt selected, press in the middle of the hay bale to set the Clone Source.
- Start painting from the center of the letter "H".


Step 6
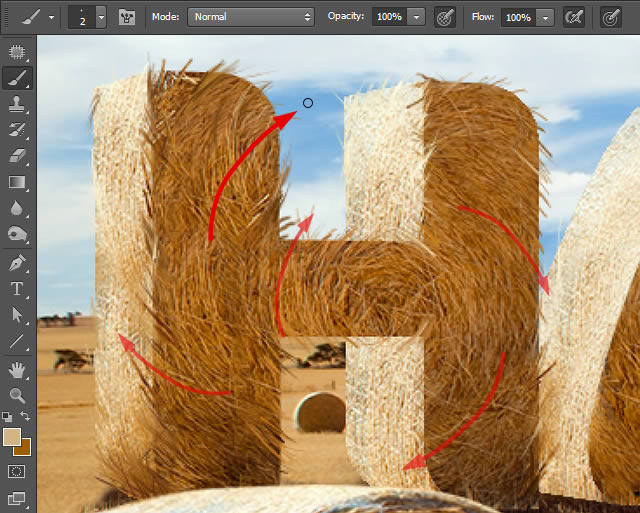
Change the Clone Source position until you paint the whole letter. Pay attention to the details. Clone the left side of the hay bale to the left side of the letter. This way you will have the impression of letters made from hay that is from a spiral shape.


Step 7
When you finish, the texture should look like this.

Step 8
Clone textures until you fill the letter "V" with hay texture. Then in the Clone Sourcepanel, change the Clone Size to 65% [1]. The rest of the HARVEST typography is very far away from us, so the textures must be smaller.

Step 9
Again with left Alt selected, press in the middle of the hay bale to set the Clone Source and paint textures.


Step 10
Then make a Rectangular Selection (M) over the hay bale that was the clone source.

Step 11
Press Delete to get rid of unnecessary pixels.

Step 12
Turn on the visibility of the "Extrusion base" layer, and drag it below the "Front base" layer. Then press Command and press on the "Harvest extrusion" layer thumbnail to create a selection.


Step 13
Now you will clone textures to the extrusion sides of the letters.
- Select "Extrusion layer" [1].
- Set Clone Scale to 80% [2]. To match the texture scale from previous steps.
- With left Alt selected, press on the side of hay bale to set Clone Source.
- Start painting the letter "H".

Step 14
From time to time, change the clone source to match the texture flow from the original hay bale.


Step 15
Clone the texture to the rest of the letters.

Step 16
To create a sharp border in the letter "S/T", make a selection with the Lasso Tool (L)over the top part of the "S" (see the picture), and invert it by pressing Command-Shift-I. Work in close-up to fine-tune the texture.

Step 17
Now refine the texture on the letter "S" to match its shape. Strands of hay should follow the direction of the edge of the letter.
- With the Polygonal Lasso (L) [1], make a selection over the bottom part of the letter "S", and invert it by pressing Command-Shift-I.
- Lock Transparency in the "Extrusion base" layer [2].
- In the Clone Source panel, change the angle of the clone to 180° [3].
- Clone the texture to refine its look.

Step 18
Now Invert the selection once more by pressing Command-Shift-I [1], and then press Command-J to create a new layer from it. Call it "S end" [2].

Step 19
Then make a Rectangular Selection (M) over the hay bale that was the clone source, and press Delete.

Step 20
Change the layer order as shown in the screenshot. Make groups for different parts of the typography. To quickly create a group, select the layer and press Command-G. Drag all typography layers below the "Hay bale 2" layer.

5. Create the Shadows of the Letters
Step 1
Select the "Harvest_final" Smart object [1]. In the Paths panel, select the "hay bale" path and create a selection from this path. Hold down Command and press on the path thumbnail to make a selection from it.

Step 2
Press Command-J to make a new layer and call it "3D shadow". Drag this layer above the "Typography" folder.

Step 3
Activate the Eraser Tool (E) and delete the top half of the hay bale.

Step 4
Turn on visibility of the "HARVEST shadow" layer to see where to clone shadow from the newly created fragment.

Step 5
Now press Command-J to duplicate the layer [1] and drag it below "HARVEST shadow". Then press Command-T to activate the Transform Tool and move it under the letter "A".

Step 6
When you are happy with the position of your shadow, hold down Command and press the layer icon to make a selection from it [1]. Press Command-C to copy it.

Step 7
Press Command-V to paste pixels to another layer, and activate the Transform Tool (Command-T). Place it under the letter "R".

Step 8
Again paste pixels and move this layer under letter "V". Repeat this process until all letters have their shadows. You will refine them in the next steps.

Step 9
Select the "3d Shadow" layer and move it away from the letter to have a better view for cloning texture. Turn off the "HARVEST shadow" 3d object.

Step 10
With the Eraser Tool (E), erase any part that does not belong to the shadow on the ground. Do it for every letter.

Step 11
Select all the shadow layers and merge them into one layer. To do so, pressCommand-E with all layers selected [1]. Then, with the Eraser Tool (E), delete unnecessary pixels [2] to start blending shadows into the ground.

Step 12
Now activate the Clone Stamp Tool (S) and set the clone source to the hay bale part shown in the picture. Start painting shadows.

Step 13
Clone until you have realistic-looking edges of the shadow. Note that by cloning fragments from the picture, you are adding very nice, realistic details. Some of the strands of hay are sticking out more than others, and the shadow edge is fuzzy and uneven.


Step 14
Now with the Rectangle Tool (M), select the hay bale that you cloned from, and press Command-X to cut it.

Step 15
Paste it above Typography and call this layer "Shadow top".

Step 16
Now you will clone strands of hay again. These strands are in front of the letters. So add them carefully try to mimic/copy the place where the hay is touching the stubble.

Step 17
Now with the Rectangular Marquee Tool select the part that you used as clone source and delete it.

Step 18
Zoom out to see if the shadow looks realistic. Your image should look like mine.

6. Paint Stray Strands of Hay
Step 1
Open the Brush settings panel and change its Shape Dynamics to those shown on the screen. I use a pen tablet to paint, so my Control is set to Pen Pressure.

Step 2
Open the Brush settings panel and change its Color Dynamics. This way Photoshop will use the Foreground color on stroke start and the Background color on stroke end.

Step 3
Now change its Transfer to modulate the Opacity of a single stroke.

Step 4
Sample the Foreground and Background color with the Eyedropper Tool. Create a new layer called "Strays".

Step 5
Start to paint with the Brush Tool (B). Set its size to a small amount (2 pixels), and change from time to time to just 1 pixel to add variation to the painted strands. Lay strokes with the directions of hay on the textures, and add some strands that go in different directions. This way your letter will get a more realistic look.
Step 6
Now paint all the letters.

Step 7
You should end up with something like this.

Step 8
Now add another layer called "Strays back". This time the layer should be below the Typography folder. Paint some strands to add life to the backs of the letters.

Step 9
Paint some more until all the letters are little bit "fur" covered.

Step 10
Now it is time to break the technical, straight look of the letters' edges. Select the "Front base" layer, add a mask to it, and paint over the edges with a ragged stroke.


Step 11
The mask of this layer should look like the one shown in the picture. To show/hide the contents of the mask, hold left Alt and click on the mask thumbnail [1].

Step 12
Now it is time to mask the Extrusion part of the letters. Select the "Extrusion base" layer and add a mask to it and paint.


Step 13
Now it is time to add a new layer that will bring some sunlight to the letters. Create a new layer and call it "sun blast". Create a Clipping Mask (to do that, press Alt and click on the line between the layers "Sun blast" and "Extrusion base"). Choose
#AD8144 color and paint roughly on the sides of letters. It is important to have different transparency over each stroke.
Step 14
Add a mask to the layer and paint strokes that imitate sunlight coming from behind the letters.

Step 15
Change the Blending Mode [1] to Soft Light. Now the letters have more golden sunlight on them.

7. Add Additional Shadows on the Letters
Step 1
Create a new layer above the "S end" layer, and call it "S sh". Create a Clipping Mask (to do that, press Alt and click on the line between the layers). Change its mode to Multiply and paint gentle shadow.

Step 2
Add another layer and call it "S sh dark", and change its Blending Mode to Multiply.Paint with darker brown to help ground the letter "S".

Step 3
Now create a layer "Shadow Low" above the "Front base" layer, set its Blending Mode to Multiply, and paint shadows. This time they have to blend between the letter shadow and the shadow on the ground.

Step 4
Create another shadow layer "T Sh" set to Multiply and make a selection with the Polygonal Lasso (L).

Step 5
Paint shadow as shown in the picture. Do it with two to three strokes of different strength.

Step 6
Create another shadow layer "S Sh" set to Multiply, make a selection with the Polygonal Lasso (L), and paint gentle shadow.

Step 7
Create another shadow layer "S Sh" and make a selection. Fill it with brown color with the Bucket Tool (G).

Step 8
Drop the selection, go to Filter > Blur > Gaussian Blur and set its Radius to 4.8 Pixels.

Step 9
Set this layer Blending Mode to Multiply.

Step 10
Add another layer "S sh top" set to multiply, make a selection with the Polygonal Lasso (L), and paint shadow.

Step 11
Add another layer "V sh" set to multiply and paint shadow.

Step 12
Add another layer "R sh" set to multiply and paint shadow.

Step 13
Add layer "A sh" set to multiply and paint shadow.

Step 14
Add another layer "H sh" set to multiply and paint shadow.

Step 15
Now you have a finished piece. You have created typography made from hay.

Hay, That's Awesome Work!
In this tutorial, I showed you how to create an autumn-themed text effect in Photoshop. In the process, I showed you how to create some 3D text in Photoshop and then use it as a guide to create a textured effect. I hope that you have learned something from this tutorial and can use the techniques demonstrated to create something amazing on your own.


