In this tutorial you'll learn how to create a fantasy landscape combining different photos. You'll also learn advanced techniques of blending and different techniques of adding lights to your scene with custom brushes and different Blending Modes.
I'll show you how to get beautiful color tones and how to work with layer styles to create a glow around objects. Let's get started!
Tutorial Assets
Download the following photos to create this tutorial:
- Upper Mountains
- Upper Waterfall
- Lower Waterfall
- Mist Brushes (free alternative)
- Sun Ray Brushes (free alternative)
Photos of "right sky", "left sky", "knight", "orb" and "aura" are attached to this tutorial.
1. Create the Background
Step 1
Open Adobe Photoshop and go to File > New... (or press Control-N on your keyboard) to create a new document.
Set Width to 1400 px, Height to 2100 px and Resolution to 300.

Grab the Paint Bucket Tool (G). Pick
#c2c5c7 color and fill the background with it.Step 2
Download all stock photos attached to this tutorial. Open the image named Upper Mountains and drag it into the document you've just created. Double-click on the new layer and name it "upper mountains".
(If you don't see the Layers panel, go to Window > Layers.)
In the image below you can see how your photo manipulation should look so far.

Step 3
Usually objects in the background look brighter and objects in the foreground look darker. Because of that, you will lighten the upper mountains in this step.
Add a new Curves adjustment layer on top of all layers and set it as shown below.
You want to adjust only the layer below (upper mountains) and not the rest of the image. To do so, create a clipping mask from it by clicking on the button This adjustment clips to the layer in the bottom part of the Curves panel.

Step 4
Download the image named "upper waterfall" and drag it into your photo manipulation. Place it on top of all layers and name it "upper waterfall". To blend it properly with the rest of the image, you need to hide the sky.
It would be really time-consuming to use the Lasso Tool (L) for masking, so you'll use Channels instead.
First, make all layers except "upper mountains" invisible. The simple way to do it is by holding Alt on your keyboard and clicking on the eye icon to the left of the "upper mountains" layer. See the image below.

Make sure the "upper waterfall" layer is active by clicking on it. Open the Channelspanel. If you don't see the panel, go to Window > Channels.
Step 5
Right click on the Blue channel and select the option Duplicate Channel... to create a new channel (Blue copy).

Click on the new channel and press Control-L on your keyboard to activate the Levels panel. Set Input Levels to 177; 1,00; 230.

Step 6
Grab the Brush Tool (B). Select a round brush and set its Hardness to 100%. SetOpacity to 100% and pick black. Paint over the waterfall to get the same image as below.

Press Control on your keyboard and click on the channel to activate its mask. After that, make the RGB, Red, Green and Blue channels visible and Blue copy invisible.

Inverse the selection. Go to Select > Inverse.
Step 7
Go to the Layers panel and click on the layer upper waterfall. With the mask still active, click on the button Add layer mask. You can find this button in the upper part of the Layers panel. The sky on the waterfall layer disappears.

Step 8
Download the image named "lower waterfall" and drag it into your photo manipulation. Place it on top of all layers and name it "lower waterfall".
Add a layer mask to this layer. Grab the Brush Tool (B). Select a round brush and set its Hardness to 0%. Set the Opacity to 50% and pick black color. Paint over the edges of the image to blend it with the rest of your photo manipulation.
In the image below you can see where you should paint. It's highlighted with cyan.

After you're done, your photo manipulation should look like the one below.

Step 9
Download the mist brushes listed at the beginning of the tutorial and install them into Photoshop. (Feel free to use any other free mist brushes you find on the internet.)
Add a new empty layer on top of all layers, and name it "mist". Grab the Brush Tool (B) and select one of the brushes you've just installed. Lower its Opacity to 30%and pick a very light grey color. Paint mist on the valley. Be careful not to overdo it; it wouldn't look realistic.
In the following image you can see how much mist you should paint.

Step 10
Add a new Hue/Saturation adjustment layer on top of all layers, and set the Saturation to -30. (You can find the button Add new fill or adjustment layer in the upper part of the Layers panel.)

Step 11
In this step you will retouch some parts of the trees which look bigger than the rest of the forest. In the image below you can see which part should be retouched.

Add a new empty layer on top of all layers and name it "retouching". Grab theStamp Tool (S). Set its Opacity and Flow to 100%. Press Alt on your keyboard and select some trees as your source. Clone them over the leaves.
You should get something similar to the following image.

Step 12
Download the image named "right sky" from the beginning of the tutorial, and drag it into your photo manipulation. Place it on top of all layers, and name it "right sky".
You need to do two things to blend it properly with the rest of the image. First, change its Blending Mode to Multiply and lower its Opacity to 20%.

Second, add a layer mask to the "right sky" layer. Grab the Brush Tool (B). Select a soft round brush and set its Opacity to 50%. Pick black color and paint over the harsh transition between the sky and the rest of the image.
In the following image you can see where you should paint. It's highlighted with cyan.

Step 13
Download the "left sky" image listed at the beginning of the tutorial, and drag it into your photo manipulation. Place it on top of all layers, and name it "left sky".
To blend it properly with the rest of the image, change its Blending Mode toMultiply and lower its Opacity to 20%, as you did in the previous step.
Add a layer mask to "left sky" and paint over the harsh edges to blend it even better. Use the same setting for the brush as in the previous step.
After this step, your photo manipulation should be similar to the one shown below.

Step 14
In this step you will increase the contrast of the image to create a more dramatic atmosphere. Add a new Brightness/Contrast adjustment layer on top of all layers, and set the Contrast to 50.

2. Add Interesting Light
In the following steps you'll focus on adding more interesting light to create more dimension in the picture.
Step 1
Add a new empty layer on top of all layers and name it "light on trees". Grab thePaint Bucket Tool (G). Pick a mid grey color (
#808080) and fill the layer with it. To blend it with the rest of the image, change its Blending Mode to Overlay.
Grab the Brush Tool (B). Select a soft round brush and set its Opacity to 15%. Pick white color and start painting over the tops of the trees where light would hit.
In the picture below you can see how the layer light on trees should look. The image on the left is in Normal Blending Mode to give you the exact idea. The image on the right is with the layer set on Overlay Blending Mode.

Step 2
In this step you will add even more light. Add a new empty layer on top of all layers, and name it "yellow light". Change its Blending Mode to Soft Light to get the effect you want.
Grab the Brush Tool (B). Select a soft round brush and lower its Opacity to 5%. Pick a bright color (e.g.
#f5e260) and paint light roughly as shown in the following image. It's important to not to overdo it to get the most realistic result.
The image on the left shows where you should paint. I set the layer on Normal Blending Mode and put a black background under to show it better. The image on the right shows the result of this step with the "yellow light" layer set on Soft Light Blending Mode.

Step 3
The photo manipulation would look better if it's brighter. Add a new Curvesadjustment layer on top of all the layers, and set the Curve as shown in the picture below.

Step 4
To add even more dimension to the photo manipulation, you will darken the cliffs in the foreground in this step.
Add a new Curves adjustment layer on top of all the layers, and set it as shown below.

You want to make only the foreground darker, not the rest of the image. To do so, grab the Paint Bucket Tool (G) and fill the layer mask of this adjustment layer with black color. After that, grab the Brush Tool (B). Select a soft round brush, set itsOpacity to 80%, and pick white color. Paint over the cliffs. In the following image you can see where you should paint.

After this step your photo manipulation should be similar to the one below.

Step 5
Download the sun ray brushes listed at the beginning of the tutorial and install them into Photoshop.
Add a new empty layer on top of all the layers, and name it "sun rays". Grab theBrush Tool (B) and select one of the brushes you've just installed. Set the Opacityof the brush to 30% and pick a very bright yellow color (e.g.
#fffcb5). Paint sun rays over the horizon.
As in the previous steps, it's very important to paint just a few strokes to get the most realistic result.
In the pictures below, you can see where you should paint the sun rays. In the left image, I put a black background under the layer "sun rays" to make the rays more visible and to give you a better idea where you should paint.

3. Add More Elements
In this part of the tutorial, you will place all the remaining elements such as the knight and orbs into your photo manipulation.
Step 1
Download the image of the knight listed at the beginning of the tutorial, and drag it into your photo manipulation. Place it on top of all the layers, and name it "knight".

Step 2
Download the orb listed at the beginning of the tutorial and drag it into your photo manipulation. Name the new layer "orb" and place it on top of all the layers.
To blend it better with the rest of the image, you'll add some glow to the orb. Make sure the layer orb is active by clicking on it. Click on the Add layer style button. It can be found in the bottom part of the Layers panel.
Check the option Inner Glow and set it as shown below.

After you're done, check the option Outer Glow and set it as shown below.

In the following image you can see how the orb looks with and without this layer style.

Step 3
In this step you'll add two more orbs to the background.
Right click on the layer orb and select the option Duplicate layer... Name the new layer "orb 2". Press Control-T on your keyboard to activate the Free Transform and resize the orb to the same size as you can see in the preview. Hold Shift while doing it to have the same proportions. Press Enter to apply the changes.
To create the impression that the orb is far in the background, it needs to be brighter. In this case you can simply do it by lowering its Opacity to 80%.

Duplicate the layer orb one more time. Name the new layer "orb 3", and resize it to the size of the third orb as you can see in the preview.
Lower its Opacity to 70% to blend it well with the rest of the picture.
In the following image you can see how your photo manipulation should look so far.

Step 4
The biggest orb should be slightly brighter and less contrasted. To fix that, add a new Brightness/Contrast adjustment layer right above the layer orb, and set it as shown below.
To adjust only the orb and not the rest of the image, create a Clipping Mask from this adjustment layer.

Step 5
Download the image named aura listed at the beginning of the tutorial, and drag it into your photo manipulation. Place it on top of all the layers, and name it "aura".
To blend it properly with the rest of the image, change its Blending Mode to Screen. Grab the Move Tool (V) and move it on the biggest orb to create a nice aura around it.

Step 6
To blend the orb even better with the rest of the image, add some gentle mist in front of it.
Add a new empty layer on the top of all layers and name it "mist 2". Grab the Brush Tool (B) and select some of the mist brushes you installed in the previous step. Lower its Opacity to 30% and pick a very light yellow color (e.g.
#fffcdd).
Paint some mist in front of the orb. In the following image you can compare how the photo manipulation looks before and after this step.

4. Color Adjustments
In this last part of the tutorial, you will focus on adjusting colors and contrast to create a more interesting atmosphere.
Step 1
To add greenish tones to your photo manipulation, add a Gradient Map adjustment layer on top of all the layers, and set it as shown below.

To blend it properly, change its Blending Mode to Exclusion and lower its Opacityto 30%.
Step 2
In this last step you will make your photo manipulation a bit darker. To achieve that, add a new Curves adjustment layer on top of all the layers, and set it as shown below.

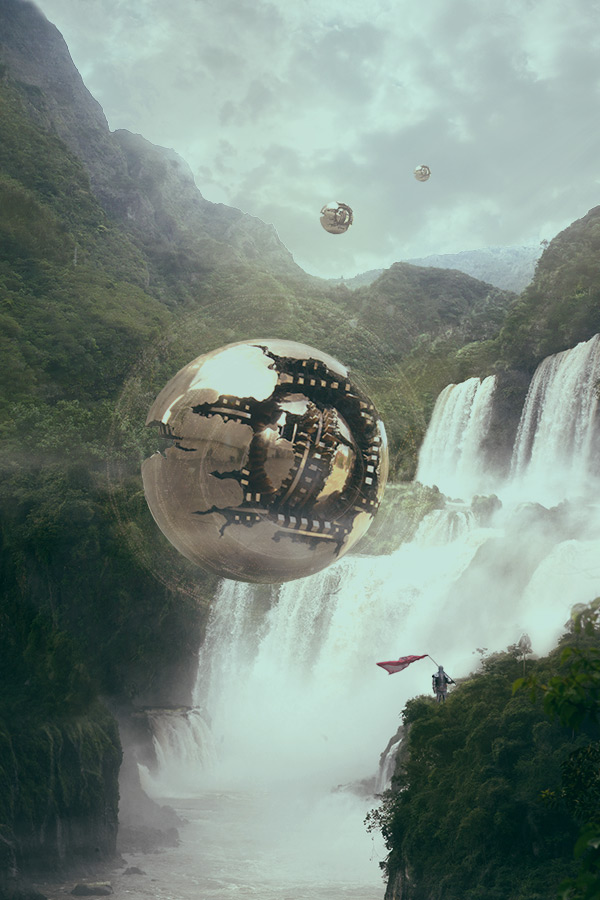
Conclusion
Congratulations! You've just finished your fantasy photo manipulation. You've learnt how to:
- use Blending Modes to create interesting light
- work with custom brushes to easily create special effects
- apply layer styles
- use advanced techniques of blending
Let me know if the tutorial was useful and inspiring for you in the comments below!


