Are you a student? Get a yearly Tuts+ subscription for $45 → What You'll Be CreatingIn
this tutorial you'll how to create a cracked and exploding planet. All
super villains wish for a weapon capable of destroying a planet. We have
one too: we call it Photoshop! We will start with perfectly good planet
and smash it like a egg! Or at least an egg that is floating in space
and has an explosion of energy within it. This tutorial is part of a
larger set of instructions on creating an epic space battle scene, which
you can find in the Tuts+ course: Advanced Photo Manipulation Part 2.
Tutorial Assets
I've contributed the
photos and textures that were used to create this effect. These are
freely available for you to use for your own personal projects. Look for
the Download Attachments link in the sidebar, then save the ExplodingPlanetAssets.zip file and extract the files within it to follow along with our galactic adventure in super villainy as we crack up a planet!
The zip file contains five reference photos of a cracked concrete sphere, a MainImage.jpg file to serve as the setting for the space scene, and a PlanetRender.psd file to use as the starting point of our planetary destruction.
Get Up to Speed
This
tutorial covers a small part of a much larger project covered in the
Advanced Photo Manipulation Part 2 course. In that course, we used a
series of photographs to create a custom, seamless planet texture. Then that texture was mapped onto a sphere using the 3D tools in Adobe Photoshop. The lighting and camera angles were all adjusted and the image was rendered out. Which
brings us up to the point where we begin this tutorial. We've got this
perfectly good rock of a planet that just looks like it's begging to be
exploded. Let's see if we can accommodate that!
1. Crack Things Up
Step 1
The
source files for this tutorial contain a series of photographs of some
cracked concrete spherical statues. These are perfect resources for
creating realistic cracks in our doomed planet. Open these up in
Photoshop so they are readily available.
Step 2
Use the Elliptical Marquee Tool (M) to create a circular selection around the sphere. Copy it into a new layer with Layer > New > Layer Via Copy (Control-J)
Step 3
The image needs to be adjusted so that the cracks are dark, but the rest of the concrete is almost white. Use Image > Adjustments > Levels (Control-L) to
accomplish that. Pull the right-hand slider towards the center until
the concrete turns white, then slide the left slider in until the cracks
become dark.
Step 4
Set the layer's Blend Mode to Multiply, then duplicate the layer with Layer > Duplicate. Create several duplicates to make the appearance of the crack more noticeable.
Step 5
Continue creating more cracks by duplicating and rotating the layers using the Edit > Free Transform (Control-T)
tool. Enhance the effect even more by layering in additional crack
textures from the other reference photos and performing the same
operations as the previous three steps.
Step 6
Continue to place cracks into a configuration of your liking. The
explosion should have an epicenter: the spot where the planet-destroying
weapon actually detonates. Focus on creating a convergence of cracks by
positioning various layers. This will require rotating and positioning
some of the layers so that the sphere forms do not align.
Step 7
Select all of the cracked layers and group them together with Layer > Group Layers (Control-G). Create another elliptical selection and use it as a group mask by pressing the Add Layer Mask icon at the base of the Layers panel.
Step 8
Add a Levels Adjustment Layer and pull the outside handles inwards to drastically increase the contrast. Then add an Inverse Adjustment Layer to turn the cracks white and the sphere surface black.
Step 9
You may notice some strange circular artifacts caused by transforming
some of the texture layers. Locate the offending layers and use the Eraser Tool (E) to remove the problem pixels. Then hold down the Alt key and go to Layer > Merge Visible to create a merged layer of the final cracked texture.
2. Apply Directly to a Planet
Step 1
Open the file PlanetRender.psd
from the source files. Drag the merged cracked texture onto the planet
file and deposit it directly on top of the planet layer. Set the Blend Mode to Screen and Transform the texture until it fits nicely onto the planet shape.
Step 2
The
cracked areas should have a noticeable blue glow to them to indicate
that they are the result of an energy explosion. The best way to create
that effect is by adding a Gradient Map adjustment layer. Then clip the adjustment layer to the MergedLayer by holding down the Alt key while clicking the line between the layers in the Layers panel. This will constrain the effects of the Gradient map to only the cracked texture, and not the planet layer. Open the Gradient Editor for the Gradient Map and adjust the gradient to match the following settings. Then set the adjustment layer's Blend Mode to Linear Dodge to complete the glow effect.
Step 3
Select the planet, cracked texture, and gradient map layers, and create a Merged layer from them by holding down the Alt key while going to Layer > Merge Visible. Then hide the rest of the layers, leaving just the new merged layer to work with.Rename the merged layer to CrackedPlanet.
3. Break It Up
Step 1
Now it is time to crack this thing apart! It's a good idea to duplicate the merged layer with Layer > Duplicate and hide the original, because things are going to start getting messy! Grab the Magnetic Lasso Tool (L) and check the options bar to make sure the Width is set to 10%, Contrast to 10% and Frequency to 60.
Step 2
Carefully
follow along the glowing cracks to create a selection that outlines a
single fragment of the planet. The tool will attempt to automatically
follow the edges, but you can help it along by clicking on edges to
direct the automated process.
Step 3
Go to Layer > New > New Layer Via Cut (Shift-Control-J) to create a new layer from the selected fragment. Then use the Move Tool (V) to move the piece out slightly. Also consider giving it a slight rotation away from the explosion epicenter.
Step 4
Repeat
that process until you have created dozens of planet fragments. Then
select all those layers and group them together with Layer > Group Layers (Control-G).
Step 5
Create a Merged layer of all the planet fragments and add an Inner Glow layer style with a Size of 70 px and a color of #afb6f6 Change the Blend Mode to Multiply and reduce the Opacity to 87%.
Step 6
Create a New Layer under the planet fragment layers called "LightRing". Create a round selection around the outside of the original planet sphere and fill it with white using Edit > Fill. Cancel the selection with Select > Deselect (Control-D) and go to Filter > Blur > Gaussian Blur. Set the Blur Radius to 30 Pixels to create a soft glow around the broken planet.
Step 7
Go to the PlanetFragments group and add a Gradient Overlay layer style to the group. Yes, styles can be applied at the group level, not just individual layers! Set the Blend Mode to Overlay and the Style to Radial. Leave the Gradient at the default Black to White.
Then on the canvas, drag the center of the gradient towards the lower
right of the planet, making it darker while making the top left
brighter.
4. Energy Explosion
In
this step it is extremely important that the canvas is a perfect
square. If you are using the downloaded files for this tutorial, then
you should be fine. But if you are using this technique in your own
project, then go to Image > Canvas Size (Alt-Control-C) and make sure the Width and Height have the same pixel dimensions.
Step 1
Create a Duplicate of the LightRing layer and move it to the top of the layer stack. Create a selection of the planet fragments by Control-clicking on the merged layer thumbnail. Make sure the LightRing copy is still the active layer and press backspace to delete the selected pixels. Then cancel the selection with Select > Deselect (Control-D).
Step 2
Add a new layer under the LightRing copy layer and fill it with black. Merge this layer with the LightRing copy layer using Layer > Merge Down (Control-E), then set the blending mode to Multiply.
This step creates no visual difference, but the layer needs to be
filled with pixels, even invisible pixels, for the next few steps to
work properly.
Step 3
Duplicate the LightRing copy layer and rename it EnergyExplosion. Go to Filter > Distort > Polar Coordinates. Use the Polar to Rectangular option to create a crazy pattern from the cracks of light.
Trust me, I know this looks ridiculous now, but it's going to be awesome!
Step 4
Rotate the layer a quarter-turn clockwise with Edit > Transform > Rotate 90 clockwise.
Step 5
Now to blast that pattern with some Photoshop wind! Go to Filter > Stylize > Wind. Set the Method to Blast and the Direction to From the Right. Press Control-F to repeat the filter. Repeat it eight or nine times until the pattern has a nice wind-blown appearance.
Step 6
Duplicate the EnergyExplosion layer and go to Filter > Blur > Motion Blur. Set the Angle to 0 and the Distance to 100 px.
Step 7
Hold down the Shift key and tap the Left Arrow Key two or three times to nudge the blur to the left. Then go to Layer > Merge Down (Control-E) to merge the blur layer with the windblown layer. Rotate the layer back into place with Edit > Transform > Rotate 90 Counter Clockwise.
Step 8
Return the layer to its original shape by using Filter > Distort > Polar Coordinates again, but this time use the Rectangular to Polar setting. This gives us a really cool "explosion of light" effect! See, didn't I promise you it would be awesome?
Step 9
To create an even more dramatic effect, go to Filter > Blur > Radial Blur. Set the Blur Method to Zoom, the Amount to 30, and the Quality to Best.
Step 10
Add a Layer Mask to the EnergyExplosion layer and use a soft-edged brush set to 50% opacity
with black paint on the mask to gently fade the burst effect in certain
areas. The idea is to create an uneven dispersion of the explosion. We
would expect to see a greater effect in areas that radiate from the
largest cracks.
Step 11
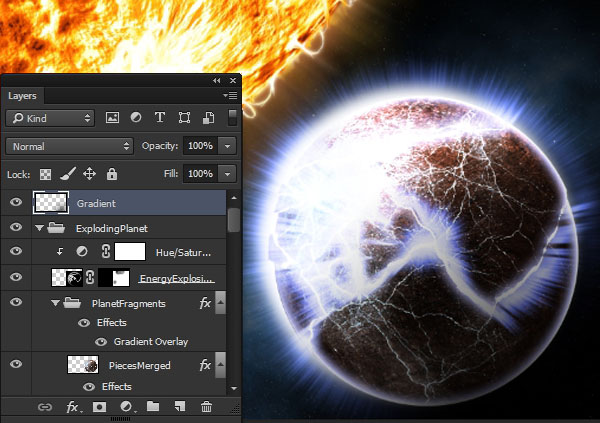
Now let's give the explosion an electric blue tint. Add a Hue/Saturation Adjustment Layer and clip it to the EnergyExplosion layer. Enable the Colorize option and set the Hue to 231 and the Saturation to 60. Leave the Lightness at 0. Then change the Blend Mode of the adjustment layer to Color.
5. Add the Destroyed Planet to a Space Scene
Now
we can fit our destroyed planet into a larger space scene. When
compositing a new element into a scene, it's always good to keep it as
editable as possible, so that if tweaks need to be made, you don't have
to redo your work.
Step 1
Open the MainImage.jpg
file from the course files. This scene is a portion of a larger scene
used in the course. It's already all set up to place a devastated planet
right into it.
Step 2
Select all of the visible planet textures and Group them together with Layer > Group Layers (Control-G), then drag the entire planet group over onto the space scene.
Step 3
The
effect is a little too strong for the scene: the white areas of the
explosion are getting blown out, and we are losing detail. So let's dial
it back just a bit. Open up the planet group and locate the EnergyExplosion layer. Reduce the Fill setting to 70%.
Step 4
Now for a very slight adjustment to the lighting of the planet. Add a new layer above the planet group and use the Gradient Tool (G) with a Radial mode using a Black to Transparent gradient. Add a slight gradient to the lower right of the planet to make that area appear to be in more shadow.
Conclusion
So here's our final image. A
pretty dramatic scene with a planet being exploded into pieces. We have
achieved full super-villain mode now! Just watch out for that plucky
young hero that is certain to come along and foil our sinister plans of
galactic domination! I hope you've gained a few new skills or ideas from
this tutorial, and I encourage you to post your results in the comments
section below. I'd love to see your work!
Want More?
This tutorial is one small part of a much larger set of instructions found in the Tuts+ course: Advanced Photo Manipulation Part 2.
That course is a 21-video series containing three and a half hours of
instruction detailing how to create this complex space battle scene.
Medical Disclaimer
The information on this site is not intended or implied to be a substitute for professional medical advice, diagnosis or treatment. All content, including text, graphics, images and information, contained on or available through this web site is for general information purposes only. Krobknea makes no representation and assumes no responsibility for the accuracy of information contained on or available through this web site, and such information is subject to change without notice. You are encouraged to confirm any information obtained from or through this web site with other sources, and review all information regarding any medical condition or treatment with your physician. NEVER DISREGARD PROFESSIONAL MEDICAL ADVICE OR DELAY SEEKING MEDICAL TREATMENT BECAUSE OF SOMETHING YOU HAVE READ ON OR ACCESSED THROUGH THIS WEB SITE.