Apple’s
system-wide dictionary on OS X is one of the more covert productivity
tools available to Mac users. It’s more than just the Dictionary app,
for instance you can add words to your personal dictionary to prevent spellcheck on things like Simplenote or foreign names like Penderworth. In this tutorial, I’ll show you what the Dictionary app is capable of when combined with its universal Look Up shortcut.
Using the Dictionary App
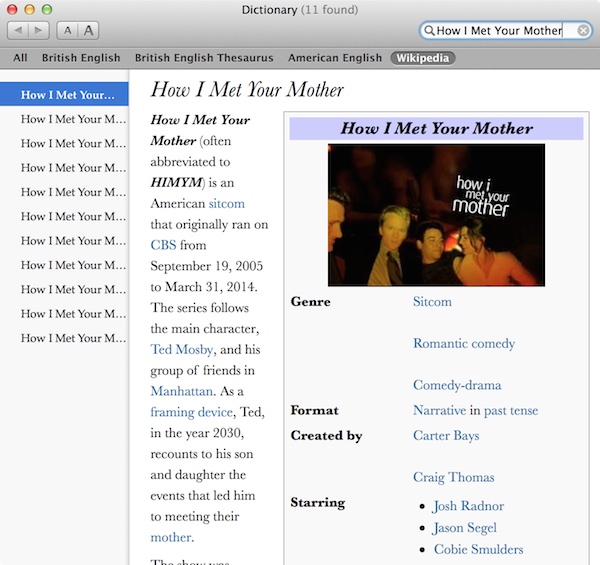
Researching a favorite TV show of mine on Wikipedia.
Dictionary, an app that’s built-in to OS X, appears very minimal at first sight. Its main screen prompts you to Type a word to look up in… [name of dictionary or thesaurus].
You can start typing to get live search results, and the app doesn’t
require Internet unless you’re looking for something on Wikipedia.
Speaking of Wikipedia, you no longer need to open the website to look something up on the reference giant. You can instead use Spotlight to search Wikipedia for it–see the bottom of results for this option. This will open in Dictionary app with a result.
You might notice that there’s an All tab to the
left of your current dictionaries and thesauruses. This makes it easy to
look up a word in all your sources. When it’s selected, you will be
prompted to search with all your sources. Searches will be organized by
source in ascending order. You can collapse the ones you don’t wish to
display by clicking the arrow to the left of them.
Managing Dictionaries
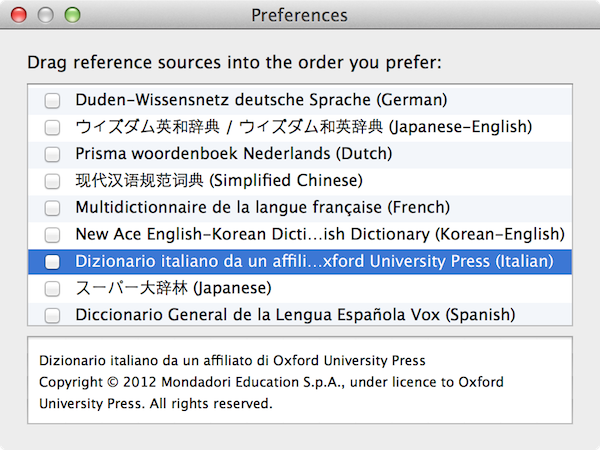
It is often useful to have some international dictionaries installed for translating words and Apple made that possible.
If you click the File menu and select Open Dictionaries Folder,
you’ll find the folder that additional dictionaries can be installed
in. All you have to do is drag a compatible dictionary file into this
folder to install it. You can then display and change the order in the
Dictionary app by heading to Preferences and checking
the box beside each additional dictionary you wish to see. Dragging an
item higher on the list will change where it is displayed in the app’s
toolbar. You can travel anywhere with this dictionary selection.
By default, the Dictionary app has ten single-language dictionaries,
three bilingual ones, and two thesauruses, as well as Wikipedia and a
dictionary for Apple’s system terms.
If you have a dictionary file in the stardict format, you can convert it to one that works with Dictionary using DictUnifer, a free tool created for this very purpose. If not, writer and developer Michel Clasquin-Johnson converted a number of languages and offers them for free download. There are a lot of resources available to help expand the Dictionary app’s capability.
Handy Tips
Here are some things you should remember when navigating the
Dictionary app. They’ll help you jump from place to place more quickly
and obtain a bit more information about things along the way. The virtual cover of Oxford's dictionary in OS X.
You can move forward and back by using the shortcuts Command-] and Command-[, respectively, or by swiping left or right with two fingers on your trackpad (one on a mouse) just as you would in Safari.
Change to the next or previous source with the shortcut Command-} and Command-{, respectively (don’t forget the shift key since it’s a secondary character) or by using the number keys combined with Command to select the applicable source.
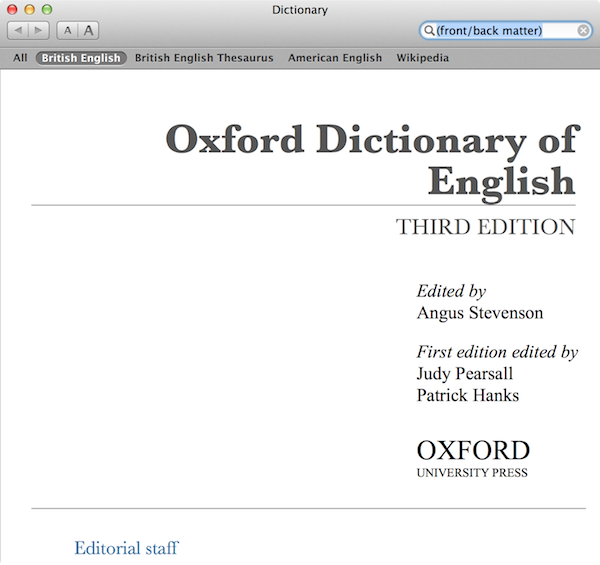
You can view the selected dictionary’s cover, preface, and introduction by selecting Front/Back Matter in the Go menu. Only some dictionaries have this.
The number of results will be displayed in the app’s title bar.
You can have multiple windows open at once. Open one in the File menu or with the universal Command-N shortcut.
Click any word in the app to look it up in the selected source.
Using the Dictionary Around OS X
You can quickly look up a word anywhere in OS X by tapping it with
three fingers in post-Lion, OS X 10.7+, versions or by
secondary-clicking it and selecting Look Up [word]. This
will display results in your top two dictionaries, along with
Wikipedia. It’s great for inline research–no need to jump from Safari or Byword to the Dictionary app just to find a synonym.
Do
keep in mind that clicking any words in the little popup will not look
them up as well. That’s a function exclusive to the Dictionary app. The inline dictionary is handy and convenient.
Free to Read
That’s everything you need to know about using the Dictionary app
more productively throughout your day. In this tutorial I have shown you
how to navigate the Dictionary app efficiently, browse Wikipedia with
it, install your own dictionaries, and define words anywhere in OS X.
Now
it's time to get back to return to your boisterous, or verbose, life.
If you have any tips of your own, I’d love to hear them in the comments.
So
far in this series on productivity, we've looked at a diverse range of
productivity systems and techniques. Here's a quick recap:
The Eisenhower Matrix helps you prioritize tasks on your to-do list based on their urgency and importance.
The Pomodoro Technique teaches you to focus on the task at hand by chunking your day in 5 to 25 minute sections.
Getting into a state of flow allows you to find your best energy, so you're naturally productive. Practicing mindfulness has a similar effect.
The Unschedule
helps you banish procrastination by taking the guilt out of play and
making you a perpetual starter rather than a one-time finisher.
Brian Tracy's Eat that Frog method helps you start each day productively by tackling the most difficult tasks first.
Mark Forster's Final Version helps you make productive, positive decisions that allow you to start digging into your to-do list.
The Don't Break the Chain technique helps you build productive habits into your life through small wins every day.
David Allen's Getting Things Done technique helps you clear your mind of distractions with a system for capturing and processing every task and idea that crosses your mind.
Our aim in introducing you to all these productivity methods wasn't
that you should use all of them. Implementing all of them would be a
full-time job in itself! Also, it would probably drive you crazy.
Rather, we hope you'll try the techniques that appeal to you or that
tackle the specific productivity issues you face. As you find what works
for you, you'll develop your own productivity system.
Think of it this way: if you're an artist, it's helpful to know a
wide range of art styles and techniques to draw on as you develop your
own style. Writers are encouraged to read a lot because it builds their
vocabulary and helps them develop new ideas. Likewise, entrepreneurs
typically draw on their experience of business when coming up with new
ideas.
So if you want to maximize your productivity, it's a good idea to know various systems you could use, as this gives you more options when developing a system that works for you.
Talking of developing your own productivity system, here's how to do it:
Step 1: Identify Your Productivity Drains
The purpose of developing your own productivity system is that it
allows you to be productive, whoever you are and whatever your
situation. Using a custom system means you can build on your strengths
and improve upon your weaknesses.
Your weaknesses are a great place to start when building a
productivity system because they show you what you most need help with.
Ask yourself: "What do I struggle with when it comes to being productive?"
To help you get started, it could be any of the following:
You struggle to focus on the task at hand. You find yourself
constantly distracted by social media, the Internet, or talking to
co-workers.
You procrastinate by putting off must-do tasks until the last minute.
You never complete your to-do list. You've got items on there that have lingered for more than a month.
Your email inbox is overflowing, and you've missed important emails.
You feel anxious about everything that needs to be done, which distracts you from getting on with your work.
Now, it's possible that you're not as productive as you'd like to be,
but you can't see the problem. If this is you, your bad productivity
habits have become so deeply ingrained that you can't even see them.
You've got a few options:
Go ahead and try out some productivity approaches (check out the
list in the introduction of this tutorial to get started). By seeing
which approach makes a difference, you'll get an idea of what your
productivity drains are.
Spend your next three days tracking yourself. Track everything you
do and how long it takes, from the moment you get up to when you fall
asleep. This will help you answer the question, "Where is all my time
going?" You'll also notice where tasks are taking you longer than they
should or where you're getting distracted.
Go ahead and read the next step, which will show you what should be in a productivity system. This will help you see where you fall short.
Step 2: Know the Ingredients of an Effective Productivity System
Before you can create a productivity system to tackle your
weaknesses, you need to know what a productivity system should do. In
other words, you need to know the purpose of your productivity system.
Not all systems need to include all of the following components. What
you include depends on your weaknesses you identified in Step 1.
Additionally, there are undoubtedly other components a productivity
system could include, so don't be afraid to add to this list (and share
your additions in the comments below and let others benefit from your
discoveries).
What are some of the components your system should consider?
Capturing
When a new task comes your way—whether that's a request from someone else or an idea you've thought of—how
do you make sure it gets noted? A capturing system could be as simple
as carrying a notepad and pen with you everywhere. It could involve
emailing yourself or sending yourself a voicemail for new tasks. Or you
could use a dedicated app. The Getting Things Done system is the most comprehensive productivity tool for capturing tasks.
Filtering
Once you've captured tasks, what next? You could add them all to your
to-do list, but that's likely to overwhelm you. None of us can do
everything. Filtering tasks allows you to:
Discard. You can get rid of tasks that aren't urgent or don't contribute to your goals. Or you can save them in a "one day" list.
Delegate. A big part of being productive is knowing when to ask for help—and having the humility to do so.
Do. If tasks can't be discarded or delegated, you can add them to your to-do list.
Prioritizing
You've got a to-do list of items, but which should you do first?
There are a range of different approaches here, from tackling important
tasks first (The Eisenhower Matrix) to doing the task you least want to do first (Eat that Frog). Finding a way to prioritize that works for you is key to developing an effective productivity system. Note: Filtering is a form of prioritizing, so these can be done together.
Focusing
When you're working, how do you stay focused on the task at hand? How do you avoid distractions and beat procrastination? The Pomodoro
technique is a good way to get started if you struggle to focus. If the
Internet or social media are the biggest problems for you, then
Internet-blocking tools will help, too.
Focus also includes limiting the number of tasks you choose to work on, and managing your time well.
Energy
All work requires energy. The more positive energy you bring to your
work, the more you'll get done. Conversely, the more negative energy you
bring to your work, the more you'll struggle to be productive.
In your productivity system, it's a good idea to find ways to manage
your energy and maintain a positive attitude. In this respect,
activities seemingly unrelated to work—such as exercising regularly, eating healthily, and getting enough sleep—can be integral to a productivity system.
Another big energy drain is resentment at feeling forced to do tasks
you don't want to do. While you're unlikely to have complete control
over what you're required to do at work, it's worth considering how you
can build choices about the work you do into your workday.
Observing your thoughts and feelings through mindfulness can also help you maintain a healthy, positive attitude to your work.
Step 3: Bodge Together a Productivity System
As you've learned from reading this series on productivity, perfectionism is the enemy of being productive. So instead of creating a perfect productivity system, you're going to bodge one together. Bodge is a British word for creating something using whatever materials are available. In French culture, this is called bricolage. Americans might call it a hack together or a quick-and-dirty solution.
Why am I using such an unusual word here? Partly because it's the
best word for describing what I want to say. But also to point out that
building a productivity system is not a science. There's no right or perfect answer. It's about creatively working with the resources you have available to find what works for you.
In other words, it's about finding an approach that's good enough for
your needs. You're not a robot, and you shouldn't expect yourself to be
one.
How can you bodge together a productivity system?
A productivity system is a collection of productivity tools. So use
the productivity tools you've got to hand. Start by reading the articles
in this series. This will give you access to plenty of tools. Chances
are, you've probably got a few tricks of your own, too.
The important thing is to try various techniques. Start with those
you're naturally drawn to and those that address your productivity
weaknesses. Only by putting them into action and giving them a try will
you see whether they work for you.
Step 4: Use Your System
You've created a system. Great job! Now comes the hard part of using it.
I recommend setting aside half a day to set up your system. This
allows you to create and print out any worksheets you need, pick up
supplies from the store, and install any apps or browser plugins you
need.
Then, put your system into practice. Do your work according to your system.
You will encounter teething problems. To start with, your
productivity system may mean you get less done. Don't panic, and don't
be tempted to give up right away. Stick with your system for at least a
week before you evaluate how it's working. Only by giving your system a
proper trial can you fully assess its strengths and weaknesses.
Advertisement
Step 5: Tweak Your System
You've already done the hard work of creating and implementing a
productivity system. From here on out, things will only get easier.
You'll just be making small changes to your system, so it becomes the
best it can be.
The two most important things to consider as you evaluate your system are:
How much work you get done. Is your system making you more productive?
How you feel about your work. Is your system helping you approach your work in a positive, upbeat way?
And what do you want to change? Pay attention to the aspects of your system that you notice.
After its initial settling-in period, a good productivity system
integrates into your life without too much fanfare. It should oil the
wheels of your work, rather than be a bother. In particular, ask
yourself: "Are there parts of my system I avoid or that always frustrate
me?" These are the parts that need changing
It's worth bearing in mind that the tweaks you make are experiments. You don't have to stick with them forever.
Here are some examples of problems in a system and tweaks you could trial:
You've implemented the Pomodoro technique. It helps you focus, but
you wish there were longer breaks between each 25-minute chunk. After a
series of Pomodoros, you feel exhausted. How about adjusting a Pomodoro
to be 40 minutes of work followed by a 20-minute break?
You've set up a Facebook block using a web browser plugin. But your
Facebook addiction encourages you to check Facebook on your phone. Is it
time to uninstall Facebook from your phone or log your phone out of
Facebook while your working?
You try Eat that Frog, but after a few early successes, you
find it makes you miserable to do the worst task at the beginning of
the day. Your procrastination problem has gotten worse. How about trying the Final Version system instead, where you start with the task you most feel like doing?
A word of warning: Before you blame all your problems on flaws in
your system, make sure you've given the system a fair trial. Yes, life
works best when what you want to do aligns with what you need to do. But
this isn't always the case. All productivity systems require at least
some measure of willpower. It's about finding the system that helps you
maximize your willpower best.
Finally, creating an effective system is a lifetime's work. What's
right for you today will change in the future as you move careers, as
your personal circumstances change, and as you develop new skills.
Going paperless is a great way to remove clutter from your life, by turning your paper documents into digital copies.
However, you’ll need great tools to help you with your paperless
transition. Sure, you could save your scanned documents to your
computer's hard drive, but then they aren’t easily searchable,
backed-up, or available across multiple devices.
That's why I use Evernote to
simplify my paperless life. It makes it simple to search and annotate
scanned documents, from any device. In this tutorial, I'll show you how
to use Evernote to organize your scanned PDFs, edit them, and find the
info you need.
Please note that some of the features mentioned in
this tutorial requires Evernote Premium, a service that costs $5 per
month or $45 per year. You can use PDFs in Evernote without going
Premium, but you'll get the most features if you upgrade.
Adding Documents To Evernote
If
you plan on using Evernote for going paperless, you’ll need to scan
your documents into the service. There are two ways of doing this:
either import existing PDFs to Evernote, or use Evernote’s new “Scan To
Evernote” feature with Image Capture on the Mac. I’ll show you how to do
both of these.
Importing PDFs To Evernote
On the Mac
Uploading a document to Evernote.If
you already have PDFs scanned into your Mac, you can easily import them
to Evernote without having to rescan them. To do this, open Evernote and select the Notebook that you’d like to store your PDF in. Then, find the PDF you’d like to import and drag-and-drop it into your Notebook. Your document will now automatically be uploaded to Evernote’s servers. Editing a PDF using Evernote.A
window will now popup that shows a copy of your PDF document. Look
towards the top of this window, right above the copy of your PDF, and
you will see three buttons. The the first button to the left allows you
to annotate your document. When you click on this option, you’ll be able
to add boxes, arrows, text, and highlights to the document. These edits
will be imported with your document.
The second option to the
right will give you a quick look of your document while the third option
will allow you to re-save a copy of your document. This is helpful when
opening the document on another computer that doesn’t have a copy saved
to its hard-drive.
Once you’re done editing your document, you
can name it from the textbox located towards the top of the document’s
window. To save a name change, just hit the Return key on your Mac’s
keyboard.
On the web
Importing documents from Evernote’s
web client is actually very similar to importing using the Mac app. To
do this, log into Evernote on your favorite web browser. Once logged in,
click into the Notebook you’re using to store PDFs. Once in the
Notebook, look towards the top of the window and click on the button
labeled “New Note”. Name this new Note by looking towards the top
of the Note window and clicking into the title menu that should read
“Untitled”. Type in your Note’s new name and press the return key on
your keyboard to save it. Opening your Note in a new window.To
add a PDF to your newly created Note, look at your new Note and open it
in a new window. To do this, click the box and arrow button located
towards the upper right-hand corner of your Note. Adding a PDF to your newly created Note on the webNow, find the PDF you’d like to import on your computer and drag-and-drop into the window containing your Note. Your PDF will now be uploaded to Evernote.
Using Scan To Evernote On The Mac
If
you need to import a document that hasn’t yet been scanned to Evernote,
you can do so using Scan To Evernote and Apple’s Image Capture. This is
because, when installing Evernote on your Mac, a plug-in is added to
Image Capture that, when enabled, will automatically upload scanned
documents to your Evernote account.
To start, make sure your
scanner is connected to your Mac and powered on. Then ready a document
for scanning, and launch Image Capture on your Mac. From the left-hand
side of the Image Capture window, select your scanner from underneath
the “devices” header. If your scanner is connected to your local
network, it will be under the "shared" header.
Now, look towards the right-hand side of the screen at your scanning options. From here, set the “Format” drop-down menu to “PDF” and change the rest of the scan settings as desired. Adding Evernote to Image Capture.Now it's time to tell Image Capture to scan to Evernote. To do this, open a new Finder window and navigate to your Applications folder. Find your Evernote application within this folder and drag-and-drop it into the "Scan to" field within Image Capture.
Now that you’re done tweaking your scan, click the “Scan”
button located towards the lower right-hand corner of the screen. Once
your scan is complete, a new Evernote Note will appear with the PDF of
your scan attached. You can now modify your scan as needed within
Evernote.
Using Evernote To Keep Your Paperless Life Organized
Searching Through PDFs With Evernote
Note:you must be an Evernote Premium user to use these search tools. Searching scanned documents with Evernote. One
of the best parts of using Evernote for going paperless is the fact
that, for Evernote Premium users, it automatically makes your PDFs and
images searchable. For instance, if you have a document with the word
“iPhone” in it and search “iPhone” in the “Search notes” (upper
right-hand corner) box within the Evernote Mac interface, your document
will pop-up with all instances of “iPhone” highlighted.
Additionally,
Evernote allows Premium users to search through individual PDFs. When
viewing a PDF, press Command-F on your keyboard to bring up a search
box. You can now type in your search to have all instances of it
highlighted within the document.
Keep in mind that this
functionality also works for images that have text, so if you have
scanned JPEGs or PNGs, you don’t have to rescan to use the search
functionality.
Keeping Your Documents Organized Using Tags
Now
that you’ve scanned a few documents into Evernote, it’s time to keep
your documents organized for quick and easy searching. One way to do
this is by using tags. To tag a document, click into its respective Note
and look towards the top of said Note. You will see a button labeled
“click to add tags”. Click on this button. Adding tags to a Note. You can now begin typing tags. If you’re tagging a document with multiple different tags, tap the return key on your keyboard after each tag to make it a separate tag. Searching using Tags in Evernote.
Now
that you have tagged your documents, there are a couple of ways to
search for a document using tags. The first way is within the search bar
in Evernote for Mac or PC. Simply type in the name of the tag you’d
like to search for, and from the drop-down menu, click on your tag under the “tag” section of the search box. You can now search for documents within your tag. Viewing a list of created Evernote tags. Additionally, you can click on the “Tags”
button on the left-hand side of the Evernote app on your Mac or PC to
view all tags that you’ve added to Evernote. To view all notes within
one of these tags, click on the tag you’d like to view and look towards
the upper right-hand corner of the screen. You’ll see a button labeled “Show X Notes”. Click on this button to view all Notes tagged with said tag.
Enjoy Your New Paperless Lifestyle!
And
that’s it! You can now recycle your paper document, and enjoy knowing
that your important documents are stored on your computer, backed up on
the cloud, and available on all of your devices with Evernote installed.
Evernote's
a powerful notes app, with tons of powerful features to help you add
info and quickly find it wherever you are. Whether you're just starting
with Evernote, or are already an Evernote pro, be sure to check out our
other tutorials about Evernote to get the most out of it:
Medical Disclaimer
The information on this site is not intended or implied to be a substitute for professional medical advice, diagnosis or treatment. All content, including text, graphics, images and information, contained on or available through this web site is for general information purposes only. Krobknea makes no representation and assumes no responsibility for the accuracy of information contained on or available through this web site, and such information is subject to change without notice. You are encouraged to confirm any information obtained from or through this web site with other sources, and review all information regarding any medical condition or treatment with your physician. NEVER DISREGARD PROFESSIONAL MEDICAL ADVICE OR DELAY SEEKING MEDICAL TREATMENT BECAUSE OF SOMETHING YOU HAVE READ ON OR ACCESSED THROUGH THIS WEB SITE.


 Searching using Tags in Evernote.


