Understanding and Working with The WordPress Options Table


In the earlier parts of this series, we looked at the tables in the WordPress database and the relationships between them.
In this part I'll cover a table which is different from the others - the wp_options table. As you can see from the diagram below, this is the only table which sits on its own:
The options table stores a different kind of data from the other tables: instead of storing data about your site's content, it stores data about the site itself. Data is written to the options table using the Options API or the Settings API, both of which consist of a set of functions used to add, update and delete data from this table.
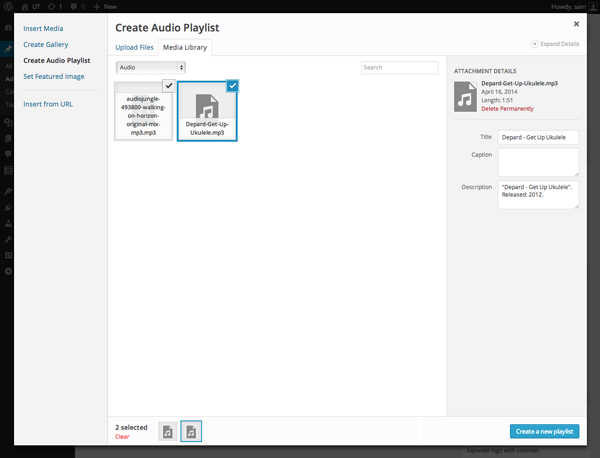
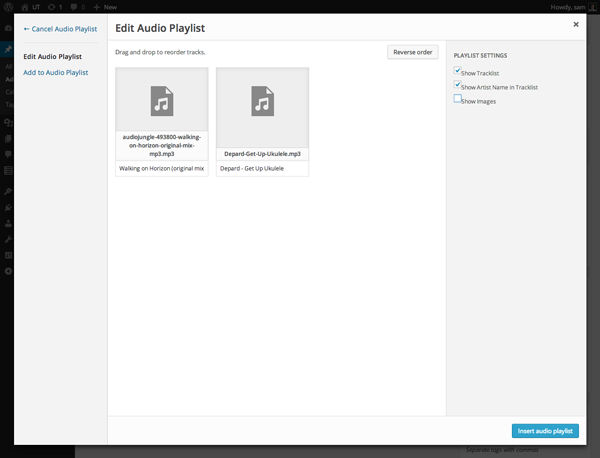
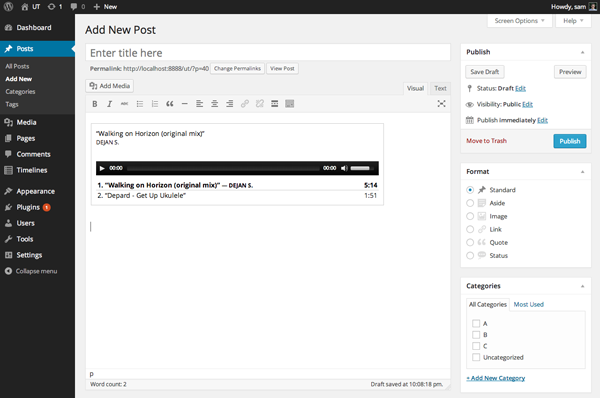
You can add values to existing options and you can also add new records to the table when you want to create new options.
 In this tutorial I'll look at different aspects of the options table and how you interact with it:
  • Access to the wp_options table
  • Structure of the wp_options table
  • Populating the wp_options table
  • The Options API
  • The Settings API
I will just give an overview of the APIs and how they interact with the options table - if you want to learn more, read Tom McFarlin's series on the Settings API.
As the wp_options table stores data which is related to the setup and administration of the site as a whole, access to it is restricted. To be able to amend settings and options, users will need to have the manage_options capability. The only default user role with this capability is the administrator role (and in Multisite, the network administrator role).
This means that if you need to add options that other user roles have access to, you'll have to assign the manage_options capability to them. This carries risks, so only do it if you're sure!
The options table has a similar structure to the three metadata tables. It has four fields:
  • option_ID
  • option_name
  • option_value
  • autoload - specifies whether the option is automatically loaded on each page load - defaults to yes in a single site installation and no in Multisite.
Each record in the option_name field will be a unique value: if you add more than one value to an option, WordPress stores this in an array in the option_value field. A good example of this is the active_plugins option, which stores an array of plugins activated on your site.
When adding, editing or deleting data in the wp_options table, you must always specify the option_name, as I'll show later in this tutorial.
The wp_options table is populated from one of three sources:
  • the default Settings screens
  • theme options screens
  • settings and options screens which you add via plugins
There are a number of options built in to WordPress - you can see all of these in the Option Reference. But you can also create your own.
To create new options in your theme or plugin, you would use the Options API or the Settings API. I'll cover these in more detail below.
The Options API consists of eight functions which allow you to add, get, update or delete options:
FunctionParametersNotes
add_option()$option$value$deprecated$autoloadOnly $option is required. If there's an existing record with your $option parameter as the value of its option_name field, WordPress will add your $value to an array in the option_value field for that record, otherwise it will create a new record.
delete_option()$optionDeletes all fields for that option
get_option()$option$default$default (optional) is the default value to return if no value is stored against the option in the database.
update_option()$option$new_value$new_value is the value which will populate the option_value field
add_site_option()$option$valueSimilar to add_site_option() but adds the option network-wide in Multisite (meaning that the option is stored in the wp_options table and not the wp_XX_options table where XX is the site ID). $autoload is not included as site options do not autoload in Multisite and this cannot be overridden.
delete_site_option()$optionThe same as delete_option() but works network-wide in Multisite.
get_site_option()$option$default , $use_cacheSimilar to get_option() but retrieves the network-wide option in Multisite.
update_site_option()$option$valueIdentical to update_option() but works network-wide in Multisite.
Note that when creating options, either via the Options API or the Settings API, you can create records with no value in the option_value field. This allows site administrators to populate that field at a later time.
As well as the Options API, you can also use the Settings API to interact with data in the wp_options table. The Settings API lets you create settings which site administrators can use to add or update data in the options table - it adds a user interface to your options.
The Settings API has more to it than the Options API so I won't cover it in detail here, but essentially it has three elements:
  • the setting (the data in the wp_options table)
  • the field (which is used to add and edit data)
  • the settings section, which is a group of related fields.
The two functions in the Settings API which interact directly with the wp_options table are as follows:
FunctionParametersNotes
register_setting()$option_group$option_name$sanitize_callbackThe $option_name parameter refers to the option_name field in the wp_options table; the other parameters interact with other functions in the Settings API
unregister_setting()$option_group$option_name$sanitize_callbackDeregisters settings from the wp_options table - normally used with deactivation hooks for themes or plugins.
These functions don't add values to the options in the wp_options table, but they create settings which can than have values added to them via other functions in the Settings API.
The wp_options table is unique among WordPress database tables in that it doesn't share a relationship with any of the other tables. This is because it stores data about the site or network, and not the content. To interact with the options table, you can use the functions in the Options API or the Settings API, and you can also make use of functions which add data network-wide in a Multisite insulation.
In the final part of this series I'll look at Multisite, as it uses some additional database tables which have not been covered so far in this series, and also creates multiple instances of each of the core tables, one for each site.

Getting Better Support By Avoiding The XY Problem


One of the many things that makes being a part of the WordPress world so wonderful is how incredibly supportive everyone in it is. The answer to pretty much any issue you have is out there, if you know where to look and how to ask. The second part of that, knowing how to ask for help with an issue can be very tricky.
A key component of asking for help the right way is to avoid the XY problem. The XY problem, which I defined in greater detail in my previous article in this series, is what happens when we have problem X, and we try and solve it with solution Y, which fails, and then ask we ask for help with solution Y, instead of our actual problem X.
The XY problem can be a real impediment to getting good support because it can limit both the range of responses you get to your question, and also add more time to the process. Instead of getting a response, you're likely to get more questions, adding to the time until your issue is resolved.
More importantly, when you fall victim to the XY problem, you focus shifts from your actual goal to fixing a solution to a problem, that might have become more of a problem than the original problem.
Often times new WordPress users ask questions as if they only relate to the theme or plugin they are using. For example, "How to change which posts are shown on the front page with X theme". Unless there is a specific theme option that you are concerned with and, this is a question that can probably be answered by someone who has never used the theme you are using.
When you change what theme, or plugin, or hosting provider, etc. you are using from being the focus of the question to an additional piece of context you gain two important things:
  1. First, there are more people to answer your question,
  2. Second, which is more important, is you may find out that the plugin, theme, hosting provider, etc. isn't the right solution for your problem.
Sometimes the XY problem manifests itself by being way to specific, without context. For example if you ask "How to insert post terms with WPDB class?" Someone may give you a literal answer to how to do that.
But, without knowing why you are inserting post terms this way and what your overall goals are, they can't evaluate if this was a good idea or not, which it probably wasn't. It might be the right solution, and if so you, would know why it generally isn't, and in that case you have wasted their time.
I know in the last section I said not to start with your proposed solution, but showing what you tried is important. It might be that your strategy was right, and you made some error. Without knowing the context of the problem, no one can know if this is the right solution or not.
That doesn't mean you shouldn't explain what you've tried, with code examples if possible. It may be that you are close and someone can show you your error. When you show your proposed solution as a possible solution you make troubleshooting easier, if it is accompanied by your actual goal.
When you don't share your goals, the only thing the person who has decided to help you, out of the kindness of their heart or because it's their job can help you with is your proposed solution. Really they only have two options: ask you for more information or give you a literal answer.
The former, asking for more information, is frustrating because you want an answer, not questions. Also it adds time to the process, each cycle of back and forth can add hours or days. While asking for more information is an important step for support providers to avoid giving bad answers due to the XY problem, when you need to solve a problem fast and the more information you provide upfront, the less likely you will need to provide information before getting an answer.
Getting a literal answer to  a question that suffers from the XY problem could be the worst outcome. Someone telling you how to execute your proposed solution may be great, unless it wasn't the right solution or even the best solution. Then you are left with advice that is technically correct, but may not actually solve your problem or may be a terribly inefficient way to solve it.
When you ask for support, the assumption is that the person answering your question knows more about what you are asking than you do. When you state clearly, what you are trying to do, why you were trying to do it, what went wrong and what you tried to fix it, and do that with an open mind, you are likely to learn something new. What you learn might be something different than what you expected to find out, but those types of lessons can be the most valuable lessons.
When you only ask about your solution, you miss an opportunity to find out from this more experienced WordPress user how they would have solved it. If you want to stop solving small problem after small problem that requires learning something and grow your skills. Yes, learning new skills just leads to newer and better problems, but at least know you'll be better at getting help with them.

Welcome To WordPress 3.9: What's New & How Does It Work?

by

The latest version of WordPress, given the nickname "Smith" and the version number of 3.9, brings a bunch of great new features to the board.
In this tutorial, you'll learn about what's new and how all the new features work.
If you're an existing WordPress user, you can upgrade your site through the WordPress dashboard. It's always highly recommended that you backup your full site beforehand as mistakes do happen.
There are seven main new features:
  1. Improved Visual Editing
  2. Easier Image Editing
  3. Drag & Drop Image Capabilities
  4. Gallery Previews
  5. Media Playlists
  6. Live Widget and Header Previews
  7. New Theme Browser
With that said, let's take a look at each of these in detail!

Improved Visual Editing

The visual editor is now better than ever, with improved speed, accessibility, and support for mobile devices. Pasting in content from your word processor will no longer suffer from styling issues, and posts are now even easier to edit and publish.
So, how can you take full advantage of this feature?

Step 1

Open up your favorite word processor, and select the text you want to publish.

Step 2

Paste it into the improved WordPress post editor.
It's as simple as that - pasting from your writing software is now super simple and extremely efficient.

Easier Image Editing

WordPress 3.9 offers a much faster way of editing your images, including rotation, flipping, cropping and resizing tools. This can be done within the post editor, and is yet again, extremely fast and easy to use.
Let's add, flip, crop and resize an image.

Step 1

Adding an image into a WordPress post is the same as it always has been: Click the "Add Media" button in the top left corner of the post editor, select the image, and click the "Insert Into Post" button.

Step 2

To resize the image within the post, simply drag the corners. Easy, isn't it?

Step 3

Once the resized image is in the post, hover over it and select the edit icon, which looks like a pencil. This will display the following window:
Now, click the "Edit Original" button.

Step 4

You'll now be presented with the "Edit Image" screen. Here you can rotate, flip, crop, and scale the image.
We're going to flip the image, which can be easily achieved by clicking the corresponding icon from the menu bar above the image.

Step 5

To crop the image, you can simply begin dragging a rectangle on top of the image, and the cropping box will appear. When you've adjusted this to your liking, save your changes.

Step 6

When you've returned back to the "Image Details" screen, click the "Update" button to replace the old image with our newly edited image.

Step 7

That's it - you'll now see your new image within the post editor.
I'm sure you'll agree that the new editing features within WordPress 3.9 are really useful, and are definitely going to be a big hit with both new and legacy users.

Drag & Drop Image Capabilities

As more of a simple productivity feature, the ability to drag and drop images directly into a post will be quite useful, especially for image heavy posts.

Step 1

Importing an image using the drag-and-drop method is really simple. Open up your file manager (for example, this is Finder on Mac OS X or Windows Explorer on Windows) and select - but don't open - the file you want to upload.

Step 2

Drag the selected file onto the post editor until the blue "Drop files to upload" message appears.

Step 3

Once this message appears, drop the file - that is, release the mouse - and wait for the file to upload.
Yet again, another incredibly simple feature that will save a lot of time for both casual and frequent bloggers.

Gallery Previews

In the past, when adding a gallery to a WordPress post, a generic placeholder was used to show where the gallery was. In WordPress 3.9, you can now preview the gallery right within the post editor.

Step 1

To add a new gallery, click the "Add Media" button above the main post content box. The "Insert Media" window will appear.

Step 2

Select the "Create Gallery" tab on the left of the new popup window and select the images you want to include - simply click on each image.

Step 3

When you've done that, click the "Create a new gallery" button, and then amend your gallery's settings.

Step 4

Finally, click the "Insert gallery" button.

Step 5

You should now see a preview of your new gallery within the post editor as illustrated in the following image:
In my opinion, some work could be done on the appearance of the gallery previews, but it's definitely a promising start!

Media Playlists for Audio & Video

WordPress 3.9 allows you to create audio and video playlists in order to show off your work or some of your favorite media. In this quick demo, we'll be creating an audio playlist; however, note that the steps are the same for creating a video playlist.

Step 1

Click the "Add Media" button above the post editor and upload your audio files.

Step 2

Next, click the "Create Audio Playlist" tab on the left of the "Insert Media" window. Make sure all the audio files you want to include are selected, rearrange them, and click the "Create a new playlist" button.

Step 3

Confirm the playlist's settings and amend them if necessary.

Step 4

Finally, click the "Insert audio playlist" and you're good to go!
Another really useful feature for WordPress 3.9 - with a little bit of styling and extra customization, these players can be customized even further.

Live Widget and Header Previews

This is quite possibly the most useful feature in WordPress 3.9 as it allows you to manage your widget areas and header images in real time as well as preview them before you push the save button.
Again, it's really simple to get going with this feature. Let's take a look at the Live Widget Previews.

Step 1

From the frontend of your site, over over your site's name in the admin bar and select "Customize".

Step 2

You'll see a bunch of different options, including the new options for the widget areas. Selecting a widget area will allow you to reorder and update the settings straight away.

Step 3

Click the "Add a Widget" button and you'll see a vertical menu appear.

Step 4

Choose the widget you'd like to add, update its settings, and you're done.
An awesome feature, and another reason for theme developers to begin using the Theme Customizer.

New Theme Browser

The final new feature in WordPress 3.9 is the new Theme Browser, which offers a totally new experience for choosing, previewing, and activating new WordPress themes.

Step 1

Open the "Manage Themes" page by hovering over the "Appearance" menu and selecting "Themes".

Step 2

Click the "Add New Theme" button to launch the new Theme Browser.

Step 3

You're now looking at the redesign for the Theme Browser - you can filter and search for themes using the tools available towards the top of the page.
Advertisement

Step 4

Select a theme to learn more and to have the option to install it.
This is a great feature for those who don't want to buy premium themes, and just want to browse the free themes directory for use or for inspiration.

In Summary

You've just learned about all seven of the great new features in WordPress 3.9. Like I mentioned at the beginning, you can upgrade your WordPress installation to the newest version through your WordPress dashboard. This usually takes less than one minute to complete, but may be longer depending on your host.
I hope you've enjoyed this rundown of the new features - if you've got any questions, please leave a comment and I'll be sure to help you out.

The Beginner's Guide to Selecting a WordPress Theme

by

When you're first starting out with your site or blog, it's easy to rush into things because of the desire to get things up and running as quickly as possible. In some cases, that works fine, in others it's not always the best idea.
And in this case, it's the latter.
If you download from the wrong provider, you could end up with malware on your computer, or security holes in your website, and if you choose the wrong theme, you can end up with many unnecessary headaches down the road.
Today, we'll cover what themes you should avoid as a beginner, and how to choose the right one for your website.

Free Themes You Happen to Stumble Upon

Not too long ago doing a Google search for "free WordPress themes" was a bad idea. In 2011, a post on WPMU that has since been updated to this post made a big splash in WordPress circles when it came out, because it proved the shadiness of many of the top results on Google for "free WordPress themes".
Specifically, they covered and proved the case that if you were to download a free WordPress theme, you were placing yourself at risk for downloading spyware or, worse, a theme with malicious code that would allow for others to access the backend of your site.
These days, you're more likely to get trusted sources as your first results, but indirectly you still might stumble onto an dangerous site because many of the results are lists of themes on third party websites. Also, going through the results myself, I can't help but notice the amount of outdated themes that show up in the list articles on the first page.
With many lists including themes that haven't been updated in years that probably lack complete compatibility with the latest version of WordPress. And that brings us to our next point.

Dated Themes

One of the first things you want to do when you're considering a theme is to check when it was last updated. If it hasn't been updated in a long time, let's say three-to-six months or longer, picking another theme would be a good idea. If it's been years since it's been updated, you definitely want to avoid the theme.
The date since a theme has been updated can serve as a warning sign that it may not be compatible with the latest version of WordPress. Though that's bad enough in itself, it also means that there is almost a zero percent chance of any issues that you have with the theme getting fixed. While some of these themes look great, and the lack of updates seems like a small price to pay, the lack of compatibility can not only limit your options when it comes to plugins, but also mess up the functionality of the site itself.

Suboptimal Niche-Specific Themes

Sometimes you'll come across a theme that looks absolutely amazing, and even though it's not quite what you were looking for in terms of functionality, and site focus, it can be really hard to pass up the good looks. This is true, especially if the theme is free.
But keep in mind that if you choose a niche-specific theme that seems to hint that the focus of your site is one thing, for example a great looking photography theme that showcases the photos but also has some text options, you might be sending the wrong message to your visitors if your site is all about written content.
Another example is if you're starting an environmental blog, and you end up choosing a great looking corporate theme, you're sending mixed signals to your visitors, and that could cause you to miss out on key parts of the audience you're trying to reach.

Skeleton Frameworks and Base Themes

If you're a complete beginner, it is a good idea to stay away from skeleton-like frameworks that require a lot of work to look good. Of course, this  unless you're prepared to put in the effort, and have the time available to get familiar with a particular framework and learn to bend it to your will.
For example:
If you want the functionality of a proper framework later on, then a great option can be to choose a child theme that aligns with the vision you have for your website. That way you get the functionality and the strengths of a framework without having to do too a lot of design and development yourself.
Another thing to consider is that when you're first starting out, unless you are an experienced web developer or designer, it's not always a good idea to give yourself a lot of options. It can become a very significant distraction and even an excuse to not do what's really important: To develop content and get it out there for the world to see.
This is not to say that that design doesn't matter, after all, a large part of Tuts+ is focused on teaching how to do design well, but if that's not your forté, your time is most likely better spent doing something other than editing your font colors multiple times a day. There's something almost reassuring by having something set in stone, allowing you to focus on doing what you do best.

How to Pick the Right Theme

Now that we've covered how to avoid themes that could damage your brand (and/or your hosting environment!), it's time we deal with how to find the perfect theme for your specific needs.

Use a Trusted Provider

To get the obvious out of the way, there is WordPress.org's theme directory. The directory is great because all relevant information is listed right on the page, and all of the themes in the database have their code reviewed by a team of volunteers before it's accepted and released. The downsides include the sheer volume of themes available, the occasional inaccurate categorization, and the relative unoriginality of many themes available there compared to themes developed for commercial purposes. There are definitely some gems to be found, and if you're willing to do some leg work, it's likely that a good match is out there waiting for you.
Remember to check the date it was last updated, and whether or not the author responds to support tickets. A truly great free theme will check out not only in the looks department, but it will have a dedicated author that keeps working on it and fixing the issues and concerns its users have.
Other than that, you can find some really nice looking "free premium themes" if you look in the right places. These will typically not be listed in the WordPress theme directory, and therefore you'll have to go straight to the source. It's best to focus on large, established theme providers that develop premium themes and use free themes as a way to generate exposure.
Let's take a look at some of the larger providers that are available.
  1. WooThemes is one of the biggest theme shops, and it also has a few free themes available through its website; however, the majority of the five they offer (and coincidentally the newest) are focused on the integration of their plugin, WooCommerce. Thus, it's aimed more towards people interested in starting an eCommerce store.
  2. WPExplorer offers a variety of high quality themes, one thing to note is that not all the free themes on display are originals works. This isn't indicative of anything negative, it's just worth knowing that the actual product may be hosted on a third-party website. Additionally, and as with most themes, the free themes also rarely enjoy support or regular updating, unlike it's premium counterparts.
  3. Themify is one of the "drag and drop" frameworks, and has a few free responsive themes to offer. Although you can get the themes, you will have to pay if you want support and a PDF that guides you through the process of setting it up and getting the most from it.
  4. If you have decided to use a premium theme, the ThemeForest marketplace offers a huge variety of themes from a multitude of independent developers, and can be a great place to start.

Consider Your Primary Focus

What do you want to do with your website? Build an audience? Promote your services? Have an online portfolio?
If your goal is to sell something or build a business, you should consider a premium theme that offers support to its customers. The reason for this is quite simple: If one day a technical issue is preventing you from customer acquisition, you won't be completely on your own. Plus a professional and original looking website provides an air of trustworthiness that having the same free theme as half the blogosphere simply does not have
If you want to spread a message, or put yourself out there, your main objective should be to find a theme that emphasizes content over anything else.

Consider Your Audience

Who are they? What is their main concern that you are trying to address with your website?  What are their other interests? If you're trying to build an audience of people interested in simplicity, it makes sense to have a very simplistic theme. If your audience is mainly writers, it makes sense to have a strong focus on the written content. If your audience is mainly photographers or those who want your photographic services, then it makes sense to have a strong focus on the visual content.
If you're feeling stuck or lost, there's a cheat code for getting an idea of what work in your space: Look at the top competitors for inspiration.
What are the favorite websites and blogs of your target audience? While trying to completely emulate them is a bad idea, you can get some important pointers for what kind of theme you should pick for your website.
Advertisement

Safety First

If you find an amazing theme through a list that leads you to a third party website, or even if you get your theme from a trusted provider, you'll want to check the integrity of the code of the theme. And thanks to a plethora of free plugins, this is a task that no longer requires you to have any coding knowledge or experience.
Plugins you can use include:
  • Sucuri is easily the most popular security related plugin for WordPress, and while it has premium options, the free version checks the integrity of your theme. So this will discover both intentional, and unintentional weaknesses in the code of the theme itself. Coincidentally it also does a range of other things, like check for blacklists and other kinks in the armor of your website or blog. After you've installed the plugin, it will appear as a menu item in the dashboard menu with the name "Sucuri Free".
  • Theme Authenticity Checker is specifically designed to seek out weaknesses, or suspicious lines of code in your themes. TAC shows you what the lines are and where they are located. It will also detect static links (typically a link back to the developer's website) which is nothing to worry about especially since the use of the theme for free might be predicated on the fact that the link remains, although you will have to check the TOS of the specific provider to determine whether or not that is the case. After you install and activate the plugin, you can find it in the Appearance menu labeled as TAC.

Conclusion

While it might seem counter-intuitive to spend a lot of time picking a theme up front, having the right one in place from the start can make a significant difference for your project and save you a lot of time in the long term.
And while going with a premium theme is a good idea if you're building a professional portfolio, or a website for your business, there are plenty of great free options out there to help you get started if you take the time to look properly.
Lastly, while fiddling around with a theme is not for everyone, if you have the time and interest, and your chosen theme permits you to do so, by all means. In fact, Tuts+ is a great place to learn how to do exactly that.


Copyright @ 2013 Krobknea.

Designed by Next Learn | My partner