Such Tutorial, Many Fun: How to Draw Doge!

by
Final product image
What You'll Be Creating
In this tutorial we're going to break the most popular shiba inu down to create a realistic rendering of doge. Whether you like this meme or not, try this tutorial for some educational fun!

1. Define the Head Proportions

Step 1

Start with a circle. And when I say "a circle", I don't mean a perfect shape drawn with calipers (having problems with drawing a circle?). Draw it very lightly—it's just a guide line and we're not going to need it after it's used.

Step 2

Draw a cross inside the circle. Again, do it softly and don't worry about using a ruler.

Step 3

"Rotate" the cross as shown below.

Step 4

Draw another circle, using the cross lines as your guide.

Step 5

Inside the circle you've just drawn, add two identical, overlapping circles.

Step 6

Add a third circle, as shown in the image below. The third circle should be the same size as the two smaller circles, and intersect them both evenly.

Step 7

The base for the snout is done! You can now press your pencil harder and draw the outlines.

Step 8

Add the nose.

Step 9

The nose and mouth are sketched out, so let's start the forehead now. We need to return to sketching very lightly, so that you can remove these lines later. Draw a big circle on the mouth, as if doge tried to balance a ball.

Step 10

Divide the circle into four parts, as shown in the image below.

Step 11

Divide the lower half into two halves.

Step 12

We need to connect the forehead with the snout now.

Step 13

Add some more structured lines.

Step 14

Now we have enough guide lines to place the eyes.

Step 15

Sketch the eyes, but don't darken them yet. We'll add details to them later.

Step 16

Draw panda patches around the eyes.

Step 17

Let's outline the head now.

Step 18

Add pointed ears to doge's head.

Step 19

Add some finishing touches to the shape of doge's face.

Step 20

The sketch is done! If you want, you can stop here and use a thick marker to stress the defined outlines, for a finished sketch. But if you go further, I can show you how to draw a realistic doge!

2. Add the Details

Step 1: Eyes

Eyes of doge should be dark and shiny at the same time, with eyelids that have dark e. Leave a bit of white space for a staring look.

Step 2: Nose

If you want to learn some more about drawing a dog's nose, why not try my "How to Draw Dogs and Wolves" tutorial.

Step 3: Mouth

Doge has black lips, cute thin whiskers and a dark and slightly open mouth.

Step 4: Ears

Add a lot of fluffy fur inside the ear!

Step 5: Shading

Simple, short lines are good to simulate fur. Draw them thickly where you want to add shade.

3. Draw the Body

Step 1

We can now add the rest of the body. Doge looks quite stocky in this perspective, so it's going to be easy to build his body out of simple shapes.
First, attach a big circle to the head. This will be the neck.

Step 2

We need to find out where the paws are going to lay. Draw a simple triangle starting in the center of the circle you drew in the previous step.

Step 3

Let's build the legs out of a few circles.

Step 4

You can now outline the basic shape of the body.

Step 5

Add the paws. Want to know why they look like this?

Step 6

Outline the paws.

Step 7

Doge paws are quite a complicated structure. We need to define "claw covers", for example.

Step 8

Here come the claws!

Step 9

Draw the rest of the body. Don't stress it too much, it's the least important part of the picture.

Step 10

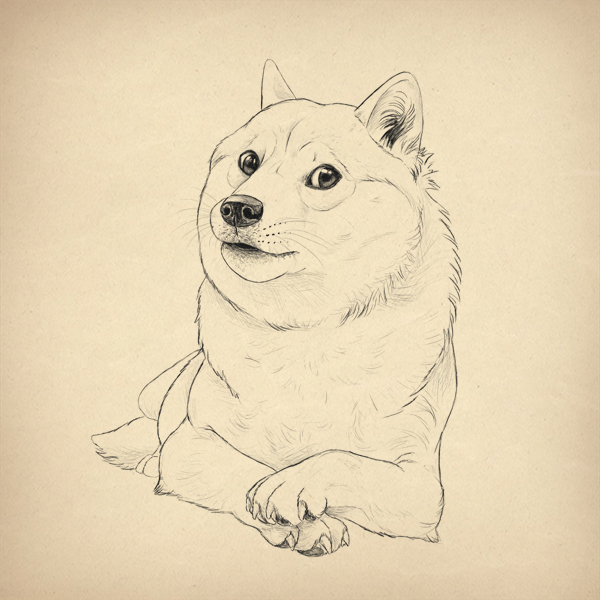
The body is fully sketched now. Just a few more steps for a finished doge!

4. Final Touches

Step 1

Use short, fast lines to draw tiny hairs at the fingers of the paws. Also, draw dark pads under the claws.

Step 2

Define the outlines of the legs with short, messy lines.

Step 3

Shade the legs with simple lines.

Step 4

Time for some final shading!

Step 5

You can stress some of the outlines to make them stand out more.
Advertisement

Step 6

Use an eraser to carefully clean up the picture. Even if you were drawing digitally, it's good to keep some of the guide lines for a natural, sketchy effect.

Wow! Such Drawing, Very Done

I hope you had a good time following this tutorial. You can now draw doge for your friends or during boring lessons!

Make Easy Easter Eggs With Mini Party Hats For No-Dye Fun

by
Final product image
What You'll Be Creating
I love hats but never seem to find the right occasion to wear them. Except on Easter. Growing up, it was a family tradition to buy a new dress and hat each spring to wear proudly on Easter. Now I get to instill the love of Easter finery in my own children. So while we're shopping for new bonnets, we'll also be dressing up Easter eggs in their own personalized party hats.

Supplies

  • Eggs
  • Small cupcake liners in assorted colors
  • Construction paper
  • Scissors
  • Tape
  • Black marker

1. Make a Cone

Step 1

Use a cup to trace a semi-circle on construction paper. Use the edge of the paper to create your semi-circle.

Step 2

Cut out the shape.

Step 3

Twist it into a cone shape and secure with tape.

2. Add Cupcake Liners

Step 1

Cut out the rim of a mini cupcake liner.

Step 2

Attach it to the inside of the cone and secure with tape.

3. Decorate Hats

Now that you know how to make the basic party hat for an egg, you can go wild with variations! Add stripes, polka dots or even a feather. Bonus points for making the entire hat with layers of different cupcake liners.
Advertisement

4. Draw Faces

Use a black marker to give your eggs a face to match their hat.

Set the Table with Party Hat Eggs

This tutorial is a simple, fun way to decorate Easter eggs - without the mess of dyes! Kids (and parents too) can personalize eggs using materials they already have on hand. Who wouldn't want a mohawk egg?
Party hat eggs make a perfect place setting - and not just for the kids table!
Are you a hat lover too? Let us know your favorite way to make your own party hats!

Trim the Bloat: An Introduction to Keeping WordPress Healthy

by
As site owners or developers, we have a responsibility. Specifically, we're responsible to make sure that our site is usable for our visitors and that our content can be easily consumed. To do this, we rely on an array of plugins and themes that come packed with every option the creator could think of and then some more.
We can do better. We should do better.
Over the past couple of years, it has become much easier to create and deploy themes and plugins for WordPress. The system itself has grown as well, offering more features out of the box and providing hooks and APIs for themes and plugins to expand further on that. But we just keep adding and adding until our sites are bloated and cumbersome to adjust and our sites are starting to suffocate from it.
This series will aim to help you prevent that bloat in the first place, or, at the very least, will cut away some of the bloat that you already have.

The Path to Bloat

The web has been redefined since its conception. It’s size has grown beyond measure and the way we utilize it has changed along with it. We've gone from simple websites to full blown applications, and it's no longer good enough to just have a website. It needs to have at least the same features as the competition and look just as good, if not better.
This wasn't always so. Once the Internet became publicly available, we started with simple websites: An HTML file along with some table elements to keep our text and images in place, maybe a moving GIF somewhere, and if you were feeling particularly adventurous you'd have marquee text scrolling across the site.
Websites were built for the simple goal to get information to the reader. Often times, it was enough to have a website even if it wasn’t particularly appealing.
Fast forward a few years to 2003. News sites and blogs were beginning to appear. Dynamic content had become the default, and the web was already starting to begin being redefined into what we know it to be today. 2003 is also the year the first version of WordPress became available.
More importantly: Compared to the early days already much more data was being transferred. We were still cautious about the amount of bandwidth people had available but it was a far cry from when we started out.
If we move ahead a few years once again, now to 2011, websites are averaging in at 0.7MB which is already incredibly large, but we haven't been doing any better since. In 2014, we hit the 1.68MB mark for average website size. That's an increase of 235% in just three years! Have we stopped caring about how we're offering up our content?
A lot of our users are mobile users and broadband is not a given everywhere on the world, so shouldn't we care more about what we're trying to force down to our readers?
I think so and I hope you do, as well.

What Can We Do

If you're working with WordPress specifically, there are a lot of things we can do. Mainly we need to start spending more time thinking about what we're doing instead of just slapping features and elements onto our websites.
If we write better and cleaner, we'll often need less code. The end result will be a lighter site, and it doesn't have to be any less visually appealing or functional than we're used to either.
We have to be smarter about it.

What to Expect

Throughout this series, I'll help you make the right choices with regard to your themes, plugins and optimizations as well as help you get started with planning out your website. We'll be looking at some basic steps to trim down the bloat from your existing site, and I'll help you avoid it getting to that point.
There will be a lot of examples and references to dig into that will help you apply the information in this series to your own website, I’ll be using some of the excellent series already available on the Tuts+ Network to refer to when you need to get hands on example.
Starting with the next article, we'll be looking at what we can do to ensure we're making the right choices.


Copyright @ 2013 Krobknea.

Designed by Next Learn | My partner