Design a Hipster Barbershop Facebook Cover in CorelDRAW

Sponsored Content
This sponsored post features a product relevant to our readers while meeting our editorial guidelines for being objective and educational.

Final product image
What You'll Be Creating

Get your 30-day free trial now! You will be downloading a 30-day, fully functional trial version of CorelDRAW Graphics Suite X7. This trial is available in both 32-bit and 64-bit versions. The 64-bit version has been optimized for those with 64-bit versions of Microsoft Windows 8/8.1 or Windows 7.
In this tutorial we’ll be creating a retro-style banner for a hipster barbershop in CorelDRAW® X7. We will learn how to use various tools for creating curves and segments and drawing hair, rendering a stylish bushy beard. Then we’ll continue by designing a banner and find out how to turn it into a trendy Facebook cover image. Let’s get started!
We’ll start by forming some basic idea of our future banner. Since it is going to be a Facebook cover, let’s make it simple and minimalistic in order not to overload our banner with details, which can distract the viewer from the main element of the composition. Here is a very rough sketch of what we are going to design. We've left some blank space in the bottom, as it will be partially covered by Facebook interface elements, such as the profile picture in the bottom left corner and info/message buttons in the lower left part. 

Facebook cover sketch

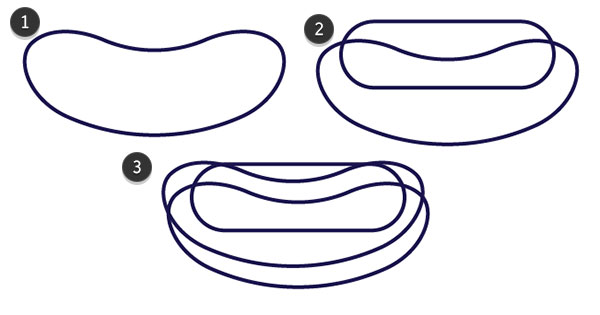
Select the Pen tool from the Tools panel and start forming the basic glasses shape. Click and release the mouse button to make a sharp corner and click and drag until you see the control handles to make a smooth curve.

make the glasses rim with pen tool 1

Continue adding nodes and then return to the starting node, making a closed path. Use the Shape tool (F10) if needed to edit the curves by changing the position of the nodes and control handles.

make the glasses rim with pen tool 2

Now that we have the base of the rim, let’s form the lens itself. Start by taking theRectangle tool (F6) and placing a square inside the glasses rim. Make the corners slightly rounded and then Convert the rectangle to Curves (Control-Q). Finally, use the Shape tool (F10) again to modify the shape, fitting it into the rim.

form the lens base from rectangle with rounded corners

Select both created shapes and use the Trim Shaping function to cut out a hole in the rim. Leave the original lens shape on top of the rim.

use Trim Shaping function to cut out a hole in the rim

Fill the lens shape with light blue and use the Transparency tool with Uniform transparency fill, lowering the opacity of the lens by 50%. Add a tiny decorative element on the left part of the rim by forming an ellipse with the Ellipse tool (F7)and Converting it to Curves (Control-Q). Make its corners sharp by moving the control handles with the Shape tool (F10).

apply transparency to the lens and add decorative elements

Add a narrow curved shape of white color on top of the rim and make it semi-transparent, forming a highlight on the slick plastic surface of the glasses.

add highlight to the rim

Copy and Paste the rim shape twice (Control-C > Control-V > Control-V) and drag the upper copy up and to the right a bit. Select the two copies and use the Back minus front function to cut off the unneeded parts. Fill the newly created outlines with dark-red color, making the rim more vivid and three-dimensional. Group (Control-G) all the created parts of the glasses, make a copy and create the second half of the glasses by Mirroring it horizontally. 

add bright outline to the rim and form the glasses

Let’s make the lenses more realistic by adding some highlights. Create a set of narrow rectangles, fill them with white color and lower the opacity using theTransparency tool. Move on and Weld the shapes, turning them into a single curve. Place the highlights above the lenses, rotating them diagonally.

make highlights with rectangles

Select both the lens and the highlight above it and use the Intersect function to cut off the unneeded parts outside the rim of the glasses. Make both highlights fit the lenses, creating a nice glossy effect.

use Intersect function to form the highlights

Firstly, we’ll try out another curve-building tool: the Bezier tool. It may seem a little tricky at first, but here are some tips on using the Bezier tool for drawing complex shapes. Let’s start by making several basic moves to get used to it. Hold down theShift key to make a straight line and then click and release to create a zigzag.

make zigzag lines with Bezier tool

Now try to click, hold the mouse button and drag, until you see the control handles which help you to make a smooth symmetrical curve.

make a smooth symmetrical curve

If you wish to make a curved line from one side and a sharp corner from the other, click and drag and then press the C key, turning it into a Cusp node (or corner) to move the control handles separately. Rotate the control handle and then continue drawing a line, thus making a sharp corner.

create a corner with bezier tool

Finally, in order to make a smooth curve with uneven length of control handles, click on the ending node and press the S key, lengthening the control handle.

make a smooth curve with bezier tool

Enough theory, let’s try this out in practice and style the hipster mustache! Use the initial sketch to trace the left half of the mustache, using the Bezier tool. Edit the shape with the help of the Shape tool (F10), making the curves more smooth and flowing.

make the mustache with bezier tool

Now we need to draw out the hair, adding more details. Fill the created shape with dark-brown color, grab the Freehand tool (F5) and draw a zigzagged shape for the overtone. The Freehand tool (F5) speeds up the drawing process and gives you more freedom, although you can still use the Bezier tool if it makes you feel more comfortable with forming the complex shapes. 
Select all the nodes of the created shape with the Shape tool (F10) and click theClose curve icon to make a closed path. Select all the nodes by double clicking the shape too and then make all the corners sharp with the Cusp nodes function. Now you can rotate and reposition the control handles of each node separately in order to make the shape smoother and to get rid of the loops and bumps. Hold down theControl key and click on white in the color palette, which will lighten the current color 10% each time you click on the white swatch.

color the mustache and add chaps with freehand tool 1

Create another zigzagged shape in the bottom of the mustache and cut it off with theIntersect function, in the same way as we did with the reflections of the glasses. Fill the newly created shape with darker brown color, making a subtle shadow.

make a shadow in the bottom part of the mustache

Continue adding hair shapes, alternating the colors. Place the lighter-brown parts on top of the mustache.

Continue adding hair shapes

Add the darker hair in the bottom area, increasing the shadow.

Add the darker hair in the bottom area

When you find the mustache detailed enough, make a copy and flip it horizontally to the other side.

make a copy of the mustache and flip it horizontally

Let’s trace the beard, using the initial sketch and making smooth lines with theBezier tool.

trace the beard

Make more twists and curls to add dynamics to the image. Use the Shape tool (F10) and double-click on the path, creating additional nodes, making the beard silhouette more detailed.

add more details to the beard base

If the document palette isn’t open, click on Windows > Color Palette > Document Palette. Inside the Document Color palette you’ll find the colors that you earlier used for the mustache. Fill the beard with the same brown color as the mustache basic shape and start forming the zigzagged shapes along the edge of the beard.

color the beard and start adding details

Use the Intersect function to make the shapes fit the beard, cutting off the unwanted parts. Fill them with darker brown color, making the areas shadowed.

use Intersect to form the shadows

Add dark shapes closer to the mouth area and make the beard more three-dimensional by adding larger shadowed areas of lighter brown color.

add more shadows to the beard

Move on and render another layer of zigzagged shapes, partially covering the previous shadow shapes. This time fill the elements with light-brown color, thus forming bright overtones and making the hair shiny and smooth. Add smaller highlights above to make the beard thicker.

add lighter hair to the beard

Finish up with the beard by placing a few tiny dark strokes on top, making the hair more true-to-life.

add final details to the beard

In order to make an attractive banner for Facebook, we need to know its exact dimensions so that we can build up a proper composition. Facebook offers us useful and detailed instructions on setting up the dimensions of our cover image. 
In summary, the cover image is displayed at 851 pixels wide by 315 pixels tall on your page on computers. Here is the image with the exact sizes that Facebook provides to us as an example:

faceboob example cover image dimensions

Let’s use these sizes to make our own cover. Deselect everything and head to the Property Bar, where we can set the page dimensions of our working area. Set thewidth of our document to 851 px and the height to 315 px.
Place the created hipster face almost in the center of the page (move it a bit closer to the right part, as the opposite part of the image will be partially covered by the avatar). Double-clicking on the Rectangle tool (F6) automatically places a background rectangle in the bottom of our Layer, beneath all other objects. Fill the created background with a neutral beige color.

set the page sizes for the cover and create a background

Let’s enliven the cover by adding some text and decorative elements, making it more informative. Arm yourself with the Ellipse tool (F7) and form a long narrow stripe by making the ellipse very thin and squashed. Copy the shape several times and form two pairs of dividers. Add some fancy text, using retro fonts (I’ve used the Diner Regular and SeasideResort fonts from fontsquirrel.com), depicting the main idea of our banner.

add text and dividers

Copy the basic beard shape and place it on top. Let’s add a thick outline by clicking on some color in the color palette with our right mouse button. Then double-click on the Outline Pen icon in the bottom control panel to call out the pop-up options window. Make the outline smooth by setting the Line caps into the middle position and tick the Behind fill box.

add outline to the beard

Convert the created outlined object to Curves (Control-Q) and Weld it with the beard copy, creating a bigger silhouette.

weld the shapes to make a silhouette

Let’s fill up the bottom part of our banner with a pattern. Set the Duplicate distancein the Property Bar to 30 px for the X axis and 0 px for the Y axis. Make a narrow stripe with the Rectangle tool (F6) and Duplicate (Control-D) it several times, forming a striped texture. 

create stripes with duplicate function 1

Change the color of the first stripe to a contrasting one, for example blue (we can change it anytime later), and this time set the Duplicate distance to 15 px for the Xaxis and 0 px for Y axis. Duplicate (Control-D) the blue stripe as many times as needed, so that the pattern is big enough to cover the bottom part of our banner.

create stripes with duplicate function 2

Place the created pattern above the background rectangle and use the Control-Page Down key combination to rearrange the position of the beard outline, placing it right above the stripes, so that the beard is separated from the objects beneath it. Use the Shape tool (F10) to expand the inner part of the beard silhouette, covering the dividers near the glasses.

separate the beard from the background stripes

Let’s play with the colors a bit, making them more subtle and hipster-like, increasing the retro effect of our image. Start by selecting the rim of the glasses and switch its color to pale red by clicking the Fill bucket icon in the bottom control panel to reveal the Edit Fill window.

recolor the glasses to red

Now let's work on the background. Start by opening the Color Styles docker in Window > Dockers > Color Styles. Select the elements you want to recolor (blue and red stripes), drag them to the new docker and drop to the area with the following description: Drag here to add color style & create a harmony, leaving the settings in the pop-up Create Color Styles window as default.

use the Create Color Styles docker to recolor the elements

Select the first group which is represented by the red color and move to theHarmony Editor section, where you can change the color with the help of the color wheel. Just grab the slider inside the wheel and move it to the desired position. Otherwise, you can change the color in the Color Editor menu (in the same Color Styles docker, under the Harmony Editor). Switch our red color to grayish-beige and move on to the next color group. 

use the Create Color Styles docker to recolor the elements 2

Select the blue color (our second group in the Color Styles docker) and change the color to grayish-turquoise using the same simple technique.

use the Create Color Styles docker to recolor the elements 3

Let's edit other colors using the same method, changing the text fill as well. Make the background lighter, adding more contrast to the cover. Here is how our cover image looks on Facebook.

cover image on Facebook

Great job, guys! We’ve managed to create a trendy cover image for Facebook and learned how to draw hair using various CorelDRAW curve tools. I hope you’ve enjoyed following this tutorial and found some useful tips and tricks. Good luck with your art!

Finished hipster barbershop illustration in CorelDRAW

How to Create a Kawaii Soda Shop Pattern in Adobe Illustrator


Final product image
What You'll Be Creating

In this tutorial we'll create a set of truly adorable soda shop inspired food icons from scratch and assemble them into a dynamic all-over print, ready for use as a desktop background or within printed media. We'll build objects from basic shapes like ellipses, rounded rectangles, and triangles, and add a little face on each one to finish it off. Open up Adobe Illustrator CC and let's get started!
Our pattern elements begin with a soda shop staple: the hamburger.
  1. Using the Ellipse Tool (L), draw a circle.
  2. Draw a thin horizontal rectangle overlapping the circle with the Rectangle Tool (M).
  3. Select both shapes and hit Minus Front in the Pathfinder panel. Ungroup the two objects so you're left with two bun halves.

Draw your hamburger buns

Let's add some toppings to our hamburger.
  1. For both the hamburger patty and the tomato slice, draw a rounded rectangle the width of the top bun using the Rounded Rectangle Tool. Adjust the radii of the rectangle to your liking.
  2. Use the Direct Selection Tool (A) to select the bottom hamburger bun and pull the Live Corners inward, rounding out their harsh corners slightly.
  3. Repeat with an adjustment of the corners of the top half of the hamburger bun.
  4. Draw two triangles for the slices of cheese with the Pen Tool (P) and add any additional toppings you'd like your hamburger to have.

Draw your hamburgers toppings between each bun

Let's focus on adding details to our design. 
  1. For the sesame seeds, draw a circle, pull out an anchor point with the Direct Selection Tool, and use the Anchor Point Tool (Shift-C) to convert the anchor point to a point from a curve.
  2. Copy (Control-C) and Paste (Control-V) sesame seeds all over your top bun. Scale and Rotate as you see fit.
  3. Draw two round circles for each eye.
  4. And a half-circle (subtract a rectangle from a circle as we did with the hamburger bun previously) for the mouth.

Draw details on your hamburger

Let's add some color to our hamburger!
  1. The outlines and hamburger patty: #482c3b
  2. The sesame seeds: #ffd9c6
  3. The hamburger buns: #dd8f69
  4. The tomato: #ff3662
  5. The cheese: #fff280
For thick outlines, Group (Control-G) together your design and make sure any strokes have been Expanded under ObjectCopyPaste, and place the copy behind the original object group with a thicker weight stroke set in the Strokespanel.

Add color to your hamburger

Start your French fries with the container that holds them.
  1. Draw a narrow ellipse with the Ellipse Tool.
  2. Draw a rectangle with the Rectangle Tool and make sure its width matches the ellipse. Align them to the center of the ellipse.
  3. Unite the two shapes in the Pathfinder panel. Use the Direct Selection Toolto pull the top right and left anchor points outward so it's at an angle.
  4. Draw an ellipse that overlaps the top of the container and whose width matches the top edge of the quadrilateral.
  5. Select both the ellipse and the quadrilateral and hit Minus Front in the Pathfinder panel.
  6. Draw a shape with the Pen Tool behind the container shape whose width matches the contour of the front shape and whose top edge curves slightly. This will form the back and inside of the container.

Draw your french fry container

Our container needs a bunch of French fries, so let's get cooking.
  1. Draw a vertical rounded rectangle with the Rounded Rectangle Tool.
  2. Adjust the radii of the corners so they're a bit more squared off by pushing theLive Corners outward.
  3. Select the top-right anchor point with the Direct Selection Tool and pull its anchor point onward as far as possible so its radius is rounder than the other three corners.
  4. Copy and Paste your French fries and place them behind the front object of the fry container.
  5. Rotate and Scale your fries as needed. Group your fries together to keep a more organized Layers panel.
  6. Draw a cute face to complete your French fry line art.

Draw some fries to fill your design

Set your fill colors to the same brown, yellow, and red used in the hamburger.
  1. For the inside of the container, set the fill color to light blue (#b1edee).
  2. For the body of the container itself, set the fill color to an even lighter blue (#f7ffff).

Add color to your French fries

For our hotdog, we'll start by building the buns.
  1. Draw a horizontal rounded rectangle with the Rounded Rectangle Tool.
  2. Warp your rounded rectangle by going to Effect > Warp > Arc and set the Bend to -50%.

Bend your bun

  1. Adjust the width of your bun as needed and make sure to Expand the shape under Object.
  2. For the hot dog itself, draw another, smaller rounded rectangle.
  3. Copy and Paste the bun. Place the copy behind the other two shapes and slightly above so you'd see the top of it behind the hotdog itself.

Draw the hotdog

Set the fill colors to those used in the hamburger. With the Pencil Tool (N), draw a squiggly mustard line and set the Stroke Width to 3–5 pt (the weight will depend on the size of your art itself) with a Rounded Corner and CapExpand the stroke under Object. I used bright yellow (#feff45) for the mustard's fill color.

Complete your hotdog

Draw a circle with the Ellipse ToolOffset the circle by going to Object > Path > Offset Path and enter 2–6 px for the offset amount. Like your stroke widths, the offset amount depends on the size of your object and how thick you want the shape to be.

Offset a circle to form a cute pickle

  1. Set the offset color to green (#4e9d30) and the center circle to lime green (#c6f453).
  2. Draw narrow rectangles overlapping the pickle center.
  3. I drew five rectangles in total. Select the lime green circle and all five rectangles. Use the Shape Builder Tool (Shift-M) to select the non-intersecting portions of each rectangle. Deselect and Delete the extraneous rectangle pieces so you're left with green stripes that conform to the lime green circle.

Create stripes for your pickle

  1. Group together the pickle stripes and reduce their Opacity to 50%.
  2. CopyPasteScale, and Rotate the pickle so that you have two pickles, one behind the other.
  3. Give your pickles a thick outline and cute face, and Group all components together.

complete your pickles

The mustard and ketchup bottles are identical except for their fill colors.
  1. Draw two identical ellipses and a rectangle between them of the same width.
  2. Unite the three shapes together in the Pathfinder panel. Repeat with the top of the bottle.
  3. Set your objects' fill colors to red.

Draw the base of the ketchup bottle

  1. For the bottle nozzle, draw a triangle either with the Polygon Tool or the Pen Tool. Beneath it, draw an ellipse whose width matches the bottom edge of the triangle. Unite them in the Pathfinder panel.
  2. Cut off the top of the nozzle by overlapping the tip of the triangle with a rectangle and hitting Minus Front in the Pathfinder panel.

draw the nozzle of the bottle

  1. Set the fill colors of all three shapes to red and make sure they're Aligned to their centers. Adjust the width of these shapes as you see fit.
  2. Copy and Paste the ketchup bottle object and set the fill color to null and the stroke color to dark brown.
  3. Place each object from the ketchup bottle group above their corresponding copy so they have a simple, 1–2 pt outline as seen below.

outline the ketchup bottle

Give your final bottle a thicker outline and draw a cute face onto the font. Copyand Paste the ketchup bottle for your matching mustard bottle. The colors I used are as follows:
  1. Red: #ff80b3
  2. Yellow: #fff07f
  3. Dark Brown: #4a293c

Complete your condiment bottles

We're going to take our time with creating our milkshake, since it's also the basis for the tall glass of cola in our final print design.
  1. Start with two ellipses. The wider of the two will be the top of the glass while the other will be the bottom of the glass's bowl.
  2. Draw a line with the Line Segment Tool (\) in the center of both ellipses. This will help with the construction of the glass.
  3. Draw three more ellipses: One below the bowl of the glass, showing the bottom of the base and two small ones of the same size that will help us with the width of the stem itself.

Plan out the glass with ellipses

I've drawn two additional ellipses in the body of the glass so I can make sure the bowl will keep the shape I intended.
  1. Use the Pen Tool to draw a curved line from the small ellipse at the bottom of the glass's bowl to the outside of the bottom of the base. This will form one half of the stem.
  2. Using the four larger ellipses as a guide, draw a line, with the Pen Tool, that starts at the center of the top ellipse and hits the center of the bottom ellipse. Adjust the angle of the path with the anchor point's handle as needed so all four ellipses touch the path.
  3. Copy and Paste both lines drawn previously and Reflect them over a Vertical Axis so they can be Aligned to the opposite side of the glass.

Draw the glass itself

Group together your glass components.
  1. Use the Pen Tool to trace the outer curve on the left side of the glass and connect it in the center of the glass shape with two right angles.
  2. Ungroup the top and bottom ellipses (see below). Copy and Paste the top ellipse and set it aside. Unite all three shapes in the Pathfinder panel.
  3. Overlap the right half of the newly United shape with a rectangle and hit Minus Front in the Pathfinder panel so you're left with the left side of the glass.

Draw the bowl or body of the glass

  1. CopyPaste, and Reflect the left half of the glass's bowl.
  2. Overlap the shapes slightly and Unite them in the Pathfinder panel. Repeat the previous step with the stem of the glass. Set the fill colors to very light blue while the stroke color is simply light blue, as used in the French fries drawn previously.
  3. Place the copied ellipse from the previous step at the top of the glass. Make sure its fill color is set to null.

Complete the base glass shape

  1. Use the Pen Tool to draw a curved line for the rim of the glass.
  2. Follow the contour of the glass's bowl to draw a rounded rectangle-like shape for the left-most flute of the glass with the Pen Tool.
  3. Draw four shapes in total, making sure there's space between each.

Draw the glasss flutes

Set the flutes' fill colors to a Linear Gradient going from blue at 100% to 0% Opacity at a 90° angle.

Set the flutes fill colors to gradients

  1. Draw a rounded rectangle-like shape inside the glass (behind the to ellipse, line, and flutes) for the milkshake itself. Set the color to pink (#ff80b3).
  2. Using the Pencil Tool (N), begin drawing the milkshake's whipped cream with a curving line at the top, starting from the right.
  3. Move down the whipped topping shape with scallops.
  4. Complete the shape by closing it at the origin in the upper right. Note how curvy, lumpy, and bumpy it is.
  5. Set the fill color to white and the stroke color to blue or light blue.

Draw the milkshakes contents

  1. Draw curving lines to show how the whipped cream folds in on itself with the Pen Tool.
  2. Draw a red circle for the cherry and place it behind the whipped topping.
  3. Give the cherry a stem with the Pen or Pencil Tool. Finally, give your milkshake a thick brown outline as we did with the other icons.

Draw details into the design

For a final touch to the milkshake, let's create a straw.
  1. Draw an ellipse and a rectangle of matching width.
  2. Copy and Paste the ellipse. Unite the first ellipse and the rectangle in the Pathfinder panel.
  3. The straw's colors should match the milkshake's glass.
  4. Draw a series of diagonal red rectangles (Rotate them 45°) along the length of the straw and use the Shape Builder Tool as we did with the stripes on the pickle to delete them from the straw base.
  5. Group together your straw shapes.
Place the straw in the milkshake behind the whipped topping and contents.

Draw a red striped straw

For our final icon, you'll want to Copy and Paste the milkshake. Delete all of the milkshake's components except for the bowl of the glass and the contents. Set aside the straw and lengthen the glass itself. Delete the flutes as well. They won't be needed for this design.

Set up your milkshake to become cola

  1. Set the fill color of the glass's contents to dark brown (#482c3b).
  2. Draw rounded squares with the Rounded Rectangle Tool for ice in the cola glass. Set the fill color to brown (#dc8e68).
  3. CopyPaste, and Rotate the ice cubes in the center portion of the glass.

Fill up your glass with ice and cola

  1. For soda bubbles, draw various sizes of circles around the ice cubes.
  2. Draw a small, thin white rectangle to create an edge on the ice cube.
  3. Repeat on the other two ice cubes and Group together all of the ice cube components and cola bubbles.
  4. Place the straw you set aside earlier in the glass. Draw a curved line in front of the straw for the glass's rim.

Draw details on your color glass

Let's take a look at our final pattern elements. I added some ketchup to the fries, faces to each item, and hearts in the place of tongues in some of the mouths. Also note how the cola's face is white instead of brown so it remains visible. Make sure each element is Grouped and has been added to the Libraries panel in its own library for easy access during the pattern creation process.

Finalize your pattern components

  1. Arrange five of your elements, select all five, and hit Make Pattern in the Pattern Options panel. Make sure Tile Type is set to Brick by Column.
  2. Drag the pickles out from the Libraries panel and place them near the top of the design. Make sure they cross over the pattern's bounding box.
  3. Place the ketchup within the design as well. Rotate or Scale each element as needed.
  4. Add the milkshake at the end. It's one of the larger designs, so I rearranged my pattern elements so it would fit easily. Make sure the elements have plenty of space around them and don't overlap.
Hit Done when you're satisfied with your pattern and you'll find it in the Swatchespanel.

Create the pattern

A final option is to create a secondary simply pattern to be layered below the cute food pattern in the final image. Draw a heart, set the Tile Type to Brick by Column, select Size Tile to Art, and set the H and V Spacing as needed.

Create a secondary optional pattern

Layer three rectangles for your final image: the cute pattern, the heart pattern, and a solid color. What other cute foods would you find at a soda shop? How about a coffee shop? Share your results in the comment section below!

the final print design


Copyright @ 2013 Krobknea.

Designed by Next Learn | My partner