We
recently saw another WWDC come and go and despite little to no progress
in the desktop area, the MacBooks all received nice upgrades. This
means there's a fresh crop of users transitioning to a brand new
machine, a task which always brings with it a decent number of
questions.
How do you migrate your data over from your old machine? Are there built in utilities for this process? Are you better off doing it on your own? Let's find out.
Basically, you need to decide how deep the integration needs to be from your old system to your new one. For instance, some users like to turn on their brand new machine and have it look and feel exactly like their old one, right down to the desktop wallpapers and carefully installed custom dock themes.
Fortunately, no matter what level of duplication you'd like to achieve, you can pull it off with surprisingly little effort. Once upon a time, tasks like this would take the better part of a day or even multiple days, but these days there are lots of systems and methods in place to make the transition as painless as possible.
Keep in mind, this doesn't just copy your important files, it copies everything. If all goes well, your new computer, from a software perspective, will be an exact duplicate of your old one.
Using this utility only requires three steps. The first step is to prepare your target drive, which means the new one that you will be copying your data to. Make sure there is absolutely nothing on it that you will need because every piece of data present on the drive is about to disappear.
Once you've completed that step, connect your new drive to your old one using a Thunderbolt or Firewire cable, then restart the new computer with the "T" key held down until you see a floating logo pop up on the screen (this will be either the Firewire or Thunderbolt logo depending on which cable you used).
 The process will likely take hours so go away and let the software
work its magic. Once the process is complete, disconnect the two
computers and startup your new Mac. If all goes well, what you should
see after the startup process is the same system you're used to.
The process will likely take hours so go away and let the software
work its magic. Once the process is complete, disconnect the two
computers and startup your new Mac. If all goes well, what you should
see after the startup process is the same system you're used to.
All you really have to do is fire up Migration Assistant on two Macs that are connected to the same wireless network, and follow the wizard that walks you through migrating data over.
 My problem with the Migration Assistant is that it's too automatic. I
don't feel like I have enough freedom to specifically choose exactly
what does and doesn't get copied, but instead am given broad, sweeping
categories of data that will be transferred.
My problem with the Migration Assistant is that it's too automatic. I
don't feel like I have enough freedom to specifically choose exactly
what does and doesn't get copied, but instead am given broad, sweeping
categories of data that will be transferred.
Just as with cloning, the potential problem here is that you're bringing your old clutter to your new machine. There's nothing worse than buying a new machine to replace an old, bogged down one, only to bog down the new one in the first week.
For this reason, I prefer to take the hands on approach and manually migrate much of my data. There are a million different types of information that could potentially be copied over, let's go over some of the most popular.
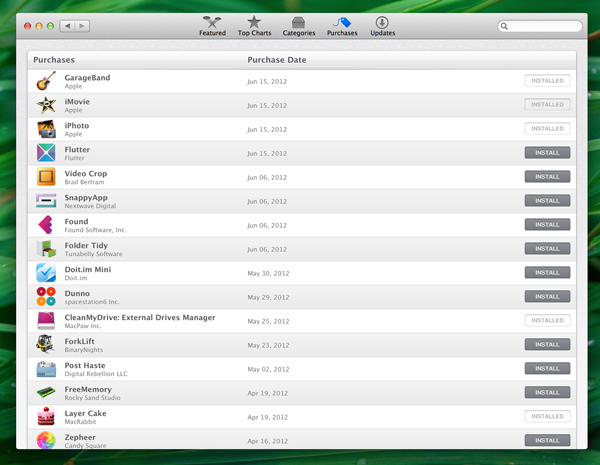
To do this, fire up the "App Store" application on your new Mac and sign in using your Apple ID. After doing this, you should see a "Purchases" tab at the top of the window. Click on that item.
 What results is a complete list of everything you've ever downloaded
from the Mac App Store, even the apps that you chose to delete on your
old machine. From here, all you have to do to install one of these apps
on your new machine is click the "install" button. That's it! Just go
down the list and decide what you do and don't need on the new machine
and wait patiently as the App Store fills your new Mac with your
favorite utilities and toys.
What results is a complete list of everything you've ever downloaded
from the Mac App Store, even the apps that you chose to delete on your
old machine. From here, all you have to do to install one of these apps
on your new machine is click the "install" button. That's it! Just go
down the list and decide what you do and don't need on the new machine
and wait patiently as the App Store fills your new Mac with your
favorite utilities and toys.
The best way to ensure a proper installation process is typically to go to the original developer's site and re-download a new copy of the application. If it's an app that you paid for, you'll often have some sort of license code that will need to be typed in to unlock the app. Unfortunately, every app is different so you'll have to either find where this is located yourself or email the developer for help. Be sure to check on the app's site for a FAQ page, which usually covers this topic.
I quickly realized that many of the applications that I use on a daily basis are actually cloud-synced in one form or another, so as soon as I logged into them on my new computer, all of my data was right there, just as I left it on the old machine.
There are two different primary ways that applications sync their data across devices through the cloud, let's take a brief look at each.

Evernote uses its own custom cloud service.
The great thing about widely used cloud solutions is that the information isn't bound to a single application. For instance, there are a number of applications across OS X and iOS that support the Simplenote service and as long as I'm logged in, my notes always stay synced to all of these otherwise completely separate applications.

Developers can incorporate iCloud storage and sync into their apps.
The two most popular solutions for third party syncing are probably iCloud, Apple's own solution, and Dropbox,
the bold startup success story that turned down Apple's purchase offer.
With iCloud, the developer specifically builds in support, if it's not
there, you can't easily rig something up yourself. With Dropbox however,
if there's no official support built in (though many apps like TextExpander
offer exactly that), you can often simply move the app's library to
your Dropbox folder to keep the data in sync between devices.
Most modern applications follow the basic rule that app-specific data should be stored in one convenient location on a user's hard drive. This wonderful folder is called titled "Application Support" and is located in your user account's Library folder.

This sounds like a pretty lame move, but in all honesty, most users who know enough to be concerned about this type of thing also know enough to get it back, so it's really not a big deal.
There are at least four or five different ways to access your Library folder despite its invisible status. The easiest solution though has to be Option-Clicking on the "Go" menu item when Finder is the active application. This menu always has a list of convenient shortcuts in it but holding down the Option key will add in the elusive Library folder (for a more permanent solution, type chflags nohidden ~/Library/ into Terminal).

Visit the Go menu with Option held down to see the Library folder.
Occasionally, you should use a little more tact than simply grabbing the entire folder. For instance, when I needed to transfer my Photoshop Actions, I didn't grab the entire Adobe folder but instead drilled down to the specific folder that contained the actions that I wanted to transfer.

Here you can backup and sync tons of data: Mail & Notes, Contacts, Calendars, Bookmarks, Photo Stream photos, Documents & Data and more. This is by far the best solution for migrating all of your basic information to your new machine. All you have to do is check the little box and within minutes or even seconds all of your appointments, important phone numbers, favorite links and more will be zapped to your new machine.
It really is that simple. I'm blown away by how easy this process is given that it used to take us several hours and lots of effort to migrate all of this information in the past.

In System Preferences, the Mail, Accounts and Calendars Preference Pane will allow you to quickly and easily sign into your various accounts from other providers. You can set up all of your email accounts here and when you open Mail.app they'll be right there waiting for you.

Another great advancement is easy account setup. It used to be that I would have to walk you through or at least link you to the specific setup process for all of the popular email services. In Lion and Mountain Lion however, the software does all of the work for you. Simply enter your username and password and let OS X figure out all of the confusing details like outgoing mail servers and ports.
The solution here is to return to your hidden Library folder again, but this time dive into the "Mail" folder instead of the Application Support folder. Drill down even further to Libary>Mail>V2>MailData to find a bunch of useful data files that hold your rules, signatures, Smart Mailboxes and more.

For many Mac users, multimedia files represent the most important digital information that they own. Vacation photos and videos, homespun Garageband hits, guilty pleasure iTunes albums; you don't want to leave these stranded on your old machine. To transfer them over, simply drill down into the Movies, Music and Pictures folders to find what you want and drag them over to the same location on your new Mac.
In the case of iTunes, the "Music" folder also strangely enough holds all of your iOS applications. To make sure I grab it all, I simply like to pull over the entire iTunes folder and replace the empty one on my new Macs.

For just about all of this data, you'll want to check your user Library folder (you should rarely touch your main system Library folder, but it is occasionally necessary) just like we did with the Mail rules above. In the Library folder you'll find Dashboard Widgets, Fonts, Keychain passwords, Preference Panes, Safari Extensions, Screen Savers and anything else you can think to bring over.
The process here is the same as before. Backup any data that you're going to mess with, then simply drag and drop to replace the folders or files on your new Mac with those from your old Mac. If you screw something up really bad, simply restore the backup and everything will be back to normal.

If you have any other helpful tips, tricks or applications for migrating data from one Mac to another, please share your knowledge in the form of a comment below. We'd love to hear from you.
How do you migrate your data over from your old machine? Are there built in utilities for this process? Are you better off doing it on your own? Let's find out.
Decisions, Decisions
If you've recently purchased a new Mac to replace an aging one, then you've got some important decisisons to make regarding how you transition to using the new machine full time.Basically, you need to decide how deep the integration needs to be from your old system to your new one. For instance, some users like to turn on their brand new machine and have it look and feel exactly like their old one, right down to the desktop wallpapers and carefully installed custom dock themes.
Fortunately, no matter what level of duplication you’d like to achieve, you can pull it off with surprisingly little effort.Other users love the feel of starting fresh with a new machine, uncluttered by years of poor filekeeping practices. This doesn't negate the need to have access to all of your important data though: emails, notes, files, apps, music, etc. The fresh new computer route is also ideal if your new machine has a better operating system than your old one. It's an awful shame to clone old technology onto a new Mac!
Fortunately, no matter what level of duplication you'd like to achieve, you can pull it off with surprisingly little effort. Once upon a time, tasks like this would take the better part of a day or even multiple days, but these days there are lots of systems and methods in place to make the transition as painless as possible.
Cloning
The first option that's available is the easiest. This involves a straight up clone of the contents of your old hard drive onto your new hard drive.Keep in mind, this doesn't just copy your important files, it copies everything. If all goes well, your new computer, from a software perspective, will be an exact duplicate of your old one.
Carbon Copy Cloner
Most Mac users turn to the same utility when it comes time to clone a hard drive: Carbon Copy Cloner. For a solid decade, Carbon Copy Cloner has faithfully and dutifully cloned the drives of Mac users without requiring a dime in return.Using this utility only requires three steps. The first step is to prepare your target drive, which means the new one that you will be copying your data to. Make sure there is absolutely nothing on it that you will need because every piece of data present on the drive is about to disappear.
Once you've completed that step, connect your new drive to your old one using a Thunderbolt or Firewire cable, then restart the new computer with the "T" key held down until you see a floating logo pop up on the screen (this will be either the Firewire or Thunderbolt logo depending on which cable you used).
Tip: Keep in mind that all of the computers involved should be connected to a power supply throughout the entire process.
Finally, download and crack open Carbon Copy Cloner on your old
machine. The interface is dead simple: just choose your Source Disk
(your old Mac) and your Target Disk (your new Mac). Make sure you choose
to backup everything and to delete items that don't exist on the
source. Now double, triple and quadruple check to make sure you've done
everything right, then hit the clone button.
Tip: Different hardware components often require
different software. You might have to download some drivers to make
everything work properly.
Migration Assistant
An easier and safer alternative to straight up cloning your drive is to use the built-in OS X Migration Assistant. This allows you to migrate lots of data over from your old computer to your new one with very little effort and setup.All you really have to do is fire up Migration Assistant on two Macs that are connected to the same wireless network, and follow the wizard that walks you through migrating data over.
Just as with cloning, the potential problem here is that you're bringing your old clutter to your new machine. There's nothing worse than buying a new machine to replace an old, bogged down one, only to bog down the new one in the first week.
For this reason, I prefer to take the hands on approach and manually migrate much of my data. There are a million different types of information that could potentially be copied over, let's go over some of the most popular.
Installing Your Old App Store Apps
Love it or hate it, the Mac App Store has, without a doubt, made being a Mac user more convenient than ever. Not only does it make finding awesome new software a snap, it also makes it easy to transfer applications to a new computer.To do this, fire up the "App Store" application on your new Mac and sign in using your Apple ID. After doing this, you should see a "Purchases" tab at the top of the window. Click on that item.
Non-App-Store Apps
Given that the App Store is still a relatively new convenience, you'll probably have plenty of applications that you'd like to transfer over that aren't even in the App Store, what then?The best way to ensure a proper installation process is typically to go to the original developer’s siteYour first instinct will likely be to click on the app on your old machine and drag it to your new machine. This process will in fact work in many cases, but it's simply not a good idea. The reason behind this is that most apps are more than the icon that you see in the Applications folder. That might be the core of the app, but there are usually other bits and pieces scattered around your hard drive.
The best way to ensure a proper installation process is typically to go to the original developer's site and re-download a new copy of the application. If it's an app that you paid for, you'll often have some sort of license code that will need to be typed in to unlock the app. Unfortunately, every app is different so you'll have to either find where this is located yourself or email the developer for help. Be sure to check on the app's site for a FAQ page, which usually covers this topic.
Synced Application Data
We currently live in a fantastically futuristic world where the data that is most precious to us is often floating around in cyber space and accessible at any given time from any Internet connected device. Having just purchased a new Mac myself, I got to experience how great this is for switching computers firsthand.I quickly realized that many of the applications that I use on a daily basis are actually cloud-synced in one form or another, so as soon as I logged into them on my new computer, all of my data was right there, just as I left it on the old machine.
There are two different primary ways that applications sync their data across devices through the cloud, let's take a brief look at each.
Custom Cloud Solutions
Some apps have their own 100% custom, completely integrated cloud syncing solution. These apps require no outside help from third party systems or frameworks (at least from a user's perspective). One shining example of this type of software is Evernote, which stores all of your data online and allows you to quickly access it simply by logging into one of their many apps across just about every device you can imagine. You'll find that lots of productivity applications such as Producteev and Wunderkit also take this route.Evernote uses its own custom cloud service.
Widely Used Cloud Solutions
Building and hosting your own cloud solution is expensive and time consuming. For this reason, many apps choose to implement a third party cloud sync system. This gives users the features that they want and helps keeps costs down on the developer's end. One example of an app like this that I use daily is nvALT, which uses the popular Simplenote cloud service.The great thing about widely used cloud solutions is that the information isn't bound to a single application. For instance, there are a number of applications across OS X and iOS that support the Simplenote service and as long as I'm logged in, my notes always stay synced to all of these otherwise completely separate applications.
Developers can incorporate iCloud storage and sync into their apps.
Meet the Application Support Folder
Unfortunately, not all apps sync their data via the cloud. In fact, it's probably the case that the majority of applications don't have a solution for this yet. Some apps, such as Twitter for Mac, require such a minimal setup that there's really no need to manually transfer data. However, there are plenty of others that will require some effort on your part. Even if you downloaded the app from the App Store, it might still have specific data that is stored on your old machine that you'd like to bring over.Most modern applications follow the basic rule that app-specific data should be stored in one convenient location on a user's hard drive. This wonderful folder is called titled "Application Support" and is located in your user account's Library folder.
The Invisible Library Folder
When OS X Lion came around, Apple decided that you as a user can't be trusted and therefore went through the process of hiding aspects of your system that were previously available to you. Specifically, this took the form of hiding the Library folder that is contained inside of your Home folder.This sounds like a pretty lame move, but in all honesty, most users who know enough to be concerned about this type of thing also know enough to get it back, so it's really not a big deal.
There are at least four or five different ways to access your Library folder despite its invisible status. The easiest solution though has to be Option-Clicking on the "Go" menu item when Finder is the active application. This menu always has a list of convenient shortcuts in it but holding down the Option key will add in the elusive Library folder (for a more permanent solution, type chflags nohidden ~/Library/ into Terminal).
Visit the Go menu with Option held down to see the Library folder.
Tip: You should always back up your data before attempting to mess around with the Library files related to any app.
Application Support
Once you've got your Library folder situation all figured out, jump in and find your Application Support folder. On your old Mac, this folder will be full of subfolders named after your various applications. It's often the case that you can simply grab one of these folders and move it over to your new machine to transfer any sort of account information, licensing, preferences and the like.Occasionally, you should use a little more tact than simply grabbing the entire folder. For instance, when I needed to transfer my Photoshop Actions, I didn't grab the entire Adobe folder but instead drilled down to the specific folder that contained the actions that I wanted to transfer.
iCloud
If you're not setup with Apple's iCloud solution, you should be. The free plan offers quite a bit and really simplifies file sharing across computers. To see what will and won't sync using iCloud, open up System Preferences and navigate to the iCloud Preference Pane.Here you can backup and sync tons of data: Mail & Notes, Contacts, Calendars, Bookmarks, Photo Stream photos, Documents & Data and more. This is by far the best solution for migrating all of your basic information to your new machine. All you have to do is check the little box and within minutes or even seconds all of your appointments, important phone numbers, favorite links and more will be zapped to your new machine.
It really is that simple. I'm blown away by how easy this process is given that it used to take us several hours and lots of effort to migrate all of this information in the past.
Mail Accounts and Calendars
The good folks at Apple realize that many of us already rely on other third party solutions for certain types of data and services and have no desire to switch over to iCloud. Fortunately, they don't hold such a decision against us too much and make it just as easy to grab this information as well.In System Preferences, the Mail, Accounts and Calendars Preference Pane will allow you to quickly and easily sign into your various accounts from other providers. You can set up all of your email accounts here and when you open Mail.app they'll be right there waiting for you.
Email Made Easy
Years ago, just thinking about transferring my email to another machine gave me a headache. These days though, most email services offer completely synced solutions. Thankfully, the letters "POP" have given away to "IMAP", so simply signing into your Gmail accounts will trigger an automatic sync. All of your read, non-read, trashed and starred/flagged emails will keep their status whether you're reading email on your iOS device, Mac Mail application or through your browser.Another great advancement is easy account setup. It used to be that I would have to walk you through or at least link you to the specific setup process for all of the popular email services. In Lion and Mountain Lion however, the software does all of the work for you. Simply enter your username and password and let OS X figure out all of the confusing details like outgoing mail servers and ports.
Email Support Data
One problematic area that I found right away when setting up my new Mac was supporting Mail information such as the custom-built rules that I had set up over the years on my old computer. This information is Mail.app specific and doesn't transfer simply because you signed into your Gmail account.The solution here is to return to your hidden Library folder again, but this time dive into the "Mail" folder instead of the Application Support folder. Drill down even further to Libary>Mail>V2>MailData to find a bunch of useful data files that hold your rules, signatures, Smart Mailboxes and more.
Multimedia and iOS Apps
We've covered most of the trickiest data migration scenarios so by now you should be well prepared to set up your new Mac exactly like you want it. However, there are three biggies that we haven't discussed, mostly because they're so easy: Movies, Music and Pictures.For many Mac users, multimedia files represent the most important digital information that they own. Vacation photos and videos, homespun Garageband hits, guilty pleasure iTunes albums; you don't want to leave these stranded on your old machine. To transfer them over, simply drill down into the Movies, Music and Pictures folders to find what you want and drag them over to the same location on your new Mac.
In the case of iTunes, the "Music" folder also strangely enough holds all of your iOS applications. To make sure I grab it all, I simply like to pull over the entire iTunes folder and replace the empty one on my new Macs.
The Library Folder: Everything Else
We've covered how to migrate all of your accounts, multimedia, third party applications, third party app data, and even some built-in apps and data to your new Mac. The only thing that's really left is your miscellaneous system data that relates to various built-in services and applications.For just about all of this data, you'll want to check your user Library folder (you should rarely touch your main system Library folder, but it is occasionally necessary) just like we did with the Mail rules above. In the Library folder you'll find Dashboard Widgets, Fonts, Keychain passwords, Preference Panes, Safari Extensions, Screen Savers and anything else you can think to bring over.
The process here is the same as before. Backup any data that you're going to mess with, then simply drag and drop to replace the folders or files on your new Mac with those from your old Mac. If you screw something up really bad, simply restore the backup and everything will be back to normal.
Go Do It!
By now you should be an expert on how your system stores different types of data and the best methods for migrating that data from one computer to another. Armed with the information above, there's almost nothing on your old computer that you can't set up in a near identical fashion on your new Mac.If you have any other helpful tips, tricks or applications for migrating data from one Mac to another, please share your knowledge in the form of a comment below. We'd love to hear from you.


