Once you've learnt how to create this effect, it will be one of those tricks which you'll enjoy playing with... even if you don't create something productive in the process!
1. Create Your Guides
Step 1
Before you start, you'll need to work out how many times you'll need to mirror one segment. I'm going to have one segment mirrored and then for that pair to be mirrored eight times. This means in total, I'll have 16 segments in my design. Of course I'll only need to work in one segment and it will be repeated in a circle.To help me set the area to work in and give make it easier to work within a controlled shape, I'm going to create some guides to work from.
Enable Smart Guides (Control-U). This will help you a lot during the process.
As the effect will have 16 segments, I'm going to draw a 16 sided polygon with the Polygon Tool. Click once on the canvas and input the settings below.

Step 2
I'm going to be drawing straight lines through the shape using the points as guides, however I wish to have a vertical and horizontal line going through the shape. I'm going to need to rotate our shape so there are points at the top, bottom and sides.Select your shape and then open the Transform panel (Window > Transform). Now you could work out the exact degrees you wish to rotate your shape by, or you could let Illustrator do the work for you. As I wish to rotate the shape half a side, enter into the Rotate field 360/32. This is because there are 360 degrees in a full circle and there are 16 sides in the shape, therefore rotating by half a side would be double the amount of sides we have... which is 32.


Step 3
Now let's start drawing lines through the shape. Use the Line Segment Tool (\) and hold-Shift-Alt and drag out your lines. This will fix your lines at 45 degree angles.
Step 4
To accurately add lines in between the ones we have, we're going to use the same trick with the Transform panel.First duplicate your lines and then in the Rotate field enter 360/16. We're wanting to rotate our lines by one segment. There are 16 segments.


Step 5
Now to set them as guides. Lock your 16 sided shape and select your lines. Then go up to View > Guides > Make Guides. Surprise, surprise, your lines will now become guides. This makes it easier when you're working with Smart Guides.
2. Create Your Kaleidoscope Effect
Step 1
Now that we have our guides, let's begin putting together our effect.To make things easier, use the Pen Tool (P) to fill in one of your segments. Build it from straight lines (so just click to create points, no curves) and fill it with a low Opacity. I'm using 20%.
When you're playing with the Transform effect, use a low Opacity because then you'll see any overlapping duplicates you've created.

Step 2
The key to this effect is that we're going to be applying it to the layer itself, not the object. By applying it to the layer, it influences everything contained within it. Therefore you can draw as many shapes as you wish and it will benefit from the kaleidoscope effect.So first select your layer. You should have the Layers and Appearance panel like the below.

Step 3
With the layer selected, go up to Effect > Distort & Transform > Transform.Tick the box Reflect X. This is because we're mirroring our triangle on the X axis first. Then enter 1 in the Copies field. This is because there is only one duplicate. Then in the nine squares at the bottom, select the middle left point. This is because we want to mirror on the middle left side.
Tick the Preview box to make sure that you can see your triangle reflected in the top segments. Once you're happy, click on OK.

Step 4
Now that I have two segments mirroring each other, I want this to now be mirrored through the rest of the circle.With the layer still selected, go back up to Effect > Distort & Transform > Transform. You'll be greeted with a pop-up. Click on Apply New Effect.


Then for our nine dots, select the bottom middle point. This is because with the shapes we have in our 2 segment slice, it's the bottom middle point which is at the center of our circle.
Then in Copies, enter 7. This is because we want to duplicate our original 7 times, giving us 8 segments. Click on OK once done.
If you're experimenting with mirroring, your 20% Opacity segment will help you in the amount of copies you select. If you select too many, the segments will overlap and you'll see darker areas in your circle. Neat trick huh?!
So this is what your Appearance panel and Layers panel will look like now:

3. Experiment With Your Vector Kaleidoscope
Step 1
This is where the fun truly begins. Once you've made your kaleidoscope effect, it's time to play with it. I'm going to show you a few things you can do with this effect before I show you how to create a stain glass disc.The first example is from playing with the Blob Brush Tool (Shift-B). I just drew lines, curves and dots. No planning what so ever, just doodling! You can see start to end the full doodle.


Step 2
In this example, I used the Pen Tool (P) to draw half of a flower petal. I duplicated the shape and modified it with the Direct Selection Tool (A). I then created a Blend from the shapes (Control-Alt-B). I added a further modified petal at the end.Now I kept the guides showing so I could see where to draw my half petal. It's worth keeping those guides to allow you to make more constructive designs such as this.

Step 3
Now the next example is purely to show how you can edit whatever you've put into your vector kaleidoscope. I've just use the Type Tool (T) and then later the Free Transform Tool (E) to modify the angle of the text.
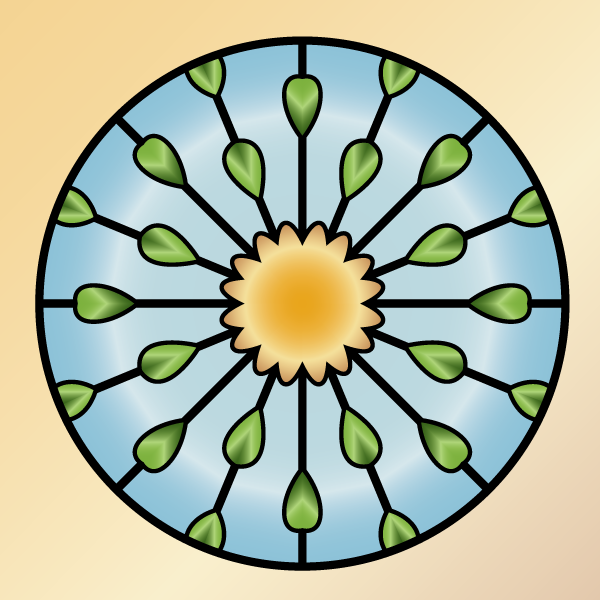
4. Create a Quick Stained Glass Effect
Step 1
Now that you've set up your kaleidoscope effect, we're going to make a quick stained glass effect with the use of the Pen Tool (P), Ellipse Tool (L) and Gradient Tool (G).Create New Layer above your kaleidoscope layer and draw a circle with the Ellipse Tool (L) and a 10pt Stroke Weight. Hold-Alt-Shift to create an even circle from the center.

Step 2
Then with the Pen Tool (P) I'm going to use the guides to draw within a segment in the kaleidoscope layer. With Smart Guides (Control-U) enabled, this will make it easier to stay along the guide lines and prevent you from overlapping.Once you've closed the shape, set the Stroke Weight to 5pt and Align Stoke to Inside via the Stroke panel.

Step 3
I've created a stain glass design which reminds me of a sun or a flower in the center and then leaves dotted around the edge. So let's color these shapes to represent that.I'm going to use one of the swatches from Illustrator's many libraries. So in the Swatches panel go into the drill down menu and go to Open Swatch Libraries > Gradients > Gems and Jewels.
In the kaleidoscope layer, begin drawing your shapes to fill in the areas in the segment. The first will be for the flower in the center. I've filled it with the "Citrine" gradient. I've changed it to a Radial Gradient in the Gradient panel and then used the Gradient Tool (G) to move the source of the gradient to the center of the design.

Step 4
Duplicate shape you created which made the outline for the flower and leaves. Remove the stroke color and fill it with the "Aquamarine" gradient.
Step 5
Then for the leave shapes, I've draw half of each shape in the kaleidoscope layer and filled them with the "Peridot" gradient. Using the Gradient Tool (G), I've angled the gradient to create "V" shapes in the leaf.
Great Work, You're Now Done!
Now your stained glass design is complete! If you'd like to check out the examples I've done or this end result, feel free to download the source file. It also include the attributes for the Appearance panel so you can have a try yourself in creating your own vector kaleidoscope effect. Feel free to share your design in the comments area below, I'd love to check them out.


About Sharon Milne
Sharon
Milne aka ChewedKandi is an Illustrator and Author specialising in
vector art. She's from Northumberland in the United Kingdom. She's also
our Vector & Drawing Editor here on Tuts+.
You can check out her website portfolio by going to ChewedKandi.net and keep up to date via her Facebook page.View Full Profile
+ Expand Bio
Advertisement


