You
already know how to add animations to objects in PowerPoint, but what
if you want more control over the individual animation timing and
arrangement? That's where the Animation Pane and Advanced Timeline in
PowerPoint come in. These are especially useful tools when you have a
lot of objects moving around and you want
to sync their timing.
The Animation Pane lists of the objects on a slide that
have animation applied. You can use it to reorder the animation sequence and
choose options for the animations. When objects have different durations and
get triggered automatically, their bars on the timeline indicate it with
different lengths. The timeline vaguely resembles what you might see in a
multimedia program like Adobe Flash, though it isn’t as extensive—but then, it doesn't need to be for what PowerPoint does.
In this tutorial, I'll show you how you can use the Animation Pane in PowerPoint to apply entrance, emphasis and
exit effects to text, tables, shapes, images, video clips and any other objects
on a slide that you can select.
Screencast
You
can follow along with this tutorial using your own PowerPoint
presentation if you'd like. Or if you prefer, download the zip file
included for this tutorial, which contains a sample presentation called timeline.pptx.
The presentation has 4 slides and no animations or
transitions applied. Play the presentation just to see how it looks. Either
click the Slide Show button on the bottom of the screen (right side in Windows,
left side on the Mac) or use the shortcut: F5 (Windows) or Ctrl-F5 (Mac). Then
just click through or press Enter to go through the slides.
Three Stages of Animation
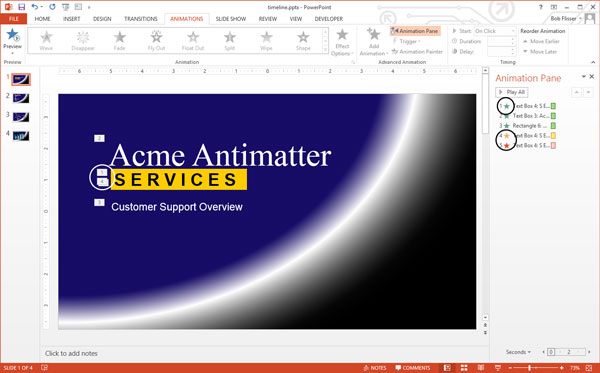
After you finish the slide show, go to slide 1. There are
three items to animate: company name, text in the yellow box, and subtitle
below the yellow box.
There are 3 available times of an object’s animation.
Entrance:
how the object first appears
Emphasis:
what the object does once it’s on the slide
Exit:
how the object leaves the slide
These timings can be exclusive, if you want. For example,
you can have an object that has an animated exit, but not an animated entrance.
Applying Entrance Animation
Let’s apply entrance effects to all three objects. Click
inside the company name (Acme Antimatter) and click the Animations tab on the ribbon. Apply animation in one of three ways,
as you can see in the screen capture, below:
Select an effect in the Animation section or
click the More button and select an
effect
Click the Add
Animation drop-down and select an animation
Click the Add
Animation drop-down, then click More
Entrance Effects, then choose one from the dialog box
Three ways of applying animation to an objectNotice the small “1” in the box next to it. Now apply entrance
effects to the other two objects the same way. The slide should now show a “2”
and a “3”, so it looks like this: Numbers attached to objects indicate the order of animation
Re-Ordering Animation in Windows
Since the yellow box text now comes in second, let’s change
it so it comes in first (the company name will then come in second).
In Windows, click the Animation Pane button on the ribbon.
That will display the pane on the right side, with the three objects listed. Object animation is listed in the Animation PaneEither drag the #2 item to the top, until you see a thin
horizontal bar at the top of the stack, OR select the #2 item and click the Up
Arrow on top of the stack. Re-order animation either by dragging list items in the Animation Pane or by using the Up and Down ArrowsOn the slide, the company name will now show a “2” box and the
yellow box text will show a “1” box. Run the slide again, and that will be the
order they appear.
Re-Ordering Animation on the Mac
The steps are similar on the Mac. Click the Reorder button, and that will display
the floating Custom Animation box, also with the three objects listed. On the Mac, use the Reorder button to change the order of animationEither drag the #2 item to the top (there won’t be any thin
bar to guide you), OR select the #2 item and click the Up Arrow below the stack
of objects.
Now it’s the same as in Windows: on the slide, the company
name will now show a “2” box, and the yellow box text will show a “1” box. Run
the slide again, and that will be the order they appear.
Applying Emphasis and Exit Animation
When you apply additional animation to the same object, the
timeline will display the object more than once. An object will be listed once
for each stage of animation.
Let’s add an emphasis to the yellow box text. Click anywhere
inside it, but if you’re using Windows, don’t just choose an animation from the
main part of the ribbon, or you’ll remove the box’s original animation. We want
to add an effect to the existing one,
so click the Add Animation drop-down
and select an emphasis animation from the list, or choose More Emphasis Effects
and choose one from the drop-down. To add additional animations, click the Add Animation button and choose from the listIf you’re using a Mac, you do select an emphasis effect from the list. Unlike the Windows
version, this will add an animation, and not
override the previous one.
Now use the same method to apply an exit effect.
The result is that the yellow box text has indicators on the
slide and in the timeline showing that it’s #1, 4 and 5 in the sequence. When an object has multiple animations, they're listed in the Animation PanePlay the presentation, and you see it comes in second, does
its emphasis, then exits before the company name and Customer Support text,
since they don’t have any exit effects. So two adjustments to make:
Make the emphasis last longer
Make all three items exit together
In the Animation Pane in the Windows version, put the mouse
pointer on the end of the #4 bar so that the mouse pointer becomes a 2-headed
arrow. Drag to the right, so the bar indicates that it’s now 2 or 3 seconds: Extend the duration of an animation by extending its bar on the timelineIf you’re using a Mac, the Animation Order box doesn’t have
timing bars. To increase the time of this effect, use the Duration box on the right side of the ribbon. (See screen capture,
below.)
Now click inside the Acme Antimatter text, then Shift-click inside the Customer Support
Overview text, so both text boxes become selected. The same way you did before,
add the same exit effect that you chose for the yellow box text.
If you run the presentation now, you’ll see that the yellow
box text still exits first. We want both #6 effects in the timeline to happen
concurrently with the #5 item. In Windows, either right-click it or click the drop-down
arrow and select Start With Previous. You can also choose With Previous from the Start drop down on the ribbon. Making an animation start when the previous event startsIf you’re using a Mac, select both #6 items in the Animation
Order box, click the Start drop-down,
then select With Previous. On the Mac, you can choose With Previous from the Start drop-down on the ribbonNow when you run the presentation, all 3 items will exit
simultaneously.
Controlling the Animation of Text
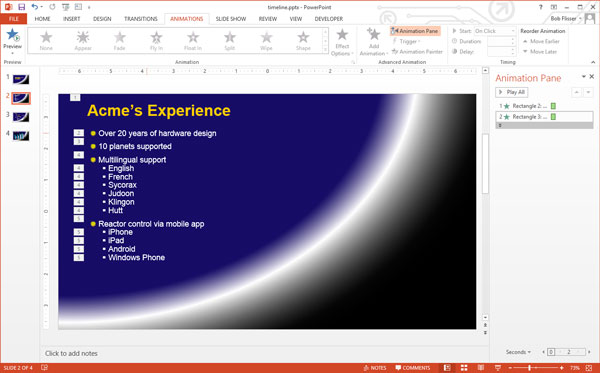
When you have a placeholder of bulleted text, you can
control how much of it comes in at once. Go to slide 2, which has a headline
and bullets on the first and second levels.
As before, select the headline and apply an entrance effect,
then do the same for the box of bulleted text. When you play the slide, you’ll
see that when there are second-level bullets, they enter all at once with the
first-level bullet above them. The numbering shows that will happen: By default, sub-bullets do their animation together with the bullets above themLet’s change that so each line comes in separately. In
Windows, click anywhere in the bullet text, then in the Animation Pane, either right-click
the second item or roll the mouse pointer over it and click the drop-down. From
the drop-down, choose either Effect
Options or Timing. Choose Effect Options or Timing from an object in the Animation Pane to change the sequencing of bulleted textA dialog box appears, and it has three tabs: Effect Options,
Timing, and Text Animation. Click the Text
Animation tab. Click the Group Text drop-down list and select By 2nd Level Paragraphs (or
a higher number). The Text Animation tab has a drop-down for "Group With" that determines how sub-bullets will be animatedClick OK, and you’ll get a preview of the animation running,
with each line of text coming in separately. Run the slide show to get a better
look.
This feature works mostly the same on the Mac. Instead of right-clicking
the item in the Animation Order box, you twirl open the Text Animations section. The choices are the same as in Windows. On the Mac, you control text animation timings using the Text Animation twirl-down section of the Custom Animation dialog
Controlling the Animation of a Chart
Chart animation is similar to text animation. Go to slide 3 of the presentation, which has
a simple column chart. Select the chart, then in the Animations tab of the ribbon, choose an entrance effect. You’ll see
a preview of the animation, which shows the whole chart entering at once. The
chart will be listed as one item in the Animation Pane. Charts get animated just like textYou can make the bars enter in various orders: each group
(year) entering at once, each series (set of 4 columns) entering at once, the
columns of each series entering one at a time, or each column entering one at a
time, from left to right.
In Windows, right-click the Chart 4 item in the Animation Pane, then select either Effect Options or Timing. In the dialog box that appears, click the Chart Animation tab. That tab has only
one thing in it: a drop-down list. Click it and make a choice, then click OK.
Try a few of them to see which one you like.
The Mac version also works like animating text. After
applying the animation, make the adjustments in the Chart Animations twirl-down section of the Custom Animation box or with the Effect Options button on the
ribbon. On the Mac, use the Chart Animations twirl-down section to control the timings of chart pieces
Synchronize Automatic Timings
The Animation Pane is especially helpful when object
animations run automatically, rather than with a mouse click. The main
difference between the Windows and Mac versions is that the Mac doesn’t display
an actual timeline, with horizontal bars. Otherwise, the capabilities of the
Custom Animation dialog box are the same.
Go to slide 4 of the timeline presentation. The horizontal
arrow is one object, and if you click one of the thumbnail images, you’ll see it’s
grouped with the description, arrow and month. We’ll apply animation to the horizontal
arrow, then to each of these groups. In
the included sample file, the month name, description, arrow and
thumbnail of each month's objects are grouped, so they will all get
animated together
Animating the Horizontal Arrow
Select the horizontal arrow, and from the Animations tab,
apply a Wipe transition. Click Effect Options and choose From Left. On the Mac, it’s the same
thing, and you’ll find the Effect Options section as a twirl-down in the Custom
Animation toolbox and also on the ribbon. After applying the Wipe effect to the main arrow, make it wipe from left to rightOn the right side of the ribbon, note the Timing group, which has settings for Start, Duration and Delay
options. For the horizontal bar, leave the default settings, which should be:
Start: On click
Duration: half second
Delay: none
On the Mac, these options are in the Timing twirl-down section of the Custom Animation toolbox.
Preview the slide, if you want.
Advertisement
Animating the Groups of Objects
Select the first group (“Acme Purchases Tablets”). It’s
easiest to select the group by clicking the image thumbnail. On the ribbon, choose
the Wipe effect, and make it wipe upwards, which should be the default
direction. Use these timings:
Start after previous
Duration: half second
Delay: 1 second
This means that 1 second after the horizontal bar finishes,
this group of objects will spend half a second wiping upwards.
A quick way of applying the same settings to the other two
groups of objects that are above the bar is to use the Animation Painter. Leave
the first group selected, then on the ribbon bar, double-click the Animation Painter. Now click the other
two thumbnails above the horizontal bar.
Since you’re done with the Animation Painter for a moment,
you need to exit it. Either press the Esc
key or click the Animation Painter. The mouse pointer will become normal,
again.
If you’re using the Mac, there is no Animation Painter. You
have to apply the animation to the other groups manually, as you just did with
the first group.
Now animate the two groups below the horizontal arrow. Select
the first group, apply the Wipe effect, and have it wipe downwards from the top.
Make sure it uses the same timings as the others:
Start after previous
Duration: half second
Delay: 1 second
In the Windows version, click the Animation Painter (only a
single-click, this time), then click the Stock Fluctuations group. In the Mac
version, manually apply the animation to the other groups.
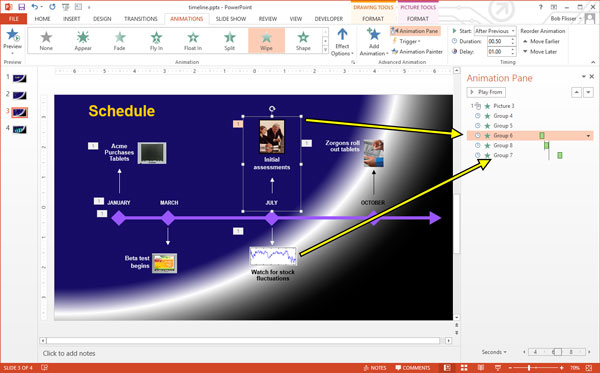
The slide should now look like the screen capture below,
with the timeline showing the progression of the animations. Note there is only
1 mouse icon in the Animation Pane: it shows that we have to click (or press
Enter) just once. That will make the horizontal arrow come in, and everything
else will follow automatically. After applying animation to all the groups, the timeline shows the sequencePreview the slide. It’s almost right, except the group below
July should wipe down simultaneously with the group above July wiping up.
Click the top July item, and notice that it’s Group 6, which
is 4th on the list. The bottom July item is Group 7, which is 6th
(last) on the list. When you select a group, you'll see its position in the Animation PaneBump Group 7 up in the Animation Pane one spot, so it’s just
below Group 6. Set the timings as follows:
Start: with previous
Duration: half second
Delay: 1 second
In the Windows version, that makes the green bars for Groups
6 and 7 run concurrently in the timeline. But now the last group needs to be
delayed for 1 second, so you can either drag its green bar to the right, or
select the group and set the delay to 1 second.
Also notice that below the timeline, there is a scale of
seconds. You can drag the box on this scale left or right to see all the timings. To
change animation timings, either use the Timing controls on the ribbon,
or drag and resize the horizontal bars in the timelinePreview the slide when you’re done.
Conclusion
PowerPoint’s Animation Pane and timeline are great features
that give you detailed control over object animations. Remember that to use it,
you apply an animation first, then choose an option in the Animation Pane or
toolbox on the Mac. And don’t forget that some of the most important features
are in the third tab of a pop-up dialog box from a right-click menu.
Unknown
Lorem ipsum dolor sit amet, consectetur adipisicing elit, sed do eiusmod tempor incididunt ut labore et dolore magna aliqua. Ut enim ad minim veniam, quis nostrud exercitation.
Medical Disclaimer
The information on this site is not intended or implied to be a substitute for professional medical advice, diagnosis or treatment. All content, including text, graphics, images and information, contained on or available through this web site is for general information purposes only. Krobknea makes no representation and assumes no responsibility for the accuracy of information contained on or available through this web site, and such information is subject to change without notice. You are encouraged to confirm any information obtained from or through this web site with other sources, and review all information regarding any medical condition or treatment with your physician. NEVER DISREGARD PROFESSIONAL MEDICAL ADVICE OR DELAY SEEKING MEDICAL TREATMENT BECAUSE OF SOMETHING YOU HAVE READ ON OR ACCESSED THROUGH THIS WEB SITE.