What You'll Be CreatingAfterBurn
is a great volumetric plugin for Autodesk 3ds Max. In this tutorial,
I'll show you how to use AfterBurn, along with Particle Flow, to create a
realistic puffy cloud scene. I'll finish by doing some compositing in
Adobe After Effects to make the result look even better.
1. Creating the Wire Structure
Step 1
First of all go to Create > Particles > Particle Flow Source. Creating PF Source
Step 2
Then draw a PF Source icon in the perspective viewport. Creating PF Source Icon in the Viewport
Step 3
Click on the Modify panel and then click on the Particle View tab. Alternatively, you can press the 6 key on the keyboard. Ways to Access the Particle Flow This opens the Particle View window: Opening the Particle View Window
Step 4
Select the Speed, Rotation and Shape
operators and then delete them, as these operators are not required for
creating static clouds. If, however, you want some motion in cloud puffs
then you can play with these parameters later. Deleting Several Operators
Step 5
Select the Birth operator and set the values of Emit Stop as 0 and Amount as 10. Setting the Birth Parameter
Step 6
Select the PF Source icon in the viewport and change the Viewport % value to 100. 100% Particles in the Viewport
Step 7
Set Icon Type as Box and set the Length, Width and Height values as 50, 80 and 10 respectively. The values may differ in your case. Changing PF Source Icon's Parameters
2. Applying AfterBurn Effects
Step 1
Go to Rendering > Environment, or press the 8 key on the keyboard. Opening Environment Window
Step 2
This opens the Environment and Effects window. Inside the Atmosphere panel, click on the Add tab. This opens the Add Atmospheric Effect sub-window. Select AfterBurn and click OK. Applying AfterBurn Effect
Step 3
You will see AfterBurn and FusionWorks Renderer are added to the list. Applying FusionWorks Renderer
Step 4
Apply a standard Target Spot light in the scene. I have done it this way to illuminate the AfterBurn particles. I can always change its settings at a later stage. Applying a Target Spot Light
Step 5
Turn on the Shadow option and choose AB Shadow Map. Increase the Multiplier value a bit and choose a light blue color for the light’s color. Changing the Parameters of the Light
Step 6
Press 8 on the keyboard to open the Environment and Effects window again. Select the AfterBurn effect which opens the AfterBurn Manager below. Opening AfterBurn Manager
Step 7
First click on the Pick Particles/Daemons icon, and then select the PF Source icon in the viewport. This adds the PF Source to the list. Click on the Show in Viewport icon to see the actual shape of the AfterBurn particles in the viewport. Selecting the PF Source Icon in the List
Step 8
Click on the Pick Lights icon and press the H key to open the Pick Object window. Select the spot light and then click on the Pick button. You will see the spot light gets added to the scene. Selecting the Light Source in the List
Step 9
Render
the scene now. At this stage it still doesn’t look very realistic. I
need to tweak some parameters and their values and then it will look
much
better. Rendering the Scene
Step 10
First of all, go to the Particle Shape parameter and change the Sphere Radius to 25 and Squash to 1.5. Set the Variation percentage to 50. Changing the Radius Value of AfterBurn Particles
Step 11
Go to the Rendering parameter, change the Falloff to 1.5, and turn on the Self Shadows option. This will enable the cloud to generate and receive its own shadow. Changing the Falloff Value
Step 12
Render the scene to see how it looks. Now we can see the cloud
formation clearly. But I've still got to change a few more things to make it look like a realistic cloud. Render the Scene
Step 13
Go to the Shading parameter and change the Ambient Color to light blue. After rendering the scene you will clearly see the difference in the ambient shadow part. Changing the Ambient Color
Step 14
Go to the Noise Animation parameter and change the Noise Size to 25. Set the Type as Smoke and don’t forget to turn on the Cubic option. Changing the Noise Size
Step 15
Render the scene again. Now the cloud looks much better. Render the Scene
Step 16
You can increase the Density to 5 to check the result. Increasing the Density
Step 17
Press 6 to open the Particle View once again and this time decrease the Amount to 5. A smaller amount of particles will make only one or two big puffs of cloud. Decreasing the Number of Birth Particles
Step 18
Change the Shadow Falloff value to 1.5 to make the shadow a bit smoother. Also decrease the Opacity amount to 0.7 or 0.8 to reduce the darkness of the shadow. Changing the Falloff and Opacity Values
Step 19
Now let’s render the scene and see how it looks. You can check from any angle. It looks pretty good. Render the Scene
Step 20
Try tweaking some more parameters and their values to get different results. Decrease the Noise value to 15 and then render the scene to check how it looks. Changing the Noise Size
Step 21
To add some more variation decrease the Hi Threshold value to 0.7 and the Low Threshold value to 0.2. It adds fractal and turbulent edges to the cloud. Changing the Threshold Values
Step 22
This time increase the Noise value to 20 and select the Cubic option. The Cubic option adds much smoother and feathered edges to the cloud. Decreasing the Noise Size
Step 23
Once you’re satisfied with the settings, go to the Smoke parameter and increase the Levels value to 15. Now render the scene and you will see more detailed cloud puffs. Increasing the Levels Values
Step 24
Go to Rendering > RenderSetup. This opens the Render Setup window. Here go to the Renderer tab and select Catmull-Rom as the Filter. Changing the Rendering Filter to Catmull-Rom
Step 25
Now render the scene once again. The Catmull-Rom filter makes the rendered frame sharper. Rendering the Scene
Step 26
Increase the Length and Width values of the PF Source box. This will scatter the cloud puffs across a broader area. Scattering the PF Cloud
Step 27
Go to Rendering > Environment and set the Background color as black. Black Background
Step 28
Render the scene. The cloud looks quite nice. It's time to do some compositing in Adobe After Effects and add some effects to make the final result look much better. Rendering the Final Frame
3. Compositing in Adobe After Effects
Step 1
Open After Effects, import the cloud footage, and place it on the timeline. Opening After Effects
Step 2
Press Control-Y to create a new Solid Layer. The solid layer color should be white. Put this white solid layer behind the cloud layer. Creating a Solid Layer
Step 3
Take the Ellipse masking tool and, while pressing Shift-Alt, mask a circular area in the white solid layer. This will act as the Sun. Add some feathering as well. Masking the Solid LayerFeathering the Mask
Step 4
With the white solid layer selected, go to Effects > Sapphire Lighting > S_Rays. Use the same settings as shown in the image. You can play with the values to get different results. Adding Rays
Step 5
Make another solid layer and make its color royal blue, just like the sky. Put this layer beneath all the layers. Creating a Royal Blue Background
Step 6
With the cloud layer selected, press Control-D to make a duplicate layer of it. Select the upper duplicated layer and apply the Brightness & Contrast effect. Use the values shown in the image. Adjusting the Brightness and Contrast
Step 7
Pick the Pen tool and make a mask around the cloud layer as shown here. Making a Mask Around the Cloud
Step 8
With the upper white solid layer selected, go to Effects > Sapphire Lighting > S_LensFlare. The settings shown in the image will give a nice lens flare effect.
Step 9
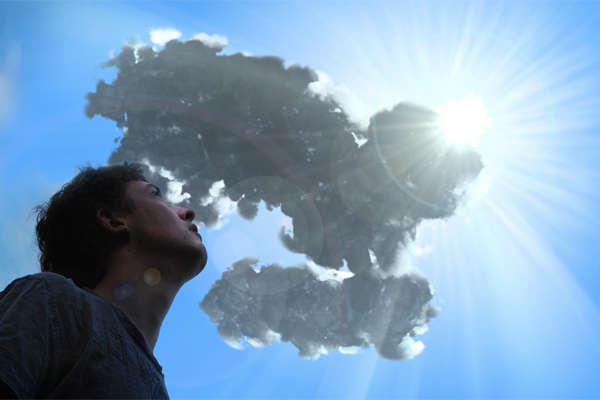
Finally, add a Tint effect to the upper cloud layer to make it a bit unsaturated. Adding Tint EffectThis is the cloud I made following the same procedure. You can play with
the settings, parameters and their values to get different results. I
hope you enjoyed the tutorial. Do share your results and views. Final Scene
A Composited Scene
A Different Look with Live Element!
Conclusion
In
this tutorial I’ve shown you how to create a puffy cloud scene
in 3ds Max using AfterBurn and Particle Flow. AfterBurn is a great
volumetric plugin for 3ds Max. You must give it a try. I hope you have
enjoyed the tutorial.
TDasany
Lorem ipsum dolor sit amet, consectetur adipisicing elit, sed do eiusmod tempor incididunt ut labore et dolore magna aliqua. Ut enim ad minim veniam, quis nostrud exercitation.
Medical Disclaimer
The information on this site is not intended or implied to be a substitute for professional medical advice, diagnosis or treatment. All content, including text, graphics, images and information, contained on or available through this web site is for general information purposes only. Krobknea makes no representation and assumes no responsibility for the accuracy of information contained on or available through this web site, and such information is subject to change without notice. You are encouraged to confirm any information obtained from or through this web site with other sources, and review all information regarding any medical condition or treatment with your physician. NEVER DISREGARD PROFESSIONAL MEDICAL ADVICE OR DELAY SEEKING MEDICAL TREATMENT BECAUSE OF SOMETHING YOU HAVE READ ON OR ACCESSED THROUGH THIS WEB SITE.