
1. Basic Anatomy
Skeleton
Just as 3D artists use bones to animate an object realistically, we need to learn what bones a bat is made of to create a believable pose. The skeleton of an animal defines its movement and affects greatly the shape of the body. Let's see what's most important here:- The arm structure is very similar to a human, including fingers.
- The forearm is very long, longer than the whole body.
- The chest is wide and compressed.
- The hips are very narrow and elongated.
- The thumb is the only unwebbed finger; it has a functional claw.
- The second finger is the shortest; in bigger species, it also may have a small, non-functional claw.
- The fingers are arched at the tips.
- The knees are reversed, which makes bats unable to walk properly, but makes flight, hunting and resting more efficient.
- There's a modified heel structure, called the calcar, used to steer the "tail wing". A membrane under it, if present, is called the keel.
- Feet are specialized for effortless hanging.
- The tail isn't always significant: in most cases it doesn't go outside of the membrane area.

Body
Fortunately, we don't need to know the exact skeleton or musculature of a bat. What we need is a general shape. It will be a base for every pose we could need. Can you draw these simple shapes? That's great! This is the most important step of this lesson.


Legs and Feet
The most important thing to remember here is that bats are made entirely of upper body. Their legs are nothing more than arms—they're used for flying, hanging, and catching food. They're thin and fragile in look—every unnecessary muscle would make flight less efficient. Wings have the greatest power in the upper body, and they can't carry too much weight in other areas. Another reason why dragons are unrealistic!While bats are so good at flying and hanging, walking is their weak spot. Except for the power of the legs, there's another reason for it—the unique shape of the hip socket that makes it impossible for them to turn their knees forward.


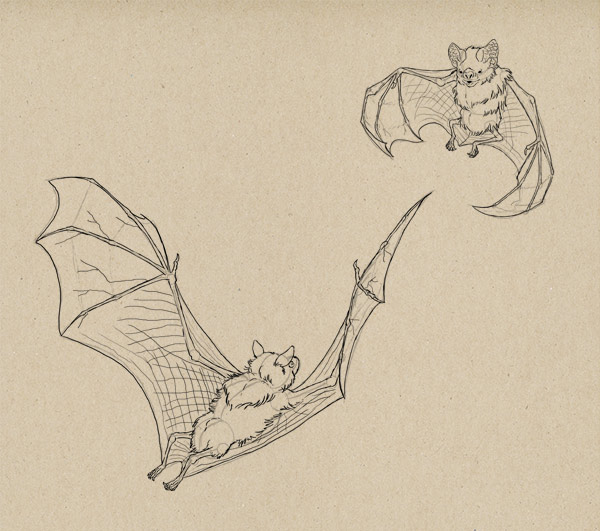
Wings
I've got a tutorial about wings and flying, but since it was mainly focused on birds, let's elaborate now.Step 1
First, keep in mind bats' wings are actually arms, nothing else. It makes them much easier to draw than bird wings. Let's start with a simple exercise. Draw a few bat poses using this as a reference. Focus on the body, hands, and feet—the distance between them can be shorter than this.

Step 2
Bend the arms by adding two bones to them, as shown earlier on the skeleton. The shorter the distance between body and hands/feet, the more acute the angle between the bones.

Step 3
Extend the fingers, first the part closest to the wrist. This part is the longest. End them with small ovals—joints. The second finger, the one next to the thumb, doesn't end with a joint.
Step 4
Add another part of the fingers. Keep in mind the second finger doesn't have any other part.
Step 5
Add the last part.
Step 6
Connect the fingers with a membrane. The bigger the distance between them, the straighter the lines. The second finger tends to be bent in the direction of the third.

Step 7
The membrane is stiffened with elastic fibers and traversed by blood vessels. You can use them all to create a texture for the wings.

2. Head Details of a Bat
First, we need to distinguish between the two main kinds of bats: microbats and megabats. The most important difference between them is the ability of echolocation, commonly seen as a crucial feature of bats. That's why microbats are called true bats—they do what all the bats should do.Head
Bats have some of the most interesting little faces in the mammal world. Some of them will look like tiny dog's muzzles, some are more alien-like. Let's start with a base for a bat face and add details later.Step 1
Draw a ball in front (1), profile (2) or 3D view (3).
Step 2
Add two smaller balls—they're going to make the upper jaw.
Step 3
Add one big circle between the balls of upper jaw. Then add two small balls on its bottom—that's the lower jaw and lips.
Step 4
Add small ovals at the sides. They'll define the spots for eyes.
Step 5
This is what we've got now—a nice base for every bat.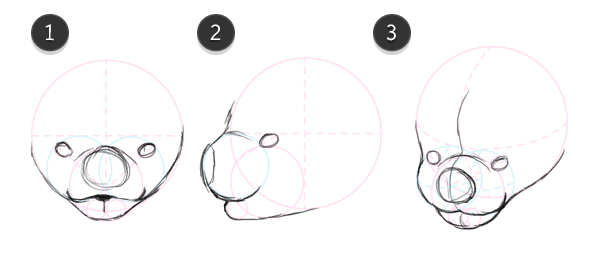
Eyes
First, bats aren't blind. Microbats do have small eyes, but they still can see shapes by distinguishing dark and light. Echolocation is so effective that good eyes would be a waste of energy. So we'll generally say that:- Microbats have small, mouse-like ("black bead") eyes.
- Megabats have big eyes and good vision.
Microbats
The "black bead" eyes are very simple to draw, especially when they're small:- Draw a tilted oval.
- Draw the upper lid.
- Draw the lower lid.
- Add a corner of the eye.


Megabats
The bigger eyes of megabats require more details. Start just like with the smaller eyes, and then sketch the eyelids. The iris is usually dark brown, but the small, round pupil may be visible in certain light conditions.

Mouth
Bats have an impressive variety of those, so let's simplify it for learning purposes:- Microbats have short snouts (think cats).
- Megabats have long snouts (think dogs).


Common Vampire Bat

Flying Fox

Ears
Ears are crucial for echolocation, and the better the species at echolocation, the less it relies on vision. Hence, the bigger the ears, the smaller the eyes, and vice versa.Again, there's an unbelievable variety of bat ears, so let's take a look at two examples.
Microbat—Common Vampire Bat
These ears will look good on every bat you'll draw. Just keep in mind they're not flat—imagine a ball can fit there.
Megabat—Flying Fox
Since megabats' ears are not specialized for echolocation, they're much simpler in construction. Good for us!


.webp)

