
Tools and Accessories
Simple Fixers: Gaffer Tape & a Multi-Tool
You can do a lot with just the basics. Gaffer tape is like duct tape but the adhesive is both stronger and less prone to sticking when you remove the tape. A multi-tool is a folding tool with a bunch of handy bits to help you fix things when you're on the go. It's not as good as a real screw driver, sax, needle-nose pliers, and wrench, but it does fit in your pocket. These two essential bits pieces of kit come with me on every job I do.I also have a “Bag of Stuff” that I take with me on most shoots. This bag contains ¼ 20 and ⅜” hex cap and socket cap bolts, ¼ 20 and ⅜” nuts, and washers in various sizes. I keep several extra ¼ 20 and ⅜” camera quick release plate screws in there as well. I also have a few metal binder clamps and the odd extra screw, nut or bolt that fits my gear.
I keep a handful of extra hex wrenches (one that fits everything in my kit) in the bag, and a hardware store L bracket, a few mini ball heads with ¼ 20 stud mounts, hot shoe studs, and cold shoe receivers—basically, anything that might come in handy.
Many of products mentioned in this lesson are available at your local hardware store or theatre supply store, as well as online.
Modifying Your Kit
Pack It Up
Cases and packs for photo and video can be pretty expensive. In this lesson I show how to modify some affordable general-purpose cases. I like using handgun cases, but an old suitcase or makeup box would work too.What You'll Need
- Handgun case
- Scrap cardboard and plastic
- Packaging foam, the sturdy kind that returns to its shape after being compressed, not hard styrofoam that breaks apart
The Hack
This hack is pretty easy: take out any existing foam or structure in your case and replace it with foam and cardboard you've cut to size for your equipment.Make Your Own Case
General purpose cases still aren't free, though. We can go even cheaper: cardboard. In this lesson I show how to make a super sturdy case out of hot glue and scrap cardboard. It looks a little weird, but it really works! Great for packing up gear you store in the trunk of your car, like spare light bulbs, cables, and delicate lights.
What You'll Need
- A glue gun. I used an 80 watt “high temp” glue gun.
- High temp glue sticks
- Heavy-duty self-adhesive velcro
- Sturdy cardboard
- Scrap foam
- Utility knife

The AC Stand Adapter
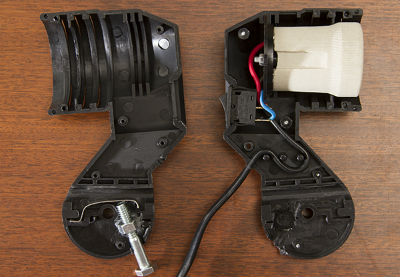
In this lesson I show you how to modify an AC Stand Adapter. Inexpensive AC adapters make using LED or CFL lights with your softboxes or umbrellas easy. The only problem is that they don't play nice: the cheap clamps tend to crush the umbrella poles.The main idea in this hack is to add a nut and bolt to the AC light stand adapter so that we can adjust the pressure on the light modifier shaft. To do this we need to open up the AC light stand adapter and determine where we can get a nut and bolt to fit without altering any of the important components in the adapter. You want the nut to remain stationary in the adapter and when you turn the bolt it drives into the small metal part originally intended to hold the shaft.
What You’ll Need
- AC light stand adapter used in this lesson
- Safety glasses
- Ear plugs: Anything with 28-33dB of protection should be fine
- Small Philips screw driver
- Sturdy pliers
- Dremel tool: Any high speed rotary cutting tool should work
- Rotary cutting bit: At 35,000 RPM just about any small bit will work as it will melt the plastic as it cuts into it
- Panavice or similar. Any sturdy vice or clamping mechanism should work fine.
- ¼ 20 nut and 1.5” ¼ 20 thumbscrew or hex bolt, can be found at your local hardware store.
- JB Weld JB Original Epoxy, available at your local hardware store.
The Hack
The first step is to cut off flatten out the metal tensioning piece so that it is not going to put pressure on the modifier shaft. When you flatten it out, you will have to cut off the back end of the tensioning piece because it will no longer fit in the adapter. When done properly, the modifier shaft will pass through the hole easily.The next step is to use the Dremel or other rotary cutting tool to carve out space for the nut and bolt. Again, don’t remove any more plastic than you need to and try not to remove important parts of the adapter. Removing material for the bolt is fairly easy. You will have to remove material from the sides of the AC adapter because a standard ¼ 20 nut will not fit and you will not be able to get the adapter to close all the way. You don’t have to remove much. Carve out a little at a time until it fits snugly. This will also help create a pocket to help hold the nut captive. If the nut moves around in the adapter, you will not be able to drive the bolt up into the shaft.
Once everything is fit properly, you can use some epoxy to hold the nut in place. Be sure that you do not get the epoxy in the threads of the nut. You might want to epoxy the nut with the bolt threaded through so that you don’t get epoxy on the inside of the nut. If a little epoxy gets on the threads of the bolt, you should be able to scrape it off fairly easily once it is cured.
Once it’s fully cured, you can put it back together and test. If you have applied too much epoxy, you can use your rotary tool to remove some so that everything fits snugly.

Lighting Mods: Using Old Speedlights
In the second part of this lesson I show how to make some collapsible snoots for your speedlights. To do this you will need a pencil, utility knife, some old black DVD cases, and some strong tape (the tape used in the lesson is Industry Tape IT-30).What You’ll Need
- Optical slave triggers
- Yongnuo 603 II C3 radio triggers: This is the link for the Canon version but a Nikon version is also available.
- Industry Tape IT-30
The Hack
This hack is pretty straight forward, too. Cut the DVD boxes into flat sections, cut them to size, then tape them together to fit over your flash.DIY Light Modifiers
This lesson explores some simple and effective light modifiers you can scavenge, scrounge, and hack together using everyday objects.For flags (used for blocking light) you can use just about anything that is fully opaque and black. Black foam board can be found at discount stores for a few dollars per sheet. If you have some sturdy cardboard you can paint it flat black and you will have a super cheap flag! Also mentioned in this lesson is the use of moving blankets. Dark blue moving blankets were used in the video but you can find them in black) as well. Be aware that many moving blankets are not fire retardant, and some smell like they were made from petroleum! Be careful using these around heat sources for get some fabric that is flame retardant from a fabric specialty shop. Look for blackout or opaque fabric.
The v-cards can be made from 8’ x 4’ sheets of 1” foam insulation board found at a local building supply store. 1” is the minimum thickness you want to use. 1.5” will be more sturdy. These products change frequently so look for a sheet that is completely or mostly white on one side. Sometimes there is a plastic wrapper that can be peeled off. If you peel it off and there is color left behind, you may need to paint the panels white. Having mostly white panels is better to start with because they require minimal paint. If you do need to paint your panels, use standard latex interior paint. You can use any type sheen you desire, but flat white is a good place to start. If the back side of the panels is also white, consider painting these black so you can use them as a large flag. To cut the panels in half you can use a sharp utility knife. Use a wide tape with good adhesive to join the panels back together and create the hinge. In the lesson 3” Gorilla Tough Tape was used. If you find your panels are getting tiny foam bits everywhere, consider taping around all the edges so that they are nice and clean and resist shredding.
Filter Your PC
Computers are dust magnets. In this lesson I show how to glue stocking material to your PSs vents to stop dust. A ten-minute hack that can save you thousands in heat damage and extend the life of your computer considerably.The tools used in this video are a utility knife, filtering material (panty hose used in lesson but any fabrics with a good air flow will work), and a hot glue gun. To help cover up the larger openings in the case you can use some sturdy cardboard. It is much easier to glue filters and cardboard to the computer case when everything is out of it. If you have to glue some filters when the case is full of components, you want to protect any stray globs of glue on internal components (especially fans).
Electronics Mods
DIY Audio Cables
Good quality XLR cables can be expensive to buy, but they're not hard to make and the raw materials are affordable. This haack is great if you need a special-purpose cable, too, like a very short cable with a right-angle plug to fit your video camera, for example..The tools used in this lesson can be found online or you can find similar tools at your local electronics hobby shop.
What You’ll Need
- Aoyue 936 soldering iron: A basic soldering iron around 20-30 watts should work fine.
- Hakko 599B-02 Solder Tip Cleaning Wire and Holder
- Kester 245 Lead Solder Wire
- Hakko CHP-170 Micro Clean Cutter
- Klein Tools 11046 Wire Stripper
- Solder Sucker
- Rosin Paste Flux
- Helping Hands
- Panavice
- Heat Shrink
- Embossing Heat Gun
- NEUTRIK NC3MX XLR
- Neutrik NC3FX XLR
- GLS AUDIO Bulk Microphone Cable
The Hack
Basically, strip a bit off each end of the wire, tin the wire and the connectors with your soldering iron, and fit them everything together. It's that easy!It was mentioned in the video that you can fill up the cups on the XLR connector with solder, but this is not necessary as excess heat can melt the plastic housing of the connector. This will make the pins shift and get out of alignment. If you have tinned both the wire and the connector you shouldn’t have to add very much solder (if any) to the joint for a secure connection.
Always keep your soldering iron tip clean as this will make for faster soldering. Heating metal causes it to oxidize quickly and oxidation will prevent the solder from flowing. The flux in the solder wire will clean the oxidation and help the solder to flow more easily. You also use a bit of flux paste to help clean the parts if they are not brand new.
DIY Lavaliere Mic
In this lesson I show you how to make a DIY lavaliere microphone.What You’ll Need
- Aoyue 936 soldering iron: A basic soldering iron around 20-30 watts should work fine
- Hakko 599B-02 Solder Tip Cleaning Wire and Holder
- Kester 245 Lead Solder Wire
- Hakko CHP-170 Micro Clean Cutter
- Klein Tools 11046 Wire Stripper
- Solder Sucker
- Rosin Paste Flux
- Helping Hands
- Panavice
- Heat Shrink
- Embossing Heat Gun
- Mini MIC Capsule Electret Condenser Microphone: You can also scavenge a microphone from old devices. Just about anything that has a tiny microphone will work!
- ⅛” TRRS Connector
- Wire: Shielded single conductor wire will work. A super thin RCA cable should work for this. Cut off the ends and strip it back to find out.
The Hack
When you are soldering small wires and parts be careful of using excess heat or holding the heat on for too long. Soldering these tiny connections should only take 1-2 seconds at the most. If the parts and your tip is clean, the solder should flow quickly.Depending on the microphone element you are using your results may vary. None of the tiny microphone elements I have tested sounded amazing and all required a little processing. What you may find is that some elements are much quieter than others. You may also find a mic elements that has a higher output but will not handle super loud sounds. These are important points to keep in mind. If you have a loud talker or are micing someone who will be shouting, a microphone element that is more sensitive might breakup and distort, even if the level on the recording doesn’t clip. The microphone used in the lesson is probably 6-8dB quieter than the first microphone I used when creating this hack. Even with the slightly quieter microphone, the signal was fairly clean and there wasn’t enough noise in the recording to warrant using a noise reduction plugin.

Power Anything
Everything these days is power hungry! Getting good, clean, reliable energy for all your gear is a struggle. This hack shows how to make a "power anything" box that draws from a simple battery and outputs the correct supply for your equipment.Selecting components for this project will depend on your needs and what you are looking to power. Below is the list of parts that were used in this lesson. If these parts don’t fit your voltage and current needs, you should be able to find similar products from these suppliers that will work. The battery connectors and wire you can find at your local electronics hobby shop.
What You'll Need
- UPG UBCD5745 Sealed Lead Acid Batterie
- 10 Pairs XT-60 XT60 Male Female Bullet Connectors
- ABS Project Box
- DC/DC Adjustable 4.0-40V to 1.25-37V Voltage Regulator Buck Converter
- DC/DC BUCK Converter Regulator 4.5-40V To 5V/2A USB Charger
- DC/DC Buck Converter Step Down Module Power Supply
- Panel Mount Metal DC Power Jack: Also available at your local electronics hobby shop
- 2.1mm x 5.5mm DC Power Male Plug Jack: Also available at your local electronics hobby shop
- Micro Momentary Tactile Push Button Switch

.webp)


