Photographing collections is a fun challenge. Working with sets of objects will get you thinking about light and imagining new ways to photograph. This kind of photography is also a good business opportunity! In this tutorial you will learn how to get started at home with still life photography of collections.

Light, Shape and Form
Photographing sets of objects can help you keep memories of things, interests or even periods of time, but it's also a great way to learn about the qualities of light. Unlike portraiture or landscape photography, objects generally sit still long enough for you to play with the way light interacts with surface and shape. The more you practice still life the better you will become at seeing the qualities of light in all areas your photography.
Many Practical Applications
This area of photography is also an important commercial form. Collections photography is used by museums and institutions to record objects in their care. It is also important for small and large retail business, especially those who sell online. Art galleries and artists also use collections photography on a regular basis. In short, anyone who needs a visual record of an object can benefit from practising these techniques—or hiring you!
Fortunately, it doesn't take much money to get started with still life photography. You can start home, photographing your own, your friends', or your family's collections. It doesn't take long to build the experience you need to get some professional results, either.

Types of Collections Photography Clients
Insurance and Inventory
Photographing a collection may be the result of your interest in a series of objects you collected for years. There are more reasons why one photographs a collection. If the collection is composed of valuable pieces, for example, photographing it may be a way to give your insurance company a record of all the pieces insured. This means that there may be a market for this type of photography in your area and that you can try to make some money photographing collections for insurance purposes.
Catalogues
Pieces photographed for cataloguing purposes are different from those photographed with a creative eye. It is here that the two-light setup is especially useful: the flat, even lighting is the proper way to register objects for many other applications where the objects have to be seen clearly. Museums and other large institutions with regularly need this type of photography.
Either as documentation or for online use, museums have to photograph their collections. In 2011 the Museum of London had more than 15,000 new photographs done, and 8,000 more from the Summer of 2012 until the Spring of 2013, so they keep having photographers working on new pieces of the different collections. This means that there is a viable market for photographers. Check with smaller museums or even private collections in your area and see if they want to work with you.
Art and Commerce
Artists, galleries, and small businesses often need collections photography but they don't usually have the skills or the time to do it well. They might not need the same volume of photographs as a museum, but this type of client can become a lasting, lucrative, and interesting one. Artists care passionately about their work. Galleries give you the opportunity to see things like carvings, artifacts, and sculpture in an intimate way. Small businesses are full of productive energy.
These smaller product photography clients often know less about photography than larger ones, so part of the work is educating them. If they are hiring you they know enough to know that they need help, and that's a good first step. When you start, talk with you client to develop a reasonable plan that meets both your needs and theirs. With any luck, you'll have a client for life!
How to Photograph a Collection
Photographing collections is an adventure in patience, meaning you really have to take your time and have a Zen attitude when it comes time to create the setup and define your aims. Sometimes it may take time to get things going, but once you get a rhythm it is a lot of fun.
1. Find a Collection to Photograph
We tend to collect different things throughout our lives, from small pebbles at the beach to fancy lighters, bottles, jars, figurines, and so on. You probably already have the material to start a photographic project. Anything from pencils to paper clips can be photographed as a collection. Scout around the house and get ready for adventure!

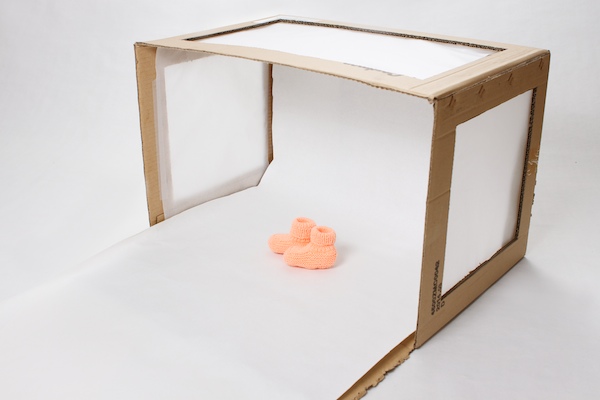
2. Set Up a Basic Table-Top Studio
Find a place that you can leave set up for a while. You want a spot where you can comfortably play with different arrangements of the elements photographed to create patterns, shapes, positive and negative spaces, light and shadow. This is a process that takes time and experimentation, bit by bit, so the best places are the ones where your equipment, cameras, and objects won't be disturbed if you have to set them down to work on something else for a day or two.
For a working area, you can build your own using a simple sheet of cardboard or you can invest in something like the Modahaus tabletop studio, which is a versatile solution. The model I use for a lot of my tabletop and product photography folds up into a neat package and is easy to carry around. Whatever you do, try to define the maximum size of the objects you’re photographing before investing in new equipment.

3. Add Light and Light Modifiers
Working close to a window is the easiest way to get all the light you need. A window facing North, in the northern hemisphere, is the best solution for soft light, but any other window will do too, if you find ways to control the light coming through it. A curtain or a diffuser will help you to achieve this.
Lights
While you can work with natural light most of the time, and be creative with it, if you want to extend your work into night hours, or need complete control for specific reasons, nothing beats artificial lighting. Lately I am using more and more in small LED panels like those mentioned in my recent article “Introduction to LED Panels for Photography and Video”.
LED panels (like all sources of continuous light) have one big advantage over flash: you can see immediately the effects of light on your subject and change accordingly. They offer less power than flash, but that does not really matter for this kind of photography. LED panels do not emit much heat, can be placed close to the subjects and anywhere around them (offering multiple creative options) and are dimmable, meaning you can control the amount of light emitted.
Although you can work with a single LED panel (or source of light) a couple of LED panels represents the best option, as it allows to create balanced light needed for some of this photography. In fact, if you want to light evenly an object, working withtwo lights at 45 degrees angle is the professional way to do it.
Modifiers
Small reflectors, in cardboard to foam, will help to control light and contrast. Along with the white reflectors buy some black surfaces too: these can be used for creative purposes, like creating darker shadow areas. Diffusion materials, like Mylar or thin paper, can also be handy for reducing the amount of light without blocking it entirely.

4. Build Your Camera Kit
A tripod is essential for this kind of work, to keep the camera in position.
In terms of cameras, a compact camera or even a smartphone allowing for manual control of exposure is fine. A macro lens may be needed for some work, especially with small objects, but a normal zoom lens — even the kit lens for many cameras — will be fine most of the time.
A trigger for your camera may not sound like something essential, but do consider it as an option. Sometimes it helps, once you’ve defined a setup and exposure, to be able to simply click the shutter while keeping an eye on the object being photographed.
A trigger is also good if you’re taking images of different objects in sequence and want to be able to work faster: you can place the object at the defined position, take the picture, remove it, place another object and take a new image. This is “drop and pop” in product photography jargon, and it is a good way to work when objects are about the same size, you’re building a catalogue, and need to work fast.

5. Photograph
Alright, you are ready to go. Place your first item and have some fun! Here are a few more production tips to help you along the way:
Tethering
Another option is work tethered, with your camera connected directly to a computer. This shows the on a computer monitor immediately,. It's an efficient way to work. If you are photographing objects that need a particular lighting or composition having the big screen for review is wonderful. If you want to know more about this check out my article "Simple Tethering for Canon and Others" here on Tuts+.
Scale
Whatever you do, it is a good idea to take one picture that has a scale bar and a registration number for each object. While the registration number can easily be added in post, the scale bar (as simple as a small ruler) is essential to give viewers an immediate idea of the size of the object.
To make this work properly, the scale bar must be placed besides the object, close to an imaginary line going from the middle of it and parallel to the camera. Placing it any other way would not allow to properly determine the dimensions of the object. Once this is done, you can take multiple photos of the objects, sometimes at different angles, to show unique characteristics.
Light Tent
With some objects, like jewellery or glass, you may find you need to use a light tent to eliminate reflections. There are a wide variety of tents and booths available for purchase, more variety than it's really possible to list here. It's also very possible to make your own lighting tent!
Last Notes
The photographs and the information in this article may have triggered your interest for this area of photography and I hope you’re eager to begin. Start small: a simple white sheet of paper placed on a table near a window is a good first setup. Start at home! Remember, it is not the equipment you own that makes the photos, it is your willingness to invest in time to understand how it all works. Give yourself a whole week of practice with small objects, from paper clips to colour marbles and see if there’s a path forward from there.


