The Five Nights at Freddy's series has become a hit of the Internet. This simple game with scary, but very likeable characters, and a literally haunting story has won the hearts of many. With the fourth game possibly in development, and the movie being created by a big studio, the hype is not likely to die soon.
In this tutorial we're going to create a digital painting of my favorite of the crew, Foxy. Have you ever wondered what this lad would look like if he were a bit more realistic? Let's find out! By the way, you'll learn how to create a painting from scratch, step by step. We'll start with an idea, and we'll paint it all using only two brushes and a few textures.
Tutorial Assets
1. Sketch the Idea
Step 1
This is a very important part. Even though you may think you know what you want to draw, you can never know if it's the best you can do. Why not find out now, when there's nothing to lose?
Create a New File, turn on some fitting music, and sketch a series of very, very sloppy figures at a small scale. Use a textured brush for this, like Texture Sketchfrom my set. Don't zoom in, draw from a distance, and don't even think about it. A few lines here and there, and go to another one.

Step 2
Set the Opacity to 20% and create a New Layer. Zoom in a bit, make the brush smaller, and try to see something in these figures. There's no need for any details; just try to define the general shape of what you see.

Step 3
Choose one that you like the most. If there's nothing you like, repeat steps 1 and 2. They should take so little time that you shouldn't worry about it.
When you have your favorite pose, select it with the Lasso Tool (L), and copy and paste to a new file. Make it as big as possible (4000 x 4000 is my favorite, but anything above 2000 should be fine).
Lower the Opacity of the sketch and create a New Layer.

Step 4
If needed, define the perspective of the scene. It doesn't need to be anything complex. All you need to do is to understand what the floor looks like.

Step 5
Create a New Layer and draw a more detailed sketch of our character, still using the previous sketch as a base.

Step 6
For now it's looking more like a generic fox character, so let's add some Foxy features, like a slightly dislocated jaw and a ripped body. Use the Eraser Tool (E) to remove the parts that you don't need and replace them with new lines.
Notice it's still a very sloppy sketch, without details and clean strokes. In digital painting we don't always need perfect line art, because a lot of details come with painterly strokes. We shouldn't predict them before the painting phase, because at that point we don't really know what we're creating.


2. Create a Base for Digital Painting
Step 1
Delete the layers you don't need, leaving only the sketch. Create a New Layer and draw an outline of the whole body with a hard brush, like Ink from my set. Don't leave any breaks!

Step 2
Use the Magic Wand Tool (W) to select the area outside the outline, and then invert the selection (Control-Shift-I). Create a New Layer and fill the selection with thePaint Bucket Tool (G). You can now delete the outline on the previous layer.

Step 3
Place the sketch layer right above the shape. Right click it and select Create Clipping Mask. Every layer placed above the shape and clipped this way will share its boundaries.

Step 4
Create a New Layer between the mask and the shape. It should be automatically clipped, but if not, clip it manually. Fill the layer with a "color of darkness"—the darkest shade you can use without making the sketch disappear. In my case it's a very dark blue.

Step 5
Create a New Layer below and fill the background with the same color.

Step 6
Create a New Layer at the top (don't forget to clip it). This part is about getting rid of the sketch while still keeping the details it describes. Use white to paint whole body, leaving only dark crevices. Don't think about lighting and don't be overly careful. It's still just a sketch!

Step 7
Create a layer below the previous one and fill it with black. Then Merge (Control-E) them both. Delete all layers between the mask and this one. Change the Blend Mode to Multiply to see our new "lineless line art".

3. Add Colors and Texture
Step 1
Create a New Layer between these two. Now you can safely paint the flat colors. They should have a neutral brightness—darker rather than brighter.


Step 2
Paste the Fabric Texture. Go to Filter > Liquify and use the tools you can find there to modify the shape of the texture and make it more 3D. Then erase the parts outside of the pants.

Step 3
You can play with the Opacity of the texture to make it more fitting. Layer Mask is also good for adjusting textures.

Step 4
Paste the Rust Texture and adjust its size to one of the metal parts. Use the Free Transform Tool (Control-T) and its Warp Mode to adjust the shape.

Then erase/remove the redundant parts with a Layer Mask.

Use the same method to add rust to other parts.

4. Add Lighting to the Scene
Step 1
Time for the most important part. By adding proper lighting to the scene we're creating an illusion of reality. Lines and colors are more of a symbol, but lighting is what speaks directly to our brain.
Create a New Layer right above the background. Build the rest of the scene using very simple shapes. I've decided to place Foxy in a small, dark room, where he approached someone. The light comes from the open door, and Foxy's head is going to be in the shadow for a dramatic effect.

Step 2
Now, more details. I've added a night guard standing in the door and seeing the scene, and then I remembered what Foxy's hide is, so I've added the curtains. Now it's starting to make sense, but what really happened here is open to the interpretation of the viewer.

Step 3
Let's shade Foxy according to our freshly defined lighting. Open Window > Adjustments and add the Hue/Saturation adjustment. Check Colorize and make it blue and dark.


Step 4
Lower the Opacity if needed to leave a bit of color in the shadow.
Step 5
The adjustment layer has a mask on its right. Paint on it with black to reveal the light, and with white to bring shadow back.

Step 6
Create a New Layer above the adjustment. Use the Eyedropper Tool (I) to pick the color of the fur in the light. Make it brighter and then paint the strongly illuminated areas.

Step 7
Create a layer above all the clipped ones. Make the brush smaller and use the same color to paint details.

Step 8
Make the color even brighter and cooler (bluer). Use it to paint fine details of the fur. Don't touch the shadow with it, and stay away from white.

Step 9
Add details to the pants, too. Make sure to not use too bright a tint—this material is matte and thus not very reflective.

Step 10
Shade the metal parts. Be very careful and use a different shade for both rusty and smooth parts.

5. Finish the Painting
Step 1
This is possibly the hardest part. Even though the picture looks almost done, the way between "almost" and "done" may be longer than all the steps before, depending how polished you want to have it.
Let's start by adding a glowing eye on a New Layer. I've used a classic soft round brush for this, but a simple hard dot would do, too. I've also added some blood on the teeth. Notice it's not red, but rather dark purple.

Step 2
The light hitting the floor and wall gets reflected not only to our eyes, but to Foxy's body, too. We can use it to reveal the edges that stay hidden in the shadow.
First, use low saturated, bright blue to outline the metal parts, but only in the shadow.

Step 3
Make sure that the outline isn't too soft—you can use the Eraser Tool to disturb it.

Step 4
Use a low saturated, not very bright red to give a back light to the head and tail. This way they'll be more visible. Do the same with the pants.

Step 5
Let's outline the poor guy on the floor, too.

Step 6
It's not only the floor that reflects light onto other objects. All of them reflect something—that's how we can see them! Use the interaction between objects to make them a whole.

Step 7
Paste the Wall Texture 1 and set its Blend Mode to Overlay. Place it on the wall.

Step 8
Paste the Wall Texture 2, changing its Blend Mode as before. Use the Free Transform Tool (Control-T) to adjust its perspective. Hold Control and drag the corners to get the effect shown below.


Step 9
Take a break, make yourself a coffee, and when you're back, look for mistakes. This step is hard to describe—you just need to fix all those little things that don't look right to you.

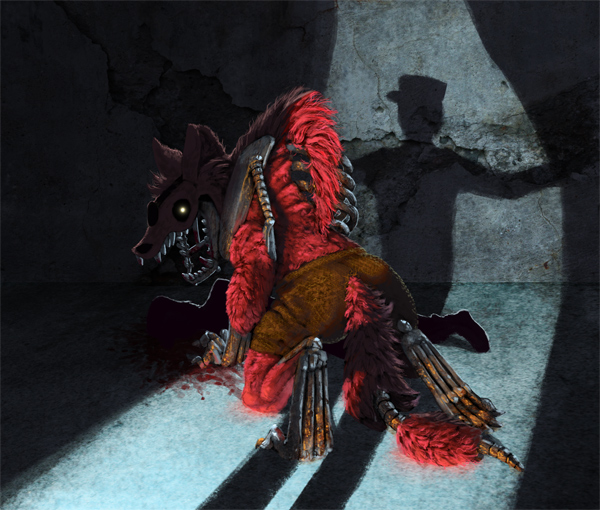
Look How Beautiful He Is!
Good job! Now you know how to create a detailed digital painting from scratch. Why don't you go and paint all the other members of the crew with the same technique? I'd love to see your results!


.webp)


