
Having your photographic portfolio in PDF format is a great and easy way to share your work with potential clients or with peers at portfolio reviews. In this tutorial, I will show you how to create a PDF portfolio using Adobe Lightroom. Thanks to this versatile format you will be able to use this portfolio on any mobile device or computer. You can even make it available for download from your website.
For the purpose of this tutorial, I will be creating a PDF portfolio to display on my iPad so that I can bring it to a portfolio review. However, you can use the same process to create a portfolio that will look great on your desktop or other devices. It’s simply a matter of adjusting the aspect ratio and choosing the correct resolution.
1. Creating a Slideshow in Lightroom
The first step is to open Adobe Lightroom and select a group of images for your portfolio. I have selected a collection of images from Orkney that I will use for my portfolio. For help in curating a good selection for your portfolio, read through this tutorial.
Now that you have your collection of images selected, head over to the Slideshow module by clicking on the word Slideshow in the upper right. You will find that your photos are collected and displayed with the default slideshow layout.
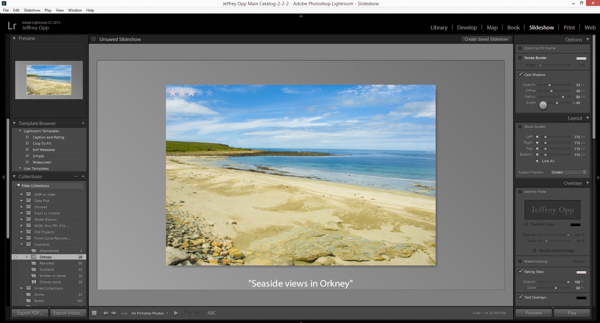
Layout Settings
Next, start to simplify and adjust the layout so you can export it as a PDF portfolio. For my portfolio, I will start by setting the margins to 50 pixels in the Layout tab.

Then I will set the Aspect Preview to 4:3 because that will match the aspect ratio of the iPad I want to display my portfolio on. It is always best to consider the device you will be displaying your portfolio on when creating it. That way you can match the aspect ratio and dimensions for a better viewing experience.

Adding Text
The next area to work on is in the Overlays tab. Here you can add elements such as text for every slide. If you want to display the title for each image, click on the Textcheckbox. Then click on the ABC area below the work area and select Title. Now the title for each image will be displayed. You will find font and typeface choices in the Overlays tab.
Next, drag the text box to resize and reposition it so that it won’t interfere with the images. I like to place it near the lower left corner.

I plan to show my portfolio to people in person so I will leave out the titles and other overlays. That way I will be more open to converse about the images in the portfolio.
Choosing a Background
Next, I want to make some adjustments in the Backdrop tab. I am going to uncheck the Color wash option. This will leave a solid, flat background color. A simple color, like grey, will put more emphasis on the photos.
Now I want to select a background color. Make sure that the Background Colorcheckbox is checked, and click on the color swatch next to it. This will bring up a color picker. You can choose the color of the background for your image by clicking on a swatch or clicking on the gradient.

I am going to send this to my iPad and display it with the Adobe Acrobat Reader app, so I need to enter a specific background color to get a seamless appearance.
To do this, I am going to look within the color picker and click on the HEX button. This will allow me to enter a hexadecimal color code that matches the grey color of the app’s interface. If you also want to match the grey color, enter the color code
C0C0C0. Now the slide background will seamlessly match the Adobe Reader mobile interface.Completing and Testing the Slideshow
In the next tabs you can add title screens at the beginning and end of the portfolio. You can also add music and adjust playback options. I want to keep this simple because I will be showing it as a portfolio. I will keep all the options in the Titles andMusic tabs unchecked and change the Slideshow Mode to Manual in thePlayback tab.
With your slides set, it’s time to test the slideshow. View each image by navigating through with the arrows under the work area. Make sure both vertical and horizontal images display well. If you are not happy with how they look, go back and adjust the margins in the Layout tab.

2. Exporting and Displaying Your Portfolio
Once you are happy with your all of your slides, it is time to export your portfolio. Click on the Export PDF button in the lower left corner. Enter a name for your portfolio and choose where you want to save it.
Set the resolution to match the device that you plan to display the portfolio on. For my iPad, this is 2048 pixels by 1536 pixels. Click on the Save button to save the portfolio. Lightroom will take a few moments to process the images and create a PDF.

Sending to Your Device
You have just created your PDF portfolio. Now it is time to show it off. But first you have to get it to the device you want to display it on. If you only want to display it on your desktop, you’re done. All you have to do is open it in Adobe Acrobat and selectFull Screen Mode from the View menu. Then navigate with the arrows on the keyboard.
Since I am going to send my portfolio to my iPad, I will use Adobe Acrobat DC and its Document Cloud Feature. You can use your preferred method for sending a document to your tablet or follow along with me.
If you’re going to send your portfolio to your iPad this way, open your portfolio with Adobe Acrobat DC. Next, click on the File menu and choose the Save As option. From the Save as PDF dialog box, select Document Cloud on the left hand side and click Save.
Now Acrobat will send the portfolio to the cloud, where you will be able to access it on any device where you are signed in.

Displaying Your Portfolio
To display your portfolio, open Acrobat Reader on your iPad. Next, chooseDocument Cloud by tapping in the center of the top bar, and select your portfolio from the list.

Now that the portfolio is displayed, tap in the center of the image to go into full-screen mode. Navigate through by swiping right to advance and swiping left to go backwards.

Conclusion
You’ve just created a PDF portfolio using Adobe Lightroom that you can now show off to potential clients or your peers. Now that you have gone through the steps once, you can easily adjust the output to match any device you own. Always having your portfolio ready with an attractive display will help you impress clients and other photographers alike.


