
Fun house mirrors are a great tradition of county fairs and festivals. There's something particularly entertaining and humorous about seeing your face distorted into unnatural proportions. Of course, it's all in good fun, and aren't we all glad our faces don't stay that way! So my kids and I wondered what they would look like if we applied a "Fun House Mirror" effect with Photoshop!
This tutorial is aimed at parents and children working together to create a fun project. The time spent together is just as important as the final results. The first part of the tutorial is aimed at parents and discusses ideas for getting the beginning shots. The next part goes through three different tools that can be used to generate the fun house mirror effect, and that portion is aimed at the kids being able to follow along with the steps. Then the final part is back in the hands of the parent to finish things up. So, let's get started!
1. Capture the Portraits
You can't exactly work with portraits you don't have. So let's work on getting some!
Step 1
That traditional head shot is ideal for this project. Try to get a solid color background and even lighting. If at all possible, avoid using the camera flash as it generates a harsh shadow against the background. I realize not everybody has a light kit, but if you do, put it to use! My kids and I took over our family room to set up some lights and rig a piece of white foam board between light stands to work as a background.

Step 2
Have your precious model(s) take a few natural shots just to get comfortable with the situation. This also gives you the chance to adjust your camera settings and lighting as needed.
I also find that having a "normal" photo of the child is reassuring to them once we start distorting the funny photos. It's important to be able to show them their image unaltered as a reminder that they really are so cute in real life, and we are just playing around with digital pixels for fun!

Step 3
Cue the funny faces! The final project works best if you exaggerate a funny face the kids already make. Encourage them to be creative and silly. Make faces at them so they will make faces back! Take as many shots as you want, and have fun with it! Laugh with your children at the silliness of it all and enjoy the moment—it's a special one. Kids are a treasure!

Step 4
Now it's time to take these shots into Photoshop and prepare the project for the little artist. Sort through the images and find ones you both agree to work with. Remember, the best results are when you can exaggerate a funny face they are already making. Before turning over the mouse and keyboard, make sure the image is already cropped and color corrected if that is needed.

I'm going to show three different techniques for creating the Fun House Mirrorfunny face effect. The first one is the easiest, and the last one is the most challenging, so pick the technique you think your child will be most capable of following and help them work through it. If you want to try all three, you will need three separate files to work with. It's a good thing we took so many shots!
2. Simple Warp
Hey kids! Ready to have some fun making silly faces? This first method is the easiest and quickest. It uses a tool called the Warp. You will see just how easy and fun this is!

Step 1
Start by using the Polygonal Lasso Tool (L)—that's the tool that looks like a lasso with sharp corners. Use that to draw a selection around the head. Be careful as you trace along the collar area on this one!

Step 2
Now press Control-J to copy the selection to a New Layer. Notice how the Layers Panel has a new layer in it for the head.

Step 3
Go up to the menu Layer and select Smart Object > Convert to Smart Object. This won't look any different at the moment, but we are now ready to start with theWarp effect.

Step 4
Go to Edit > Transform > Warp to get the Warp Transformation Cage. At the top of the screen there's a menu with some presets in it. Start by trying the Shell Uppershape. How funny is that?

Step 5
Now change the warp shape to Custom. Look at the cage again—do you see thoselines with little circles at the end? Those are Warp Handles. Try grabbing those and pulling them around a little. See how it changes the way the picture is shaped?

Step 6
Now do the same thing using the lines inside the warp cage. Grab one of them and move it around. Even more funny warping!

Step 7
When you are done changing the face shape, click on the Checkmark at the top of the screen to finish up the Warp effect.

3. Puppet Warp
This tool has more control than the simple warp, but is also a little bit more difficult to use. We actually start with the same few steps as the Simple Warp technique above. So if you need to look back at those steps, go right ahead!

Step 1
Begin with the same type of Selection and Smart Object steps from the Simple Warp steps above.

Step 2
Start with a Warp shape of Bulge, but adjust the Bend to 50%.

Step 3
Now go to Edit > Puppet Warp. Think of the image now as a piece of stretchy cloth that can be pulled around to make funny faces. We need to start by placing a fewPins in this cloth to keep it from moving around too much. Place one pin between the eyes, and another near the top of the head.

Step 4
Add a Pin to the tip of her chin and pull it downwards. See how it makes her chin grow? How easy was that? That's the way this technique works... add a pin and move it around!

Step 5
Keep adding Pins until you get the face all moved around and completely silly!

Step 6
Click on the Checkmark to finish up the Puppet Warp and see your work. Nice job!

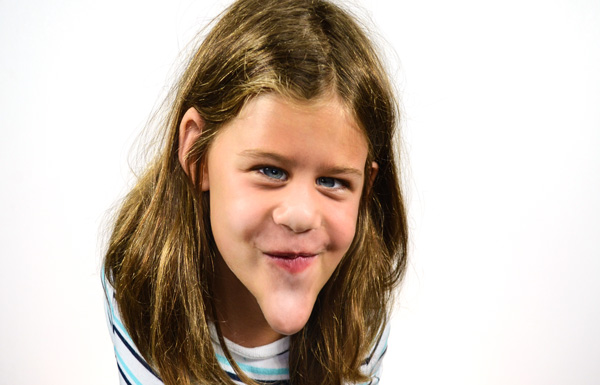
Here's how ours ended up looking after the Puppet Warp.

4. Liquify
This last technique is the most fun, but it's also the most challenging to do! It's known as Liquify!

Step 1
There's no need to create a selection, but it is a good idea to turn the photo layer into a Smart Object first (see the steps in the Simple Warp section for help on that).

Step 2
Now go to Filter > Liquify. The way this tool works is that the changes are made by a set of brush-like tools you can see over on the left side. They each do something a little different, and we are going to use most of them!

Step 3
The first tool is the Forward Warp Tool (W). It pushes areas of the picture around! Make sure the Brush Size is set to be something rather large, around 250, and thePressure at 50. Then try pushing the center of the mouth upwards. Follow that by pushing each side downwards.

Step 4
Switch to the Bloat Tool (B) and make sure the brush size is just larger than the eyes, around 300. Click a few times on the center of each eye to make it look much larger.

Step 5
The Pucker Tool (S) does the opposite of the Bloat Tool, so use it to click a few times on the nose to shrink it down a bit.

Step 6
Oops! Did you push something around too far? If you need to undo something, use the Reconstruct Tool (R). Then just brush over the mistake to magically bring it back to normal!

Step 7
Keep playing with the different brush tools to elongate the chin and make the ears larger too. When you are happy with how silly the picture looks, press the OK button to finish up.

Here's our result from the Liquify filter! How silly does yours look?

5. Final Effects
Now it's time for the parents to come back with some final touch-ups to complete the project. Before moving ahead, make sure there are no hurt feelings over the appearance of the funny faces. The point is NOT to make anybody look ugly or scary—it's a just way of making a silly picture, like those fun house mirrors!
Step 1
In the Warp and Puppet Warp projects, the image was copied to a new layer and sits over the background. This warping might have made the edges move around, and they may not line up with the background. This is particularly noticeable on images that have a patterned shirt. To correct this, add a Layer Mask to the funny face layer and use a Soft Edged Brush on the mask with black paint to hide the offending areas.

Step 2
Now we want to create some interesting lighting effects on the image. Make sure the funny face layer is the active layer and go to Filter > Camera Raw Filter. Increase the Clarity to around 15 and the Vibrance to around 10—your settings may vary, but these are good starting values to work with. Then click OK to apply the filter.

Step 3
Now go to Layer > New Layer (Shift-Control-N) and in the New Layer dialogue box, change the name to Dodge and Burn. Set the Mode to Overlay and check theFill with Overlay-neutral color box. This will add a new layer that is filled with gray, but is invisible because of the blending mode.

Step 4
Grab the Dodge Tool (O) and set the Exposure setting to 7%. Using a large, soft brush, accentuate the highlight areas, focusing along the side of the face, hair, and in the eyes.

Step 5
Now switch to the Burn Tool (O) and use the Exposure set to 7% to deepen the shadow areas with light brush strokes.

You Are Done!
How did yours turn out? Here are the results of each of ours.


Congratulations and great work! It's my hope that this tutorial has inspired you to try to create your own Fun House Mirror themed effects on your own!
Want More?
I hope you and your child had as much fun with this project as my kids and I did! I've got more Photoshop for Kids! tutorials along with some photo manipulation projects, custom brushes, and even more Photoshop fun. Check out my profile here at Tuts+ for my other tutorials, quick tips, and courses.


