
We’ve all seen photos of silky smooth, impressive waterscapes and lusted over the places they were taken. In this tutorial, I’ll take you through how to make these striking images yourself. You'll learn how to go about it by day and by night.
What You’ll Need
- A neutral density filter (for daylight shooting)
- A tripod
- A remote shutter release or the ability to switch to timer mode
- Patience!
Daytime Long Exposures
Before You Go: Neutral Density Filters
If you want to do any kind of long exposure during the day then you’ll need a neutral density filter. These are ‘black’ filters that go over your lens and effectively block out the light so that your shutter can be open for longer.
I use a 10 stop ND filter. What that means is it’s the equivalent of reducing the light by 1000x. This is quite a severe filter and I use it for creating really smooth water or motion blur from clouds, for example. You can get ND filters that are fewer ‘stops’, so a 9 stop will let through half as much light again as a 10. Choose one that’s right for you. You can also get variable ND filters that let you adjust the amount of light that gets through. I’ve heard these can cause trouble with image sharpness though.
Check reviews before buying your filter. Prices vary greatly and that’s because different coatings can be used to reduce things like vignetting, ghosting and lens flare. Expensive doesn’t always mean better but the cost attached often reflects the quality; buy cheap, pay twice, as they say.
You can get screw-on filters or slot in. The former is my preferred option as they’re light and manageable but it does mean you need one for each thread-size of lenses that you’re intending to use or stepping rings to attach a larger filter to smaller lenses. Slot-in filters mean you can use the same filter for every lens, but you need the adapter/holder and it’s more fiddly bits to have to set up for your shot.
Step 1: Compose Your Shot
Set up your camera and tripod and compose your shot as you would with any otherwithout your ND filter attached:

Think about the way the water is flowing and give it room to move within your frame. Line up any points of interest using the rule of thirds or get down low to include some great foreground interest.
Change your focusing to back-button focusing. Otherwise when you put your ND filter on and hit the button to take the picture, it’ll try and focus. Focus your camera on the water and then attach your filter to the lens, carefully. Change your camera toManual (M) shooting mode.
Step 2: Select Your Settings
For the following shots/examples I’m using a Sigma 12-24mm lens at 24mm with a10 stop neutral density filter attached.
Shutter Speed
This is really going to depend on the look you’re after and how fast the water is moving, if at all. So in my example above you can see that the water is pretty fast moving and I was going for a silky smooth look so I tried around the 10 second mark and after some trial and error decided 13 seconds was about right.
If you have a remote shutter release, use it. You don’t want to touch the camera once the shutter has opened. If you don’t, switch to self-time with a delay of a couple of seconds. Then when you hit the shutter button you’ll have 2 seconds to move your hand away before it takes the shot. You can read more on how to use your camera's self-timer as a shutter remote, here.
Aperture
So once you’ve worked out your shutter speed then you’ll need to decide how to set your aperture. This will depend on the lens and focal length you’re using. As I'm not leaving the shutter open for a huge amount of time and as I’m shooting with a verydark ND filter, f/5.6 was good for this example.
ISO
Take ISO off auto and set it to the lowest (usually 100 or 200) for a bright daylight shot. If you really need a small aperture for some reason and are getting dark images, then boost this up as needed.
White Balance
White balance is so often overlooked or misused that I think it’s worth going into here. I never use a pre-set when shooting long exposure. I know it’s tempting if you’re unsure or can’t work the Kelvin Scale (K) out but really, this is something worth learning. It’s just not the same adjusting it in post-production. Here are my camera’s pre-sets with my set up:
- AUTO (A)
I appreciate this might be hard to see at 600px but the highlights are a little yellow and the water is a little purple. It’s not bad but bear in mind this is only 13 seconds. The longer the exposure, the more pronounced these odd colours can look.
AUTO (A) white balance - TUNGSTEN (light bulb icon)
Very blue as you can see. This is usually used to balance out orangey/yellow light that you can get from overhead bulbs.-white-balance.jpg)
TUNGSTEN - (the light bulb icon) white balance - FLUORESCENT (glowing tube icon)
As it suggests, usually to balance out fluorescent lighting. In this situation it’s made everything very purple.-white-balance.jpg)
FLUORESCENT - (a glowing tube icon) white balance - SUNLIGHT (sunshine icon)
It was a bright day despite being overcast but as you can see, this pre-set it far too yellow.-white-balance.jpg)
SUNLIGHT - (sunshine icon) white balance - CLOUDY (cloud icon)
Used for darker, cloudy days. Very much like sunlight, too yellow.-white-balance.jpg)
CLOUDY - (cloud icon) white balance - FLASH (lightning bolt icon)
Would never be appropriate for this kind of photography really but it’s only fair to show all of the pre-sets. Far too orange.-white-balance.jpg)
FLASH - (lightning bolt icon) white balance - SHADE (a house with shadow icon)
Once again, far too orange and not really appropriate anyway for what was a bright day.-white-balance.jpg)
SHADE - (a house with shadow icon) white balance
If you’ve fiddled with your white balance before then you’ll have noticed a K at the end of your pre-sets. This is the Kelvin system which is how colour temperature is recorded. Cool colours (blue, white, etc) are generally over 7000k and warm colours (red, yellow, orange) are at the other end of the spectrum, around 2000k.
The Kelvin system is another tutorial entirely (and you can read Ben Lucas’ explanation of the Kelvin system here) but once you’ve got the gist then you can start to make decisions based on the outcome you want. So here, because the day was pretty bright but overcast, everything was very ‘white’. I opted for 4000k so that it wasn’t too stark but also didn’t start to become orange.
Cover Your Viewfinder!
Something I learned the hard way is that light will get in through your view finder. Some cameras (including the D800) have a handy little flip-down cover.

If yours doesn’t, you’ll still need to cover it or you'll get light leaking in to your image. Think about bringing a roll of opaque gaffer's tape with you and sticking a small piece over. Make sure it’s suitable for your needs though, you don’t want to leave it full of glue or even damage it.
The Finished Results
Here’s the straight out camera result for all of the settings we’ve discussed above:

And after a quick edit:

If you’re shooting during the summer you might find that everything looks really over-saturated because the trees and grass are so lush and green. I usually find that black and white works better during this time, but find a look that you like and don’t be afraid to experiment.
The Maths
I’ve talked about how to choose your settings and if I’m honest, I tend to use trial and error and now have a feel for what sort of settings will be right. If you’d rather have a more sensible method of working things out (and I don’t blame you!) then here’s a website you might find useful.
There’s an excellent depth of field simulator and calculator here: DOF simulator which will work out figures based on your sensor size and a number of variables which you can input. There’s also a slightly less complicated one at DOF Master. Don’t get hung up on these numbers though; after getting out and doing this a few times, you’ll soon get a feel of what changes affect other aspects and how to adjust accordingly.
Evening and Night Time Long Exposures: No ND Filter Required
Composing Your Shot
This might be slightly different than during the day, depending how the natural light is. If it’s dark, you may need to shine a torch on it until you get your focus right and maybe even do that during the exposure so that you can see it.
Settings
The same principles as with our daytime one but you’re most likely going to need more light, so try a wider aperture and increasing your ISO.
For evening shots you may want a shorter shutter speed as there’s still some light:
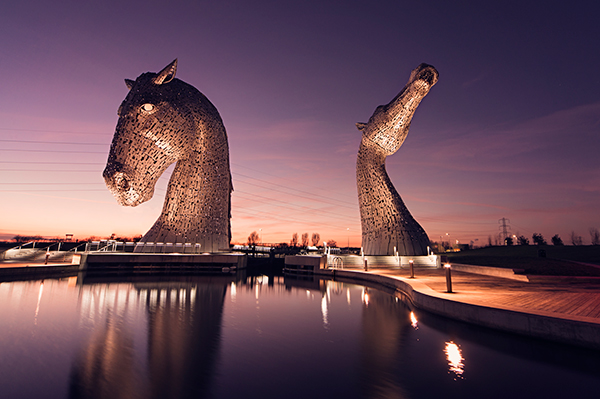
This was an 8 second exposure with no ND filter attached and the ISO cranked up a little, to 400. It was just enough to get the water smooth and retain the colour of the evening sky without flooding the picture with light.
If you’re intending to shoot water and it’s really dark, you’re probably going to need more than a 30 second exposure. Most full frame cameras will have a BULB mode, but many entry-level DSLRs don’t, so check whether your camera has this option before you trek all the way out somewhere. BULB mode allows you to keep your shutter open as long as you like. Using a remote, you simply press the button when you want it to close again, allowing you much longer exposures.
Final Thoughts
Shooting long exposure water is great fun and can produce some amazing results. Although an ND filer isn’t always required, it’s a good thing to have so that you aren’t limited to night shots only. Think carefully about which ND filter you choose and make sure it’s good quality and the right darkness for your needs.
For the shot itself, remember:
- Compose and focus using back button focusing before your put your ND filter on
- Shoot in Manual (M) mode
- Use a remote shutter release or self-timer
- Choose a long enough shutter speed to capture the motion of the water and adjust aperture accordingly
- Take ISO off auto and use a low number for daytime shooting, increasing it at night where needed
- Avoid using white balance pre-sets and familiarise yourself with the KelvinScale
- Cover your viewfinder so light can’t leak in
Long exposures can seem really complicated because the effect is impressive. There is a lot to remember initially but this will become second nature to you by the time you’ve been out a few times. Try using the DOF guides above to help you understand the maths, but don’t feel you need to rely on this; some trial and error will help you get a feel for your camera, what works and what doesn’t. Remember: you’ll only improve by getting out there and doing as much as you can, so go and find your spot by a river, lake or the sea and start creating some great long exposures!


.webp)

