Keeping
track of all your passwords can become a huge burden, but using the
same password everywhere is terribly dangerous. You may have heard the
recent news of the HeartBlead bug—a bug in OpenSSL that let servers leak passwords and other secure data as explained in this xkcd comic.
If your password was leaked by a compromised server, and you've ever
used that password elsewhere, all those accounts are now vulnerable.
That's one of the many reasons why it's so important to use a password
manager.
A password manager is an app that will automatically
generate secure, random passwords for your online accounts, remember
then and autofill them whenever you need to login, and keep your
passwords synced between all of your devices. There's a number of great
apps for this, including the polished 1Password that we've already shown how to use, but also the cross-platform LastPass.
Lastpass is unique in that its free to start using, and lets you
securely share credentials within an organization without revealing your
actual password.
In this tutorial, I will show you how to start
using LastPass, use it to manage your passwords, share your team account
credentials, and more. If you're just getting started with LastPass,
this tutorial has everything you need to hit the ground running.
Create an Account
Getting
started with LastPass just requires installing the app, setting up a
free account to keep your passwords synced, and finally installing it on
your mobile devices to keep your passwords with you wherever you are.
Just got to the LastPass site, and click the Download Free
button, which will automatically show you the download page link
appropriate for your computer. Download the app, then install it as
normal. LastPass will then automatically take you to the appropriate
extension store to add its browser extension to your browser, so install
that as normal as well. Download LastPass to get startedOnce
it is installed, click the new Asterisk icon in your browser toolbar or
address bar, depending on your browser, to create an account. You'll
need your email address, timezone, and a master password you'll use to
unlock your LastPass account. This is the one password you'll need for everything:
you'll only need to memorize your LastPass password, and that will
unlock all of your other online accounts. You may want to write it down
somewhere to make sure you don't forget it, but make sure it's somewhere
secure that you'd feel safe keeping, say, your bank account info.
Once
you've made your account, LastPass will show the settings to keep a
history of your logins and form fills as well as send anonymous error
reporting data to help improve LastPass. I recommend leaving these boxes
checked, as they are by default.
You can then install LastPass on any other computers you may have, as well as get its LastPass Mobile apps
on your smartphone or tablet. It's free on all computers and tablets,
but you'll need a $12/year Premium subscription to use it on your
smartphone—though there is a 14 day free trial to test it out on mobile
and see if you need it.
Saving Passwords to LastPass
There
are two main ways to add your site passwords to your new LastPass
database: saving them automatically as you use your online accounts, or
adding them manually.
Save Passwords Automatically
Using
the built-in prompts from LastPass is not only the most common way to
add new passwords, but this is also the easiest. Here's how it works.
Just visit a site where you have an account. Once the page has loaded,
add your account info as normal, then click the Asterisk icon in the text box to open LastPass. Adding Twitter to your LastPass account automatically.Here you will be able to add the new website by clicking on the Plus icon in
the username field. LastPass will automatically recognize the account
info you've already typed in, and you can add any extra info you'd like.
It will also automatically suggest a secure password for you if you're
creating a new account, or you can get it to suggest one manually if
you're updating your account info. Once you're done, click Save Site, and the site credentials will automatically be filled by LastPass the next time you go to login.
Save Passwords Manually
Occasionally,
you may want to add a site, but the aforementioned method won't work or
you'd rather just enter your info directly. For these situations,
LastPass' manual entry is the best option.
Click on the Asterisk
Logo in your address bar to open LastPass, and enter your email address
and master password to log in. You'll then be directed to your Vault,
where you can see all the password and folders you've saved. Adding a site manually to your LastPass VaultTo add the new website to your Vault, click Add Site on the left side of the page. A pop-up box will ask if you would like to continue. Click Yes. At this point a new pop-up will prompt you to add your new website. Fill in the URL, Name of the page, Username, Password, and any Notes that you would like to associate with this page. Click Submit to save your new login.
You
should note there is also a small eye icon in the password field. This
button lets you reveal your password during your account set up, if
desired, which can make it easier to be sure you've got the correct
password entered versus the traditional dots. There's also a password
strength indicator, as well as options to auto-login or require your
master password before opening the site you've added—great options to
either simplify your login or make one account more secure.
Using Groups in LastPass
Passwords
have become so ubiquitous these days that just having a database of
them isn't enough. If you've got several personal email accounts, along
with a few business email accounts and perhaps leftover university
accounts, just Gmail alone can end up with a half-dozen logins.
LastPass' Groups are a great way to simplify this, by letting you store
your related passwords (say, everything work related) in one folder.
To create a group, click on the Create Groups
button on the left side of the page, then add the name you want for the
group. Now you can move your existing accounts into the groups you
want, and when you add new logins in the future, you can set their group
in the new account prompt. Your groups in LastPass VaultThen,
you can login to your accounts directly from the LastPass Vault as
well. Just open the appropriate group, click on the name of the site you
wish to access, and a new tab will open in your browser with the
website login open and the proper credentials already filled in. That's a
great way to use LastPass as both a password manager and a bookmarks
list for your most important sites.
Securely Share Passwords
LastPass’s
share feature allows you to grant access to one of your logins
to someone, without having to give them your LastPass master password.
That's a great way to, say, share a company Twitter account's password
around your social media team, among other things. Best of all, if you
update your account info on the shared account, it'll automatically be
updated in your colleague's LastPass account.
To share a login,
locate it in your LastPass Vault then click on the icon that looks like
two human outlines. A new pop-up box will display where you can type
a friend’s email address that is associated with their LastPass account,
or choose a friend from a list of people you've already shared with.
Add a message, if needed, then click the Share button. They will
be notified that you have shared the credentials and they now have
access to the site you want them to access. Sharing your credentials in LastPassSharing
individual passwords is great for personal and light business use, but
if you're using LastPass in your company to share a number of important
passwords, it'd be far easier to share everything in one group together.
That's one of the many company-focused LastPass Enterprise features that would make it worth upgrading if you want your entire corporate team to use LastPass.
Advertisement
Add Secure Notes
There's
more sensitive information you need to remember than just your account
logins. There's also your personal info, such as your address and social
security number, along with credit cards, real-world accounts like gym
memberships, and more. LastPass is perfect as a secure place to keep
this info and more in secure notes.
From your LastPass Vault, click on the Add Secure Note link on the left. A pop-up form will prompt you to provide a Name, choose a Folder, select a Note Type and
fill in a note below. You also have the ability to require a Password
re-prompt to add extra security to especially sensitive data like your
SSN. Once you have saved the information, any secure notes you've
added shows in your Secure Notes folder, and you can view,
share, or edit at any time. You can even use the secure notes' info to
fill in forms online if you want. Sharing a secure note in LastPass
Putting LastPass to Work
LastPass
is a great password manager, with the tools to help you remember all of
your sensitive information and protect your accounts with secure,
auto-generated passwords. It even lets you share logins with others, a
great option for accounts you share with team members. All of that power
is enabled by just memorizing one master password, and having the
LastPass app installed everywhere you work—and then actually using it.
A
password manager is no good if you don't actually rely on it. If you
keep using your old, short, easy-to-remember passwords on all of your
important accounts, such as your email and social media accounts, then
you're just as vulnerable as ever. Instead, start using it for all of your passwords on every account you use online. Use the LastPass keyboard shortcuts to
automatically fill out forms for you, and when you're making a new
account, use the LastPass password generator as mentioned above to make
secure passwords. That's the only way to actually keep yourself safer
online with a password manager.
Then, when a security breach
happens online, such as the recent Heartblead OpenSSL bug, you'll know
that any potentially hacked accounts only had a password that you used
with that one account. You can find the accounts that are affected,
change their passwords with newer, secure LastPass generated passwords,
and save the updated info to your account. It'll still be an annoyance
and take up some time, but it'll be far easier—and you'll be far
safer—than if you used the same password on every site.
Give
LastPass a try, and start saving your data using the steps in this
tutorial. If you have any trouble, or need help with anything, leave a
comment below and we'll be sure to help you out!
When
an idea hits you, it’s never in an organized way. This idea, then
another, then something unrelated! The mind just does not always follow a
logical order. That’s where Scapple comes in handy. Scapple will help you take this chaos to be your next masterpiece.
Introducing Scapple
You can think of Scapple as an electronic bulletin board that you can
paste random ideas and notes just about anywhere. After throwing
everything down, step back and see how to organize it all. Move that note here, this one there, add a note here, stick in a picture or two, ...and
by the time you've finished, a masterpiece is before you. I have found
that once my thoughts start to get organized, I start to have more
inspiration on what to write or create to make the whole a finished
product.
You can use Scapple for:
Writing literature (books, articles, plays, etc)
Writing programs
Research Notes
A visual way to organize pictures.
Or, just about anything else that has notes, pictures, ideas in it.
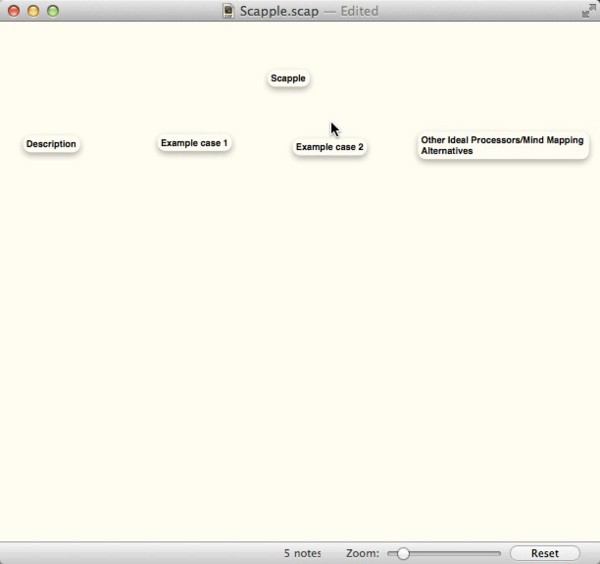
Example Case 1: This Tutorial
By way of example, Scapple can help organize thoughts about a tutorial. Begin with the title or subject matter to be discussed. Title of the Tutorial
To add a note double-click anywhere on the background and start typing. In my example, above, I started with Scapple. Main Ideas
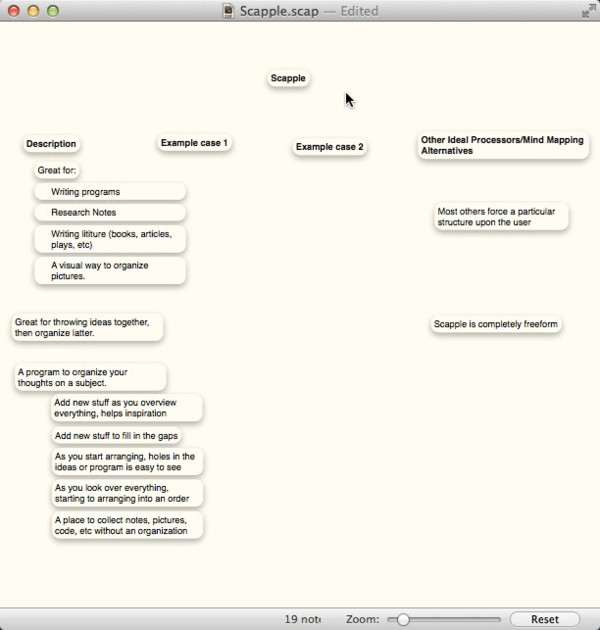
Think about the main ideas that you want to present and create notes
for each of them. You may wish to organize as you write but it's not
necessary. Aim to get all of your thoughts into Scapple first and
consider organization later. Adding Ideas
Look over the main ideas that you have recorded and think about how
to flesh them out with more information. As you think add more notes as
appropriate. Adding Examples
Adding examples to the notes is also useful. Tutorials often work
well with examples. In my case, I am using this tutorial and a proposed
workflow for Alfred as examples. Final Notes
Personally, I never work straight through, but here and there I add
my thoughts and ideas until I have expanded on all of the original
thoughts. The beauty of Scapple is that you can adjust it to your way
of working. Organizing and Structuring
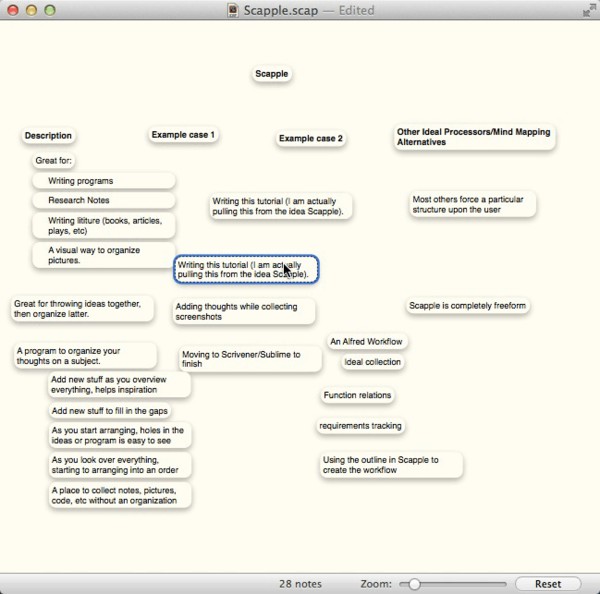
Once all thoughts, notes and ideas have been recorded they need to be
organized. Move things around as required. If you select a group of
notes you can secondary-click on them to select the sub-menu. This
creates a nicely organized stack of notes.
To provide some structure, you can drag a note on top of another note
to make a connection line. Using these lines can help define the
progression of ideas. The lines can be styled in many ways with or
without arrows. With lines added, you can easily see that Scapple, in my example, is the main idea connecting to the sub-ideas. Then sub-ideas to others. Adding Pictures
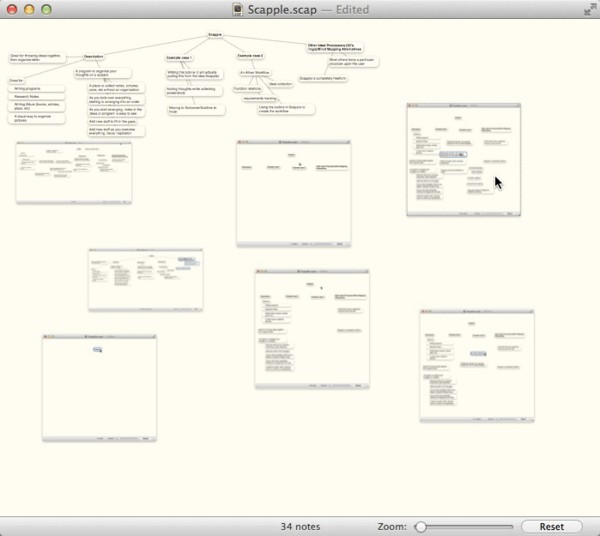
Once the notes have been organized, start thinking about pictures to
accompany the notes. As you create pictures add them to the canvas. You
can move them around until you have the ordering that you want. It is
possible to connect the pictures to the notes, but they can be left
separate as is your preference.
Once ideas and thoughts are organized, you can start writing. I use
Scapple as an outline more than the actual work so I'll start writing
with the notes to one side. I can see the graphical structure on one
side of the screen, and the text editor on the other.
You can
just as easily export your notes to a text editor, if you prefer.
Scapple attempts to keep related notes together when exported to a plain
text file, but it tends to jumble them when exported to this format
unless each note block is more than a brief note.
If you export
to Scrivener, each text note becomes it’s own document. With that
approach, you can think of each note as it’s own chapter. That’s the
more common approach to using Scapple.
Once writing, you do not have to keep strictly to the outline. It is
still your writing and you can change whatever you need to.
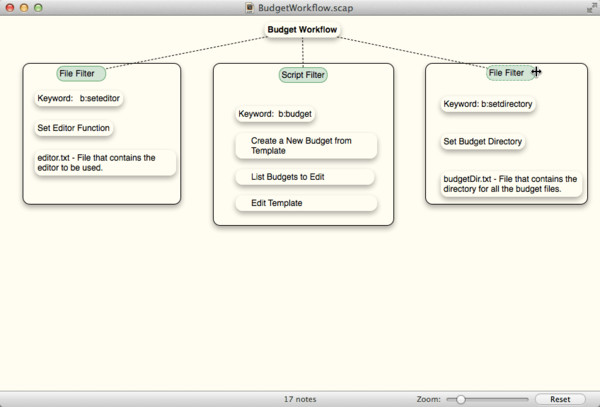
Example Case 2: Budget Workflow for Alfred
Scapple’s not just for writing literature, but is great for program
design. The canvas area makes a great place to consider the elements of a
program. Budget Workflow for Alfred
In this example I am creating a workflow for Alfred to work with my budget.
I created background shapes to set apart each function in the workflow.
Each function shows what type of block in Alfred to use to make that
function. I also place notes about keywords, functionality, and files
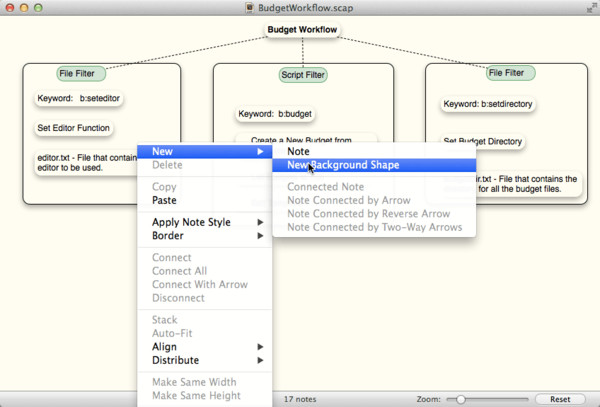
used. Added New Background Shape for Notification Block
To create a background shape, secondary-click on the background and select New Background Shape from the menu. When you move the background image, any note placed on top of the background image gets moved with it. Fill in Notification Information
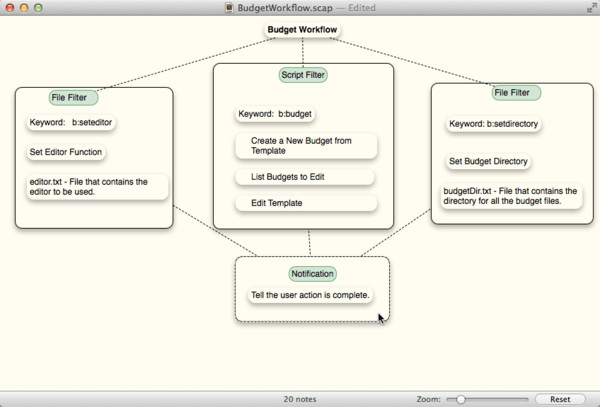
By dragging the background shape on top of another, you can create
lines to connect them. This is exactly like notes. As you move
background shapes, the notes on them will stay with them. In this way,
flow diagrams showing execution order are easily created and
re-arranged. Creating the Workflow from the Scapple Document
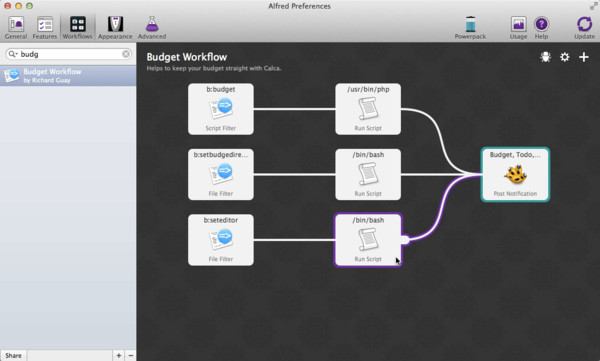
Once you've defined the functionality, you can start writing the
workflow. Since Alfred has a graphical workflow creation system, it
looks just like the diagram in Scapple.
Conclusion
It is better to plan your work before you start working. Scapple is a
useful tool to gather your thoughts and play with ideas for both
writing articles and writing computer programs. Your way of working may
differ from mine, but Scapple remains an efficient way to capture, order
and reorder one's thoughts and ideas.
Medical Disclaimer
The information on this site is not intended or implied to be a substitute for professional medical advice, diagnosis or treatment. All content, including text, graphics, images and information, contained on or available through this web site is for general information purposes only. Krobknea makes no representation and assumes no responsibility for the accuracy of information contained on or available through this web site, and such information is subject to change without notice. You are encouraged to confirm any information obtained from or through this web site with other sources, and review all information regarding any medical condition or treatment with your physician. NEVER DISREGARD PROFESSIONAL MEDICAL ADVICE OR DELAY SEEKING MEDICAL TREATMENT BECAUSE OF SOMETHING YOU HAVE READ ON OR ACCESSED THROUGH THIS WEB SITE.