Shooting convincing crowd scenes is difficult when you
only have a few background actors to help. This tutorial shows how using a long lens can
make things a lot easier: long lenses narrow the angle of view and make a space
appear to be crowded.
We’ll also look a stacking your actors in
layers, so that a large room can appear to be fully populated by the smallest
crowd. This works well when combined with camera motion.
Finally we’ll show how you can
creatively fill gaps, or stage wide scenes and cut rapidly, so that a
small number of extras appear to fill a large space.
It happened early one beautiful July morning. I was racing to make a
fitness class and tripped over my shadow. I landed on the concrete
sidewalk. Hard. I broke my right arm and damaged my wrist. Less than two
months later, I was due to be in Italy for a week-long shoot. And I'm
right-handed.
I learned a great deal about my body that summer. In
particular, I learned how photography uses my body. I also learned it’s
difficult to shoot when hurt.
This article looks at how we may
unintentionally hurt ourselves when shooting and explores how we can
prevent injury by changing our posture and how we carry our equipment. A
short series of exercises at the end of the article offers an
opportunity to start on a mini-conditioning program for photographers.
Photography and the Potential for Injury
Juliette
Hunter, an athletic therapist who specializes in helping individuals
restore fitness and function for everyday life, equates photography to
fencing or boxing. Thrusting her arm at me with a mock camera in her
hand, Juliette said, “Just as a fencer holds a sabre in a certain way
and reaches out to attack and then pulls back, so does a photographer
hold a camera in a certain way, reaching forward - or sideways or around
- to shoot, and then pull back.” A photographer’s moves can also be
compared to a boxer’s, she added. Both shift their weight forward and
back, leaning in and out of posture to get the perfect angle for a shot.
While
there is much attention paid to overuse injuries - physical damage
caused by repeated movements in the same pattern - less attention is
paid to the physical damage caused by holding a certain position over
time,. Photographers - and fencers and boxers - are at risk of these
“holding injuries” - technically called “excessive positioning injuries”
- which can cause the same physical damage over time as overuse
injuries would. Juliette maintains that holding our bodies at the ready
with our cameras always held the same way, with the same eye always to
the viewfinder, sets us up for these holding injuries. Worse, she added,
we break out of these held positions to thrust and parry, bob and
weave, oblivious to our postures as aim for the best shot.
The Importance of Posture
I've
learned to schedule a day off after a big shoot. Without fail, I'm sore
and tired afterwards. The next morning I wake up to that
I-worked-out-too-hard-the-day-before feeling and a headache. I'm never
aware of being so physically active when I have my camera in my hands,
but after, when I think back, I realize that I was climbing, crouching,
bending, standing, leaning, twisting, and reaching around with abandon.
Juliette
identifies poor posture as a leading cause of physical injury, mental
exhaustion, and accidents. As she described the litany of miserable
feelings that follow on poor posture, I mentally checked off the list of
complaints my body and mind toss at me after every big shoot. Swelling
and heat in joints, physical stiffness and discomfort, headaches, jaw
pain, and chronic neck or low back pain are all signs that our bodies
have taken a beating and need care. Rest, fluids, a hot bath with epsom
salts for sore muscles, and ice applied to sore joints are a good start
for recovery. Full rehabilitation may require more care, which should be
arranged with someone knowledgeable and trained to offer that kind of
support. The very best way to deal with injuries, however, is to prevent
them.
Conditioning for Healthy Photography
Repeating
her association of photography to athletics, Juliette recommends that
photographers embark on a program of basic conditioning. “It seems to me
that photographers love what they do, so why wouldn’t they do what they
can to keep their bodies healthy for a long time in the profession?”
Juliette said. “It also makes sense to avoid injury in order to be
healthy for other activities.”
Conditioning does not require
pumping iron and running marathons. Juliette recommends a basic program
consisting of postural awareness, stretching and strengthening, fluids,
and common sense.
Posture
Better posture
uses muscles instead of joints. Our joints can’t work harder and they
only have so much life in them. We can take the pressure off our joints
by using our muscles more. Our muscles may get sore, but that can be
relieved with stretching.
To get into good posture:
Start
with a wide base of support. Spread your feet moderately wide for
stability and bend knees slightly to soften joints and lower your body’s
centre of gravity
To protect your low back, keep your pelvis in a neutral position.
Juliette recommends imagining your pelvis as a bucket filled with water,
almost to the rim. If you tip too far forward or back or to one side or
another, the water will spill out. Keeping the bucket horizontal will
keep your pelvis in a neutral position and keep your low back happy
We
think of these principles when we set up equipment. We spread tripod
and light stand legs wide to ensure a stable support. We place one leg
of the tripod or light stand under the lens or extended light to ensure
the setup is balanced and doesn’t tip over. We also place sandbags
strategically to lower the centre of gravity and ensure our setup isn’t
top heavy. Just as we care for our equipment setup, so should we care
for our bodies.
Keep your core - not just abdominal but also side and back muscles -
taught. Juliette is emphatic about maintaining a strong, balanced core
as key to full body balance in not just photography but in everything we
do
Drop shoulders down and back, and keep your chin tucked in
A
typical photographer’s pose is with our upper body forward, shoulders
rolled in, and neck bent forward with chin extended as we lift our eyes
out of this rolled inward pose. In addition to neck pain and headaches
as a result of the unhealthy bend we create in our necks, this pose sets
us up for a loss of resilience in our upper bodies and a progressive
curve in our backs.
Hold your camera with a light grip with elbows tucked in
Photographers
are at risk for holding injuries to elbows, upper arms and wrists. We
keep our arms bent when holding a camera, which is usually bulky and
heavy. Also, we typically hold and grip our cameras tightly -
intentionally for stability and unintentionally with tension. And to
compound the insult to our bodies, while holding our cameras in a tight,
bent position, we twist our elbows and wrists to change the zoom or
focus on the camera lens. The result is potential for any of a number of
“-itis” injuries - all involving swelling, pain, and heat in tendons
and joints.
Keep your camera as close to your body as possible, whenever possible,
and manage your camera and equipment with the same principles you would
use when lifting boxes or other heavy objects. For example, instead of
reaching up to adjust equipment, raise yourself to the equipment or
bring the equipment down, make the necessary adjustments, and then put
the equipment back up.
Our
equipment is heavy and awkward. Juliette cringed when I showed her my
collection of lovely camera bags - all shoulder or messenger bags. She
recommends using a backpack or rolling bag instead to move equipment
from place to place. Ideally, peripherals such as tripods, water
bottles, and extra lenses, should be secured in the camera bag or
strapped tight to the bag. Juliette recommends using a camera vest
harness to hold equipment when shooting outside of a studio. If a vest
harness is not practical or available, she suggests carrying equipment
cross body with equipment shared between shoulders. Using a rapid strap
connection allows equipment to be carried cross body and still be
quickly available for shooting.
Stretching and Strengthening
Photography
requires that we be strong and flexible for longevity and health. When
we understand what muscles are being used we can strengthen weak muscles
and stretch muscles that are tight. “A muscle can only be as strong as
it is flexible,” Juliette warned, emphasizing the importance of balanced
conditioning. She offered the following five exercises as a starting
place for a conditioning program and as a quick “stretch and tune”
during breaks in a shoot.
Corner Chest Stretch
Stand
facing an empty corner with feet together, placed about 1 foot away
from the corner. Raising arms and bending elbows to 90 degrees, place
forearms and palms against the wall. Lean into the corner until you feel
a gentle stretch in your chest and front of shoulders. To intensify the
stretch, lean further into the corner, being careful not to hyperextend
(arch) your low back. Hold the stretch for 20 to 30 seconds and repeat
for a total of three stretches.
Monkey Stretch
Stand
with your feet shoulder width apart, hands stretched out in front and
elbows straight. Cross one arm over the other and turn arms so palms are
together. Drop your chin towards your chest. Lean forward slightly to
feel a stretch in your upper back and neck, especially between your
shoulder blades. Hold the stretch for 20 to 30 seconds; repeat for a
total of three repetitions.
This exercise will give you an even
better stretch if you can use an open door. Stand at the open door with
feet shoulder width apart and one hand holding each of the door handles.
Lean back into a squat position while dropping your chin towards your
chest. Feel the stretch in your upper back and neck, especially between
the shoulder blades. Hold the stretch 20 to 30 seconds; repeat for a
total of three repetitions.
Body Squat
This exercise is best done beside a mirror, when possible, to check positioning and posture.
Stand
with feet shoulder width apart. Engage your core and tilt your pelvis
back slightly (tuck tail). Focusing your body weight through your heels
and inhaling, send your buttocks back and slowly lower your body down to
a squat position. Make sure to keep your knees over your ankles. Never
allow your knees to move forward over your toes. The goal is to get
your knees bent to 90 degrees, but begin by just focusing on pushing
your buttocks back and getting your knees as close to 90 degrees as
possible, pain free. Progress as your flexibility and strength allow.
Hold
the squat for 3 seconds (working up to 5 seconds), then return to the
start position by, again, concentrating on putting your weight through
your heels and keeping your core tight. Squeeze the muscles in your
buttocks (imagine squeezing the juice out of a clementine with your
buttocks) and exhale as you return to a standing position.
Do a total of 10 squats and repeat for a total of two sets.
Lunges
Stand
with your feet shoulder width apart, your right foot forward and your
left leg back. Your feet should be about 2 to 3 feet apart, depending on
your leg length. This split stance requires balance, so hold onto a
wall or chair if you feel wobbly, or as you feel more confident,
increase your stability by tightening your core to balance.
Make
sure your torso is straight, your shoulders are back and down, and your
core is tight. Lift your foot on your back toe. Bend your knees and
lower your body down, keeping a straight line by not leaning forward.
Your goal is to get your front thigh parallel to the floor with your
weight through the heel and your buttocks engaged. Your back knee should
point slightly toward the floor. Keeping your weight evenly distributed
between both legs, exhale and push through the heel of your front foot
as you use the muscles in your buttocks to push back up. Do a total of
five lunges, switch legs and repeat. Repeat both sides for a total of
three sets.
Standing Pretzel or Figure 4 Stretch
Standing
with one knee bent to 90 degrees, turn that hip out and place the lower
part of the bent leg against the opposite thigh, just above the knee.
Bend forward from your hips, supporting your bent leg at the knee. Hold
on for support if needed. As you bend forward, you can also push back
into your buttocks to get a good stretch along your outer thigh. To
increase the stretch even further, push your bent knee slowly down
toward the floor. Hold the stretch for 20 to 30 seconds. Repeat for a
total of three stretches for each leg.
Conclusion
When
shooting, photographers are focused on what’s through the lens, not on
what is holding the lens. We climb and twist and reach in our pursuit of
the right perspective, unaware of how we may be injuring ourselves.
However, with some persistent attention to posture - it does become
second nature, Juliette assured me - we can minimize our chances of
injury. A few basic exercises can also stretch and strengthen those
muscles we work hard on a shoot.
What You'll Be CreatingToday,
we're looking at the process from start to finish of creating composite
work, particularly in this case for commercial advertising purposes.
I've teamed up with designer Thiago Storino who will show you how to take my images and mold them into the final product.
Why Shoot for Composites?
The answer to that is quite simple. You shoot composites to achieve
physical impossibilities and overcome aesthetic difficulties. For
example, most of the time you couldn't easily bill a client to take a
model, crew and gear to a remote jungle for a shoot.
Aesthetically,
if you want an HDR-style background with lots of visceral light that
isn't there on vacation, it's quite difficult to cut around your model
in order to separately style them and the background, and if you get
grip in the shot, you'll have to clone or crop it out if possible. If
not, tough luck. Recognise this one? Yep, all one shot. Not so easy to
circumvent the problems of location shooting and the limitations imposed
on post.
On the other hand, you probably could bill that client for the use of
jungle shots as background plates that you took on vacation a few years
ago. And if you shoot on green screen
or white seamless, it's easy to cut out your model and remove any grip
in the sides of the shot. Plus, your background will be perfect since
it'll be shot and processed like a landscape photo.
In essence, we composite because it's the easiest, most practical and cost-effective route to get the final image we envision.
Shooting for Compositing
There are some considerations that must be made when shooting for
compositing. There are also extra steps you need to take when you're not
doing the post-work, but you're simply sending in the RAW files to a
separate designer or digital artist. The most important things are
lighting and posing.
The lighting must be able to work in a variety of scenarios, wherever
the subject may be composited into. If you're lucky, you'll know
beforehand and will be able to work with that knowledge to set your
lighting.
In this case, and likely the more usual scenario, I have
no idea where my model is going to be put so I have to ensure that
there's enough data to allow a reasonable amount of manipulation and
re-lighting of both him and the background in order to blend them
together. I'll look at exactly what I did next. An example of what doesn't work. An octa lighting test shot
composited on a random hiking snapshot. Just because you have flat, even
lighting doesn't mean it'll go into any old scene.
Because you don't know what format, market, or media the image will
end up in, you can't be sure that one pose may work where another won't.
So you have to shoot several varying poses in order to accommodate the
variety of end-uses the image could see. I'll look at my posing shortly.
The Shoot
1. Tearing Off Skin?
What's this about tearing off skin? Well, that's the main aspect of
what we're working on for this shoot. The idea is to have the model
tearing his skin off, revealing his "true colours" or "true nature"
underneath.
How are we supposed to do this? It's actually quite simple. We just
need to have another material doing the actual tearing, that we can
integrate into Brad's skin seamlessly. The obvious choice for
torso-tearing like this is simply a skin-coloured t-shirt.
We went
with that over a neutral-coloured shirt (a mid-light grey) that can be
used to differentiate in Photoshop between the shirt to merge and the
shirt to stylise (if it's branded apparel) or remove (if it's some kind
of VFX shot). The two shirts doing their jobs.
So, in order to get the skin, we do a shot with no shirt. This
provides skin colour, texture, specularity and muscle contours. Then you
have to do an almost identical shot (certainly identical around the
manipulated area, anyway) with the grey shirt under the skin-toned
shirt, where the outer shirt is being torn in whatever way you want. Providing the skin texture and muscle definition!
Thus the contours of the tearing shirt can be blended with the
texture and contours of the skin, which should be relatively easy due to
it being a similar tone.
2. Versatile Lighting
I didn't have time to keep changing lighting and shooting every pose
under every lighting scenario I can think of that Brad could be comped
into. So I have to come up with a single versatile lighting scenario
that should cover most possibilities, particularly the more likely,
dramatic options.
My solution is simple. Three-point edge lighting, close to white
seamless. A five-foot octa from front-top replicates diffusive lighting
from the sky for outdoors, while being burnable down to a dimmer
non-specific indoor bounce light source or large window. This covers
everything from mid-afternoon outside to a futuristic gym to a
stone-walled dungeon corridor. A 5ft octa isn't so easy to move around a residential living room.
Then the edge lighting provides a reasonable rim, not too hard, which
can be blended with outdoor backlighting or toned down a little for
interior work as necessary. One of my rim lights is a little iffy on the
recycle time and is unpredictable whether it'll fire or not.
Knowing
I would be turning Brad to camera left in any asymmetrical poses, I set
this light on the right so it doesn't matter too much whether it fires
or not on any one shot, since the result would still be naturally
blendable in a dramatic graduated background (say, sunlight on the left,
storm clouds on the right). These rimlights were angled inward so that
they would light both Brad and the background, so I wouldn't have to
worry about extra background lights taking up unnecessary performance
space. Another lighting test, only this time with all three lights. Very late at night... Can you tell?!
He was positioned quite close to a nine-foot white seamless so that
he could also catch some bounce from the rim off of that surface at a
slightly different angle, making him appear more enveloped and naturally
lit. No grids here, natural light is chaotic.
3. Poses
I wanted to keep the poses relatively simple, bold and strong to suit
the sports-fitness theme itself, but relatively easy to create in
duplicate. I ended up going with just four poses with simple codenames:
"stomach," "chest," "neck," "back," referring simply to where the
tearing was taking place.
Brad was fantastically understanding and
outgoing, so we nailed each pose with just one shot, usually with a
second "for safety." First shot, seconds after the neutral light test shot. Brad's a stage musician so he can turn the act on at the drop of a hat
First was the shirt-off, this was where I had Brad do the full act,
muscle tension and expression and all. I gave him something to pull
against to make the arm muscles actually appear to be doing work. In
hindsight, a couple of inches of 1/4" steel rod or 1/2" hardwood dowel
would have been much better, as it could have been contained entirely
within his hand and wouldn't need to be separately removed in Photoshop. Tape doing its job, Sharpies poking out.
Next was the harder part of recreating the above four images with the shirts on and torn.
4. Reposing for compositing
Here we added the shirts, and I mostly "tore" them with a Stanley
knife while Brad was wearing them (there's some trust!) to maintain
control over its path. I did a bit at a time, in the same order we shot
the previous images. The stomach tear was elongated to make the chest
tear, which produced a little excess fabric but this could be gathered
up in Brad's fist no problem.
I found that verbally guiding his extremities into place was
difficult, with him being a mirror image of the camera's view, and I
couldn't verbalise precisely enough. Brad was having a hard time gauging
exact distances without a mirror or anything to work by.
This was where using a short focal length close to the subject came
in handy. I could flip around the LCD panel, and stand in front of the
camera, observing the LCD closely and then precisely replicating it by
physically manipulating Brad's limbs. This was much quicker and easier,
and since we were just replicating arms and torso we had all four shots
done in well under ten minutes.
Advertisement
Pace and Tempo
Keeping up the pace of these kinds of shoots is important, you've got
to keep it quick and light. Because there's no obvious interaction
between subject and environment due to the fact that they'll be
composited in later, they have to use their imagination to try to act on
what they think is going on.
If you're unclear as to what the
purpose of the shoot is and the strange posing or behaviour makes no
sense to them, they'll start getting uncertain and bored and you'll lose
them. Better to get the poses not-quite-perfect and keep the energy up.
Keep them involved all the way through. Show them any pre-production
work you've done, any work of others that's similar technically or
conceptually, and generally try to build a solid image in their head as
to what is going on, both technically and creatively.
Since I wasn't sure what's going on creatively, I showed Brad a
similar example of the end results (easy to find on sites like 500px and
Behance) so that at least he could conceptualise the process and his
part in it. The actual shoot was only about 25 minutes long, and I only
took 17 shots all-told, including the one lighting test shot which
didn't really require much interaction from Brad. Since this was the
first time we were working together, I used this brief time to get to
know him more and let him acclimatise to the studio environment.
Final Images
To wrap up, here are the poses as side-by-sides, showing how close I
got. The closer you get, the easier it is in post! None of these are
quite perfect, but they're all close enough that post work isn't too
difficult. Stomach Chest Neck Back... This felt like too awkward a pose in the end, so we decided to skip it on the tearing part.
Well, that's all for now on the shooting aspects, I hope you've
enjoyed the ride so far. Be sure to check out Thiago Storino's tutorial
covering the compositing and manipulation of my images.
Questions? Comments? Hit up the comments below!
Wedding
photography is an exciting and high pressure niché that photographers
are quick to dive into, often without enough preparation. In this
article, you'll learn from my experiences (and mistakes) about how to
properly manage a wedding day.
Shooting a wedding can bring a
great deal of stress and pressure on the photographer. The seriousness
of weddings can make it difficult to manage the day from start to
finish. Preparation for every part of the day is key to performing at a
high level. In this article, we'll take a look at the the most challenge
parts of shooting a wedding.
Family Photos
I have
always found the “firing squad” style of family photos to be stressful.
The family photos usually take place in the short span of time
sandwiched between the ceremony and reception.
In my experience,
weddings start late and that only further squeezes the time for family
photos. The job of the family portrait photographer is to serve as a
logistics coordinator, re-arranging family groups.
This part of the day alone hangs over my head, but I’ve found some ways to reduce the stress and anxiety involved with it.
Preparation
is the key to having this part of the day run smoothly. Before any
wedding, I send my clients a checklist of the family photos that they
want to have captured. This presents them with an easy to signal list of
ideas about what family photos they want included. Each checkbox is a
“grouping” of the members involved, like “bride with groomsmen,” for
example. I also include a box that allows them to add any other
groupings that might not be on my standard list. The
survey I send to my clients includes a checklist of the family
arrangements that they want photographed. I always print the list and
keep it in my bag on wedding day. Special thanks to my tremendously
talented friend Alex Bee Photography for giving me this form!On
the day of the wedding, I print this list and ensure that its in my
bag. If I have a second shooter that day, he or she gets one, too.
Second shooters play a pivotal part in keeping things running smoothly
and letting me know what’s coming next.
Scouting a location for
the portraits early on ensures that you won’t be scrambling after the
ceremony. Furthermore, being in command and assertive during this time
is pivotal to making it run smoothly.
I find that this part of
the day is always smoothest when I am confident in telling people where
to stand, how to be grouped, and what alignment looks best. With some
preparation and confidence in this part of the day, it all becomes
bearable.
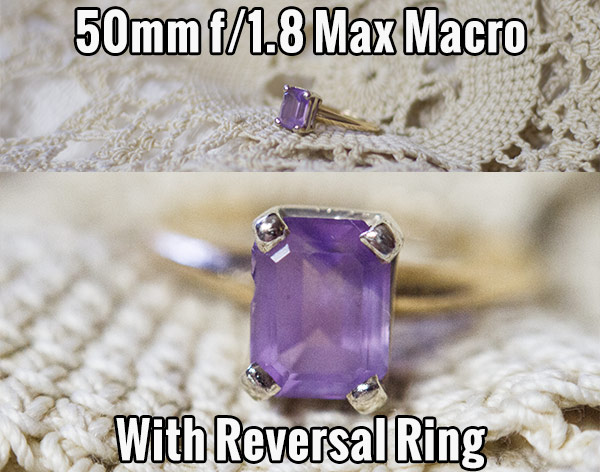
Macro in a Pinch
Buying a dedicated macro lens
can cut into your bottom line when shooting weddings. Although a macro
lens is handy for capturing some details, there is a much lower cost
option for getting up close and personal.
A reverse ring, which
typically costs under $10, is an inexpensive option for getting macro
capabilities with the lenses that you already have. While
the top image shows the maximium macro capabilities of the Canon 50mm
f/1.8 lens, the bottom image shows the power of the reversal ring. This
inexpensive accessory puts you much closer to the subject without the
expense of the dedicated macro lens.Combined
with a 50mm f/1.8 lens, you can reverse the lens so that the front
element is attached to the body of the camera. With this, you get a
fully manual lens with incredible macro capabilities. If you’re trying
to keep costs low, skipping a macro lens for a reverse ring is a great
option.
Dark Receptions
More often than not, the
receptions are not planned with photography in mind. I’ve found that
almost every one requires using flash, and that’s not something that we
always have a good handle on.
Dark weddings are where the
professionals separate from hobbyists. Although it’s easy to pose a
beautiful couple in the light of day, it’s much more challenging to
manage a scene that has little light. I’m going to offer two main
methods for using flash in a way that doesn’t blind your subjects and
keeps your images looking natural.
First, let’s explore the
on-camera method. This means that our flash is sitting atop the camera
in the hot shoe, firing whenever we release the shutter button. The
tendency of the beginner is to simply point the flash head at the
subject and fire away. Although this is simple and guarantees a “safe
shot", the desired effects are a far cry from perfect.
There are
many ways to improve the results of off camera flash. The first step
when using flash on-camera is to dial in negative flash compensation,
telling the flash to use a less power than usual. In my experience, the
flash unit gets overzealous in deciding how much power to throw at the
subject. Going to -2/3 of a stop means that the flash is going to be
more balanced. It helps to open the aperture on your lens a bit more to
compensate Shot
just seconds apart, I find that the image on the right is a much more
natural flash effect, dialing in -2/3 stops of flash compensation.
There's no reflection from the background, and the lighting on the
subject is much more natural.Beyond the above
tips, there’s an even better solution: moving the flash away from the
camera! There are tons of solutions for setting your flash off
wirelessly, including RadioPoppers, PocketWizards, and inexpensive
alternatives seen on eBay.
One of the most popular ways of
managing a dark reception is to place a flash in the corner of reception
/ dance area and let it do its thing. With a small softbox on it, the
difference is tremendous. With this pointed at the subject, it’s going
to make for softer and more natural light. If the flash is at a
subject’s back, it can make for some amazing backlit effects. Either
way, an inexpensive flash off camera is a complete game changer for the
reception. Adding
an off camera flash can save the day during a dark reception. Even when
the flash is behind the subject, I love the starburst, backlit effect
that it can provide.
Keeping Shots Safe
No
matter how good your shots are, you have to be mindful of protecting
them. On the front-end, you’ll want to ensure you take good steps to
not lose memory cards, like using a memory card wallet stashed safely in
the bag. Even better is using a newer DSLR with dual card slots that
can create a backup as you go.
There’s never a time when data
integrity matters more than when shooting weddings. That’s why I leave
the original images on my memory cards until I’m forced to wipe them. I'm
proudly obsessive about protecting files during wedding shoots. Once I
get finished, I immediately copy all images to my MacBook, ensuring that
the number of images on the cards ties up to the number of images on my
drive. I immediately copy them to my Synology DiskStation, which has
two hard drives in it running in redundancy mode. At any given time, I
recommend ensuring that your images are in two places at bare minimum.When
I finish shooting a wedding, I make sure to copy the images from the
cards the same night and get them into Lightroom. Doing so ensures that
all cards are accounted for and no gaps in image sequencing exist. I’ve
known of situations when photographers have caught gaps in their
Lightroom timeline and realized that one card was left lying on the
reception dance floor. Catching errors like these on the night of the
event increases your chances to resolve the issue.
At the bare
minimum, you should keep a wedding stored in two places. Having them on
my computer plus having the original images still on the memory card
means that if my computer is stolen, I can always recopy the images from
the card.
Even more ideal is having the images on an external
drive in case your computer crashes. If I’m traveling and shooting on
the road, it’s also a good idea to stash one drive with images in a
second shooter’s hotel room to prevent the loss of images due to theft.
Stick
to the script of your workflow when managing wedding images. All of the
tips above will help to guarantee that you don’t lose the priceless
wedding images that you just captured.
Stress Management
Although
weddings are an incredibly special day in the lives of our clients, the
stress is going to happen. People can be rude. People can lack
understanding of what our goals as photographers are. Things can go
haywire and the power can go out in the middle of your ceremony.
Bridezillas and momzillas and auntzillas are present no matter how good
of a job you do. Through it all, you have to maintain your
professionalism.
Photographers, as a whole, are passionate.
Sometimes, through passion we neglect our basic needs and forget to make
sure that we are well rested, eating right, and keeping our energy
levels up during weddings.
This tip may seem superficial, but I
believe that managing the mental side of shooting is as important as the
technical side. When you lose confidence in your abilities, it shows in
your work.
I’m reminded of a simple tip a highly respected shooter once gave me: “Smile at people, they always smile back.” Whether
you're shooting the ceremony or driving your clients in a golf cart,
it's essential to maintain professionalism and confidence in your craft
throughout the day. The results will show in your work.Ultimately,
you’ve been hired by the bride and groom. Everything you do should
align with delivering a great product to them. There are sure to be
people who are annoyed by having their photos made, but pay them no
mind, beauty is in the eye of the checkbook holder.
Wrapping Up
Don’t
let the fear of shooting weddings intimidate you into never trying
them. Start off building your confidence by second shooting for others
and grow your gear lineup to make sure you can cover every situation
that the day brings. Following the tips above will help to manage the
most stressful points of photographing weddings.
Medical Disclaimer
The information on this site is not intended or implied to be a substitute for professional medical advice, diagnosis or treatment. All content, including text, graphics, images and information, contained on or available through this web site is for general information purposes only. Krobknea makes no representation and assumes no responsibility for the accuracy of information contained on or available through this web site, and such information is subject to change without notice. You are encouraged to confirm any information obtained from or through this web site with other sources, and review all information regarding any medical condition or treatment with your physician. NEVER DISREGARD PROFESSIONAL MEDICAL ADVICE OR DELAY SEEKING MEDICAL TREATMENT BECAUSE OF SOMETHING YOU HAVE READ ON OR ACCESSED THROUGH THIS WEB SITE.