Wedding
photography is an exciting and high pressure niché that photographers
are quick to dive into, often without enough preparation. In this
article, you'll learn from my experiences (and mistakes) about how to
properly manage a wedding day.
Shooting a wedding can bring a
great deal of stress and pressure on the photographer. The seriousness
of weddings can make it difficult to manage the day from start to
finish. Preparation for every part of the day is key to performing at a
high level. In this article, we'll take a look at the the most challenge
parts of shooting a wedding.
Family Photos
I have
always found the “firing squad” style of family photos to be stressful.
The family photos usually take place in the short span of time
sandwiched between the ceremony and reception.
In my experience,
weddings start late and that only further squeezes the time for family
photos. The job of the family portrait photographer is to serve as a
logistics coordinator, re-arranging family groups.
This part of the day alone hangs over my head, but I’ve found some ways to reduce the stress and anxiety involved with it.
Preparation
is the key to having this part of the day run smoothly. Before any
wedding, I send my clients a checklist of the family photos that they
want to have captured. This presents them with an easy to signal list of
ideas about what family photos they want included. Each checkbox is a
“grouping” of the members involved, like “bride with groomsmen,” for
example. I also include a box that allows them to add any other
groupings that might not be on my standard list. The
survey I send to my clients includes a checklist of the family
arrangements that they want photographed. I always print the list and
keep it in my bag on wedding day. Special thanks to my tremendously
talented friend Alex Bee Photography for giving me this form!On
the day of the wedding, I print this list and ensure that its in my
bag. If I have a second shooter that day, he or she gets one, too.
Second shooters play a pivotal part in keeping things running smoothly
and letting me know what’s coming next.
Scouting a location for
the portraits early on ensures that you won’t be scrambling after the
ceremony. Furthermore, being in command and assertive during this time
is pivotal to making it run smoothly.
I find that this part of
the day is always smoothest when I am confident in telling people where
to stand, how to be grouped, and what alignment looks best. With some
preparation and confidence in this part of the day, it all becomes
bearable.
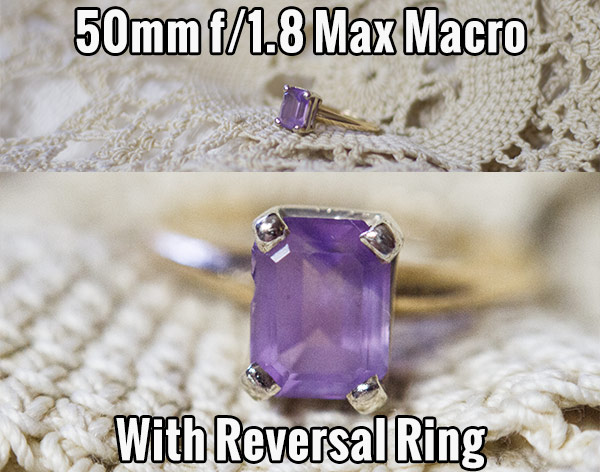
Macro in a Pinch
Buying a dedicated macro lens
can cut into your bottom line when shooting weddings. Although a macro
lens is handy for capturing some details, there is a much lower cost
option for getting up close and personal.
A reverse ring, which
typically costs under $10, is an inexpensive option for getting macro
capabilities with the lenses that you already have. While
the top image shows the maximium macro capabilities of the Canon 50mm
f/1.8 lens, the bottom image shows the power of the reversal ring. This
inexpensive accessory puts you much closer to the subject without the
expense of the dedicated macro lens.Combined
with a 50mm f/1.8 lens, you can reverse the lens so that the front
element is attached to the body of the camera. With this, you get a
fully manual lens with incredible macro capabilities. If you’re trying
to keep costs low, skipping a macro lens for a reverse ring is a great
option.
Dark Receptions
More often than not, the
receptions are not planned with photography in mind. I’ve found that
almost every one requires using flash, and that’s not something that we
always have a good handle on.
Dark weddings are where the
professionals separate from hobbyists. Although it’s easy to pose a
beautiful couple in the light of day, it’s much more challenging to
manage a scene that has little light. I’m going to offer two main
methods for using flash in a way that doesn’t blind your subjects and
keeps your images looking natural.
First, let’s explore the
on-camera method. This means that our flash is sitting atop the camera
in the hot shoe, firing whenever we release the shutter button. The
tendency of the beginner is to simply point the flash head at the
subject and fire away. Although this is simple and guarantees a “safe
shot", the desired effects are a far cry from perfect.
There are
many ways to improve the results of off camera flash. The first step
when using flash on-camera is to dial in negative flash compensation,
telling the flash to use a less power than usual. In my experience, the
flash unit gets overzealous in deciding how much power to throw at the
subject. Going to -2/3 of a stop means that the flash is going to be
more balanced. It helps to open the aperture on your lens a bit more to
compensate Shot
just seconds apart, I find that the image on the right is a much more
natural flash effect, dialing in -2/3 stops of flash compensation.
There's no reflection from the background, and the lighting on the
subject is much more natural.Beyond the above
tips, there’s an even better solution: moving the flash away from the
camera! There are tons of solutions for setting your flash off
wirelessly, including RadioPoppers, PocketWizards, and inexpensive
alternatives seen on eBay.
One of the most popular ways of
managing a dark reception is to place a flash in the corner of reception
/ dance area and let it do its thing. With a small softbox on it, the
difference is tremendous. With this pointed at the subject, it’s going
to make for softer and more natural light. If the flash is at a
subject’s back, it can make for some amazing backlit effects. Either
way, an inexpensive flash off camera is a complete game changer for the
reception. Adding
an off camera flash can save the day during a dark reception. Even when
the flash is behind the subject, I love the starburst, backlit effect
that it can provide.
Keeping Shots Safe
No
matter how good your shots are, you have to be mindful of protecting
them. On the front-end, you’ll want to ensure you take good steps to
not lose memory cards, like using a memory card wallet stashed safely in
the bag. Even better is using a newer DSLR with dual card slots that
can create a backup as you go.
There’s never a time when data
integrity matters more than when shooting weddings. That’s why I leave
the original images on my memory cards until I’m forced to wipe them. I'm
proudly obsessive about protecting files during wedding shoots. Once I
get finished, I immediately copy all images to my MacBook, ensuring that
the number of images on the cards ties up to the number of images on my
drive. I immediately copy them to my Synology DiskStation, which has
two hard drives in it running in redundancy mode. At any given time, I
recommend ensuring that your images are in two places at bare minimum.When
I finish shooting a wedding, I make sure to copy the images from the
cards the same night and get them into Lightroom. Doing so ensures that
all cards are accounted for and no gaps in image sequencing exist. I’ve
known of situations when photographers have caught gaps in their
Lightroom timeline and realized that one card was left lying on the
reception dance floor. Catching errors like these on the night of the
event increases your chances to resolve the issue.
At the bare
minimum, you should keep a wedding stored in two places. Having them on
my computer plus having the original images still on the memory card
means that if my computer is stolen, I can always recopy the images from
the card.
Even more ideal is having the images on an external
drive in case your computer crashes. If I’m traveling and shooting on
the road, it’s also a good idea to stash one drive with images in a
second shooter’s hotel room to prevent the loss of images due to theft.
Stick
to the script of your workflow when managing wedding images. All of the
tips above will help to guarantee that you don’t lose the priceless
wedding images that you just captured.
Stress Management
Although
weddings are an incredibly special day in the lives of our clients, the
stress is going to happen. People can be rude. People can lack
understanding of what our goals as photographers are. Things can go
haywire and the power can go out in the middle of your ceremony.
Bridezillas and momzillas and auntzillas are present no matter how good
of a job you do. Through it all, you have to maintain your
professionalism.
Photographers, as a whole, are passionate.
Sometimes, through passion we neglect our basic needs and forget to make
sure that we are well rested, eating right, and keeping our energy
levels up during weddings.
This tip may seem superficial, but I
believe that managing the mental side of shooting is as important as the
technical side. When you lose confidence in your abilities, it shows in
your work.
I’m reminded of a simple tip a highly respected shooter once gave me: “Smile at people, they always smile back.” Whether
you're shooting the ceremony or driving your clients in a golf cart,
it's essential to maintain professionalism and confidence in your craft
throughout the day. The results will show in your work.Ultimately,
you’ve been hired by the bride and groom. Everything you do should
align with delivering a great product to them. There are sure to be
people who are annoyed by having their photos made, but pay them no
mind, beauty is in the eye of the checkbook holder.
Wrapping Up
Don’t
let the fear of shooting weddings intimidate you into never trying
them. Start off building your confidence by second shooting for others
and grow your gear lineup to make sure you can cover every situation
that the day brings. Following the tips above will help to manage the
most stressful points of photographing weddings.
Unknown
Lorem ipsum dolor sit amet, consectetur adipisicing elit, sed do eiusmod tempor incididunt ut labore et dolore magna aliqua. Ut enim ad minim veniam, quis nostrud exercitation.
Medical Disclaimer
The information on this site is not intended or implied to be a substitute for professional medical advice, diagnosis or treatment. All content, including text, graphics, images and information, contained on or available through this web site is for general information purposes only. Krobknea makes no representation and assumes no responsibility for the accuracy of information contained on or available through this web site, and such information is subject to change without notice. You are encouraged to confirm any information obtained from or through this web site with other sources, and review all information regarding any medical condition or treatment with your physician. NEVER DISREGARD PROFESSIONAL MEDICAL ADVICE OR DELAY SEEKING MEDICAL TREATMENT BECAUSE OF SOMETHING YOU HAVE READ ON OR ACCESSED THROUGH THIS WEB SITE.


.webp)

