Learn
how to create a comet or shooting star by using the Blend Tool,
combined with a Blur effect in Adobe Illustrator. We'll finish the quick
illustration off with the not often used Flare Tool.
7:31 PM
Illustrator's Blend Tool: A Comprehensive Guide
A
few times a each month we revisit some of our reader’s favorite posts
from throughout the history of Vectortuts+. This tutorial by Simona
Pfreundner was first published on November 14th 2008.
In Adobe Illustrator, the Blend Tool can help you create impressive color blends. But there is more to it than you might know. This comprehensive guide can help you unlock your creative potential and teaches the features, shortcuts, and in depth methods that the Blend Tool has to offer.


 Or between closed paths like shapes
 And blends between blends


Below is an illustration that I made quite a while back. The Blend Tool was next to the Gradient Tool as one of my most important tools in creating this piece. Have fun using the Blend Tool in your work.
 Subscribe to the VECTORTUTS RSS Feed to stay up to date with the latest vector tutorials and articles.
In Adobe Illustrator, the Blend Tool can help you create impressive color blends. But there is more to it than you might know. This comprehensive guide can help you unlock your creative potential and teaches the features, shortcuts, and in depth methods that the Blend Tool has to offer.
Introduction
If you are using Illustrator for detailed imagery creation, the Blend Tool can be your most important tool. Compared to the Gradient Mesh Tool, the Blend Tool is a Live tool, meaning that you can change its object or shape, its color or position, and the blend will be updated live. You can create blends either with the Blend Tool or the Make Blend command. One thing to remember though, the Blend Tool takes a lot of RAM, so it may slow down your computer.Exercise File
Below is an screenshot of the Exercise file that accompanies this tutorial, and is available to PLUS Members. Want access to the full Vector Source files, Vector Packs, Exercise files, and downloadable copies of every tutorial, including this one? Join VECTORTUTS PLUS for just $19/month.1. The Blend Tool
Overview and Keyboard Shortcuts (see image below for Menu items):- Blend Tool (W)
- Blend selected paths or shapes (Ctrl + Alt + B)
- Release blend (Shift + Ctrl + Alt + B)
- Expand to make blend permanent
- Reverse Spine to flip a blend
- Replace Spine to apply a different path
- Reverse Front to Back to reverse the stacking position of blends (useful for animation)
2. Blends with Various Shapes
You can make a blend between open paths like lines3. Blend Options Palette
Under Object > Blend > Blend Options, you will find different settings that you can apply:Smooth Color
Specified Steps
Specified Distance
4. Applying Blends with the Blend Tool (W)
When selecting the Blend Tool (W), you can easily morph two or multiple colors together. Also, by clicking on the corner points of a shape instead of the middle, you can morph the shape into a mirrored object.5. Blending Different Shapes
When morphing two or more different shapes together, you can easily built up complex objects.6. Blending Shapes with Different Gradients
You can blend two shapes with a different gradient and achieve some neat effects. These objects can be used as backgrounds or part of more complex shapes you are creating.7. Aligning blends Along a Path
Once you applied a Blend, you can modify the path that the blend runs along.Along a path with Specified Steps
Along a path with Smooth Color
Along a path with Specified Distance
8. Replace Spine Option
Once you have created a blend, you can change the path that it runs along. Just create a path to your liking, select both the path and the blend and go to Object > Blend > Replace Spine.9. Align to Path or Page
Once you have created a blend and applied a specific path, it can be important that in the Blend Option Palette you choose the correct options.10. Reverse Spine
If you want to have a spine reversed, for example have a gradient blend run reverse, you can achieve this by selecting your blend and going to Object > Blend > Reverse Spine.11. Creating Highlights With Blends
You can create some neat highlights for shapes with blends. Especially where the Gradient Tool doesn't work so well.12. The Possibilities are Endless!
When working with blends, you can create some really interesting stuff. You can even blend symbols, outlined fonts, or brushes. Remember though that blends are RAM suckers and your AI file could get heavy. Nevertheless, they can save you time and help you create some awesome effects.Below is an illustration that I made quite a while back. The Blend Tool was next to the Gradient Tool as one of my most important tools in creating this piece. Have fun using the Blend Tool in your work.
7:29 PM
Create a Sunset Scene Using the Blend Tool in Illustrator
The
Blend Tool is a powerful tool which allows you to create quick and easy
blends in Adobe Illustrator. In this quick tip screen cast, I'm going
to show you how to create a sunset using primarily the Blend Tool.
7:27 PM
How to Create a Blended Hexagonal Print Design in Adobe Illustrator

1. Draw Your Hexagons
Step 1
The first step is simple: draw a hexagon. To do so easily use the Polygon Tool to create a 6-sided polygon with a Radius of 100pts.
Step 2
Draw a second, smaller hexagon next to the first. This one has a Radius of 20pts.
2. Blend the Hexagons
Step 1
Select both hexagons and Align their centers (both Vertically and Horizontally). Using the Blend Tool (W), select both shapes and apply a blend of 6 Steps. I change the colors of the hexagons before applying the blend so the blend is easier to see.
Step 2
With your newly blended group selected, go to Object > Expand, and Expand the group so you have eight stacked objects.
3. Divide into Sections
Step 1
Use the Line Segment Tool (\), draw a straight path in the center of the hexagon, bisecting it horizontally, from left corner to right corner. Draw two additional line segments from the top left corner to the bottom right corner and another from the top right corner to the bottom left corner. Zoom in as needed to get the placement of the paths just right.
Step 2
Select the lines and hexagons and hit Divide in the Pathfinder panel. You should be left with each of the eight hexagons having been cut into six individual sections.
4. Coloring the Sections
Step 1
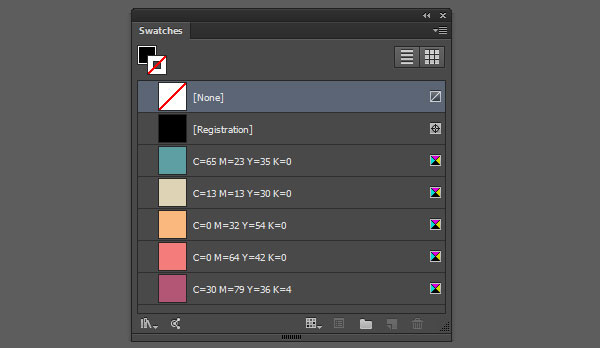
Before we change the color of each of the hexagon's sections, let's figure out a color palette. The one I've chosen is as follows:- Blue: C65 M23 Y35 K0
- Taupe: C13 M13 Y30 K0
- Peach: C0 M32 Y54 K0
- Salmon: C0 M64 Y42 K0
- Rose: C30 M79 Y36 K4
Step 2
Ungroup the hexagon shapes and sections. Select three of the first hexagon's sections and set the color to the blue from the palette in the previous step. Select the other three and set the fill color to the taupe from the step above. Continue selecting three pieces at a time changing their colors so no two colors of the same hue touch (aside from at their corners).
Step 3
As you select pieces and apply new fill colors change up the order in which they appear in each hexagon. For instance, sometimes the color order may go taupe, salmon, taupe and other times it could be a successions of different colors like blue, peach, and rose.
Step 4
The number of steps you applied in the blend in Section 2, Step 1 contributes directly to the amount of sections you'll have to recolor. The more sections and the more colors you add, the more complex your design will be. When using muted colors like these, having a more complex design reads well and it's too busy, vibrant, or loud. If you're using brighter colors you might want to limit the palette and number of sections. This, of course, is entirely up to you.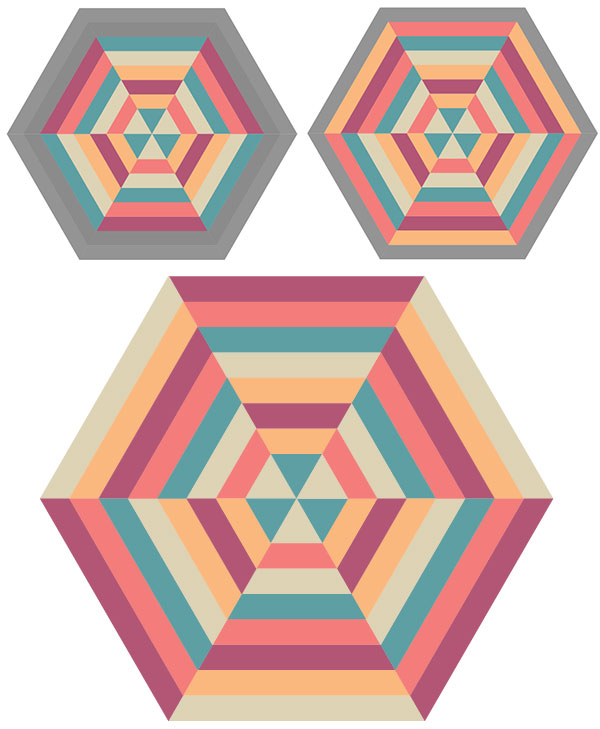
5. Final Touches and Pattern
Step 1
Group (Control-G) together your hexagon sections once you've finished recoloring them. Copy (Control-C) and Paste (Control-V) the hexagon group. We'll call the first group Hexagon A and the copied group Hexagon B. Align groups A and B.
Step 2
Apply a Linear Gradient to Hexagon B with the Gradient panel going from Purple (C60 M86 Y45 K42) to Creamy Yellow (C0 M13 Y57 K0). Note how many of the gradients are angled in different directions. This is intentional.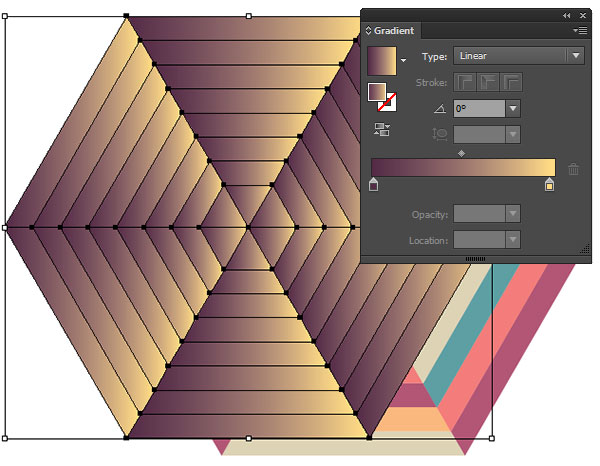
Step 3
In the Transparency panel reduce Hexagon B's Opacity to 53% and change its Blending Mode to Color Burn. Group together Hexagons A and B.
Step 4
Select your unified hexagon group and in the Pattern Options panel go to Options and Make Pattern. Name your new pattern and choose Hex by Column as the Tile Type. At the top of your document's window you should have the option to save this pattern; do so.
Print up Your Pattern!
Your pattern is now complete. Use this swanky hexagonal design for posters, note cards, the background of your business card, or other assorted print designs.Use Web-Only colors and create a trendy background for your blog. I hope this inspires many more blended geometric designs. By layering shapes, blends, and gradients the possibilities of abstract geometric pieces are endless. Enjoy!
Subscribe to:
Posts (Atom)


